On your 1st ever lesson
Pick up location of your 1st lesson.
Your driving instructor will pick you up from your address or a location agreed upon during the initial booking. They will greet you and ask to see your provisional driving licence, then request that you read a number plate from 20 meters away. If you cannot provide your licence or read the number plate, the lesson cannot continue. Once these checks are completed, your instructor will drive you to a suitable location for your first lesson. Knowing you may be nervous, they will help you feel comfortable.
Demonstrations drive
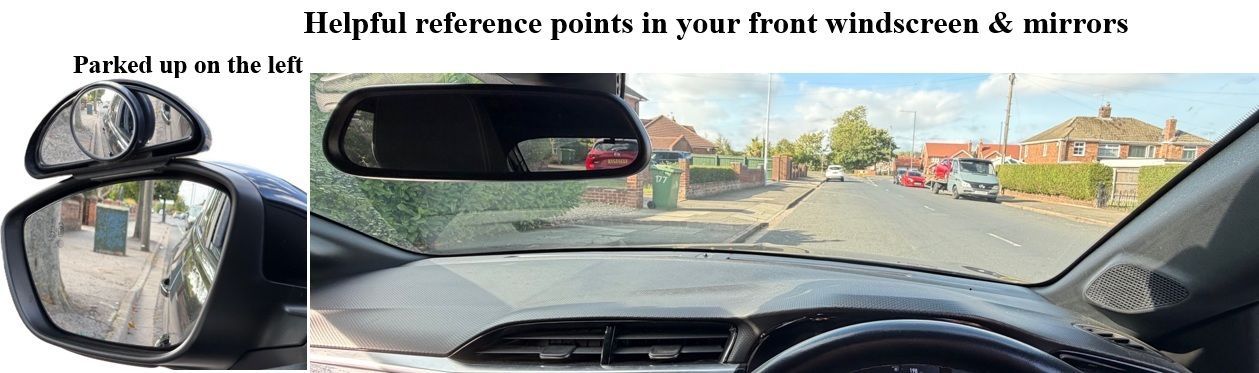
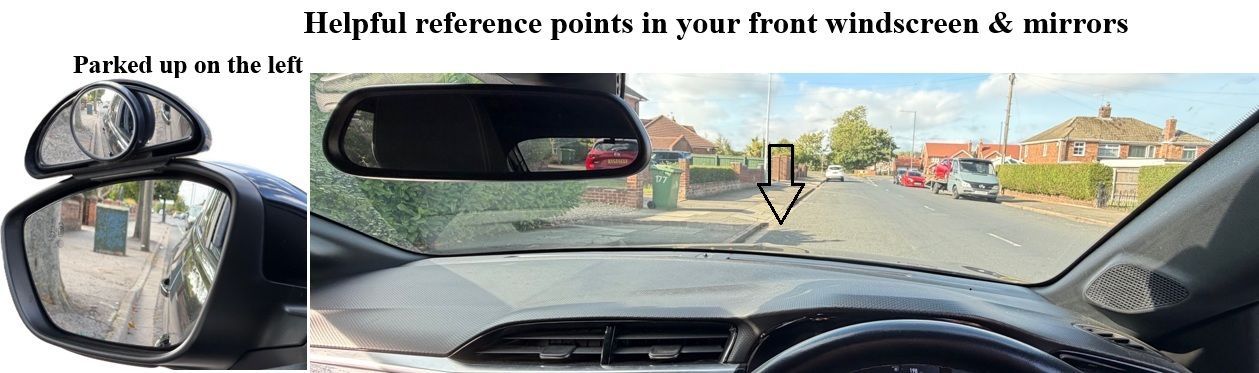
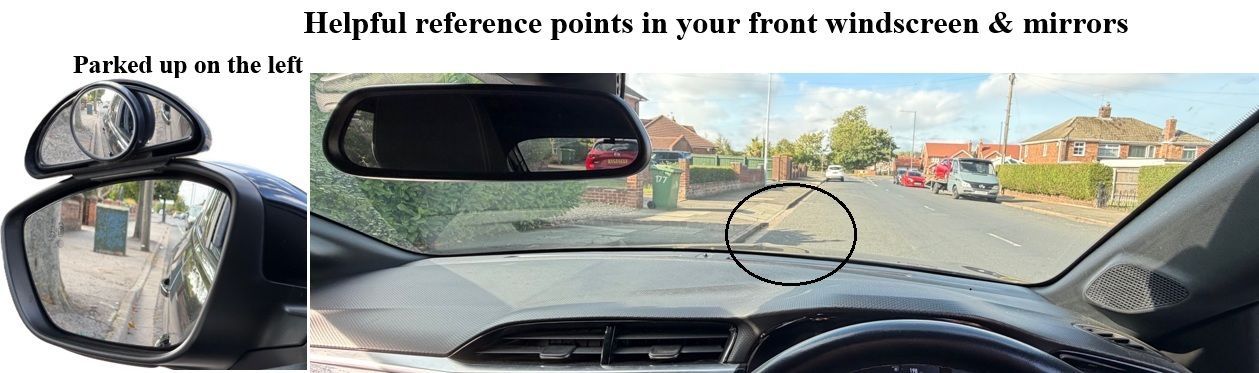
On the way to your training location your instructor will demonstate ether the M.S.M routine (mirror, signal, manoeuvre), the pull/push steering method, and reference points at the base of your windscreen.
At the location
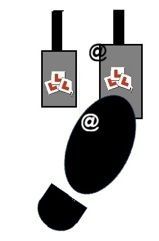
Upon arriving at the training location, your instructor will indicate a visual reference on the road outside your training vehicle while you are seated in the front passenger seat. In the example shown in the picture, there is a shadow on the ground, and the question is how far the shadow is from the front bumper of the training vehicle.
Sitting in the drivers seat
You will now be asked to walk around the back of the training vehicle and sit in the driver’s seat and your instructor will sit next to you in the passenger’s seat.
Dual controls
Your driving instructor will point out the dual controls installed in the training vehicles. These controls are legally required in all driving instructors’ vehicles and can be used to keep both of you safe if you ever lose control. Don’t worry— instructors are familiar with hiccups from new students.
Throughout your lessons, your instructor will talk about adjusting risk responsibility, which will be explained in more detail during your sessions.

Instructor badge
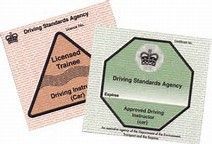
Your instructor will also show you their ADI/PDI badge that is displayed in the passenger window. This is a requirement for all instructors to display this and if they do not, they cannot teach for money or fuel.
The difference a Green and a Pink badge
A green badge is a fully qualified driving instructor and a pink badge is a trainee instructor. To find out more about the two differences click on the link to find out more
The cockpit drill
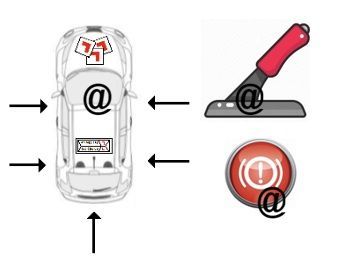
The cockpit drill is a pre‑drive safety routine remembered as DHSSSM or DSSSM, covering Doors, Handbrake, Seat, Steering, Seatbelt and Mirrors to ensure the car is correctly set up before driving.
Doors
1. Ensure all your doors are closed (including bonnet and boot)
2. Check your handbrake is on, the handbrake leaver will be up
and you will see a handbrake light on your dash board
Driver’s seat
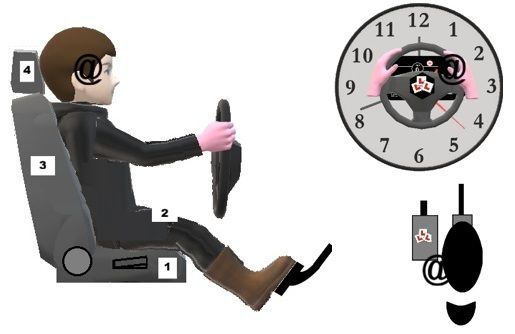
1. The height of your seat, make sure you can see ½ way up your front window.
2. Place your ball of your left foot on the clutch pedal and push it fully down to the floor, making sure you do not over stretch your left knee (if unsure on the pedals your instructor will help you).
3. Place your hands on the steering wheel to ensure your shoulder blades do not come out your driver’s seat
4. Adjust your head restraint so the middle part of the restraint is in line with your ears and eyes
Seat belt
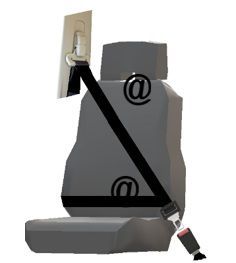
1. Fasten your seatbelt and ensure your passengers also fasten their seatbelts.
2. Ensure there are no twists are in your seatbelt when you applying it.
3. There may be a seat belt alteration on seatbelts, if your seat belt irritates your neck, you can adjust it.
4. The driver is responsible for all passenger to wear seatbelt and by law any children under 14 years of age.
Use appropriate child restraint as required by law.
Click on the seatbelt picture to see the .GOV rules (wearing of seatbelts and exemptions).
Mirrors
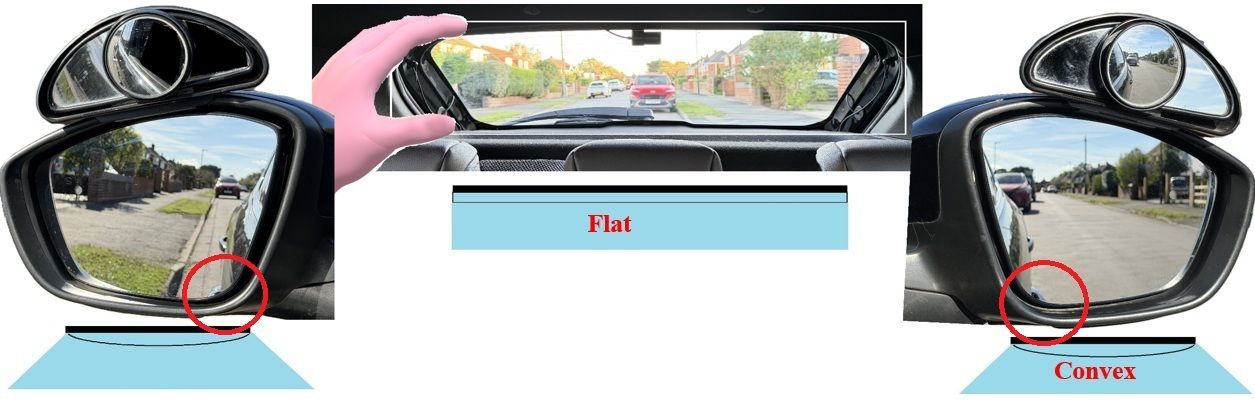
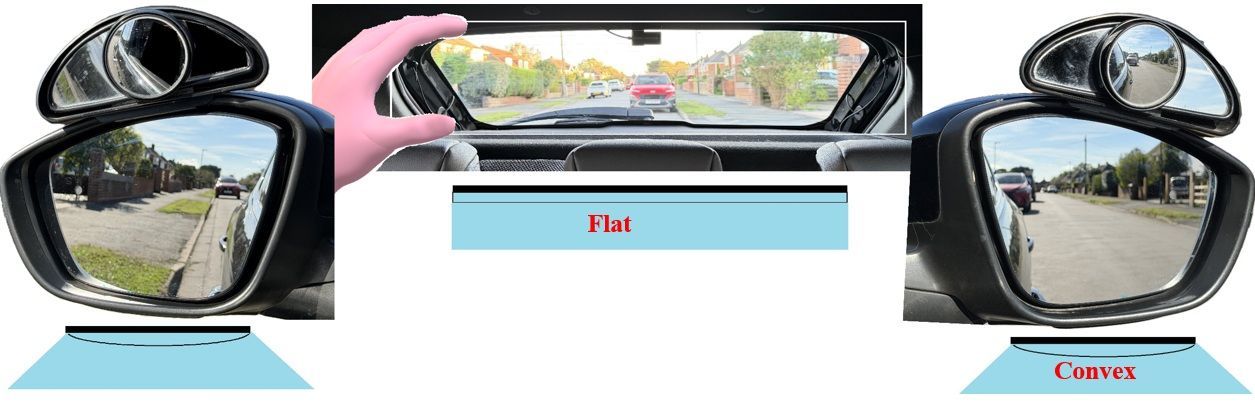
1. The interior mirror glass is flat (true view) and the door mirrors glass are convex (wider field of vision).
2. Set up the interior mirror by framing the rear window with the interior mirror and using your left hand.
3. Set the door mirrors so you see the front door handles in the inside corner of each mirror.
Adjust the door mirrors with the switch on the driver’s door, your aim is to see roughly 25% of your vehicle and 75% of the road
Practice the cockpit drill
Please note there is another order of the cockpit drill which is DSSSM - Doors, Seat, Steering, Seatbelt & Mirrors.
The main controls
The accelerator pedal
- The accelerator (commonly known as the gas pedal) is used with your right foot.
- To control the speed of the vehicle gently press and release the pedal lightly, this will increase or decreasing the flow of fuel to the engine.
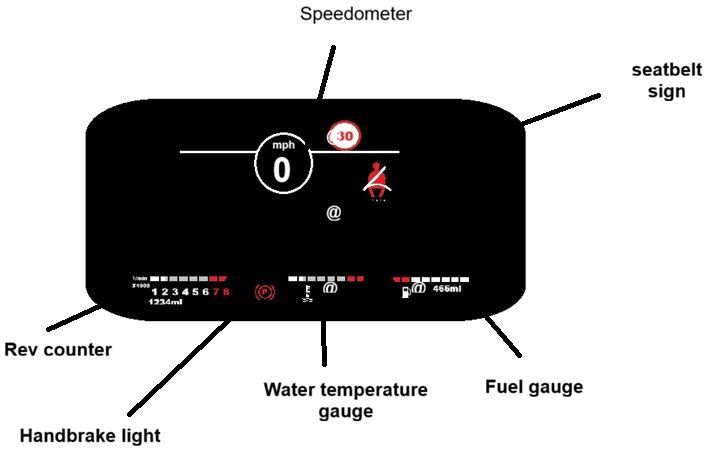
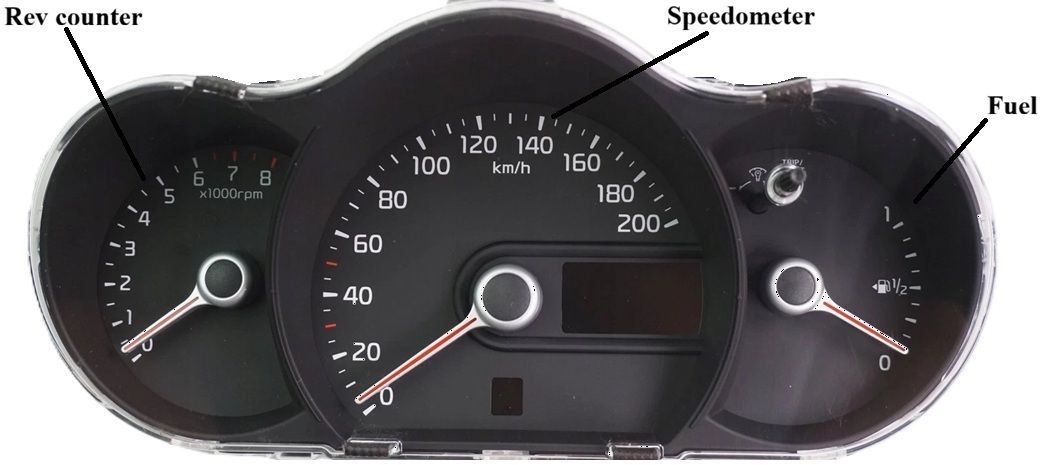
- To know how fast you are travelling you use the speedometer on the dashboard, it will be in MPH (miles per hour) but it can be altered to KM (kilometres)
- The rev counter in at the bottom left, to set the 2,000 on the rev counter you apply gentle pressure to the gas pedal.
Other type of clocks on a vehicle can look like the clocks below.
Other important safety features that are necessary for your knowledge are:-
- Rev counter
- Fuel gauge
- Speedometer
- Water temperature gauge
- Handbrake light
Below are two different cockpit clocks a digital display and an analog display
Footbrake pedal
1. This pedal is also operated with the right foot.
2. Place your right foot in line with the brake pedal and pivot the right foot from the brake pedal to the accelerator pedal whilst keeping your heel on the floor.
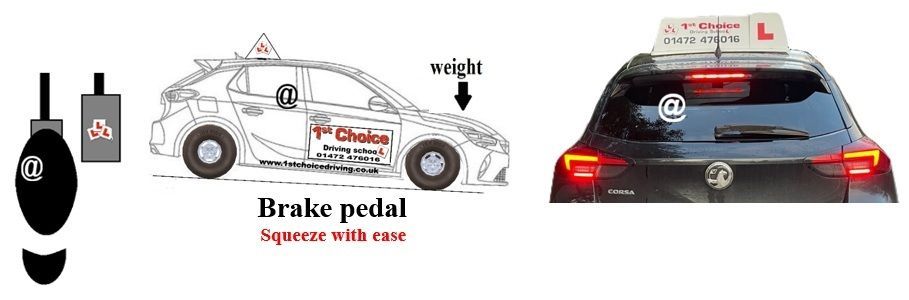
3. When you press the brake pedal the brake lights (on the back of the car) will be activated, this warns drivers behind you that you are slowing down or stopping.
4. The footbrake operates brakes on all four wheels and is used to slow/stop the vehicle.
5. The pedal should be pressed progressively until you have stopped (imagine the brake pedal is a fresh chicken’s egg, only put light pressure on it and your aim is not to crack or break the egg).
6. The best way to stop safely is to pulse the brake pedal, slowing the vehicle down gently and stopping in a S.CA.L. P (safe, convenient and legal place).
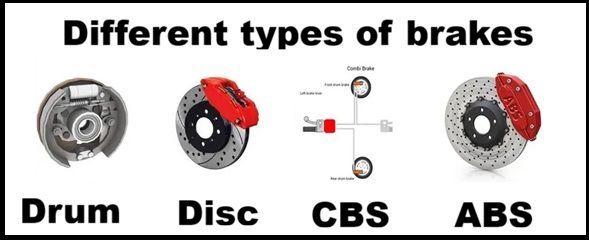
Extra information about different types of braking systems on vehicles.
Clutch pedal
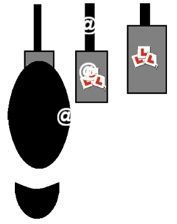
1. The clutch is used with the left foot.
2. Use the ball of the left foot have your foot high enough so that the top of your footwear to nearly covers the top of the pedal.
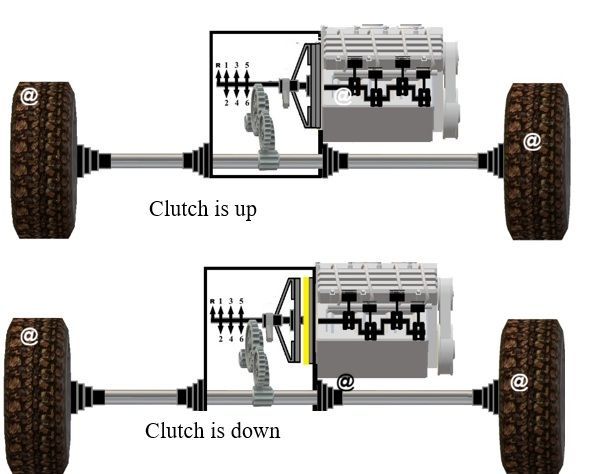
3. The clutch breaks the link between the engine and the gearbox
4. (drive wheels) while the vehicle is running.
5. To separate the engine and gearbox simply press the clutch pedal to the floor and then releases it slowly and smoothly (this finds the biting point).
The three times you need to lower your clutch
You need to put the clutch down before moving off, stopping and changing gear.
Below is a helpful video on how a clutch works.
Hand controls Steering wheel
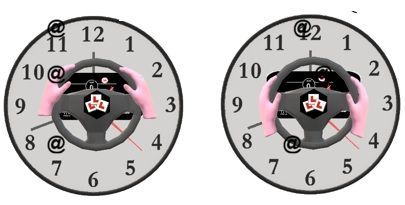
1. Hold the wheel with your hands at the ten to two position and no lower than quarter to three.
Question - Do you know why ten to two position and no lower than quarter to three positions on the wheel?
2. Best control is gained with the pull and push method to turn the wheel.
3. The steering wheel is used to turn the front wheels when changing direction.
(N.B Steering is dealt with in more detail in Lesson 3).
Indicator stalk
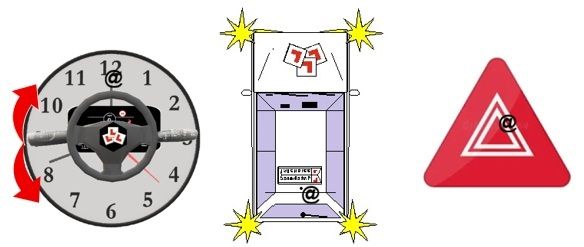
1. The indicator stalk is usually located to the left or right of the steering wheel. 2.
The stalk is designed for fingertip control.
3. To signal left or right you simply move the stalk the direction you wish to go.
4. Lane change facility is just touching the indicator stalk and the indicators will flash twice.
Gear lever (stick)
1. You select each gear with your left hand.
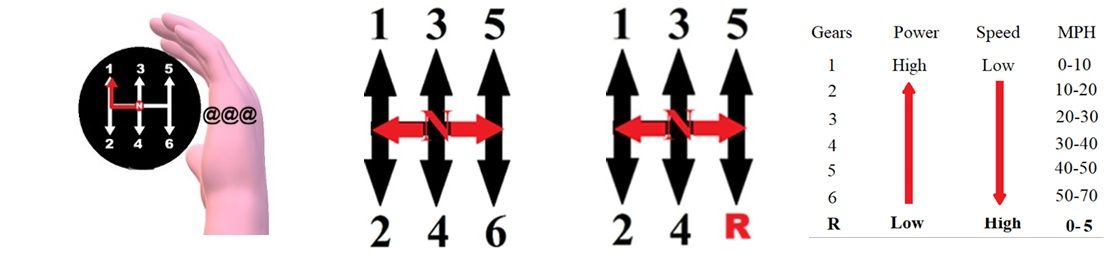
2. When changing gear, use the palming method.
3. When the engine is running always press the clutch pedal before you select any gears.
4. There are usually 5 (or 6) forward gears and reverse gear
5. Change gear every 10mph, also the number of engine revolutions can help too.
6. Between the gears there is a position called neutral, when the gear stick lever is in neutral position there are no gears selected and the engine is safe to start.
7. The higher the gear (1st or 2nd gear) the greater the pulling power (therefore the lower the engine speed). Think back to when you rode on a bicycle, you would never start pedalling in 4th or 5th gear (smallest cog at the back wheel) as you would find it extremely difficult to move off. The same applies when pulling off in a vehicle
Think back to when you rode on a bicycle, you would never start pedalling in 4th or 5th gear (smallest cog at the back wheel) as you would find it extremely difficult to move off. The same applies when pulling off in a vehicle
Handbrake
1. The handbrake is used to hold the car still once you are stationary.
2. The handbrake is connected to the rear wheels with a cable.
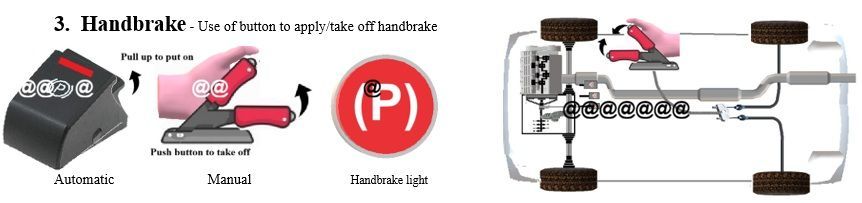
3. Manual handbrake - Push the button in with your thumb and pull up to put on and push the button in with your thumb and push it down to take off.
4. Automatic handbrake - Pull the button up with your finger to put on the handbrake. To take it off press the foot brake then push the button down with your finger to take off.
End of lesson
At the end of lesson your instructor will give you feedback on your performance. Then you will discuss and agree new goals for next lesson. Agree support on upcoming lesson. Agree risk responsibility. Encourage gestalt on student’s new topic.
Please note you will cover moving off and stopping on this lesson too. Click the link below to take you to moving off and stopping.