Gears
In today’s lesson, you and your driving instructor have decided to focus on learning how to change gears up and down. Understanding and mastering gear changes in a manual car is an important skill that plays a big role in safe and efficient driving.
Goal (aim)
To change gears, you need to observe the road ahead and coordinate your hands and feet. Keep your head focused on where you’re going, not on the gear stick. Use your left hand to operate the gear stick, and your left foot to control the clutch for a smooth gear change.
Risk responsibility (objective)
When changing gears, your goal is to keep looking ahead through the windscreen rather than down at the gear stick. Taking your eyes off the road could cause you to swerve left or right, or miss important actions of vehicles ahead, such as slowing down for a cyclist crossing in front.
Why do you need to change gear
Each gear change lets the vehicle move at different speeds, and you’ll notice this once you start practicing on roads with varying speed limits.
How many gears are there?
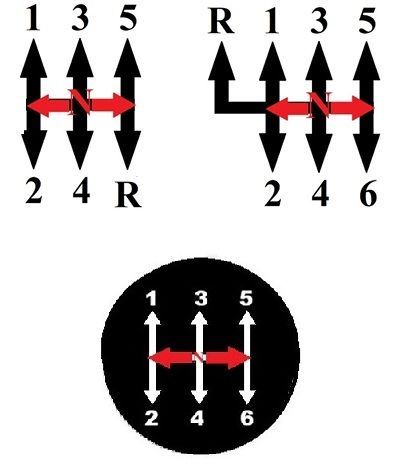
Most modern vehicles have between 5 and 7 forward gears, and between all gears is a position called neutral.
In your previous lesson, you would have covered gears and neutral, and in this section, we’re going to discuss them a bit more.
Neutral has a great range of movement freely between all gears and what a lot of new drivers do not know it that neutral is spring loaded. For example, if you pull the gear stick out of 1st gear it will automatically go inline with 3rd and 4th gear.
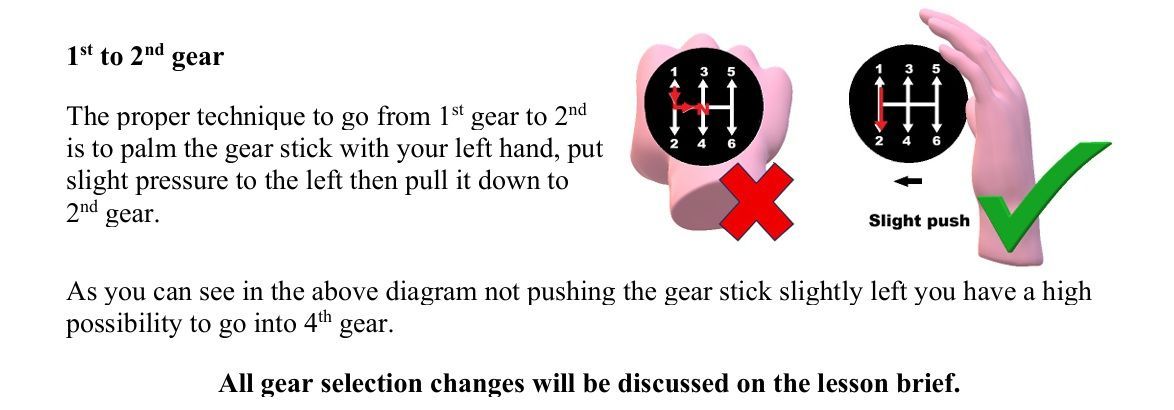
All gear selection changes will be discussed on the lesson brief.
How to change gear
You will be given full support to start with, then you will be encouraged to try it more independently. Don’t worry if it is slow to start with as it will slowly come together.
Recap (last lesson’s if gears have not been covered)
Once you have a re-cap o the cock pit drill and moving off and stopping you will then get the opportunity to change from 1st to 2nd gear then 2nd to 3rd gear. Then 3rd to 2nd gear, so how do you do this?
Moving off
Once you have P.O.M and travelling down the road you will then be given the instruction to change to 2nd gear, so here’s what you need to do.
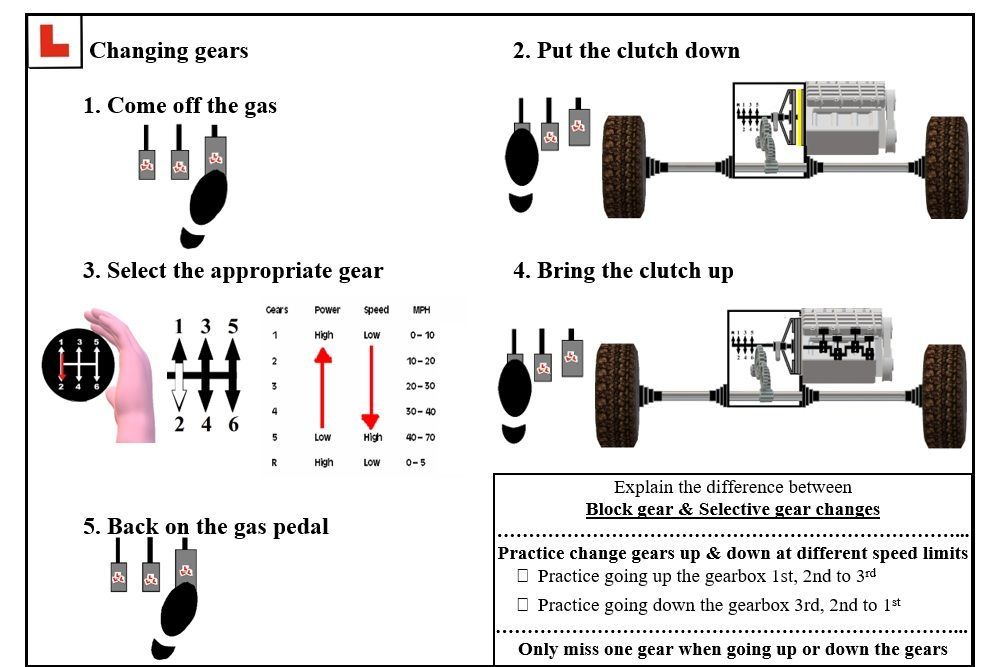
1. Come off the gas.
2. Put the clutch down
3. Put your left hand on the gear stick, push it slightly to the left and pull it down from 1st gear to 2nd gear.
4. Bring the clutch up 70/80 percent up then all the way up.
5. Apply gas to make progress.
6. Then bring the clutch all the way up.
Different methods of gear changes
Block gear changes involve using every gear when shifting up and down, as taught in 1990. The issue with this is that it relies on the clutch and gearbox to slow the vehicle instead of the brakes. While it promotes engine braking, doing this constantly can wear out the clutch faster than brake pads and prevents vehicles behind from knowing you’re slowing down since the brake lights aren’t activated.
A little cost effective Serino
Brake pads typically last three to four years, while a clutch, if used properly, can last up to 80,000 miles. Since the average driver covers about 12,000 miles a year, that’s around 84,000 miles over seven years. However, riding the clutch or using the block gear method can reduce its lifespan to just 30,000 miles.
A new set of brake pads = £130 and a new clutch will cost you between £500 to £1,000. I know what bill I would want every 3 years.
REMEMBER GEARS TO GO AND BRAKES TO SLOW
Selective gears changes – Is when you miss one gear out going up or down the gearbox – Going up the gears from: -
1. Going from 1st gear (0/10MPH) to 2nd gear (10/20MPH) then 3rd gear (25MPH), miss our 4th gear, then to 5th gear (45MPH) then to 6th gear at 50/55MPH.
2. Going from 1st gear (0/10MPH) to 2nd gear (10/30MPH), Miss out 3rd gear and go into 4th gear (28/30MPH) then 5th gear (45MPH) then to 6th gear at 50/55MPH.
3. Going from 1st gear (0/10MPH) Miss out 2nd gear then to 3rd gear (25MPH), miss out 4th gear then to 5th gear (45MPH) then to 6th gear at 50/55MPH.
Going down the gears from: -
For example, slowing down approaching a large roundabout or even meeting oncoming vehicles: -: -
1. Going from 6th gear to 4th gear then to 2nd gear then maybe keep on going at 10/12mph and then be able to keep going in 2nd gear to make safe progress.
2. Going from 5th gear (40/50MPH) to 3rd gear(15/20MPH) then to 1st gear (0/3MPH) when you stop due to oncoming vehicles.
The method here is to go from 6th gear at 60MPH to 5th gear you will need to slow the training vehicle down to 40/50MPH, then go into 4th gear. Then slow the training vehicle down again to 15/20MPH then go into 2nd gear.
Eco driving
Changing up and down the gears correctly will allow your (training) vehicle to save fuel as high gears (1st and 2nd) use more fuel so consequently having the correct engine revs will keep your engine and gearbox to work more efficiently.
The right gear selection will give you more power to overtake and go up incline areas.
The rule of thumb, simply put a naught at the end of each gear number
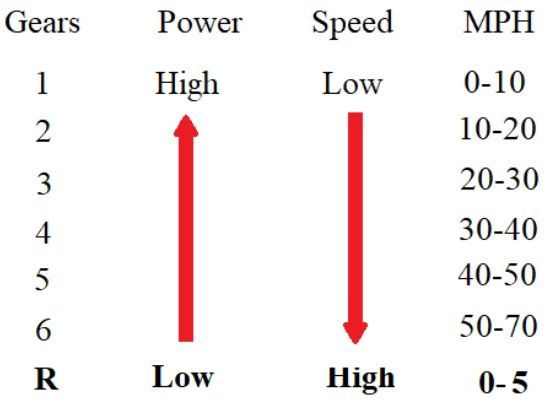
1st gear = 10MPH
2nd gear = 20MPH
3rd gear = 30MPH
4th gear = 40MPH
5th gear = 50MPH
6th gear = 60+MPH
Damage to your engine
Prolonged use of low gears (1st and 2nd) can not only cause internal damage to the gearbox but also harm the engine, as it works harder than necessary. Additionally, changing gears at high revolutions—such as 5000 RPM instead of 2500 RPM—will consume twice as much fuel. While it may be necessary to drop from 5th to 3rd gear and rev up to 5000–6000 RPM for overtaking, doing so occasionally is acceptable.
This next stage is where you need to fine tune the movement of the clutch.
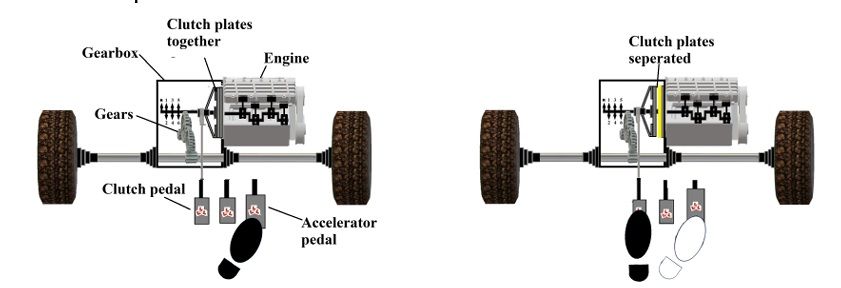
Releasing the clutch pedal
Never change gear and then take your foot straight off the clutch, as this will damage some internal part of the gearbox/dual mast flywheel. Always bring your clutch up to the biting point then raise the pedal £1 thickness at a time.
Practice moving off, stopping and changing gear
Objective
Throughout your driving lessons your goal is to move your training vehicle off, change gear then park up on the left somewhere... S.C.A.L.P as this is a skill needed to be demonstrated on your driving test.
Aim
Practice moving off, stopping and changing gears up and down.
End of lesson
At the end of lesson your instructor will give you feedback on your performance. Then you will discuss and agree new goals for next lesson. Agree support on upcoming lesson. Agree risk responsibility. Encourage gestalt on student’s new topic.
Steering or adequate clearance could be your next lesson topic