Steering
In today’s lesson, you and your driving instructor agreed to focus on learning the skill of steering.
Understanding and mastering the push/pull method in any vehicle is a key skill that plays an important role in safe driving, especially when negotiating junctions.
Goal (aim)
- Understand the pull-push method of steering
- Confident building finding your biting point (using clutch control)
- Understand points of turns on corners and execute a safe and smooth turn when turning left, right and emerging
For safety this lesson is necessary before you move onto the next stage of basic junction
Remember your last skills on observations and control
Head – To look where you are going
Hands – Hands to guide your training vehicle in the direction you want to go
Feet – Your feet to co-ordinate your accelerator, brake and clutch pedals so you are in full control
Managing your training vehicle
Understanding what is expected from you on each lesson in other words what responsibility are you going to take on each lesson skills?
- Moving off & stopping.
- Changing gear.
- Turning left, right from a main road into a side road.
- The holding back position including leaving adequate clearance (if this brief has not been discussed on your lesson so far it will be your next skill to learn).
The question is what help will you need?
Risk responsibility's
You and your instructor will agree the support needed and which areas on the start of your lesson: -
• Full talk through
• Prompt
• Independent
The above information is so important to ensure that you the student and your instructor understands what part of the (risk) responsibility in the training vehicle you are taking control off and at what help you are in need from your instructor.
Your goal is to drive as independently and client-centered as possible in each lesson, taking on more responsibility every time and staying in full control of any situation you encounter. Gaining knowledge and building your skills is your main focus.
How your lesson will begin
Your driving instructor will park in a space and align the wing mirrors with the front line of the bay. This is your first reference point to help you identify where the front end of your training vehicle is.
Why will your instructor give you this reference point?
Your instructor does this to give you a visual reference for judging how far to drive forward into a parking bay. It also helps you understand how to approach the end of the road safely and gauge the distance when driving into bays.
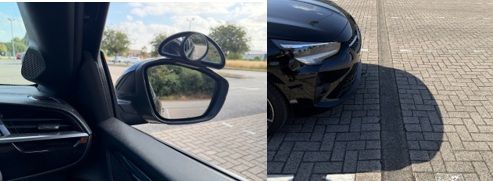
Use reference points in the front window to locate the front two wheels.
You and your instructor will swap seats, then review the cockpit drill.
Next, discuss the view from your front window—where do you see the two white bay lines at the bottom?
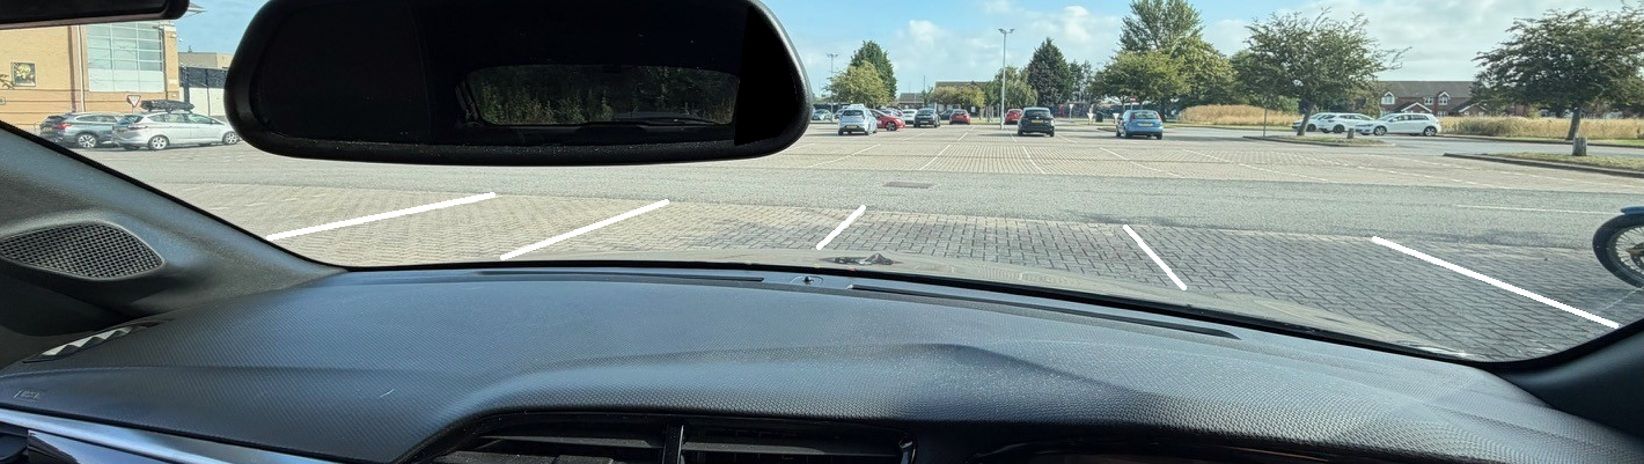
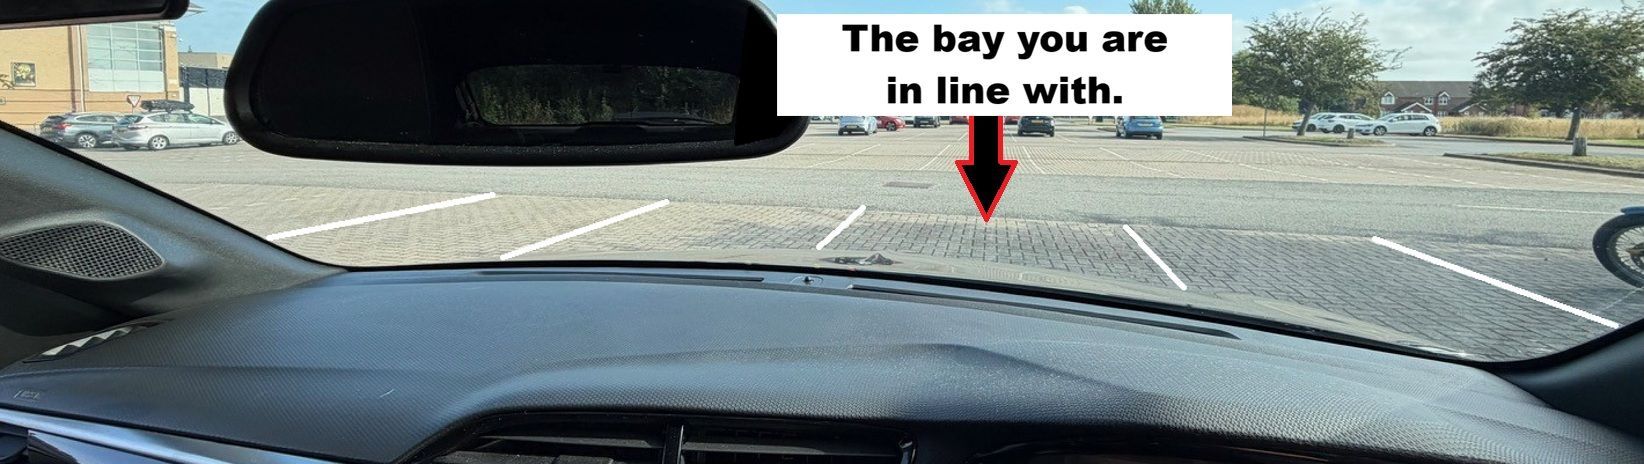
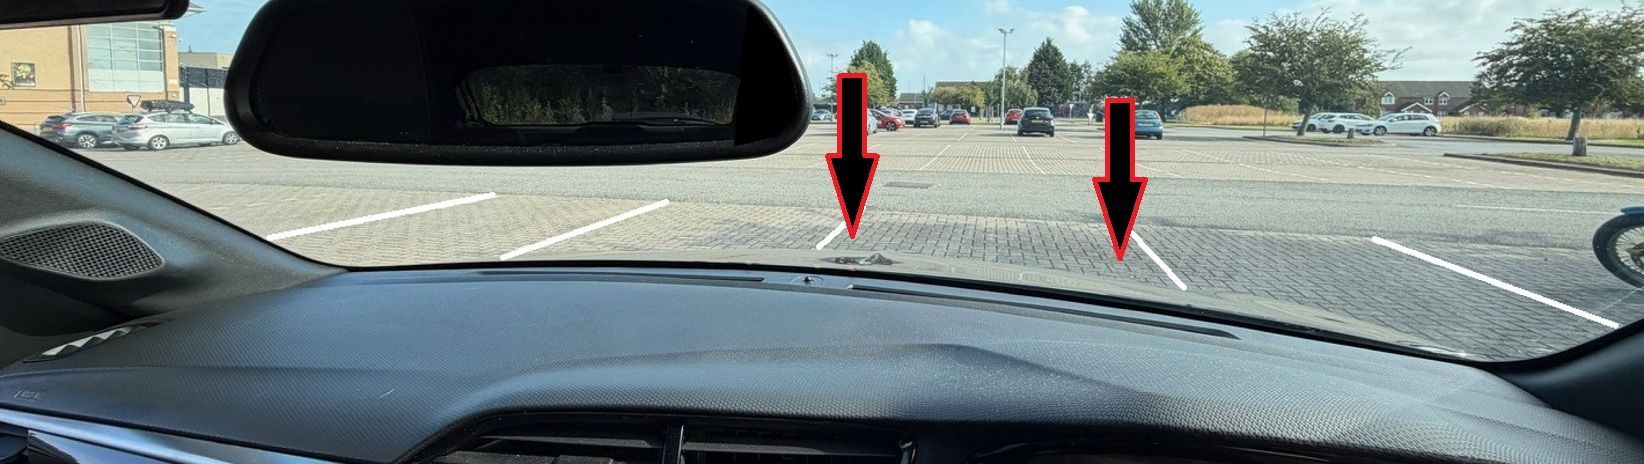
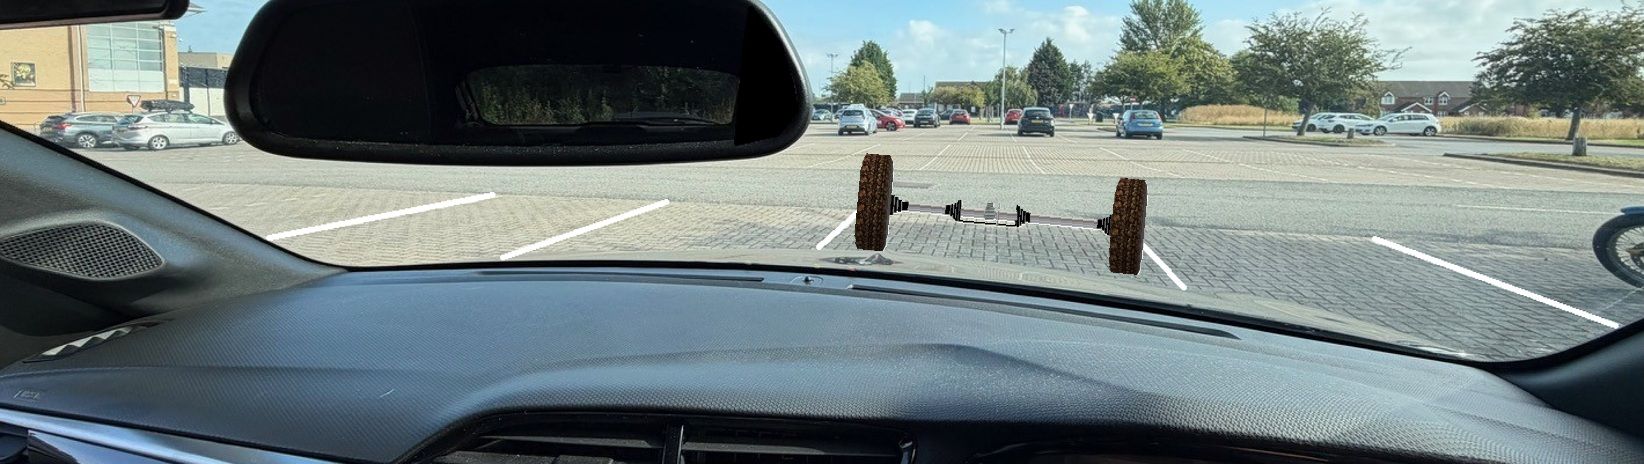
You're now looking at the slideshow and thinking, "I don't understand this at all." What you'll start to realize is that when you're sitting in the driver's seat, the view you see will change.
When parked next to the kerb, it will appear just to the left of the center at the bottom of your front window.
Let me give you another visual point.
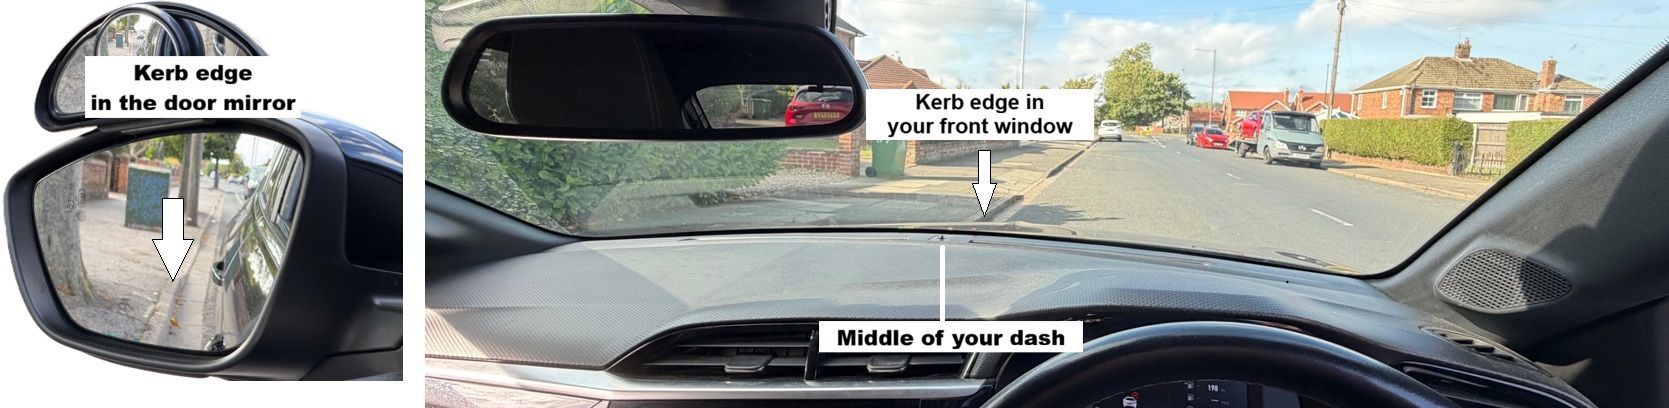
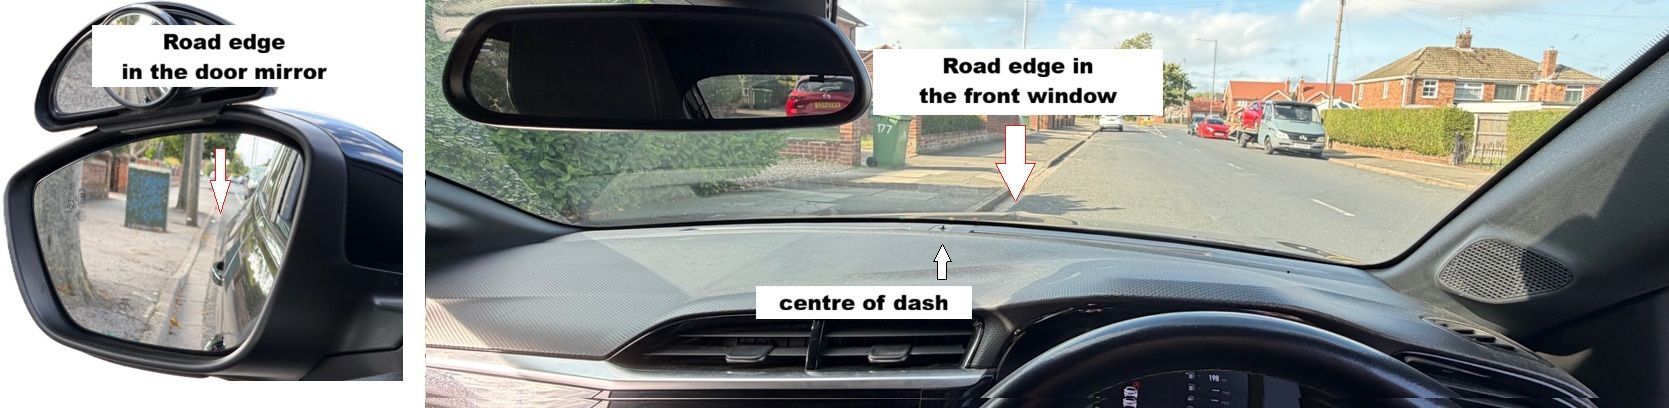
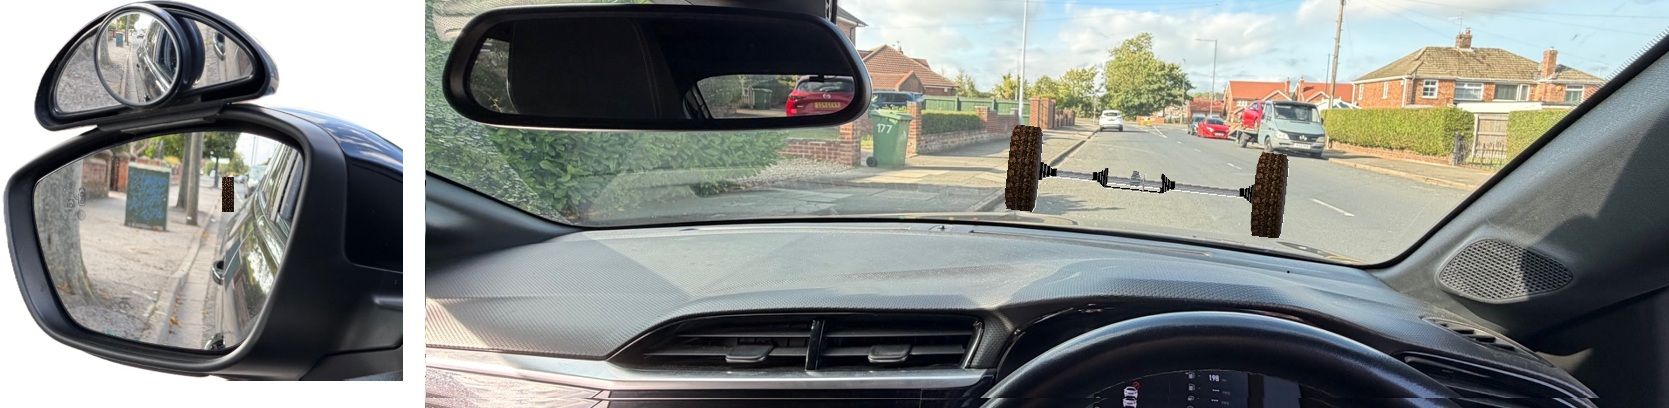
With the three moving pictures above, you can see where the kerb appears at the bottom of the window and in the door mirror. Then you can visualize where the road edge is in the door mirror, helping you determine where the two front wheels will be.
Re-cap on:-
Cockpit drill.
P.O.M - Prepare, Observe and Manoeuvrer.
P.O.S.M - Prepare, Observe, Signal and Manoeuvrer.
M.S.M - Mirror, Signal and Manoeuvrer.
Biting point - Using the clutch pedal.
Let’s begin with the new topics
Topic 1
Understand what is meant by the term full lock.
Learn how to pull/push to the right and the left.
Full lock
What is full lock?
Full lock refers to the number of revolutions your steering wheel makes before reaching its maximum turning point. Some steering wheels turn one and a half times, while others may turn slightly more or less.
Topic 2
Pull push method of steering
Learn how to push and pull to the left and right without crossing your hands for full control. To start a push/pull to the right:
A. Begin with your hands at the 10 and 2 positions on the steering wheel.
B. Slide your right hand to 12 or 1 o’clock, take your left hand off the wheel, and pull down with your right hand to rotate the steering wheel. Then, slide your left hand down toward 6 or 7 o’clock.

C. Swap hands so your so your left hand is at the 6 or 7 0’clock position.
D. Take your right hand off the wheel.
E. Pushing up with your left hand and sliding your right hand back to12 or 1 0’clock. Repeat till you have achieved full lock right and left
Topic 3
Drive forward and make U turns in the car park to the right & left
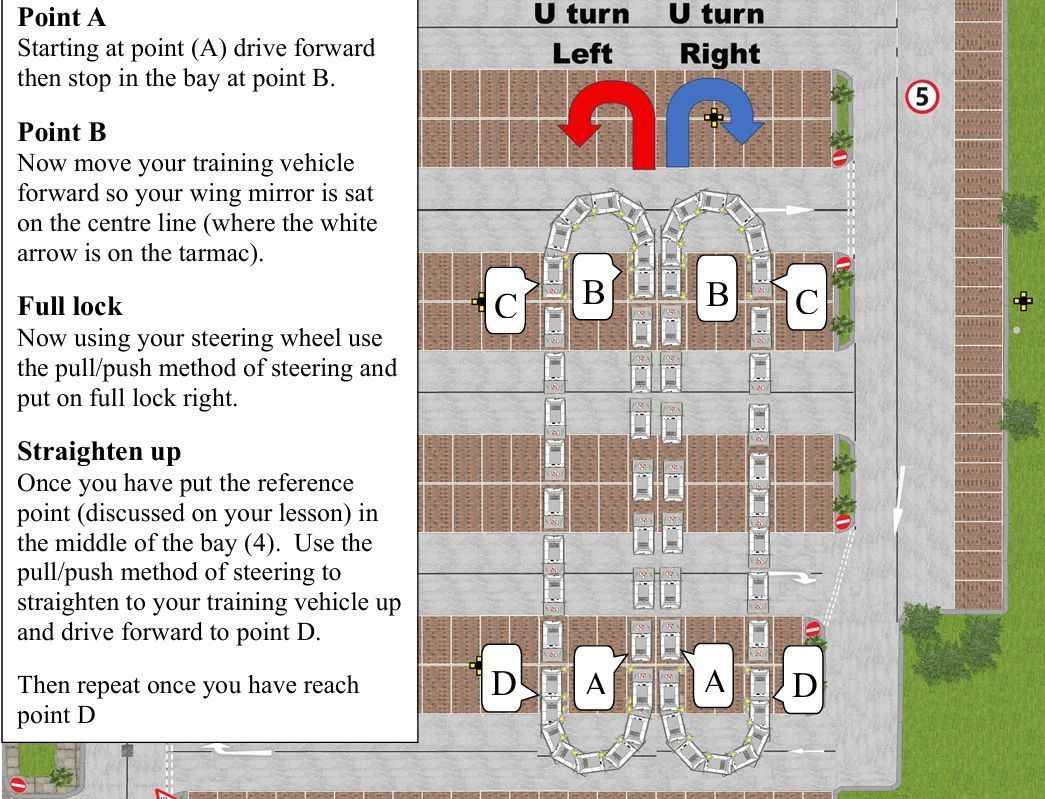
Skill setting.
Stopping is a skill you need to master for safety. Use bay points B and D, and practice stopping in the parking space to get comfortable with pulsing the foot brake and lowering the clutch pedal. Remember, stopping past the parking space can be risky if you’re emerging from a junction. This is all about managing your risk before attempting it on the road.
Also by driving in a straight line you are working on you lane postioning.
Repeat the U turn exercise until confident and independent turning right and left.
Steering left and right around a carpark
Once the U turns are achieved independently it’s time to move on to the next exercise 90 degree turns.
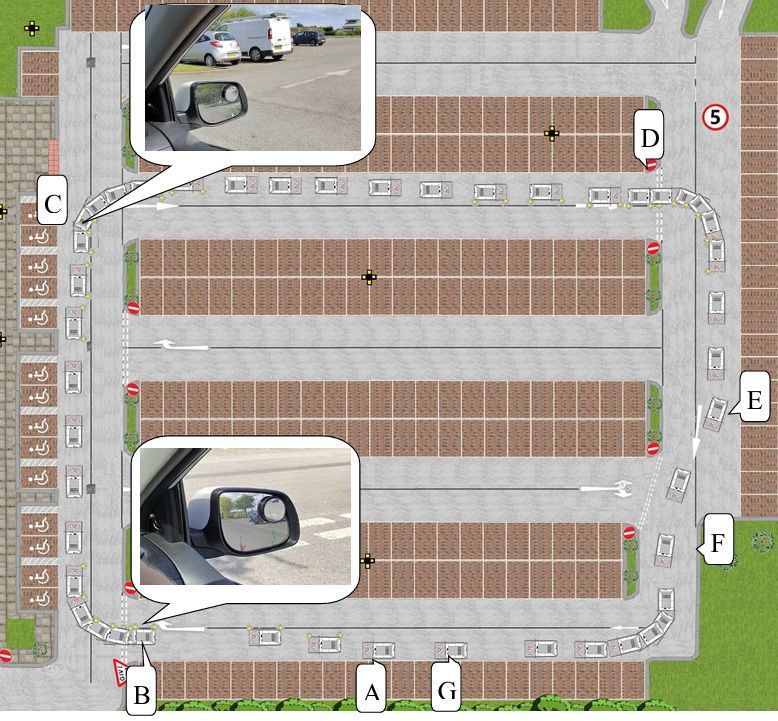
Follow the grey car
Starting at point A
Drive forward till you reach the give way line point B then practice stopping at the give way line.
B (end of road turning right)
Once you have assessed its clear drive to the point of turn (already covered on U turns) Turn your wheel using the pull/push and turn right, then straighten up and drive forward to C.
C (main road turning right)
Once you get to point C (achieving to the main road point of turn), turn into the corner using the pull/push method steering and straighten your steering wheel at the given reference point and drive forward to point D.
D (end of road right)
Once driven to point D, (repeat stopping point of turn at A) and stop at the give way line and practice stopping at the give way line. Once you have assessed its clear drive to the point of turn (already covered on U turns). Turn your wheel using the pull/push and turn right, then straighten up and drive forward to E and park up on the left at point G.
Repeat couses until you have reduced any errors (risk assessement) and move onto turning left.
Follow the white vehicle to the left from A to F
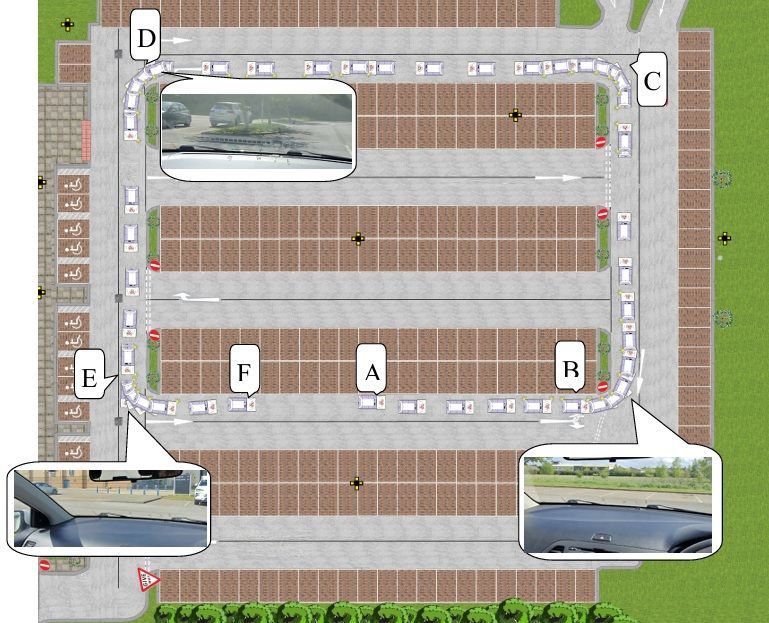
Starting at point A
Drive forward till you reach the give way line point B then practice stopping at the give way line.
B (end of road turning left)
Once you have assessed its clear drive to the point of turn (already covered on U turns) Turn your wheel using the pull/push and turn left, then straighten up and drive forward to C
C (main road turning left)
Once you get to point C (achieving to the main road point of turn), turn into the corner to the left using the pull/push method steering and straighten your steering wheel at the given reference point and drive forward to point D.
D (end of road left)
Once driven to point D, repeat point A and stop at the give way line and practice stopping at the give way line. Once you have assessed its clear drive to the point of turn (already covered on U turns) Turn your wheel using the pull/push and turn left, then straighten up and drive forward to E and park up on the left at point F.
Repeat couses until you have reduced any errors (managed any risks).
Objective
Throughout your driving lessons your goal is to move your training vehicle off, then park up in the assigned parking bay then progress using the pull/push method, stopping behind lines and keeping your training vehicle stright.
Aim
Improve and practice moving off, stopping and stopping behind lines.
End of lesson
At the end of lesson your instructor will give you feedback on your performance. Then you will discuss and agree new goals for next lesson. Agree support on upcoming lesson. Agree risk responsibility. Encourage gestalt on student’s new topic.
Adequate clearance will be your next lesson topic.