Adequate clearance

Two second gap, hold back position, overtaking, adequate clearance when overtaking stationary & slow moving vehicles 

Introduction

By now you should getting better and getting more independent and only  being prompt when you're doing P.O.M routine (moving off)
  • M.S.M routine when stopping (including turning)
  • Improving clutch control
  • Co-ordination of foot controls
  • Steering to a safe driving position and pulling up on the left
  • Gear changing up and down 
should now be getting more independent.  

Risk responsibility's 

You and your instructor will agree the lesson plan(s) by setting the support to ether 
  • Full talk through
  • Prompt 
  • Independent. 
This is important to ensure that the instructor and student understands who has the more responsibility on the control of the training vehicle on the set lesson plan

The new Goals agreed for this lesson plan will be:-
  • Two second gap
  • Hold back position
  • Overtaking, adequate clearance when overtaking stationary & slow moving vehicles 
  • Extending M.S.M to M.S.P.S.G routine (hazard routine)
  • Introduce you to L.A.D.A routine
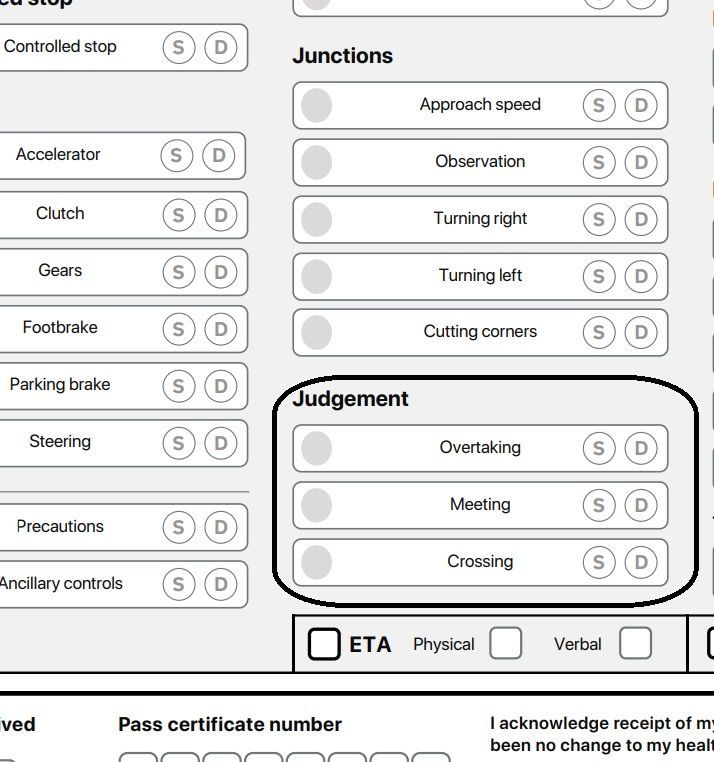
These new routines will improve your observation with reading the road in front, beside and even behind your vehicle while you are driving (awareness and planning) and make more progress.  The M.S.P.S.G & L.A.D.A routine's will the foundations when meeting oncoming vehicles traffic, overtaking stationary/slow moving vehicles and when negotiating all junctions. You will also cover the 2 second rule, the correct hold back position, adequate clearance around parked stationary vehicles at different speed limits.
The hazard and L.A.D.A routine's during this lesson will be will be given by your instructor to a level to suit you… (full talk through then reducing to either prompt or independent).

Agree risk responsibility

Intervention

Agree if the lesson is instructor lead lesson or a client centred lesson and if it is client lead and if the instructor has to intervein verbally, take control of the training vehicle by ether using the dual control or take the wheel the lesson plan may need to be changed until the fault is fixed.

Lesson aims and strategies

The aim of today’s lesson is to learn how to work out the 2 second rule, the best position to hold your training vehicle back from behind parked vehicles, leaving adequate clearance at different speed limits when passing stationary vehicles, bicycles and horses.  

Objectives
Your objective will to be as independent as possible and by the end of your lesson be able drive in a location suitable to your level of driving skill, negotiating stationary and oncoming vehicle, incorporating the L.A.D.A and M.S.P.S.G with little or no help from your instructor. 

Judgement

You were marked on:

  • overtaking
  • meeting
  • crossing

You needed to show good judgement when overtaking, meeting and crossing other road users, such as knowing when to proceed, and when to wait for a safer opportunity.


You needed to make your intentions clear, and understand the intentions of the other road users.


Examples of faults

Some of the most common faults for this area include:

  • not giving way to road users that have priority
  • reacting late when meeting an approaching vehicle
  • being too close to a cyclist when overtaking
  • crossing the path of an oncoming vehicle when turning right

Your examiner may have explained the specific details of any faults you made.


How you can improve in this area

If you made faults in this area during your test, or if you want to improve in this area, you should:


check rules 162 to 169 and rules 179 to 183 of The Highway Code

read section 7 of ‘The Official DVSA Guide to Driving: the Essential Skills’ (2022 edition)

If you need to rebook the test, spend time practising this skill with your driving instructor or supervising driver.


Information about the fault on the DL25 report form

Subject brief


The two second rule


One of the biggest dangers on the road these days is tail gating (getting to close to the vehicles in front and behind).

Always maintain a 2 second safety gap as your vehicle

highway code rule using the 2 second rule
Only a fool breaks the two second rule

It’s not just in town or built up areas drivers tailgate they also do it on motor ways too, so there’s no wonder there are so many accidents. We should always leave a two second safety gap from each other.  

How to workout and maintain your two second gap

Use the vehicle in front and when it reaches a land mark like a tree or a lamp post then say under your breath Only a fool breaks the two second rule".  If you are now at the landmark that the vehicle was just at you have the two second safety gap, if your still not at the land mark you have a greater gap, however if you have complete the saying the rhyme then you are too close and need to create a bigger gap with the vehicle in front of you.
Remember this is in dry weather, in wet weather its double the stopping distance and in ice its 10 times greater.

Question

Do you know what your stopping distance would be in dry weather?
Answer - At 30 MPH your stopping distance would be 23 metres, 75 feet or 6 car lengths

Do you know what your stopping distance would be on in weather?
Answer - Double the stopping distance - At 30 MPH your stopping distance would be 46 metres, 150 feet or 12 car lengths

Do you know what your stopping distance would be on in snow and ice?
Answer - Ten times in snow and ice - At 30 MPH your stopping distance would be 230 metres, 750 feet or 60 car lengths

The hold back position

The holding back position is a safety gap needed when you're going to giving way to an oncoming vehicle(s) that is travelling towards you. We advise on a teaching strategy is that if you intend to hold back behind a parked vehicle to allow the oncoming vehicle to make progress is to hold back 6/8 car lengths back from the parked vehicle but the closest should be 2 car lengths (or tyres and tarmac). As you can see in the below pictures the further you are back from the parked vehicles the more you can see ahead and the less you will need swing out with your steering wheel.
Adequate clearance

Try to ensure that you are seen and if possible obtain eye contact with the other road users, assess the speed and distance of the approaching vehicle. If you are confident that you will arrive earlier than the oncoming vehicle it is likely that the other driver will give you priority but don’t assume it. 

Safety gap as passing a stationary vehicle

The narrower the road gap and more pedestrians on the pathment the slower your speed should be:-

  • Give 1 metre clearance (door length) from parked vehicles and from the centre line when travelling at 30mph
  • Give ½ metre clearance (1/2 door length) from parked vehicles and from the centre line when travelling at 15mph 
  •  If you are less than 1/4 of a door length (wing mirror distance) from parked vehicles and from the centre line when travelling reduce your speed to a walking or crawling pace 5mph
Don’t forget to look out for children or any kind or pedestrians when passing the parked vehicles and always leave the correct adequate clearance.

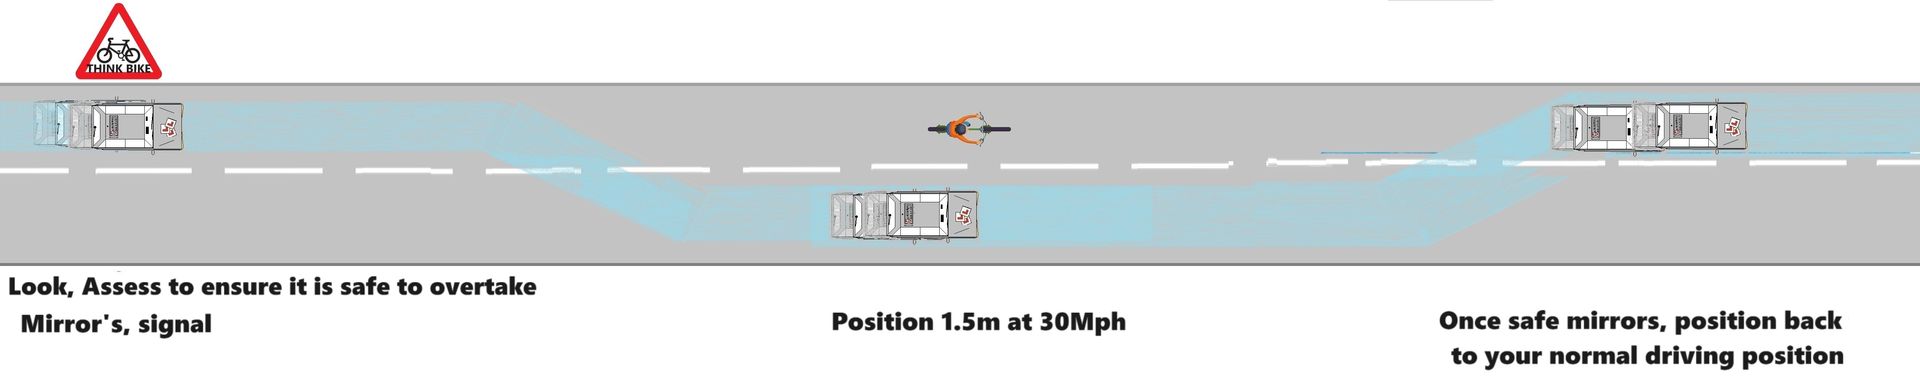
Overtaking slow moving vehicles (cyclists)


The overtaking manoeuvre requires you again to employ the hazard drill at least three times. 


  1. Look & assess to ensure it is safe to overtake the cyclist safely (including all mirrors)
  2. Before overtaking check mirrors (interior & right door mirror, (consider a) signal
  3. Mirrors (interior & left door mirror as you return back to your normal driving position


Highway code rules changes January 2022

The new rule 2023 for pedestrian's and cyclist


Road positioning


When riding on the roads, there are two basic road positions you should adopt, depending on the situation.


Ride in the centre of your lane, to make yourself as clearly visible as possible, in the following situations

  • on quiet roads or streets – if a faster vehicle comes up behind you, move to the left to enable them to overtake, if you can do so safely
  • In slower-moving traffic - when the traffic around you starts to flow more freely, move over to the left if you can do so safely so that faster vehicles behind you can overtake
  • At the approach to junctions or road narrowing where it would be unsafe for drivers to overtake you


Highway code - road users requiring extra care
Highway code rile 215

Overtaking a horse and rider


The overtaking manoeuvre requires you again to employ the L.A.D.A and hazard drill at least three times. 


  1. Look & assess to ensure it is safe to overtake the cyclist safely (including all mirrors)
  2. Before overtaking check mirrors (interior & right door mirror, (consider a) signal
  3. Mirrors (interior & left door mirror as you return back to your normal driving position


Sharing space with pedestrians, horse riders and horse drawn vehicles.

When riding in places where sharing with pedestrians, horse riders or horse drawn vehicles is permitted, take care when passing pedestrians and horse riders, especially children, older adults or disabled people. Slow down when necessary and let them know you are there; for example, by ringing your bell (it is recommended that a bell is fitted to your bike), or by calling out politely.


Remember that pedestrians may be deaf, blind or partially sighted and that this may not be obvious.

Do not pass pedestrians, horse riders or horse drawn vehicles closely or at high speed, particularly from behind.

You should not pass a horse on their left, remember that horses can be startled if passed without warning. Always be prepared to slow down and stop when necessary.

Highway code rule 63

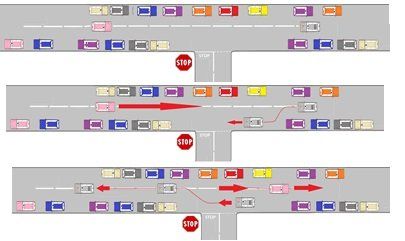
Meeting and overtaking stationary vehicles


When you’re approaching a stationary vehicles always use the L.A.D.A and hazard routine's a minimum of 3 times.


1. Once before you think about move out to overtake

2. Once before you overtake the stationary vehicle

3. Then again before you move back to your normal road position
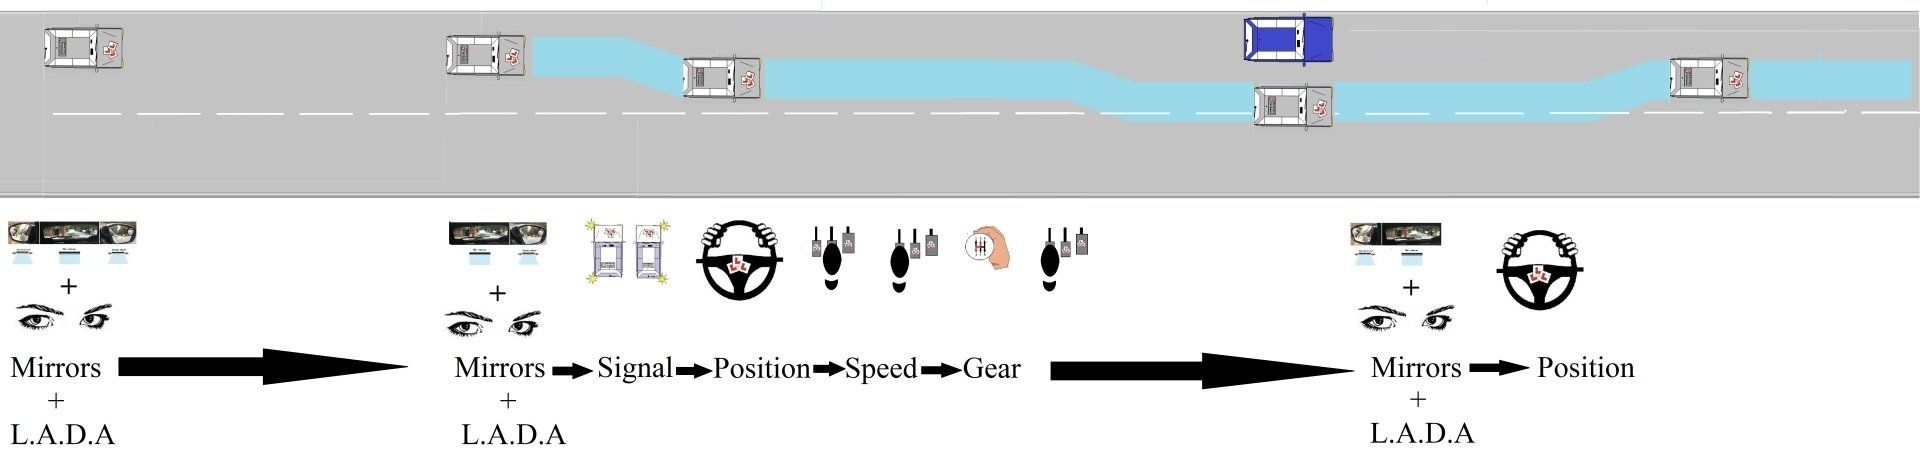
Highway code 163
Awareness, anticipation and planning using the hazard and L.A.D.A. routine's

When you are going to overtake stationary vehicles you will be faced with one of three situations:-

Situation one 
No vehicles coming towards you (including no cyclists or pedestrians).
All you will need to do is:-
  • Mirrors right
  • Position so you’re next to the centre line (above diagram)
Once you are 4/6 car lengths from the parked vehicle this is the time to:-
  • Mirrors right
  • Position just over the centre line
Once you are past the parked vehicle check your:-
  • Mirrors left
  • Position move to your normal road position
  • Making progress
So as you can see the hazard routine doesn’t need to use in full but needs to be used in order.
Situation two

A couple of vehicles coming towards you (or it could be a cyclists or pedestrians) this is going to be a little more difficult.  The key here is to slow your vehicle so you do not reach the holding back position until the vehicle has passed the object in your path.

Check your:-
  • Mirrors right
  • Position so your vehicle is just left of the centre of the centre while line
but this time you will need to:-
  • (Speed) - reduce your speed to a walking/crawling pace, so you can slow and flow (if possible), if you do not achieve this just hold back a minimum of 2/6 length vehicles back from the parked vehicle
  • Gears down, 2nd if you have timed the reduction of your vehicles speed or 1st gear if you needed to stop to let the cars get past the hazard (so far you have used M.P.S.G)
When it is safe to over take:-
  • Mirrors right (again)
  • Signal (unless it could misleads any other road user)
  • Position so you’re over the centre line (like in the above diagram)
  • Speed (increase)
  • Gear (change up to make progress)
Once you are past the parked vehicle check your:-
  • Mirrors left
  • Position move to your normal road
  • Speed (increase your pace)
  • Gears (to making progress)
So as you can see, the hazard routine doesn’t need to use in full but needs to be done in order.

Situation three

A convoy of vehicles coming towards you (or it could be a cyclists or pedestrians) this is going to be difficult if you don’t think about it.
Check your:-
  • Mirrors right
  • Position so your vehicle is just left of the centre of the road but this time you will need to hold back a minimum of 2/6 length vehicles back from the parked vehicle
  • Speed reduce your speed to a crawling pace or stop if it a big queue
  • Gears down, probably 1st gear, to let the cars get past the hazard (so far you have used M.P.S.G)
When it is safe to over take:-
  • Mirrors right (again)
  • Signal (unless it could misleads any other road user)
  • Position so you’re over the centre line (like in the above diagram)
  • Speed (increase)
Once you are past the parked vehicle check your:-
  • Mirrors left
  • Position move to your normal road
  • Speed (increase your pace)
  • Gears (to making progress)
So as you can see, the hazard routine doesn’t need to use in full but needs to be done in order.
Meeting oncoming traffic and using the side road as a passing place

On busy busy roads you can sometimes be confronted with the problem of meeting another vehicle driving towards you and parked vehicles on both sides of the road.  In this situation it you can use the side road as a passing place, slow down and wait in the junction area to allow the pink vehicle to make progress.

Anticipation and planning is necessary (all road users should) be polite and give common courtesy.
Highway code rule 155
learning techniques and strategies

Practice achieving the two second gap, hold back position, overtaking, adequate clearance when overtaking stationary & slow moving vehicles while using the M.S.P.S.G.L.A.D.A routines.

Once you have practiced a few situations a few times your instructor will reduce his/her support transferring his responsibility over to you (that's if you agree with this).

Lesson Planning
  • Agree learning goals and needs of todays lesson
  • Agree appropriate lesson structure (full, partially or independent level of instruction)
  • Practice in a suitable training area
Agreed if needed to adapt the lesson plan to help the pupil work towards their new learning goals if any verbal or physical intervention was made by the instructor

Risk Management

Fully understood how the responsibility for risk of the lesson would be shared on the lesson plan between instructor and student.
  • Directional instructions will be given in ADI format (Alert, direction and identify manor) given to the pupil clear and given in good time
  • Agree if the students made a minor, serious or dangerous error on your lesson it will be broken down using F.I.S.H (fault, implications, solution & help) this method of feedback helps pupils understand what fault is being made and how to strategies on how correct the faults.
Teaching & Learning Strategies

Like mentioned earlier every student is induvial and each and everyone of you will progress at different rates so driving will adapt their lesson plan to help you achieve your driving goals.
  • Your driving instructor will adapt their teaching style to suite your ability and ability
  • Your driving instructor will continue to encourage you on your lesson and analyse any problems made and allow you to take responsibility for your own learning goals by giving you technical information to improve your techniques. Your technical feed back from your instructor will be ether given on the move or if feel needed by pulling you up on the side of the road somewhere safe, legal and convenient.
At the end of your lesson 

At the end of each lesson you will have a debrief with your instructor giving you the opportunity to reflect on your performance on your lesson then you can set up new goals for your next driving lesson.
This will also give you the opportunity to research any new topics that will be brought into on your next agreed lesson
Share by:
Driving school & instructor courses in Grimsby, Intensive lessons & course Louth/Scunthorpe Driving schools in Grimsby & Cleethorpes, trailer training lessons