Two and three lane traffic lights with green filter systems
Introduction
By this point of your training (P.O.M) moving off from the side of the road and stopping on the left and right hand side of the road (smoothly), gear changes, clutch control, hill including angle starts and busier junctions should now becoming independent, this includes anticipation, awareness and planning with the road ahead, behind, reacting safely to pedestrians, cyclists while driving, so it’s now to look at dealing with multi lane traffic lights (especially turning right).
This briefing could be taught before or after single lane traffic lights, however you will be giving your new lesson topic for your next driving lesson at the end of your lesson from your instructor.
Agreed lesson is covering :-
On this lesson you have agreed with your instructor you will be working on multi lane traffic lights.
You will be using and incorporating the L.A.D.A and hazard routine's during this lesson, on the way to the training location you be from now assessed on your driving skills from previous briefs:-
L.A.D.A & M.S.P.S.G routines on junctions and crossroads you approach
Nearside to near side and offside to off side then crossing
Two second gap. hold back position
Meeting, overtaking, adequate clearance when overtaking stationary & slow moving vehicles
Awareness and planning
Traffic calming measures
Hill/angle starts
Busier junctions
Approaching and negotiating single, multi lane and mini roundabouts
single lane traffic lights
Agree level of instruction
Intervention
Agree on what part of the lesson is going to be a instructor-lead-lesson and client-centred-lesson and if it is client-lead agree if the instructor has to intervein verbally and take control of the training vehicle by ether using the dual control, verbally or take the wheel the lesson plan may need to be changed until the fault is fixed.
F.I.S.H
- Fault
- Implication
- Solution
- Help
Lesson aims and strategies
Todays briefing will be using the L. A. D. A and M.S.P.S.G routine's on the approach different multi lane traffic lights and work on approaching speed and timing of gaps with oncoming traffic. These routine's will be broken down to help you develop your skill to organise your lane positioning, negotiate gaps when approaching different types of traffic light sequences.
Risk responsibility objective's
You and your instructor will agree lesson plan support to ether:-
- Full talk through
- Prompt
- Independent
This is important to ensure that the instructor and student understands who has the main responsibility on the control of the training vehicle on the set lesson plan.
Your level of instruction will be given by your instructor to a level to suit you from full talk through then reducing your support to either prompt or independent.
Multi lane traffic lights brief
Planning approaching traffic lights
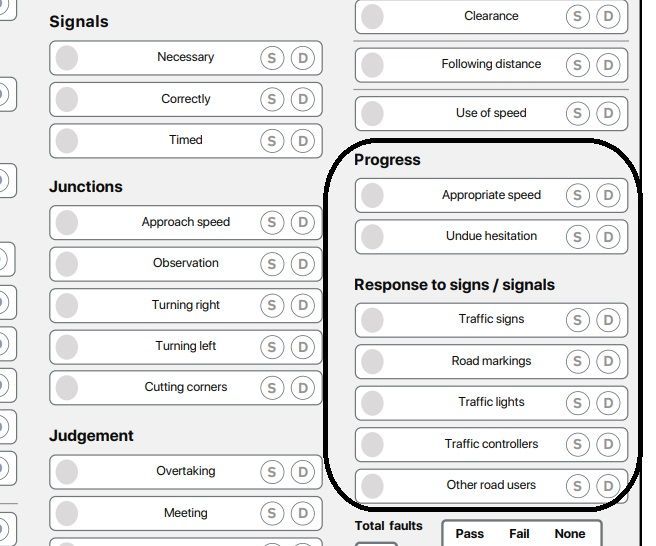
On the approach to a traffic lights your job as a student is to plan and make progress on your driving test, this includes at a set of traffic lights. Why? just image racing up to a red traffic light and it immediately changes amber to green and you are not prepared to go! That is on the DL25 marking sheet Junctions, Progress or Response to signs / signals.
You should have recognised and reacted correctly to signs and signals on the road. This included:
- road signs
- road markings
- traffic lights
- traffic controllers
- other road users
Examples of faults
Some of the most common faults for this area include:
- taking up space meant for cyclists when stopping at a red traffic light
- reacting late or not at all to a speed limit change sign
- not stopping at a compulsory stop sign
- driving in a bus lane when sign says you should not
- driving in an incorrect lane that was clearly marked
Your examiner may have explained the specific details of any faults you made.
How you can improve in this area
If you made faults in this area during your test, or if you want to improve in this area, you should:
- check The Highway Code’s sections on traffic signs, road markings and signals by authorised persons
- read ‘Know Your Traffic Signs’
- read section 6 of ‘The Official DVSA Guide to Driving: the
Essential Skills’ (2022 edition)
If you need to rebook the test, spend time practising and improving this skill with your driving instructor or supervising driver. Ask them to quiz you on the signs and signals you will come across on the road.
Forward planning
Looking, Assessing, deciding and acting (L.A.D.A) is needed at every T junction, Crossroads, roundabout and traffic light system. The difference with traffic lights systems is that the sequence of the traffic light dictates who's got priority on the junction unlike at a basic T junction or crossroads.
On the approach to each traffic light look for clues on who will be next in the traffic light sequence... Are you approaching a red traffic light? Have you assessed if the adjacent road has vehicles passing the mouth of your T junction/crossroad then the traffic flow stops... This could mean your traffic light could change to green next. Always react accordingly with your approaching speed and try to slow and flow when the traffic light sequence changes.
Road markings and signs
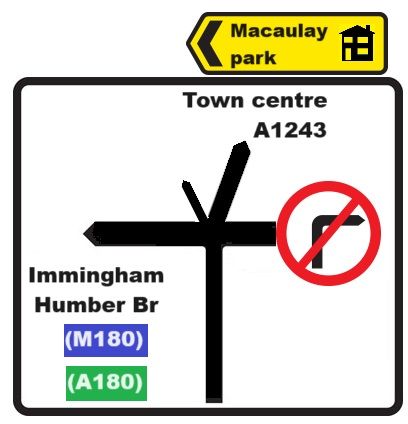
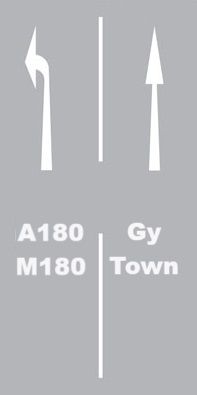
On the approach to any main junction (traffic light or roundabout) there will be an information sign giving you directional information.
A multi lane traffic light will also have white directional arrow on the road just like a multi lane roundabout, you need to look for the correct lane for your destination.
Traffic light sequence
Do you know your traffic light sequence?
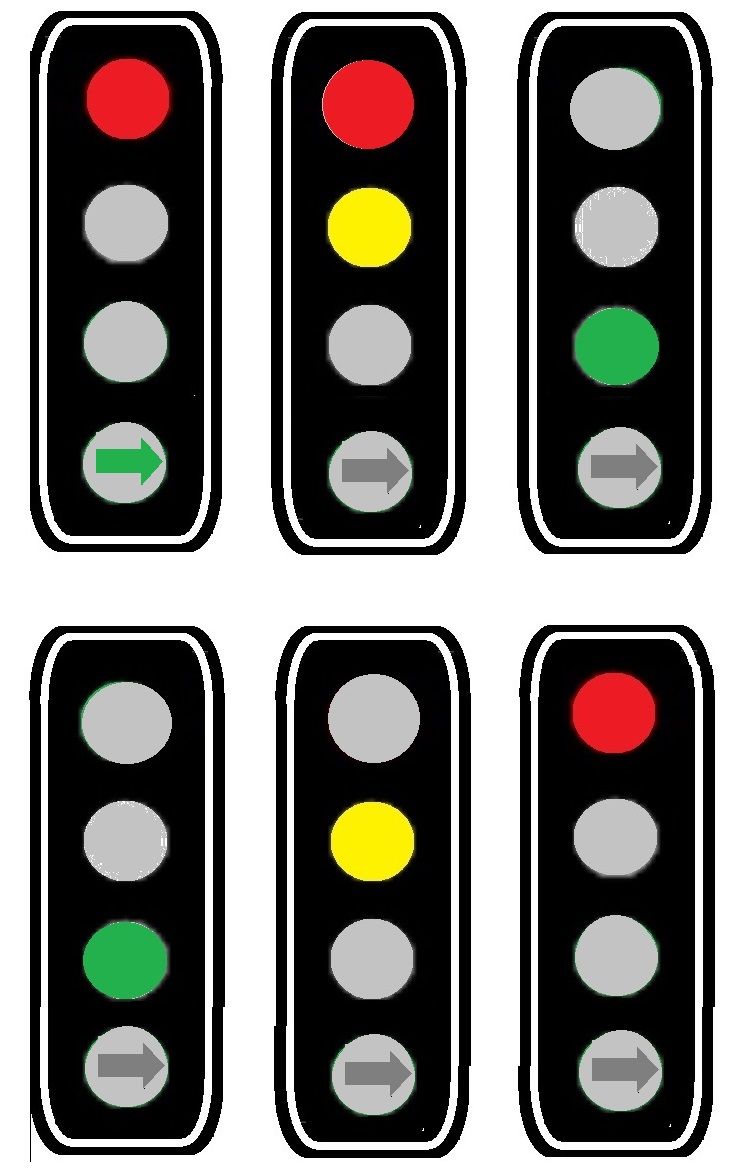
Single lane traffic light
Sequence 1
The sequence of a traffic is
- Red
- Red/amber
- Green
Then
- Green
- Amber
- Red
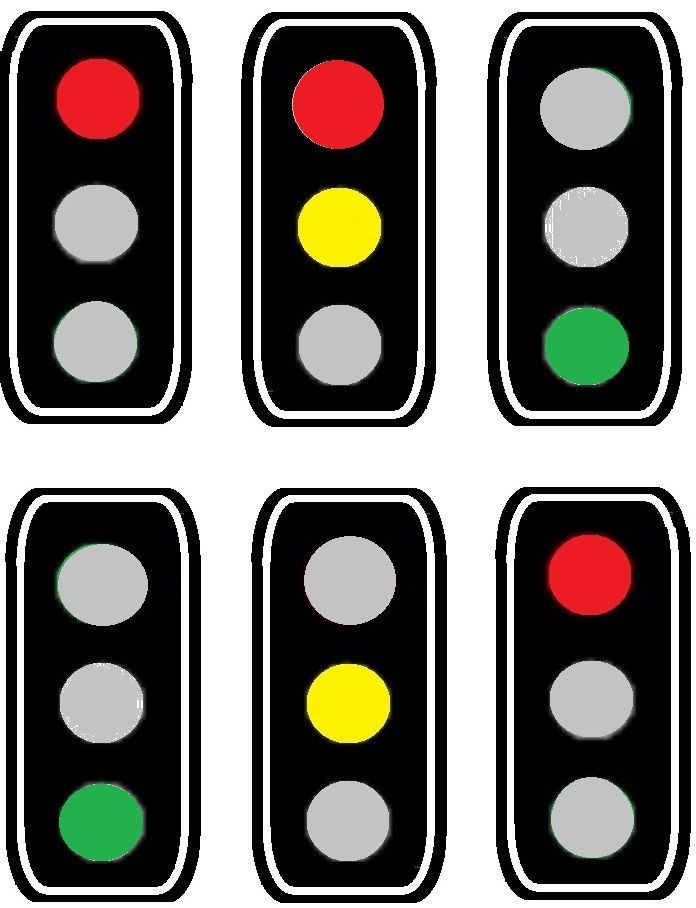
Sequence 2
Two/three lane traffic light sequence
- Sequence 2 is visually difference as the traffic light on the right hand side of the road will looks like a capital L and the green filter arrow is beside the green light
- The
green
arrow may go
green
before the main
green traffic
light or afterwards, so pay attention when you are waiting at the
red
light
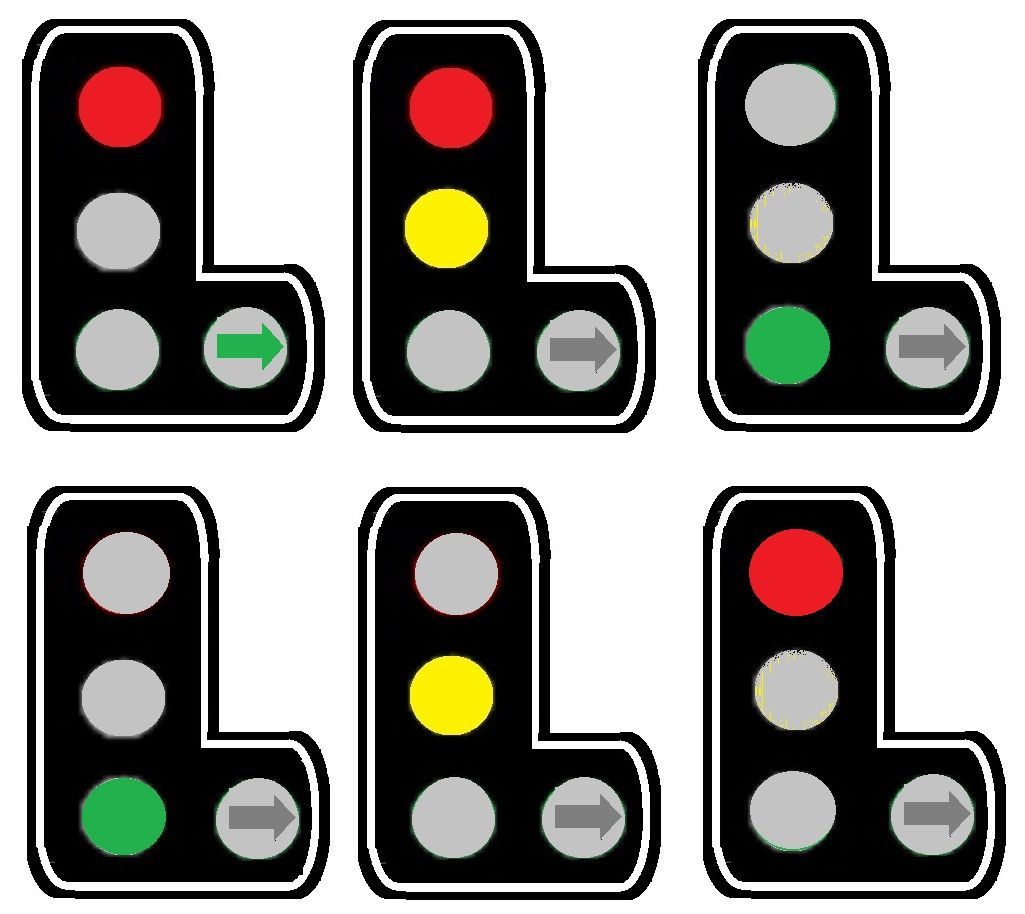
Sequence 3
- Sequence 3 is visually different again and the green filter arrow is below the green light
- Again the green arrow may go green before the main green traffic light or afterwards, so pay attention when you are waiting at the red light
- The reason for the
green
filter is to reduce the congestion and allows the vehicle turning right to make progress before or after the main
green
light
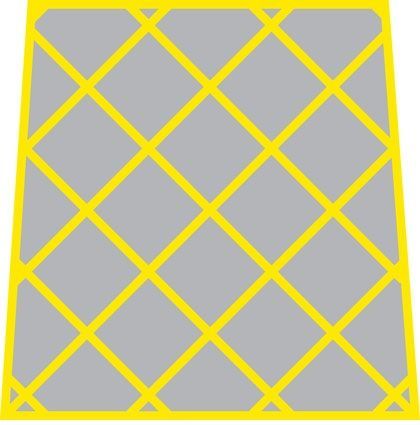
Yellow boxed junction
If the Traffic light junction has a yellow box junction on the road do not enter the painted area unless your exit road is clear.
Highway code rule 174
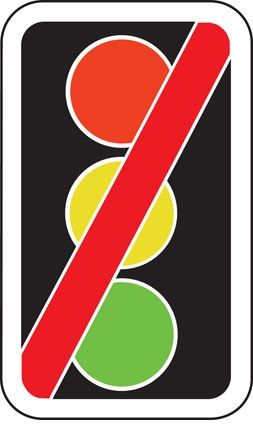
The lights broken down
If you see this sign when approaching traffic lights or if the traffic lights have stopped working, nobody has priority at the junction. Slow down and treat it as an unmarked Crossroads (No one has priority) and give-way to your right.
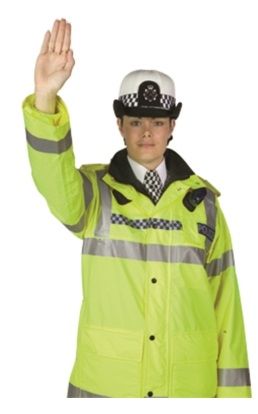
When they do break down you could be given hand signals by a police officer, do you know the commands?
Green light is activated
When the green filter arrow goes off and the main green light comes on you can still go forward and wait for a potential gap. As reference only go roughly a ¼ into the road junction (the aim is to stop and wait so you can see the centre of the road ahead (for example using a manhole cover)
Why?........(By look at the below diagrams) when you go to far forward you will block the other side of road also wishing to turn right on the opposite side of the road.
Point of turn
Achieving the correct P.O.T is very important for safety and ether side to make progress when turning right. Having a visual reference point ((1) for example a man hole cover that is in the centre of the junction) ((2) position your drivers wing mirror no further than the centre dividing white line in the adjacent road.
Your safety
objective is to keep on your half of the road when you are turning right or waiting to turn right.
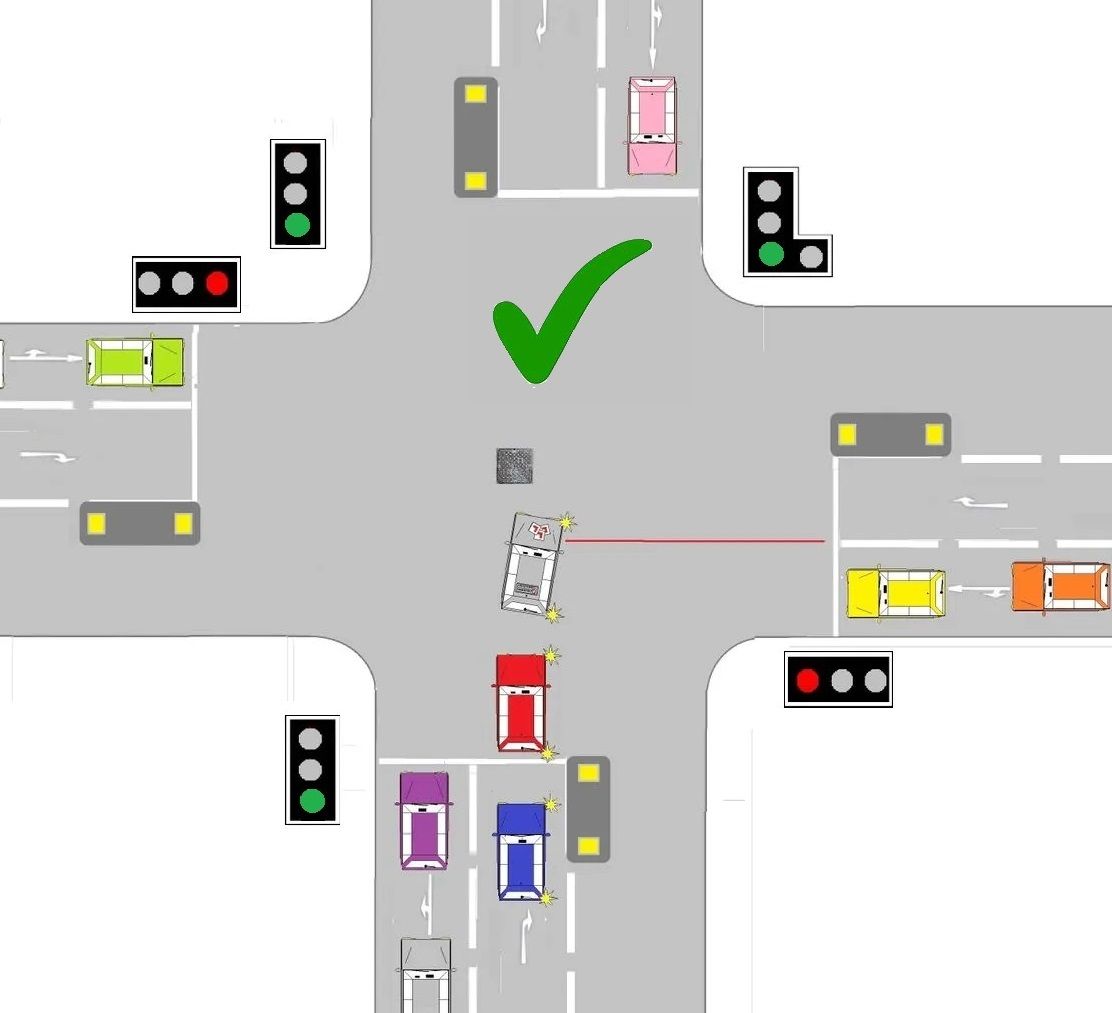
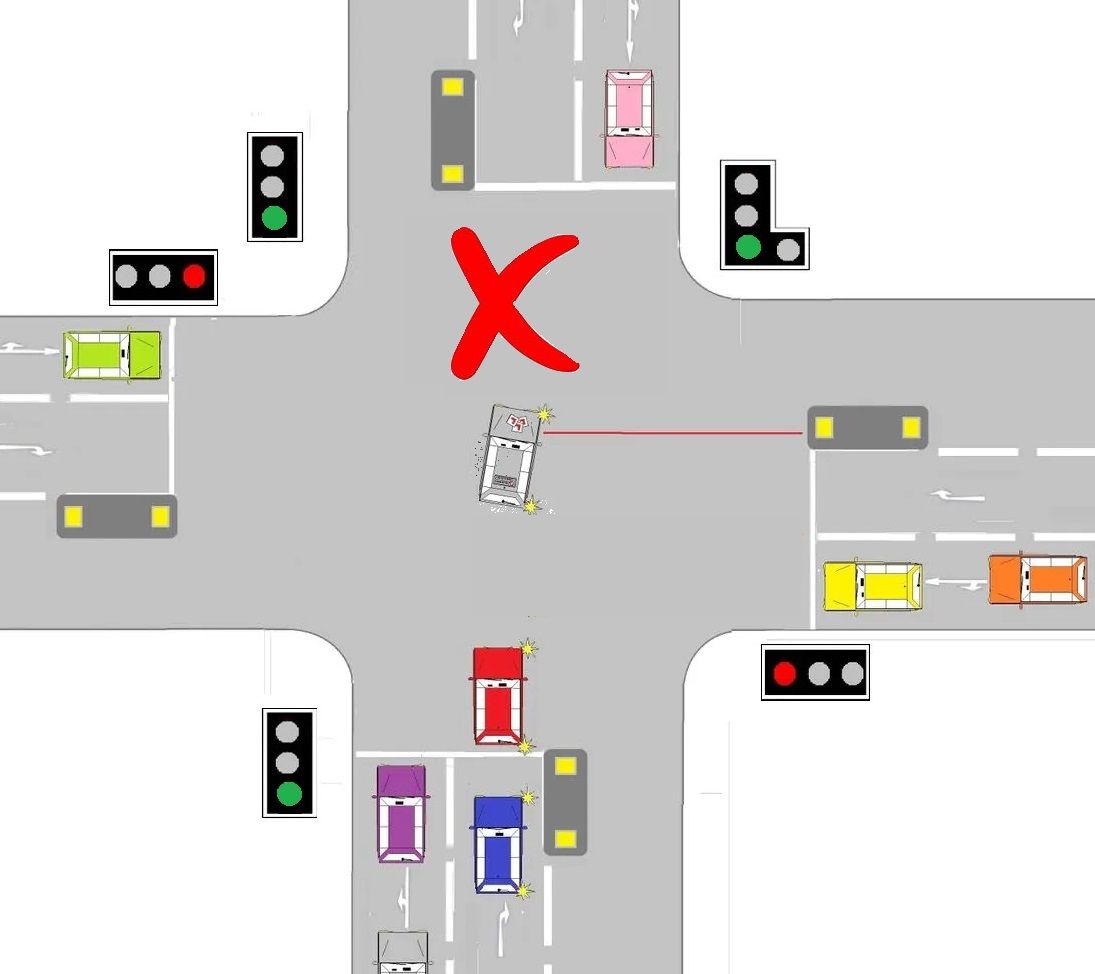
How many vehicle can wait in the middle of the road?
When the
green filter light come off and the main
green light comes on and it is not safe to go due to on coming traffic for safety only 2 vehicles can progress, stop and wait in the junction area, the first vehicle will go to the P.O.T and the second vehicle will follow, but hold back to keep
tyres and tarmac.
The reason for only 2 vehicles is that when the traffic lights go to red these 2 vehicles can cross safely before the opposite road gets a green traffic light. The 3rd vehicle does not have enough time to turn right and will potentially slow the road down on their right an left.
- NEVER wave people in front of you as this could be dangerous if another vehicle is approaching from the opposite direction and not seen the crossing
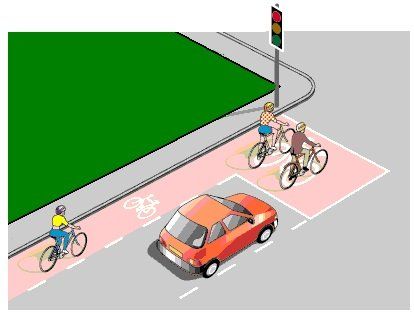
Pedestrian crossing
A pedestrian crossing can also be incorporated into traffic lights (explained below).
The pedestrian crossing's are operated by a push button and activated by a pedestrian wanting to cross the road. The crossing area is clearly marked by two rows of white studs. When the crossing is activated it stops all four side of traffic with
red
light. This is not very user friendly due to the traffic junction will go
red
on all four sides. Their is another type pedestrian with centre islands (information below).
Pedestrian crossings on a traffic light junction with in island
Information for pedestrians
In the next diagram you can see on one side there is an island and the other side has no island in the centre of the road. With the side with no island its the same information applies, however the island that breaks the two directions of the road mainly work with the red and green traffic lights.
This means when the traffic lights are on red, the green person emblem will be showing on the push button box and when the green traffic light is on the red person emblem will be showing on the push button box.
However if you do press the button always wait for the
green person emblem to active and walk to the centre island and repeat the procedure (press the button on the pedestrian crossing box, wait for the green person emblem then once you have assessed it is safe to walk across proceed but keep looing for any danger.
Pedestrian crossing topic is the next brief

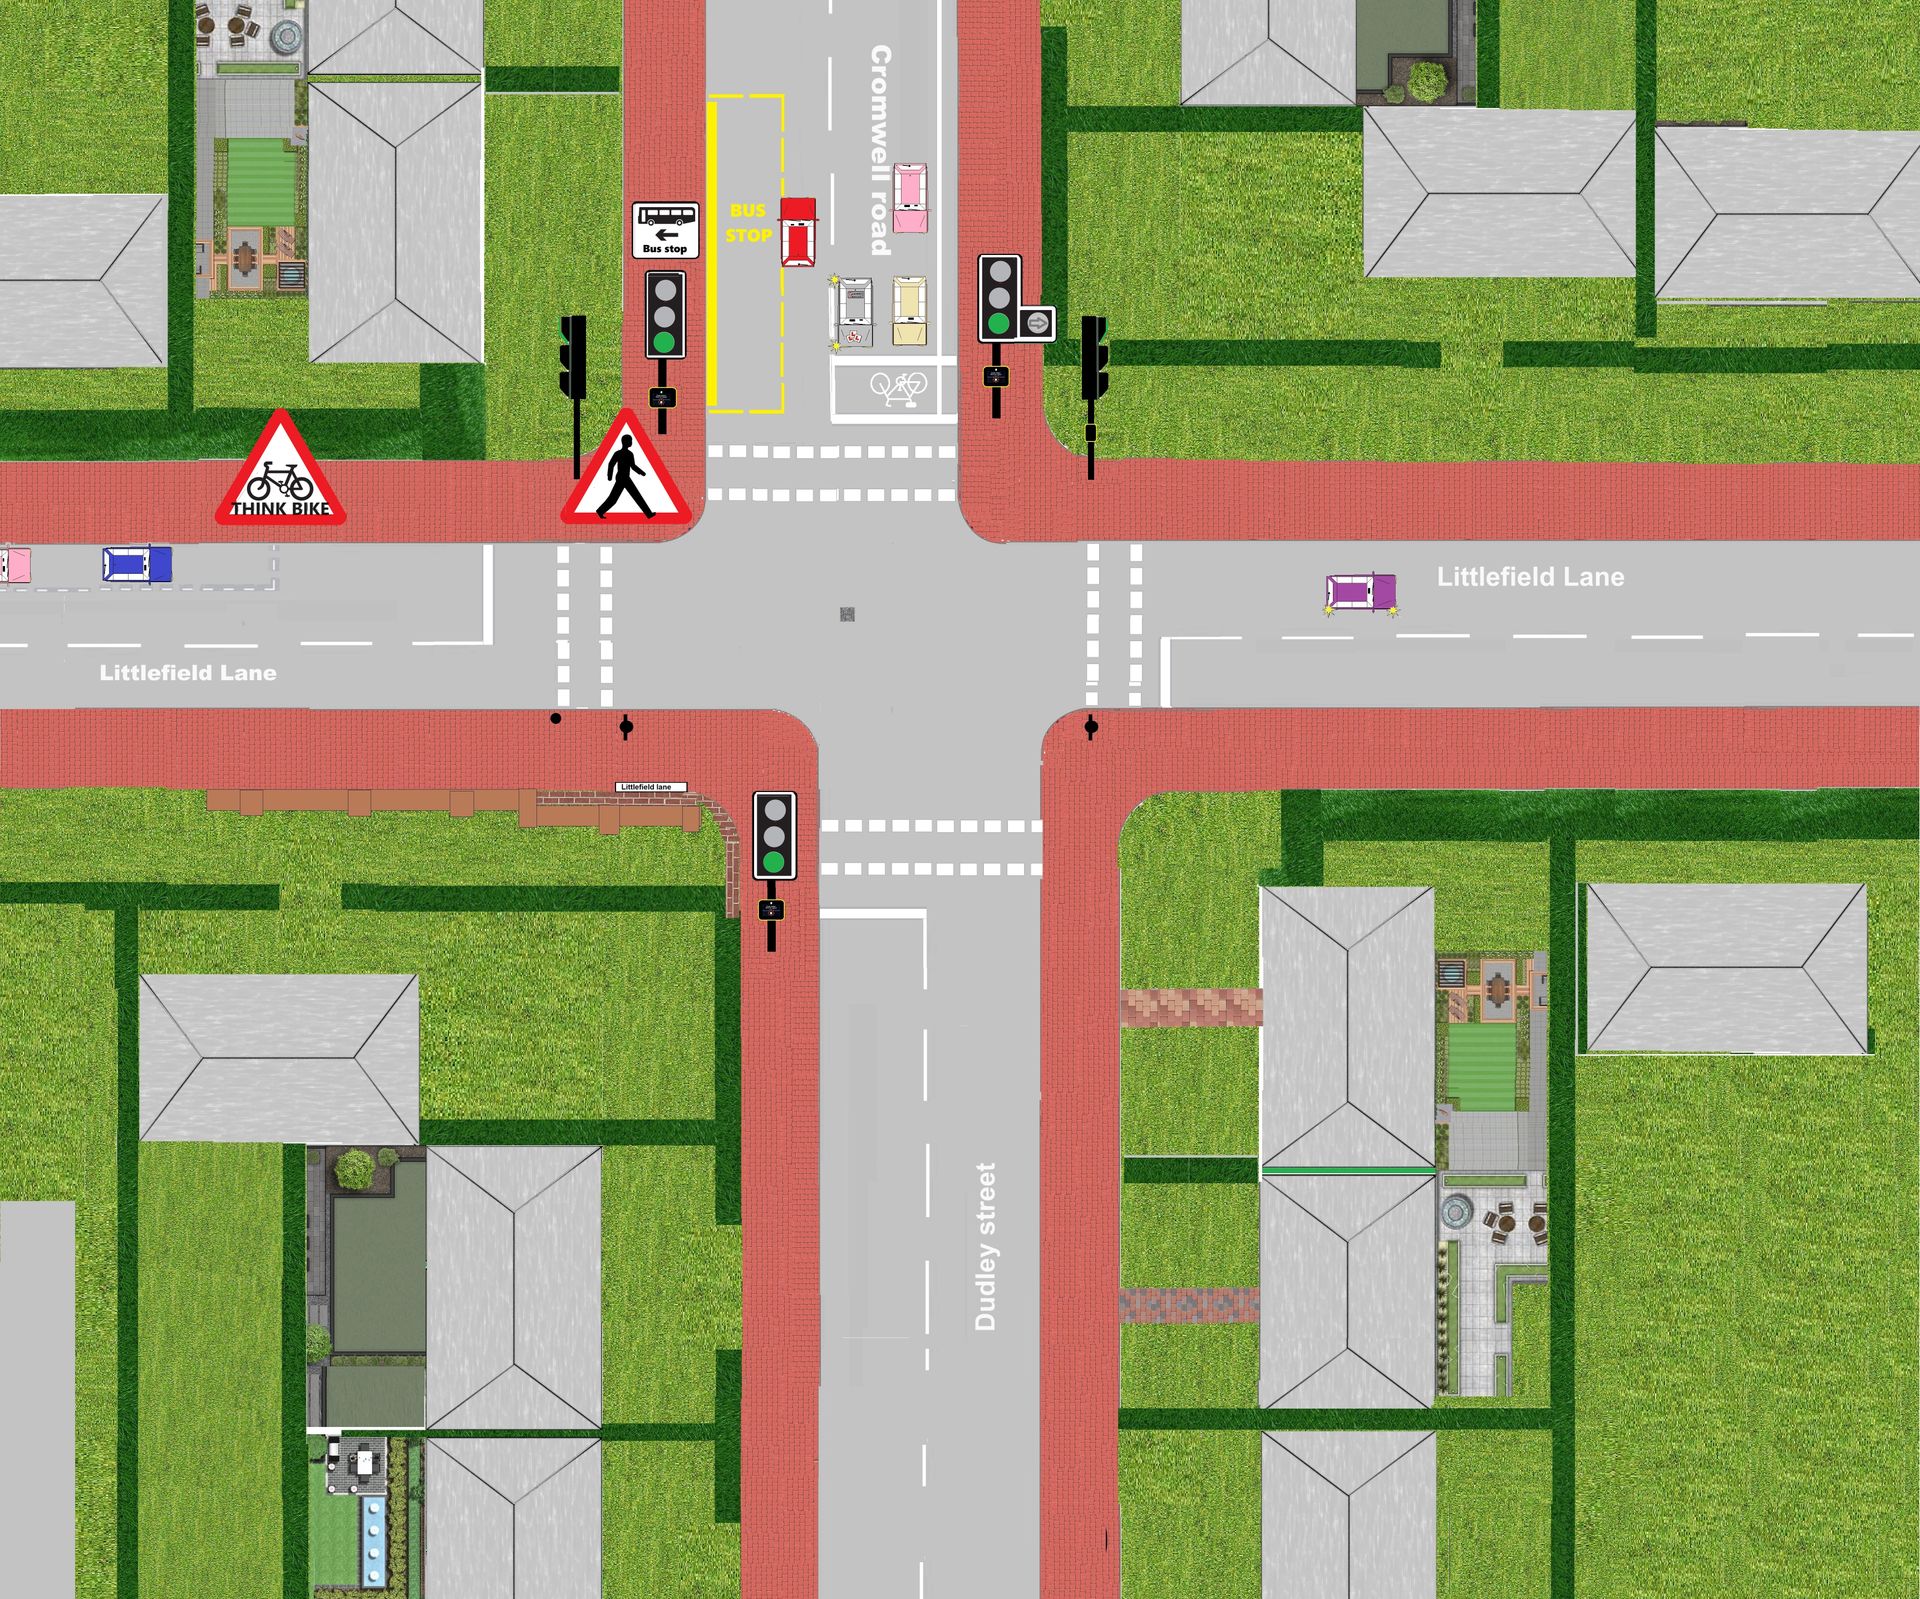
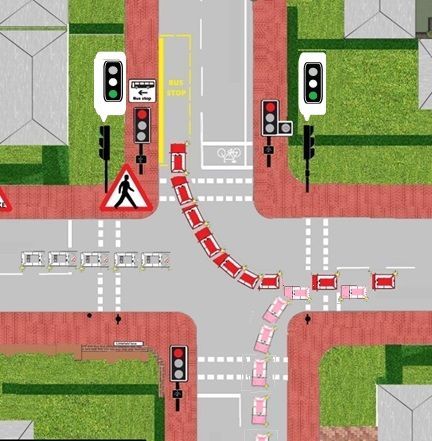
Staggered junction
Staggered junctions are a bit of a nightmare with adopting the correct position then turning right. At certain traffic lights congestion is a big problem so in the below diagrams I'm going to break it down into 4 section.

Diagram 1 Dudley street to Cromwell road
The green filter has come on for the Dudley street side so vehicle on that side can proceed (if safe). They can turn right, left and ahead as the green light and the green arrow are showing.
Diagram 2
When the main green light has now activated this means Dudley street and Cromwell road can now proceed.
Ahead and left on ether side has priority and the vehicles wanting to turn right. Vehicles will have to wait for a safe gap to proceed. As you can see in diagram 2 the learner vehicle has a good point of turn (any further back or forward would block the progress of any on coming traffic from Dudley street.
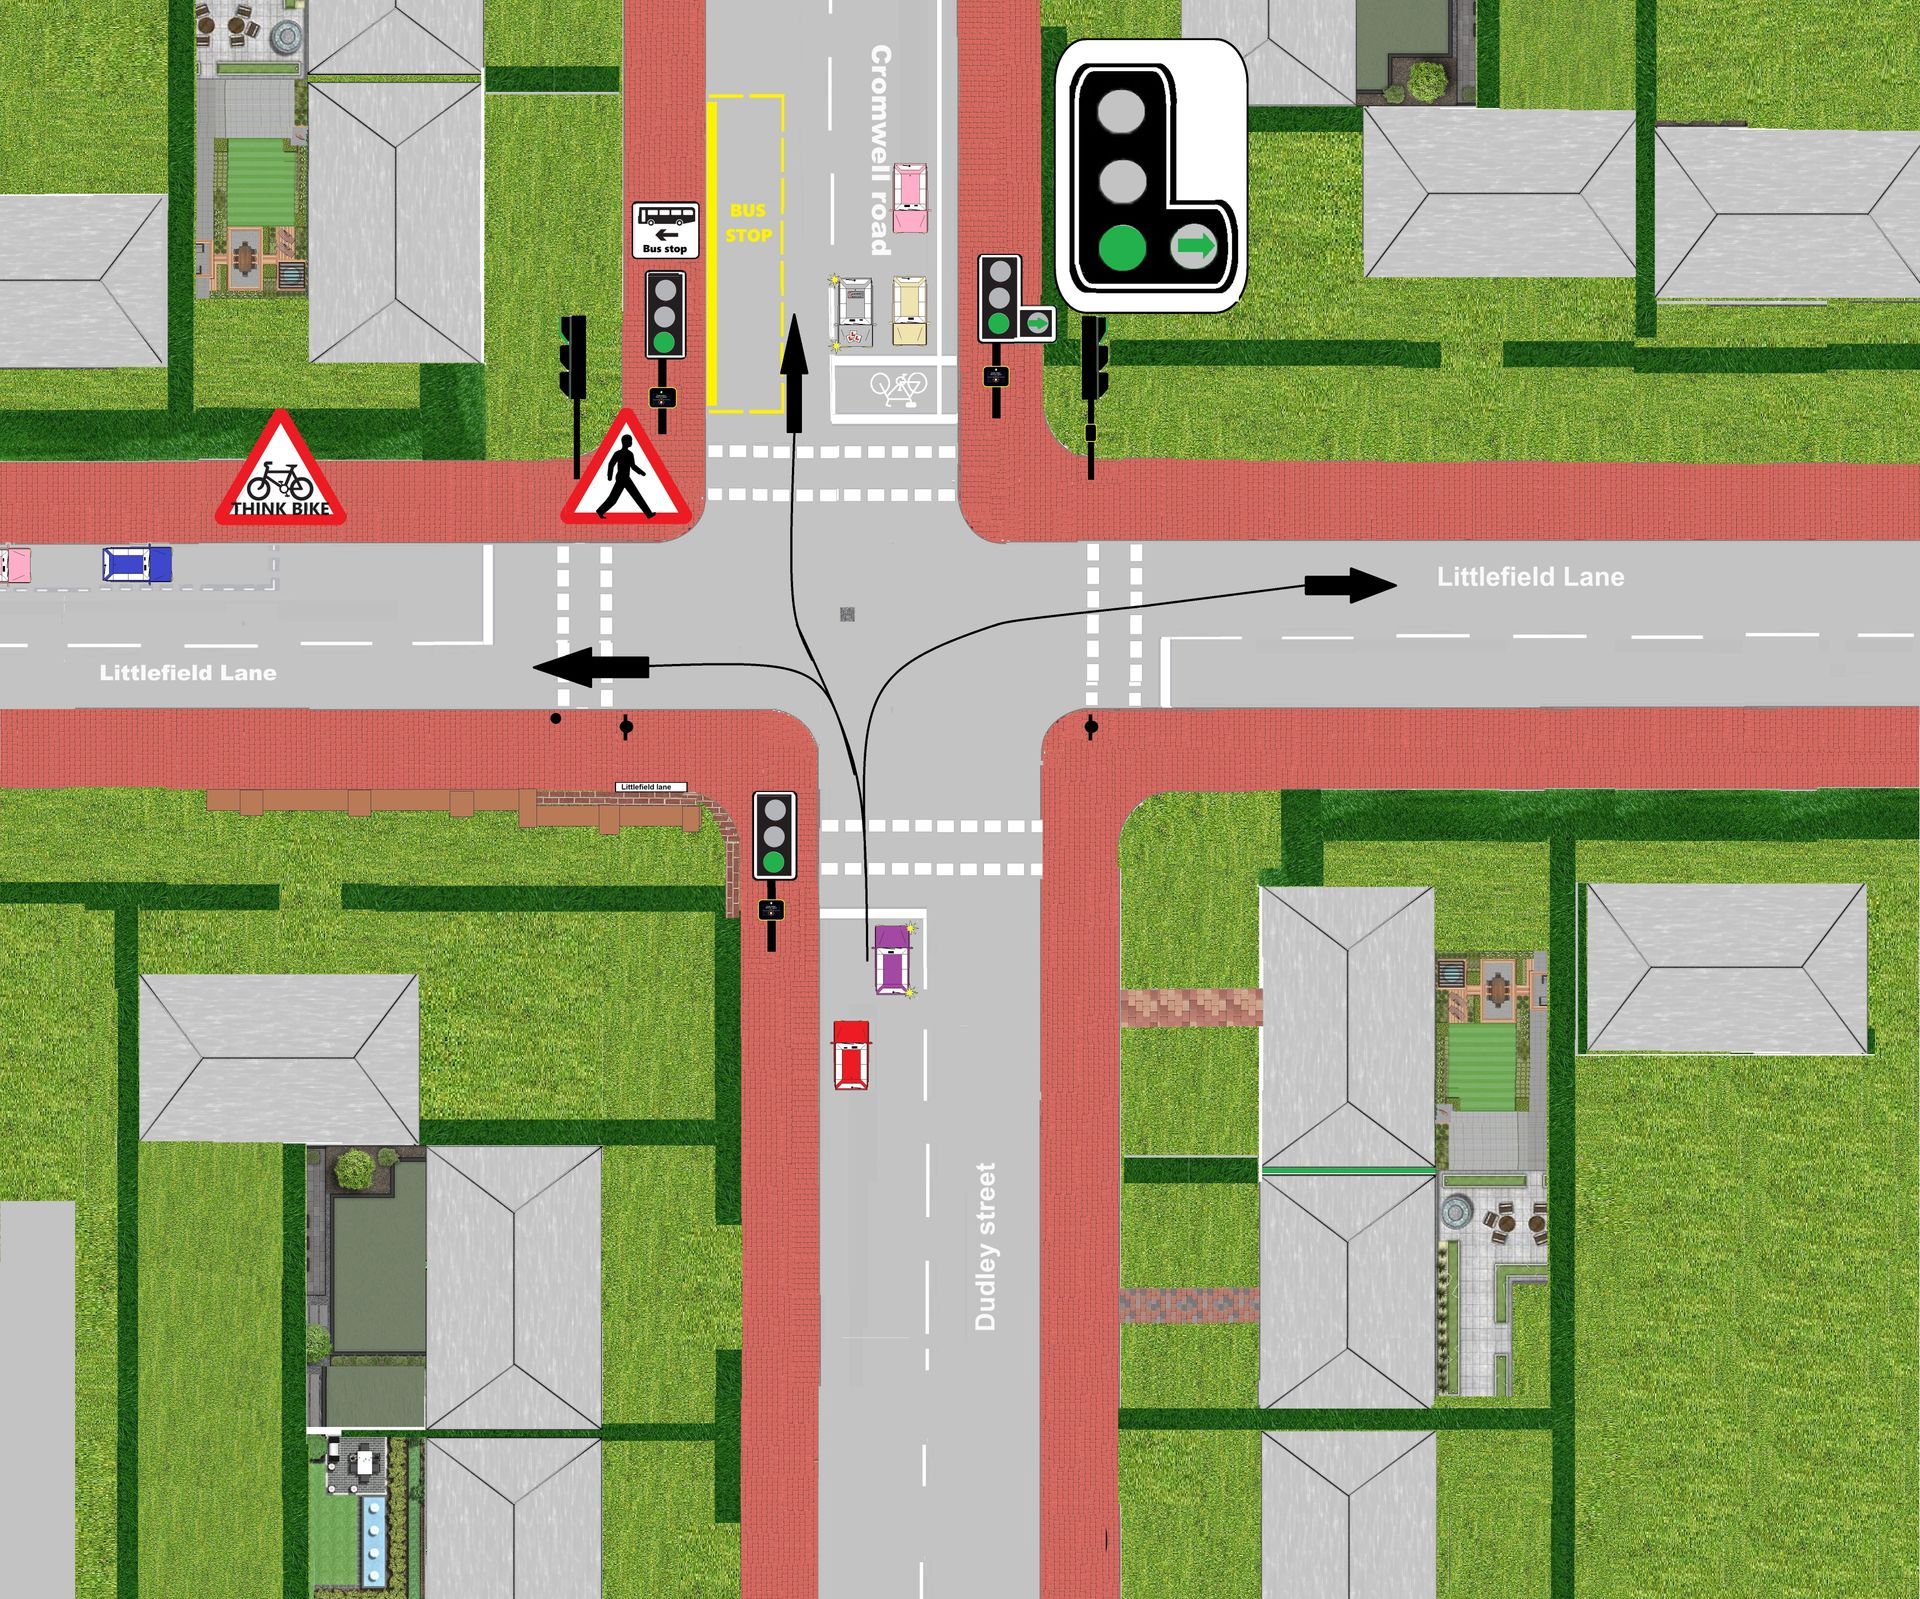
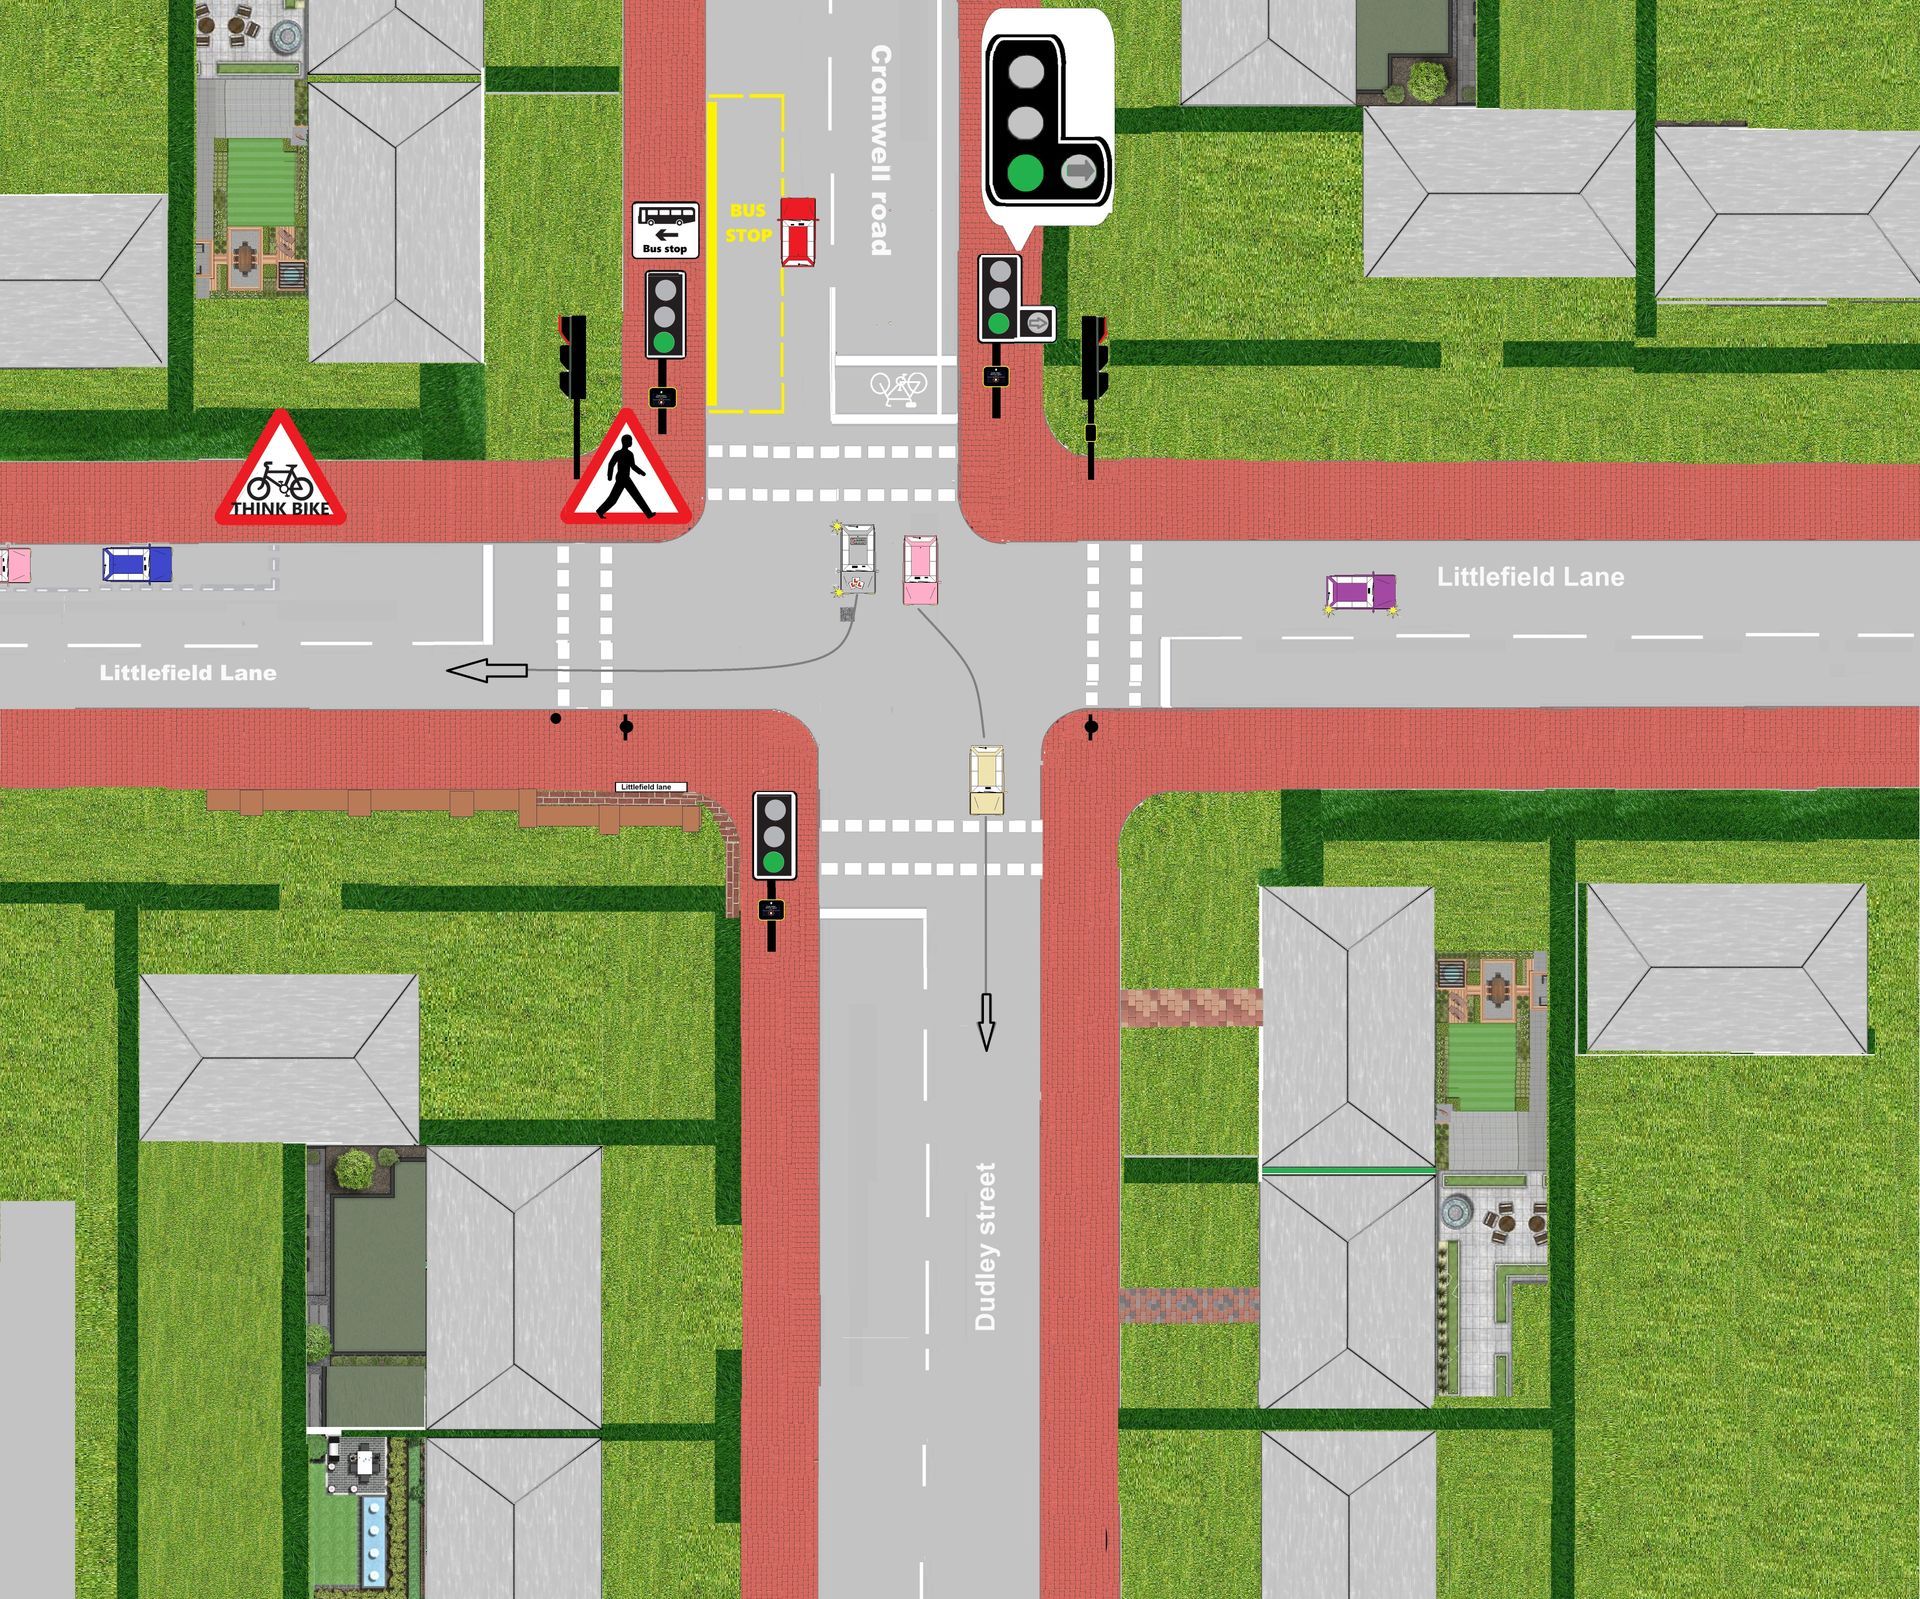
Diagram 3 Littlefield lane to ether Cromwell road or Dudley street
Once the transition of the traffic light goes green on Littlefield lane, the biggest problem is when vehicles intend to turn right on ether side. The issue some drivers want to do nearside to nearside and the other drivers want to do offside to offside (nether is wrong but having the correct strategy for progress is necessary). If their are only two vehicles turning right (one ether side of the junction) that easy Nearside or offside can be used.
But if more than two vehicles on both side want to Go ahead, left and right you need a 3rd option of one side holding back to allow the vehicles to turn.


Strategy on the approach
Look well ahead
Some drivers do not read the road and just slow down and stop at the line on a green traffic light when it isn’t necessary. Consequently vehicles behind may end up running into the back of them as they wouldn’t expect them to stop if the way was clear.
Therefore don’t make this mistake and do not assume that the vehicle in front will proceed even if the way is clear.
Y junctions on traffic lights
There are a lot of errors when it comes to Y junctions on traffic lights as some have traffic lights and filter arrows on them and some just have a give-way line.
Below in the first diagram you can see an advanced stop line a traffic light on the left hand side kerb and a give-way line at the mouth if the junction. On a green light or green filter arrow is displayed ensure its safe and turn left and plan to go. If the red traffic light is on stop at the stop line.
In the second diagram their is no advanced stop line, no traffic light and just a give-way line at the mouth of the junction. The ahead traffic light does not effect you so if it is safe on your right (and left) you can proceed and make progress.
Diagram three Shows a traffic light on the left and a stop line on the mouth of the junction. You have to wait for the green traffic light to activate to proceed.
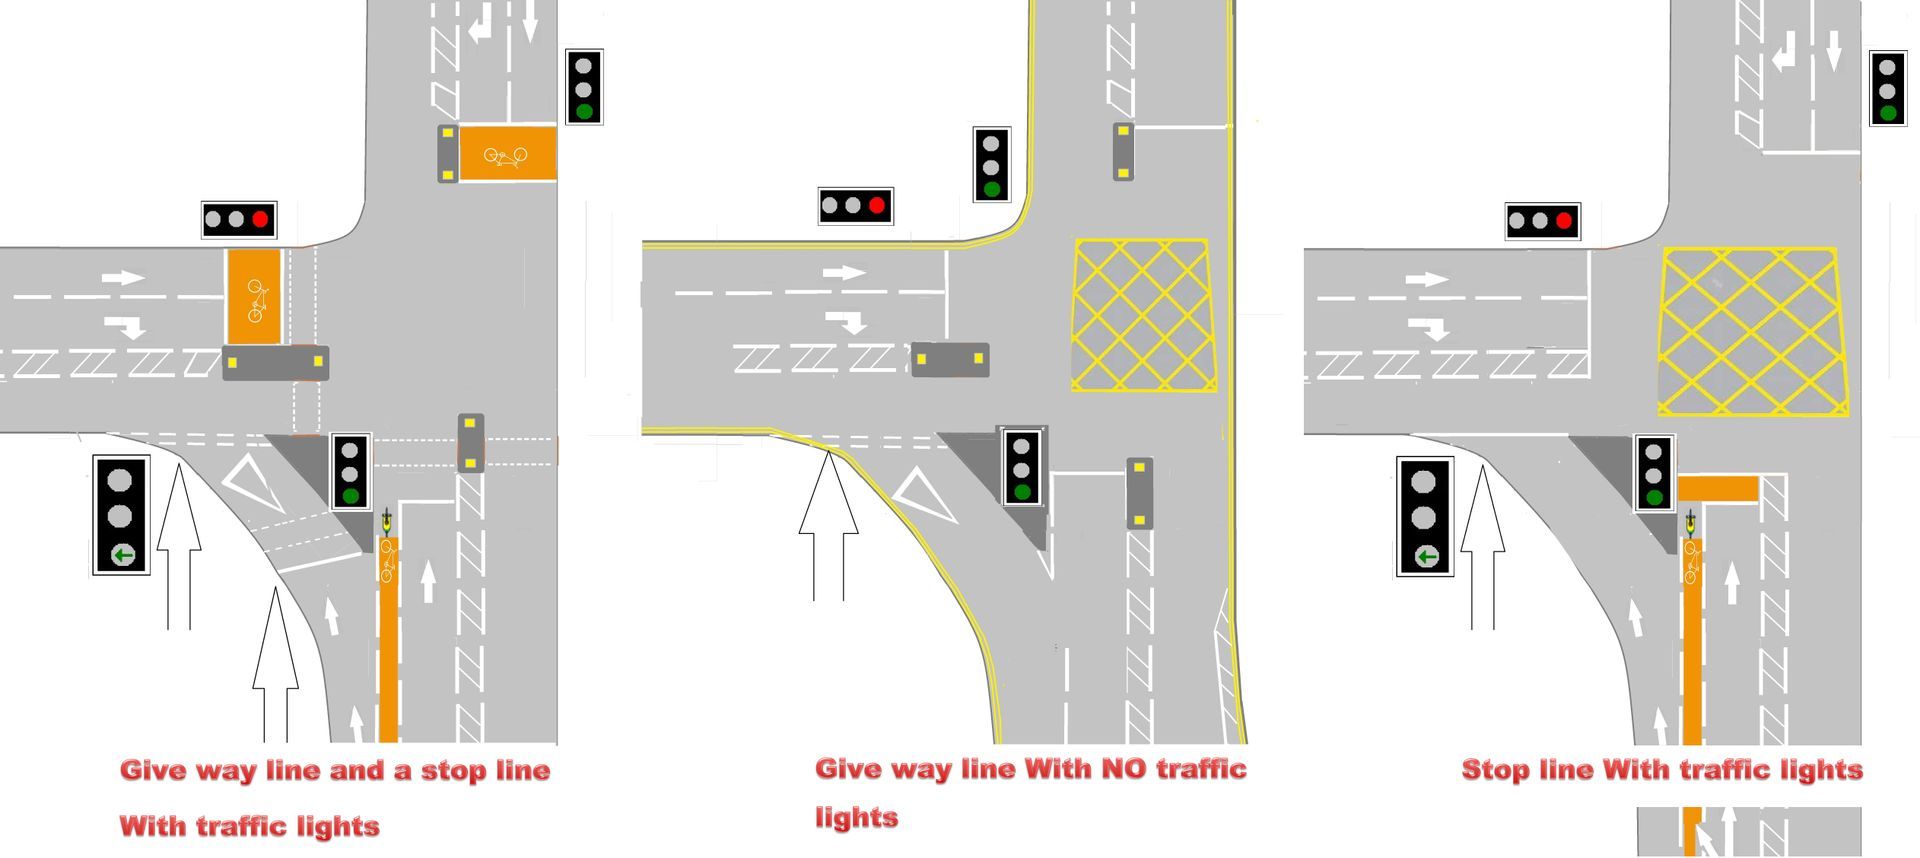
More pictures are in the visual teaching presenter
Teaching & Learning Strategies
Like mentioned earlier every student is induvial and each and everyone of you will progress at different rates so driving will adapt their lesson plan to help you achieve your driving goals.
- Your driving instructor will adapt their teaching style to suite your ability and ability
- Your driving instructor will continue to encourage you on your lesson and analyse any problems made and allow you to take responsibility for your own learning goals by giving you technical information to improve your techniques. Your technical feed back from your instructor will be ether given on the move or if feel needed by pulling you up on the side of the road somewhere safe, legal and convenient.
Rote learning (WikipediA)
Rote learning is a memorization technique based on repetition. The method rests on the premise that the recall of repeated material becomes faster the more one repeats it. Some of the alternatives to rote learning include meaningful learning, associative learning, spaced repetition and active learning.
At the end of your lesson
At the end of your lesson you will have a debrief with your instructor giving you the opportunity to reflect on your performance on your lesson then you can set up new goals for your next driving lesson.
This will also give you the opportunity to research any new topics that will be brought into on your next agreed lesson. So remember your instructor is there to HELP you, so on your driving lesson if you have any uncertainties or need anything rewording or recapping to make things any clearer, just ask.

