- L.A.D.A & M.S.P.S.G routines on junctions and crossroads you approach
- Nearside to near side and offside to off side then crossing
- Two second gap. hold back position
- Meeting , overtaking, adequate clearance when overtaking stationary & slow moving vehicles
- Awareness and planning
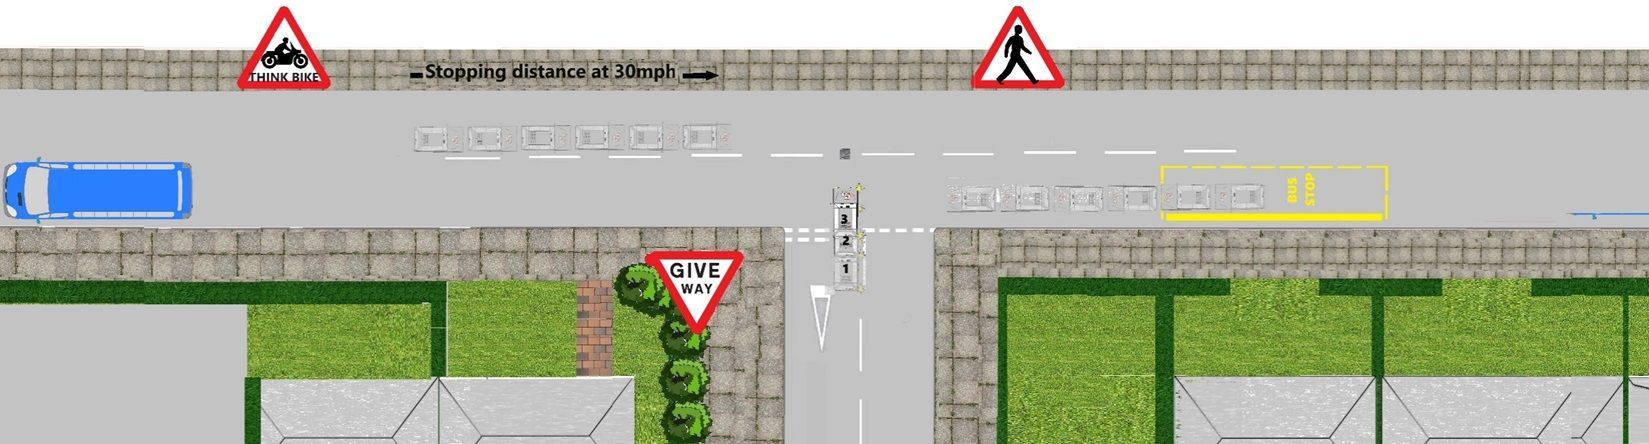
- Traffic calming measures
- Hill/angle starts
- Full talk through
- Prompt
- Independent
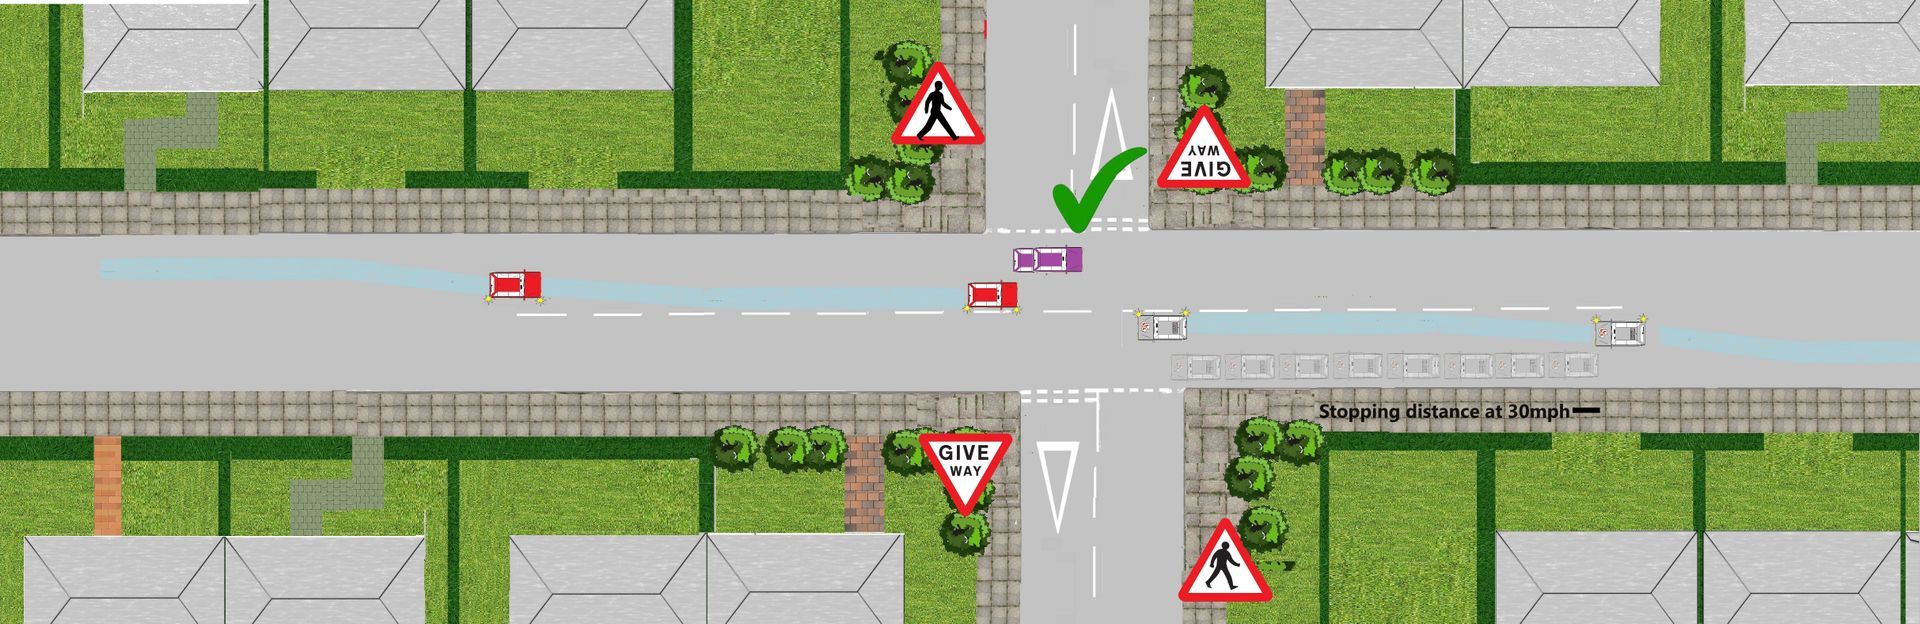
Main road information
Main road travelling ahead
When driving on a main road you have priority over oncoming vehicle wanting to turn right across your path and the side also gives way for you too.
Lets have a recap:-
So let’s break it down using the L.A.D.A and HAZARD routine's on the approach to gain information with what’s coming towards you and a potential danger too you.
- L.A.D.A to see where the side road's are and assess oncoming vehicle's
- Mirrors to see what is behind
Large vehicles (bus or articulated lorry)
HGV's may need to emerge more out of a side road and need extra road space to turn or to deal with a hazard that you are not able to see. Be extra observant when approaching junction for HGV or even a vehicle not looking the way they are entering and only looking to the right.
Vehicles emerging
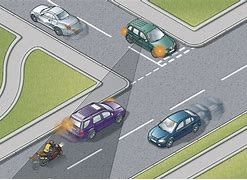
When you are travelling on a main road and for example: You may need to overtaking a parked (red) vehicle less than 10M to a junction, you will need to anticipate vehicles emerging (pink) vehicles that have not looked-asses-decide-act to their left of the main road they intend to enter and have only look to their right for a safe gap.
Overtaking a bicycle
Do not overtake a bicycle just before you turn left, if you are unsure if you have enough time to overtake safely? "DON'T" just hold back and reflect on the situation and have a discussion with your instructor after the situation has been delt with safely.
Question's would be....Was it safe to overtake? Did you have enough time to overtake? Would you of slowed the cyclist down? Was it a safe to continue?
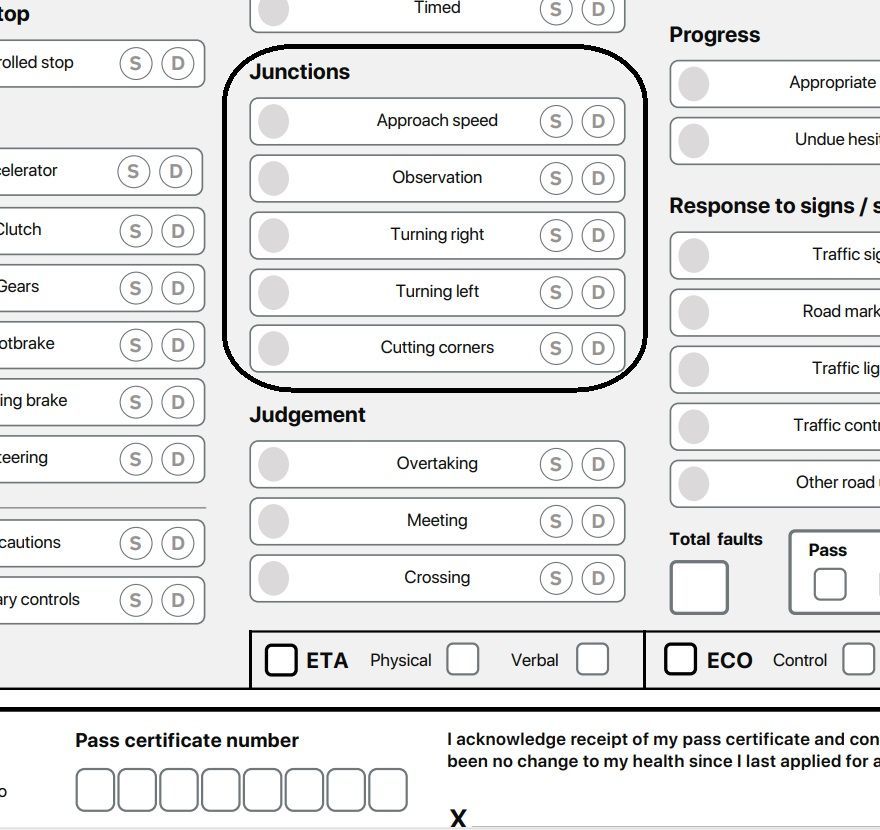
You were marked on:
- approach speed - your ability to approach junctions at an appropriate speed
- observation - your effective observation and judgement of your surroundings
- turning right - your position when turning right
- turning left - your position when turning left
- cutting corners - your ability to avoid cutting corners when turning
You needed to show you can drive through junctions safely. You should have observed your surroundings, made your intentions clear, followed road signs and signals, and properly controlled the car.
Examples of fault
Some of the most common faults for this area include:
- incorrectly judging the speed of an oncoming vehicle, forcing it to slow down when emerging from a junction
- not checking for other road users when emerging from a slip road, onto a dual carriageway
- being positioned too far to the left when turning right onto a minor road, holding up vehicles behind you
- approaching a junction too fast, making it difficult to make observations
Your examiner may have explained the specific details of any faults you made.
Show you can improve in this are
If you made faults in this area during your test, or if you want to improve in this area, you should:
check rules 170 to 190 of The Highway Cod
read section 8 of ‘The Official DVSA Guide to Driving: the Essential Skills’ (2022 edition)
If you need to rebook the test, spend time practising and improving this skill with your driving instructor or supervising driver. You could work on:
- using the mirrors - signal - manoeuvre (MSM) routine
- using the position - speed - look (PSL) routine to improve your manoeuvres
- approaching and emerging at a variety of different junctions
Main road turning left
When turning left (in the below diagram) from the main road into a side road you have priority over oncoming vehicle wanting to turn right (red vehicle) into the road you are intending to turn left into the side road. The side roads also gives way to you too, however the (below Picture) complications could happen so always be prepared to react in a safe manor.
Main road turn left into a side road recap
So let’s break it down using the L.A.D.A and HAZARD routine's on the approach to gain information with what’s coming towards you.
- L.A.D.A to see where the turning is and assess oncoming vehicle's
- Mirrors to see what is behind
- Mirrors to the left
- Signal left
- Position so you’re close to the left
Staring the slowing down routine (on a 30MPH road)
When planning to turn left into a side road you would check you mirrors and come off the gas pedal about 16 car lengths from the junction (this action will reduce your vehicles speed to about 20/22MPH when you get to 8 car lengths from the junction you are turning into you start your hazard routine.
Once you are at "the point of turn" and if it is safe to enter turn into the road
- L.A.D.A to see if it’s safe to continue?
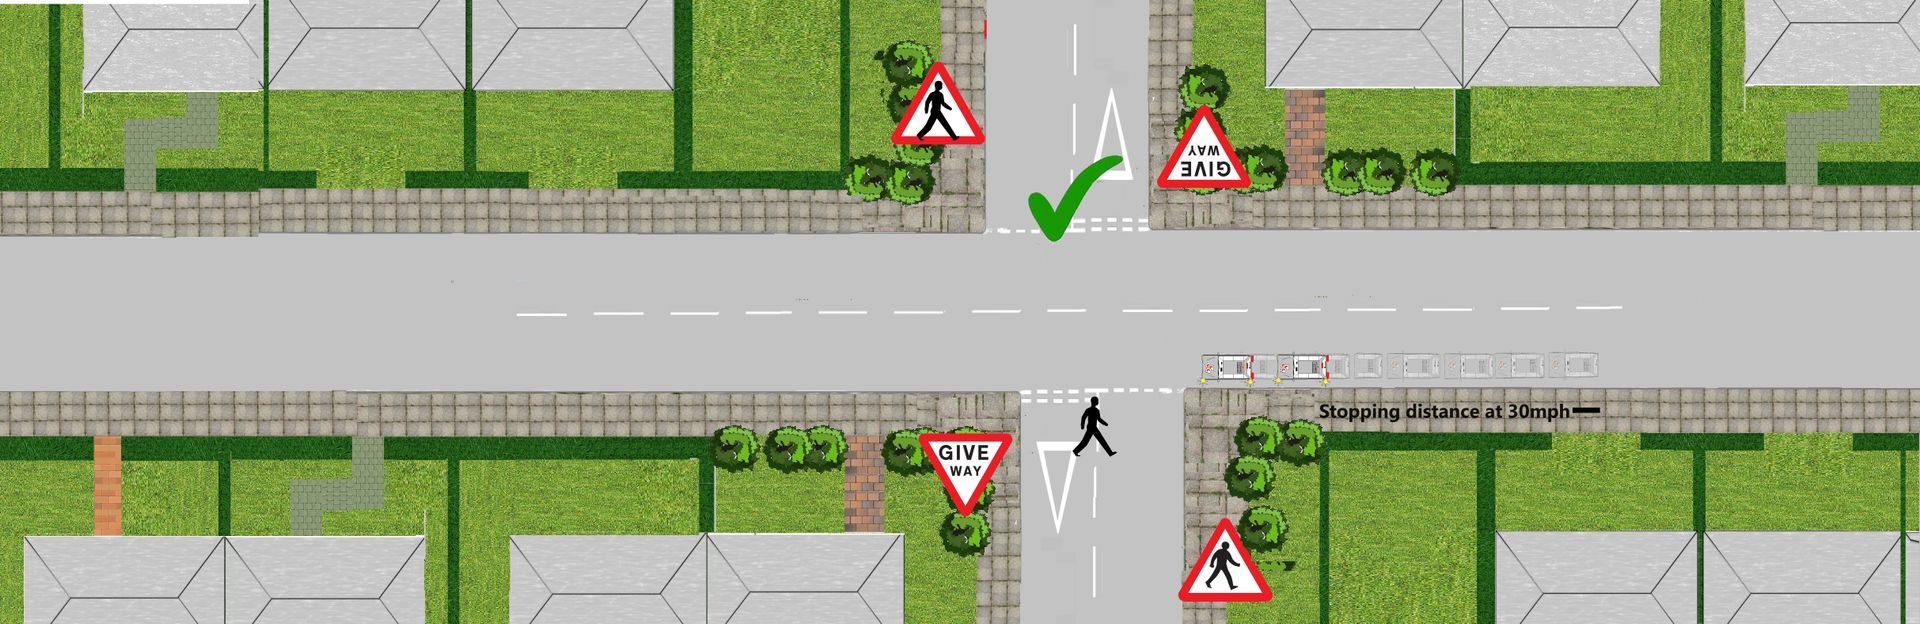
Look for pedestrian's crossing the road you are entering (2022 new rule) AS THEY HAVE PRIORITY OVER YOU (highway code rule 170).
- Speed reduced to a walking pace 10/12mph or stop if that’s the safest thing to do.
- Gear on the approach.
- L.A.D.A into the road you are intending to entre, looking for pedestrians or parked vehicles
- Enter the side road when safe.

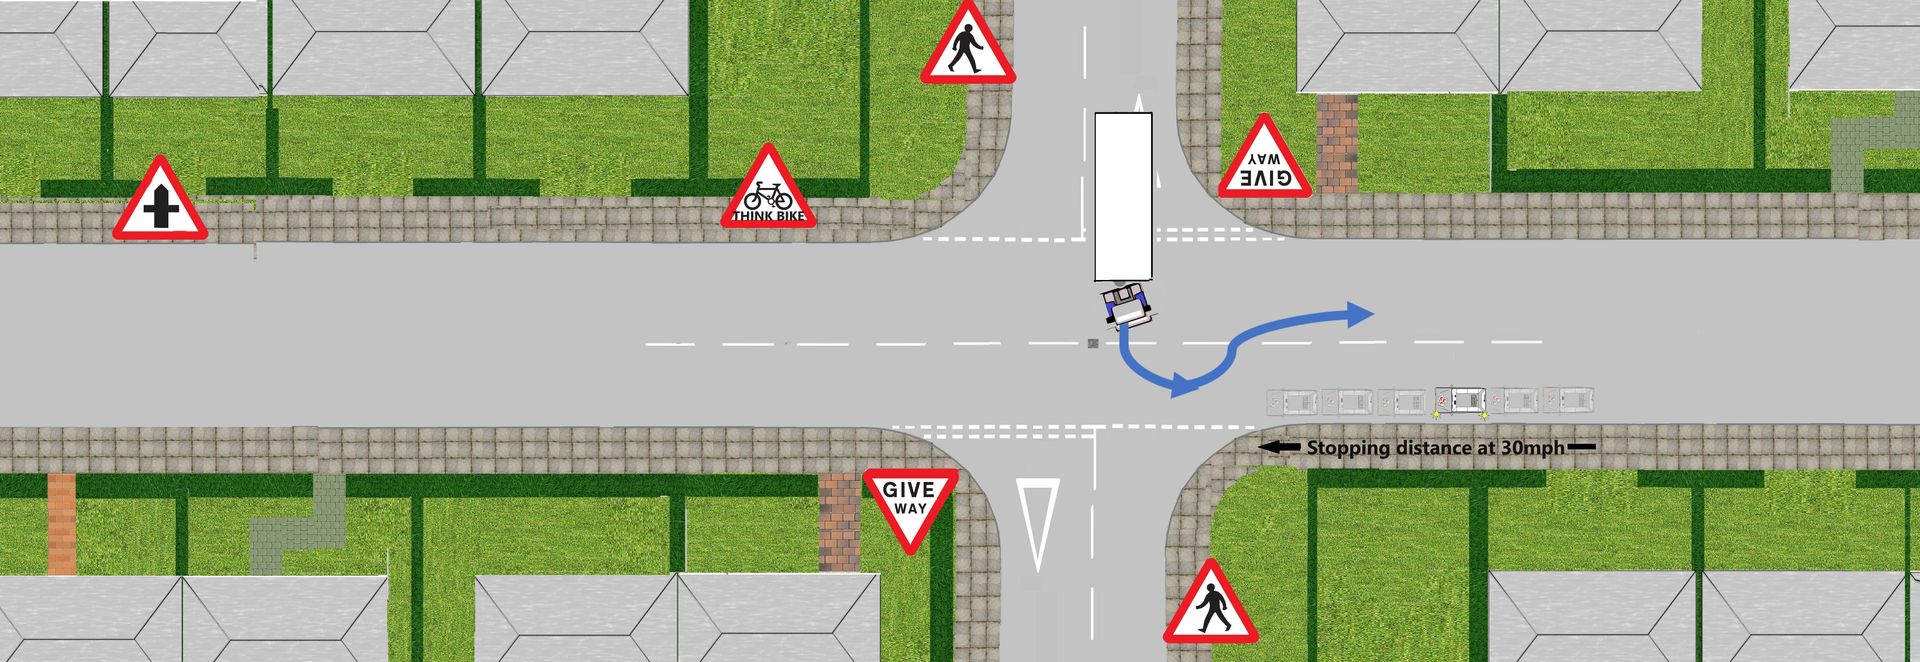
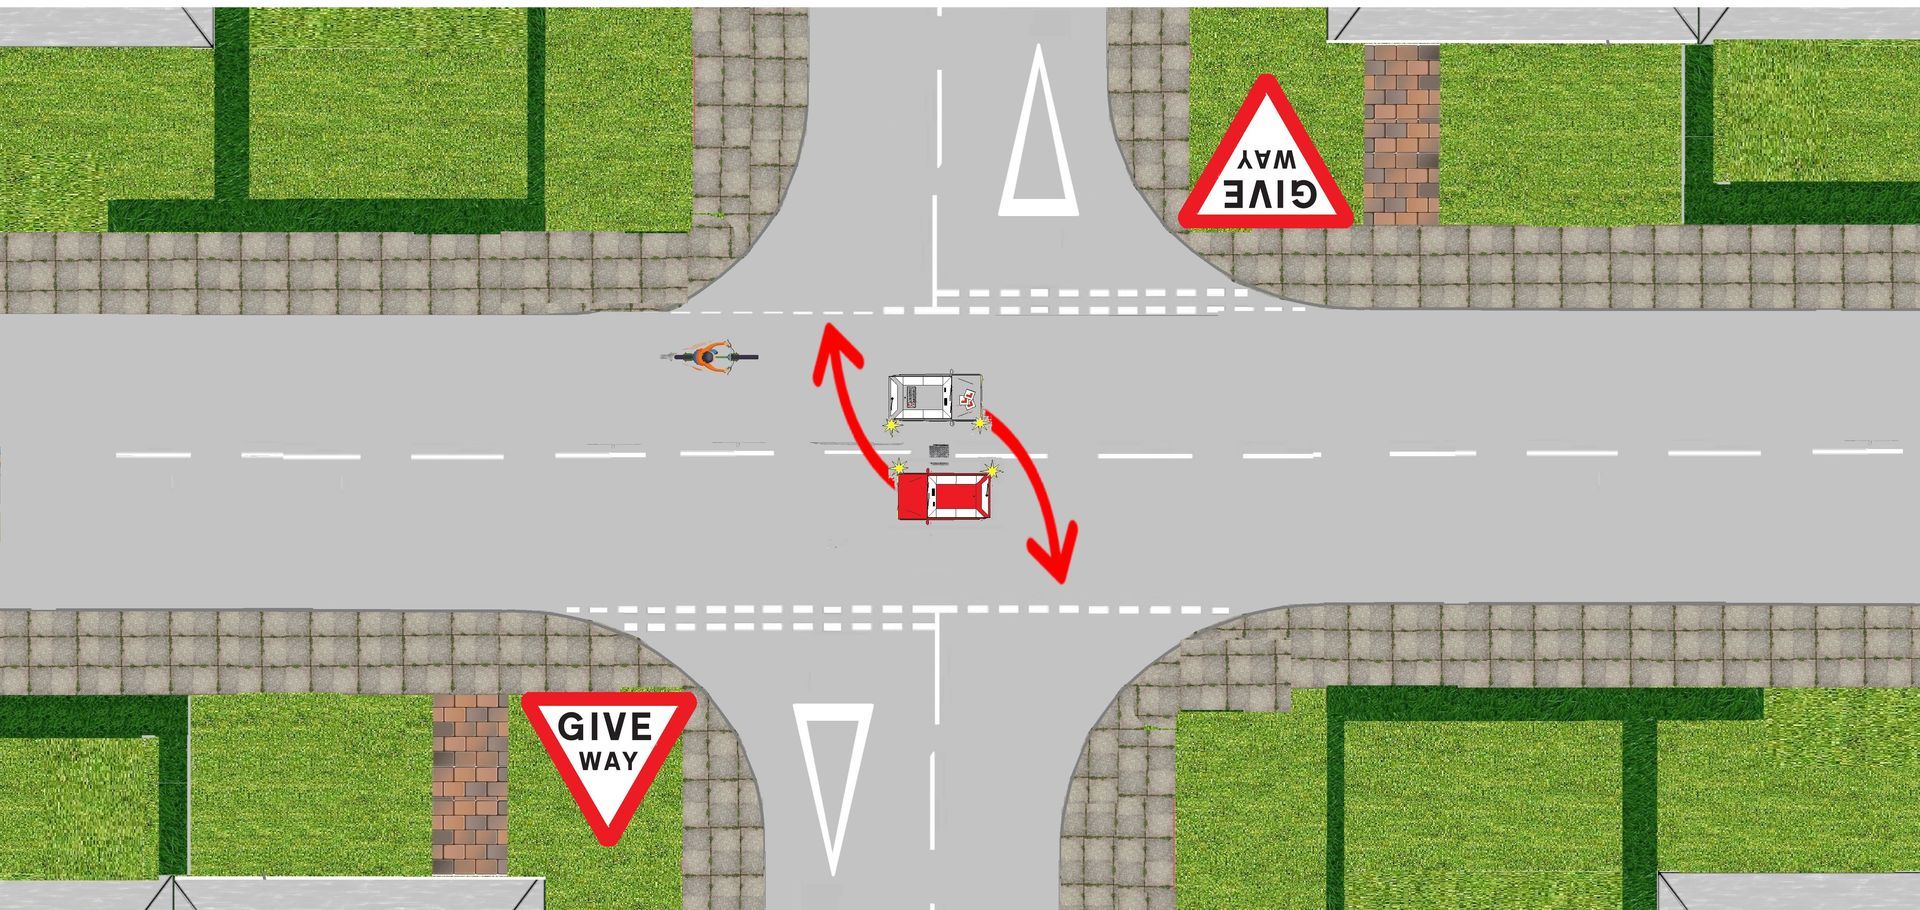
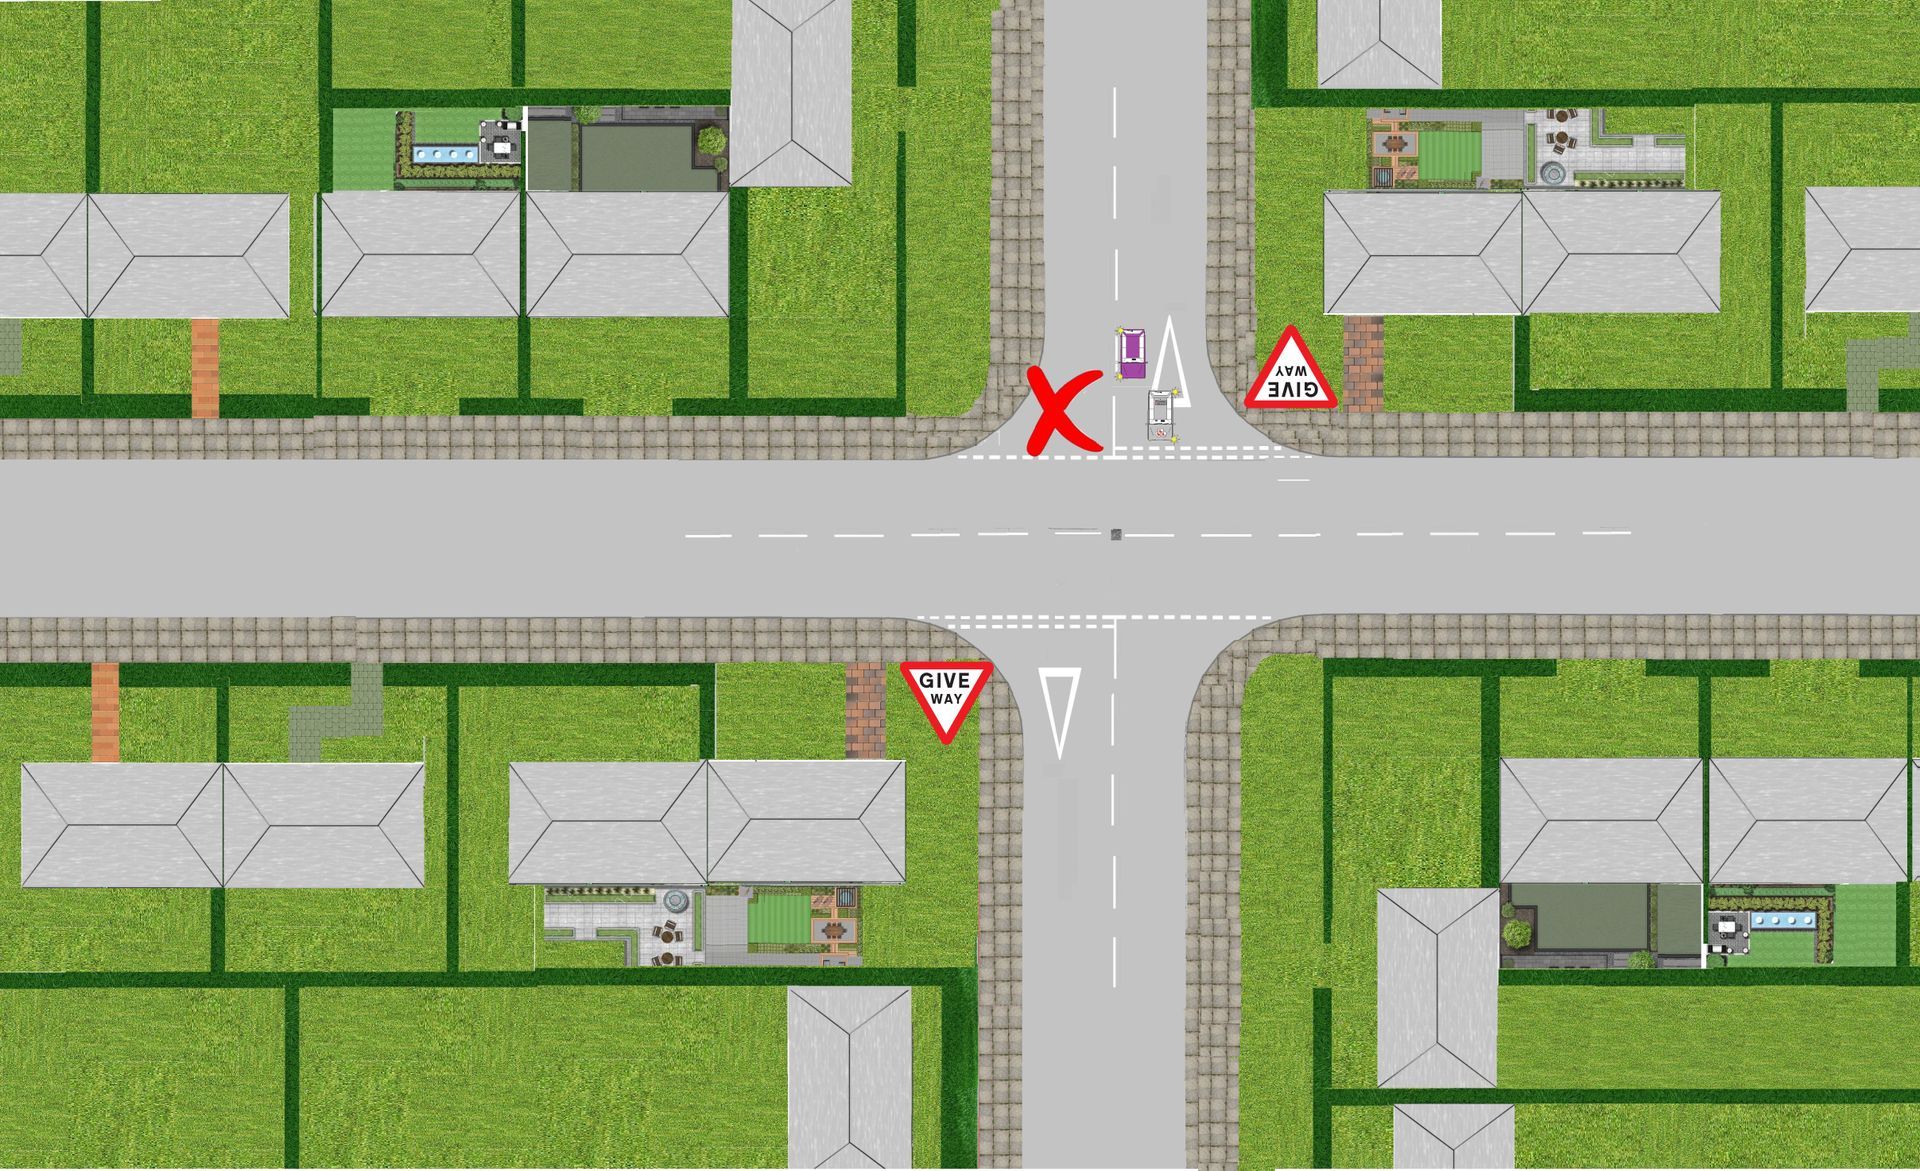
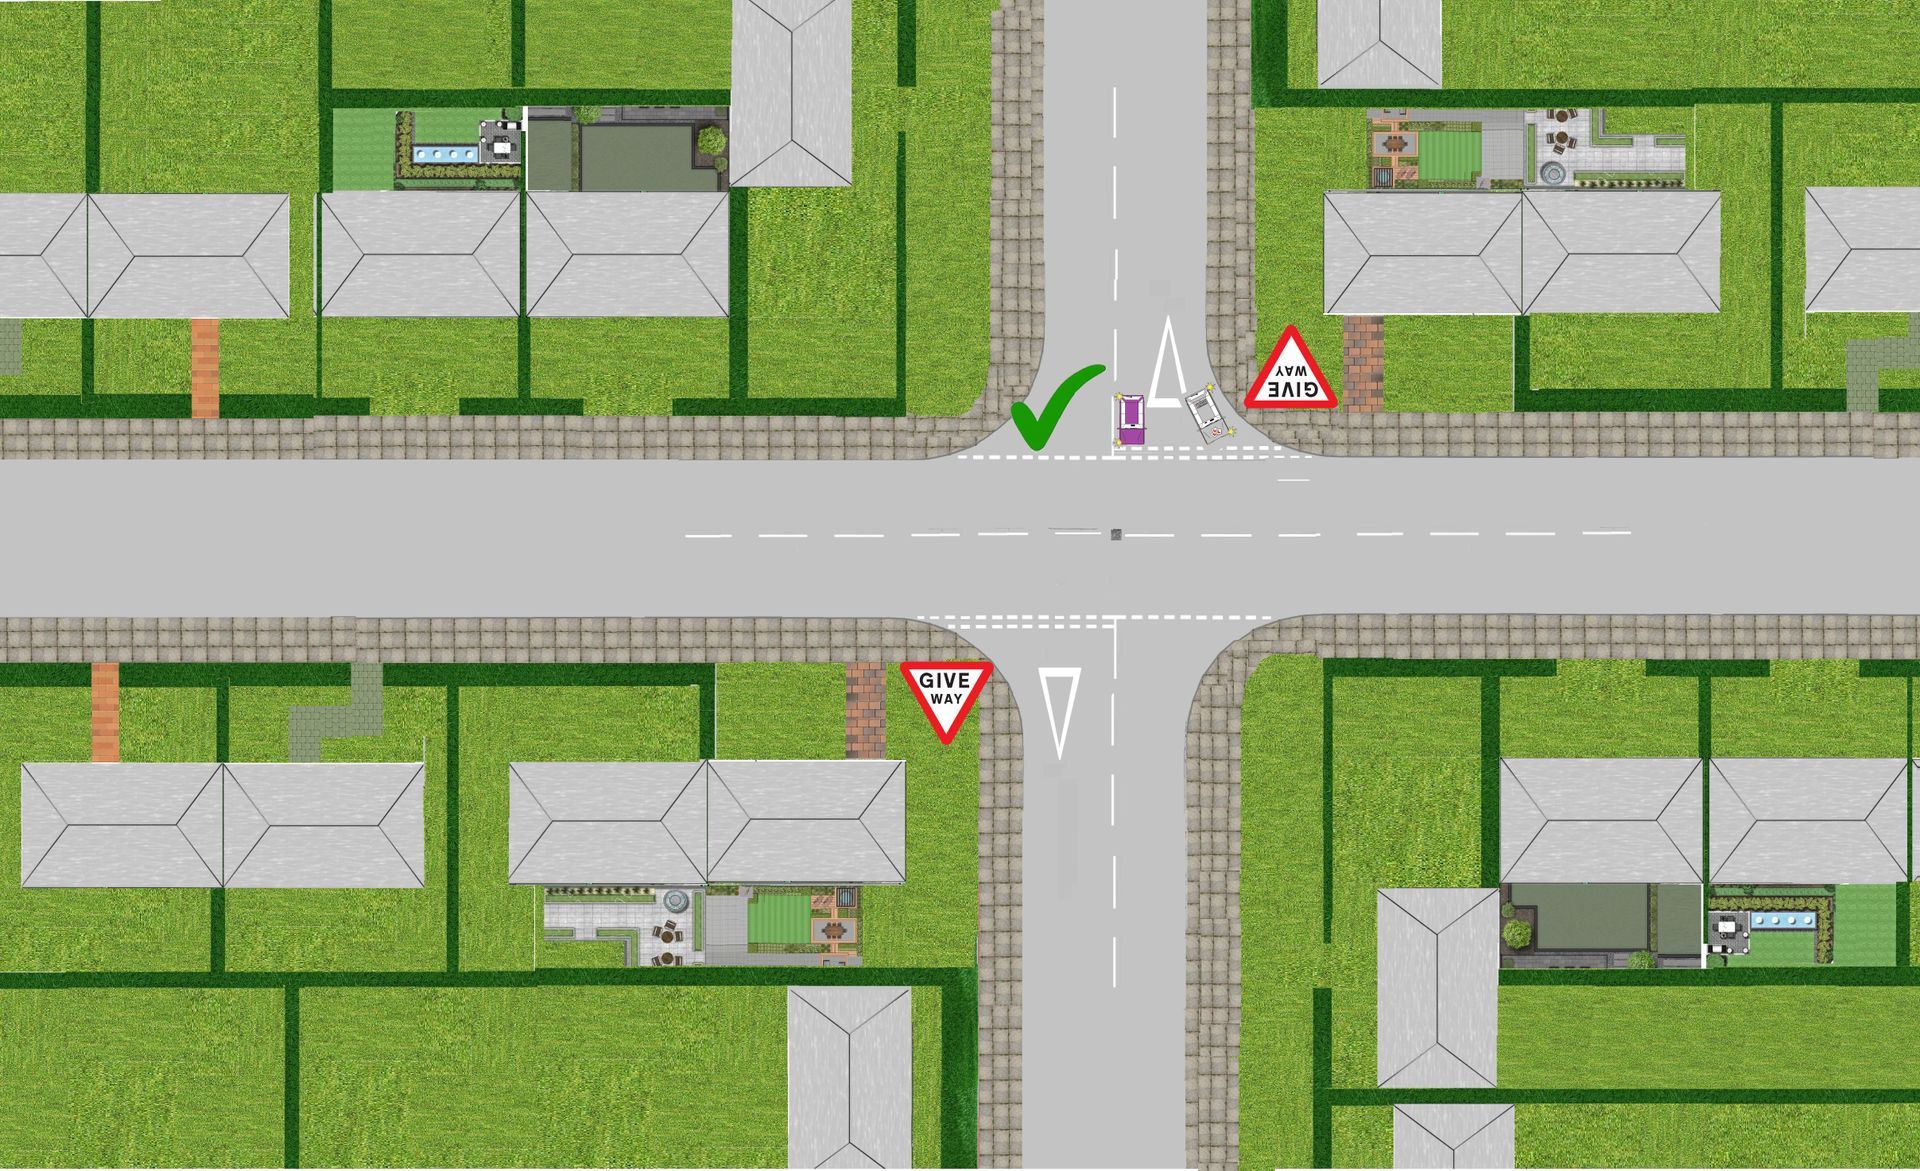
Main road turning right
When turning right (in the below diagram) main road to a side road you have to give-way to oncoming vehicle’s that are approaching you as you will be crossing their path. However if the oncoming vehicle(s) also intends also to turn right you can hopefully cross at the same time ether nearside to nearside or offside to offside.
As you can see with offside to off side you see more of what is going on behind the oncoming vehicle.
Nearside to Nearside
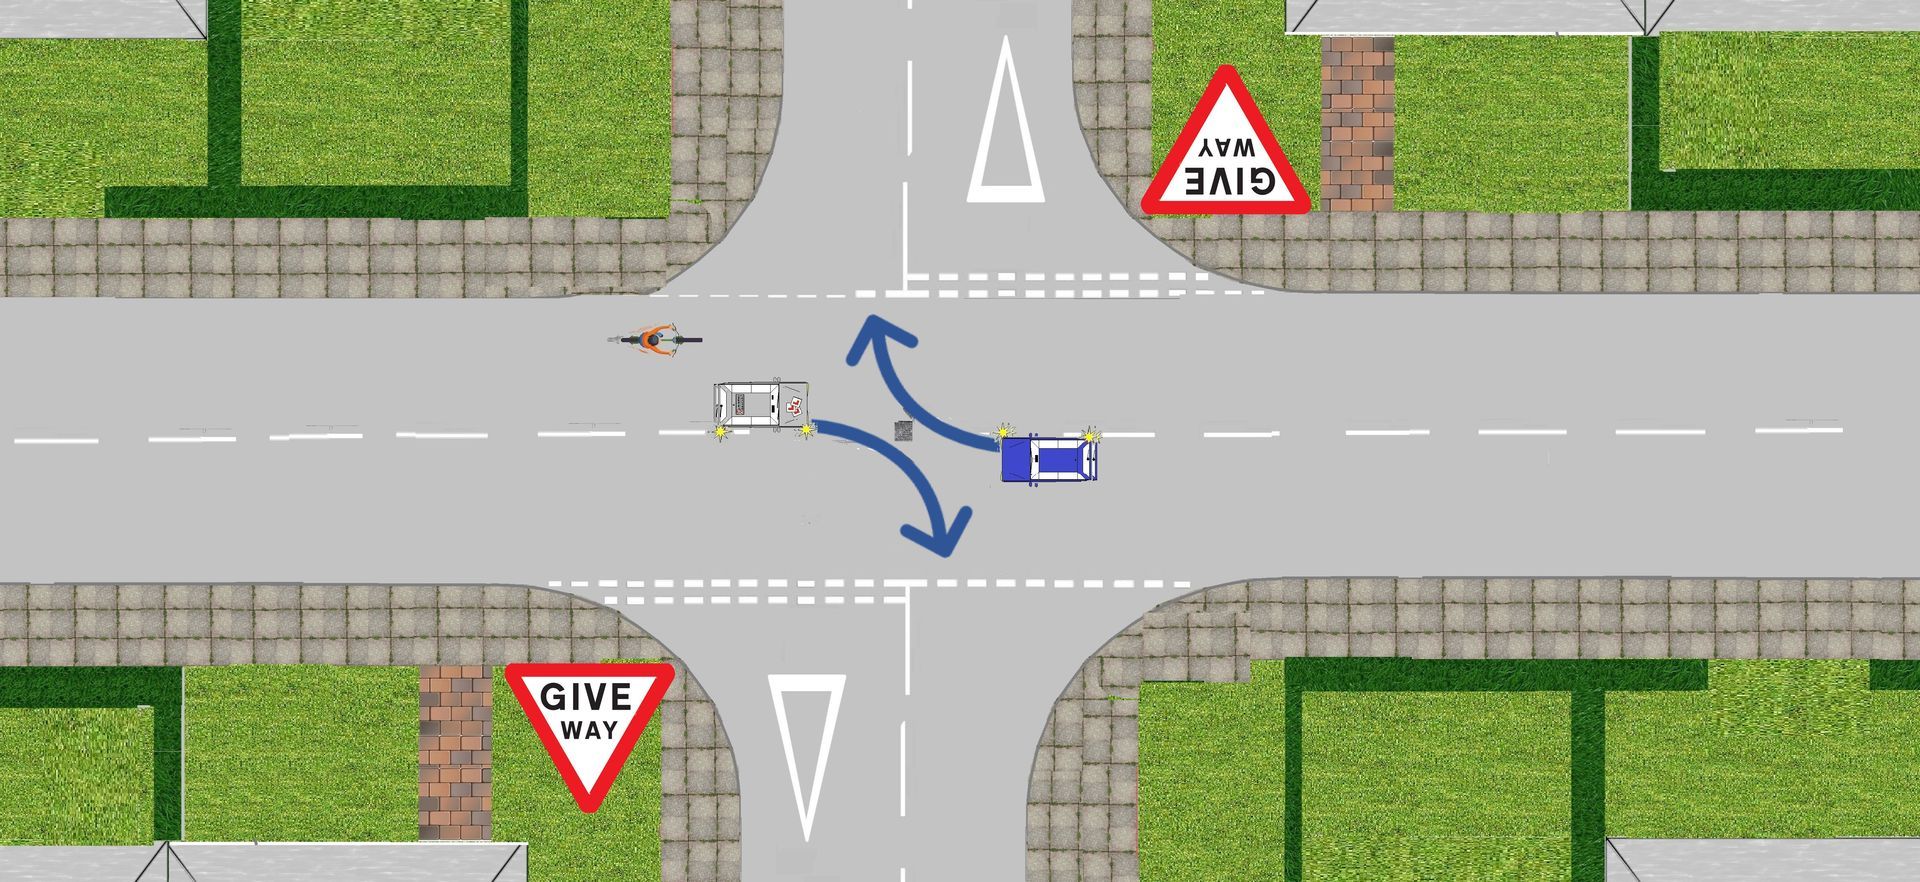
Offside to Offside
Hold back and wait
Lets have a recap:-
So let’s break it down using the L.A.D.A and HAZARD routine's on the approach to gain information with what’s coming towards you.
- L.A.D.A to see where the turning is and assess oncoming vehicle's
- Mirrors to see what is behind
- Mirrors to the right
- Signal right
- Position so you’re close to the centre line
- L.A.D.A to see if it’s safe to continue?
- Speed reduced to a walking pace 10/12mph or stop if that’s the safest thing to do.
- Gear on the approach.
L.A.D.A into the road you are intending to entre looking for pedestrians or parked vehicles
Cross when safe.
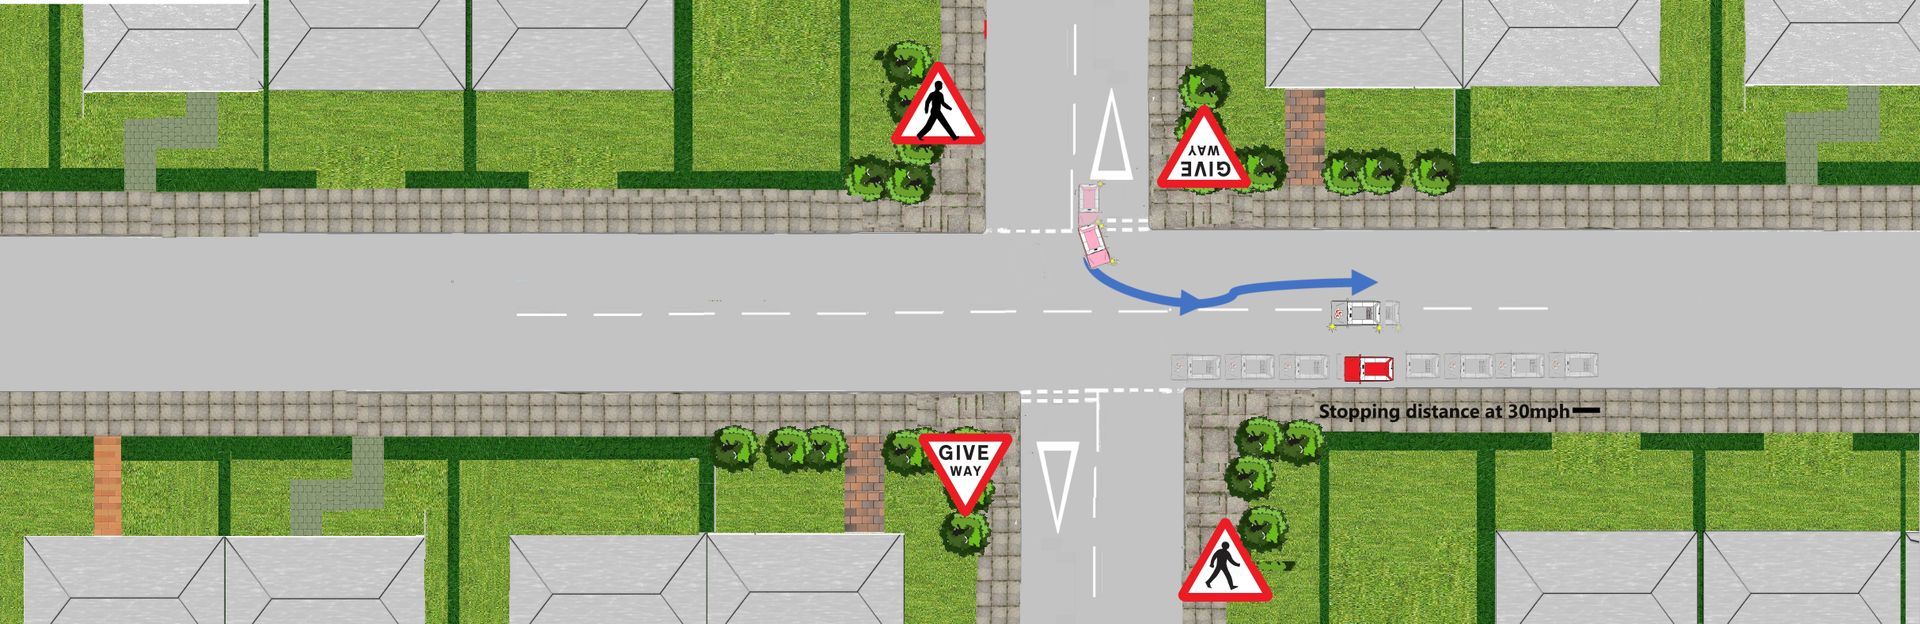
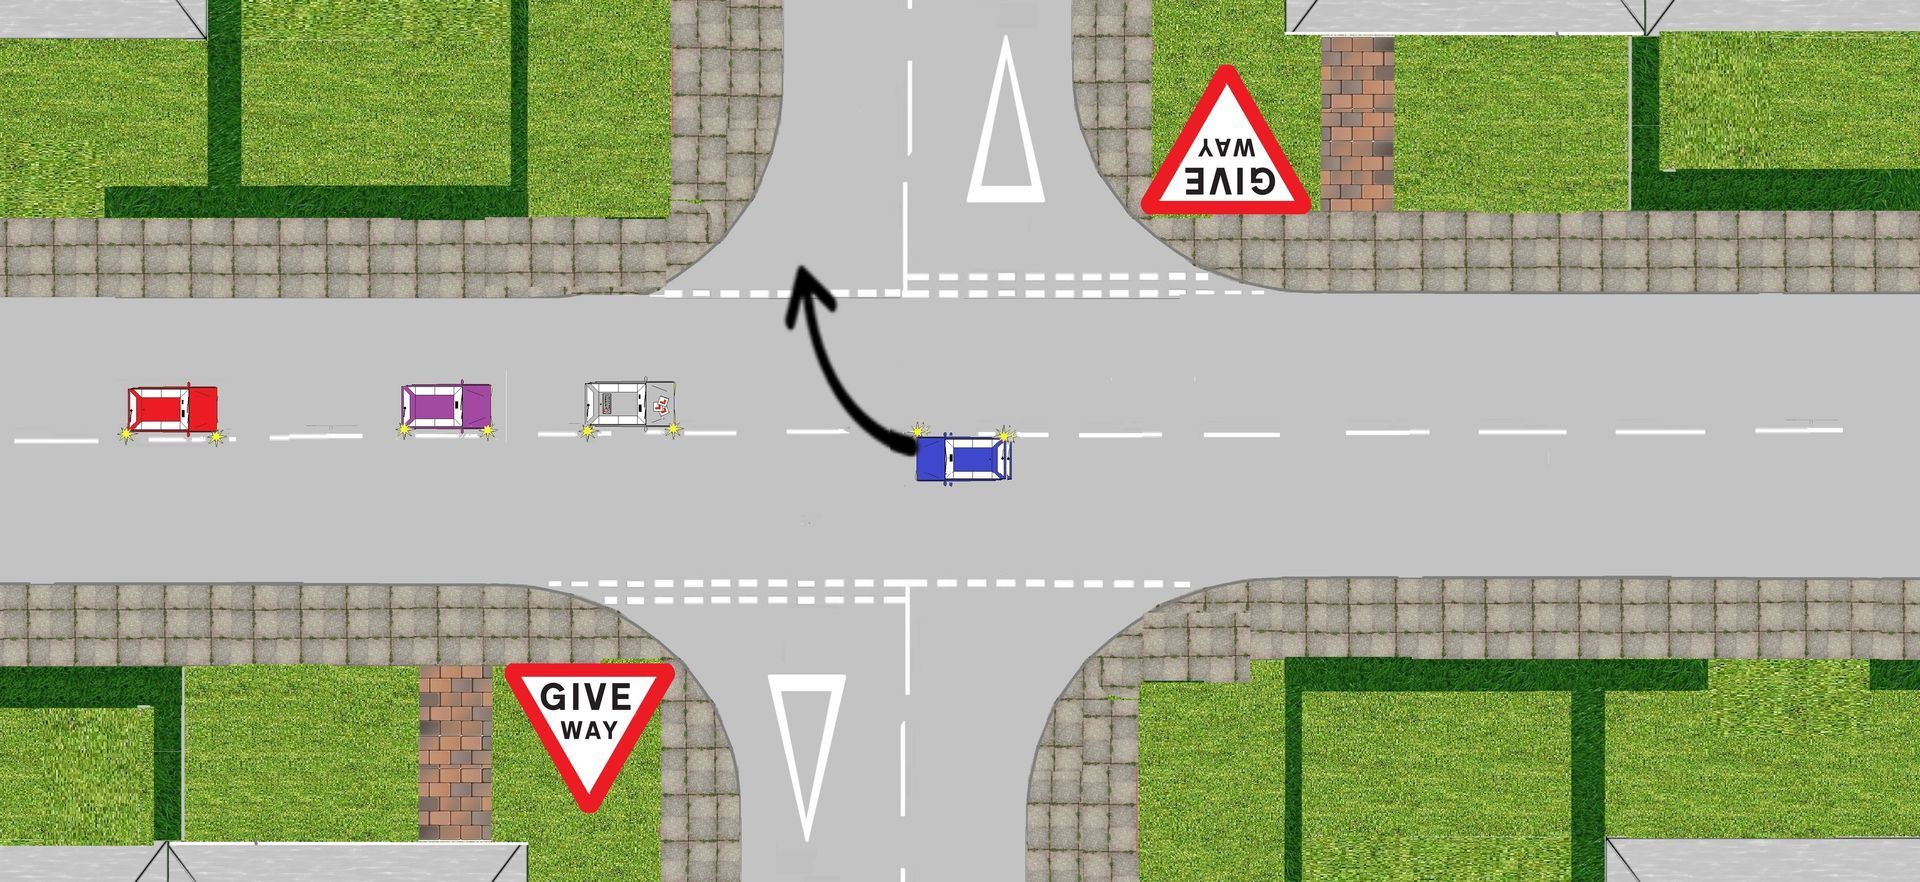
Correct positioning when crossing
In the below diagram you can see having the incorrect position to the centre line can slow down drivers unnecessary.
In diagram 1 the red vehicle intends to turn right and there is a purple vehicle behind them. With the red vehicle in the middle of there side of the road the purple vehicle can not overtake safely.
Diagram 2 now show the red vehicle at the correct positioning so the purple vehicle can make progress.
Diagram 1
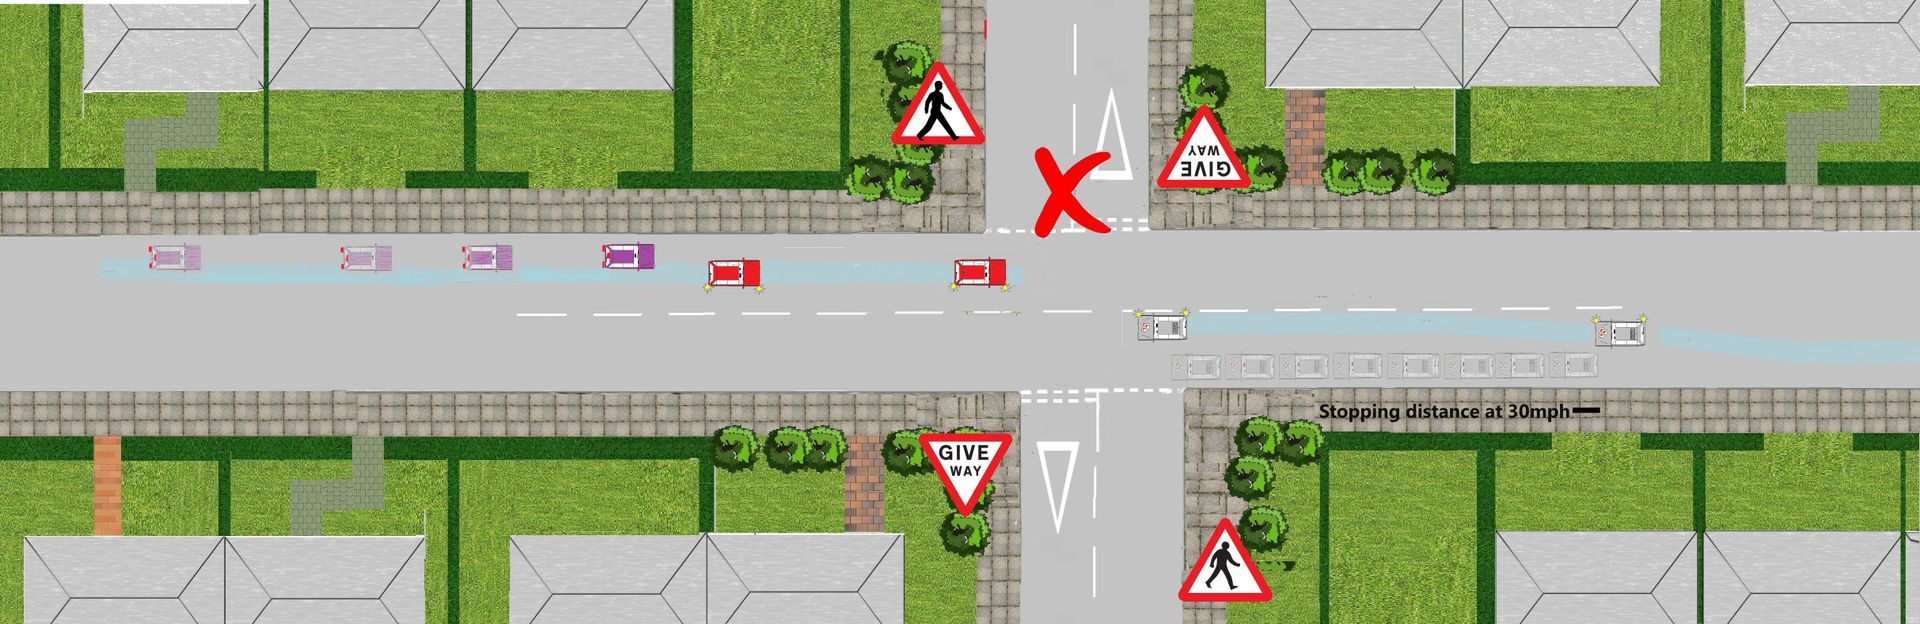
Diagram 2
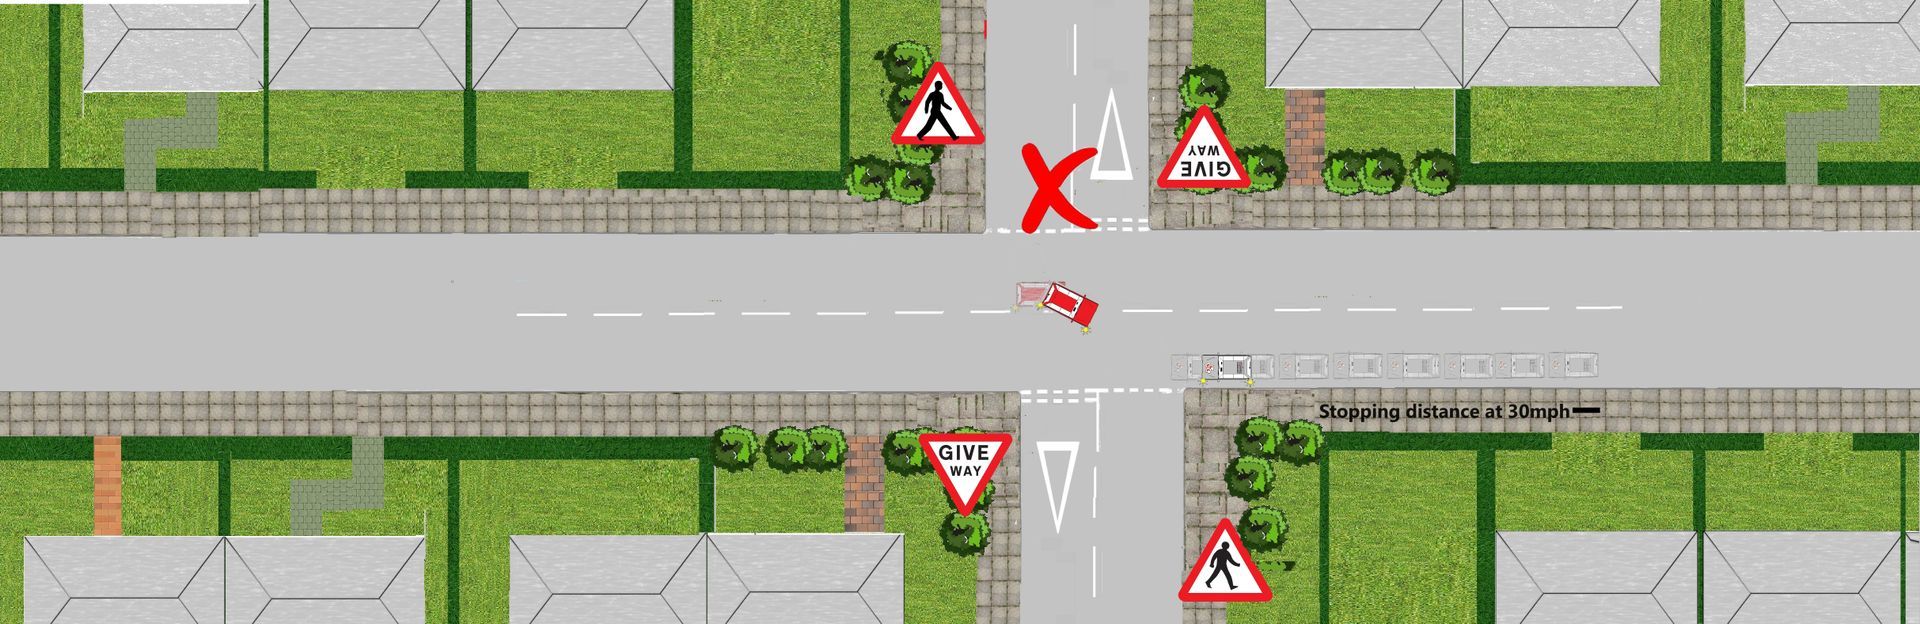
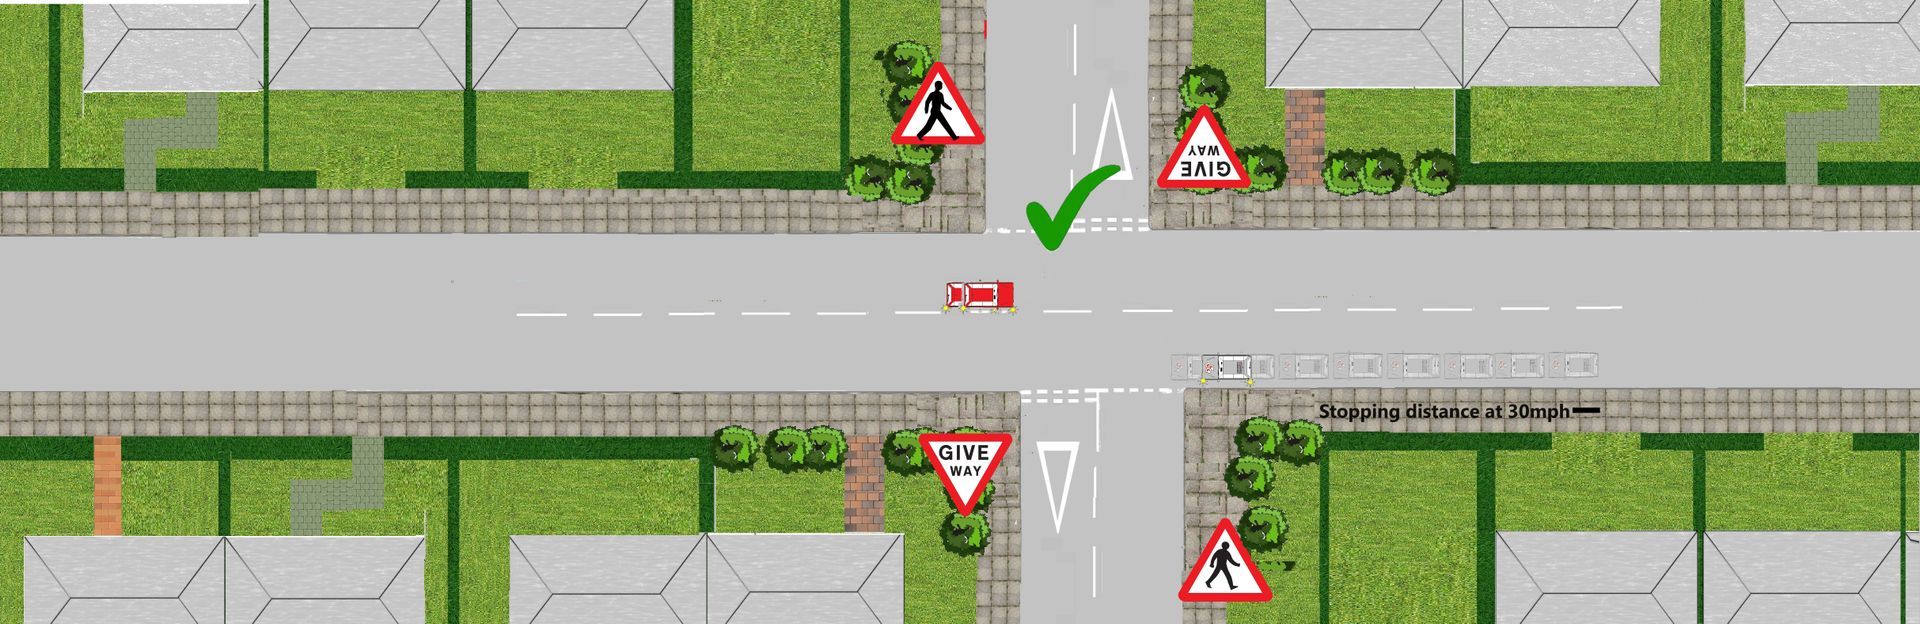
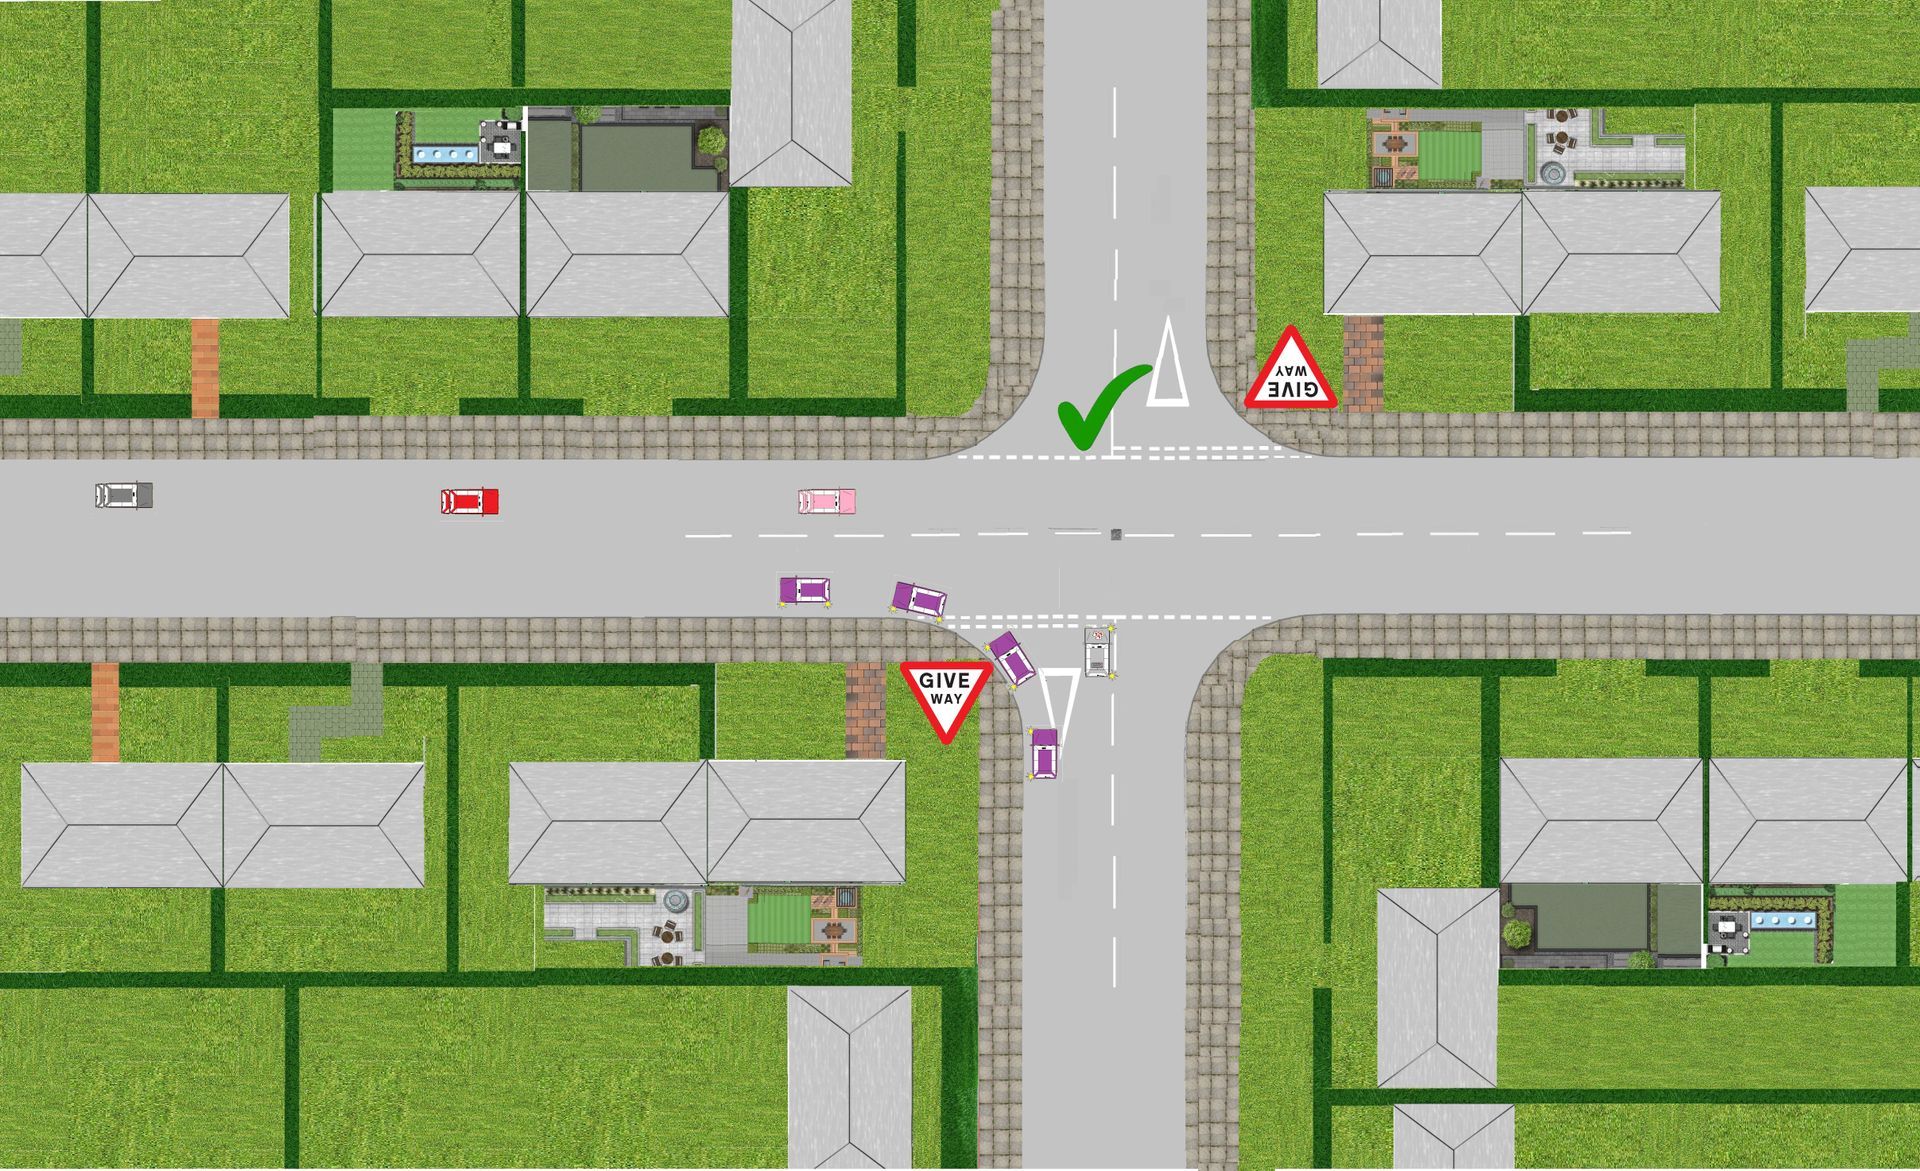
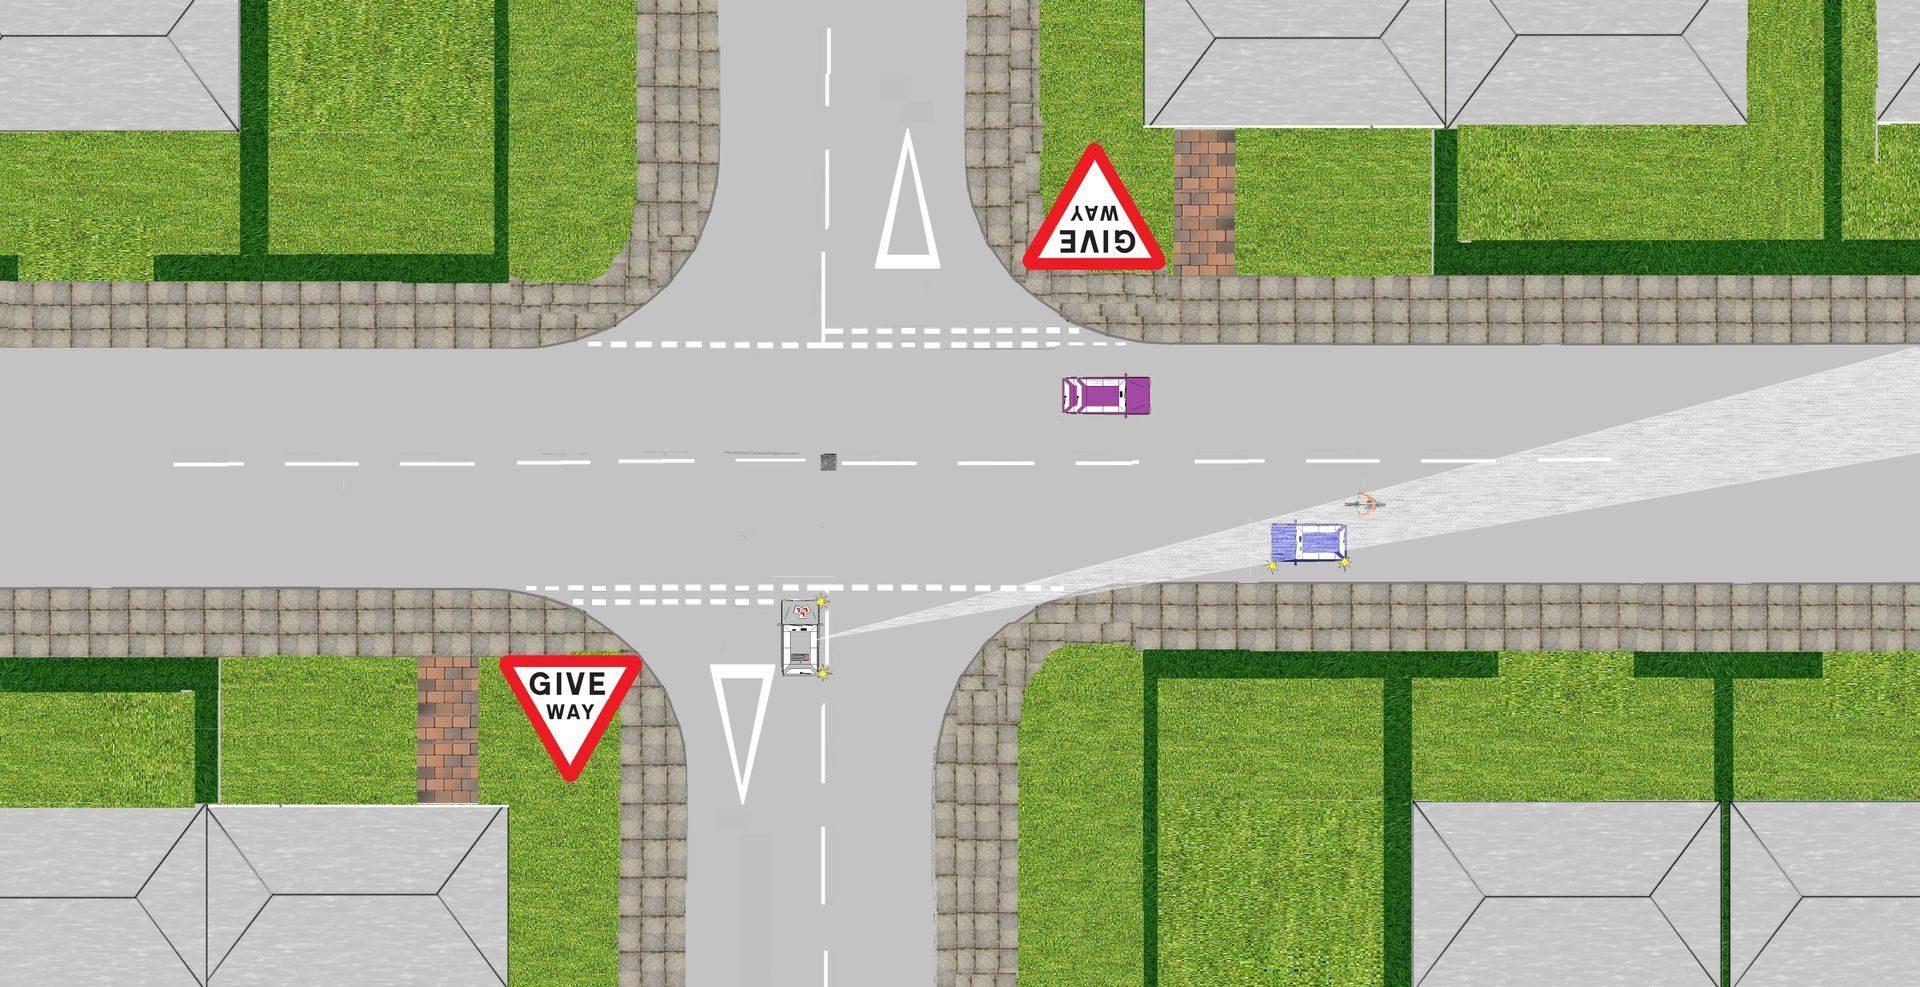
Emerging information
Emerging out of a busy junction left
When emerging left (in the below diagram) out of a side road you have to give-way to the oncoming vehicle on the main road. Your waiting positioning is very important that you do not hold up the traffic behind by being in the wrong positioning.
Reacting correctly to the indicators of the vehicles on the main road turning left (or right) when emerging out of a side road is very clear in the highway code and the highway code states:-
- Do not assume, when waiting at a junction that a vehicle coming from the right and signalling left will actually turn, wait and make sure.
- L.A.D.A to see where the turning is and assess and parked vehicles near the junction
- Mirrors to see what is behind
- Mirrors to the left
- Signal left
- L.A.D.A to assess if you have an open or closed junction
- Position so you’re close to the curb (drain width).
- Speed (OPEN JUNCTION IS A WALKING PACE, CLOSED IS A CRAWLING PACE).
- Gear on the approach (2nd gear if open and clear, 1st gear if closed).
- At this point the main road has priority and you are aiming to emerge safely into a gap you will have to give way to oncoming traffic.
When emerging left
- Keep as close to the left as is safe and practicable
- Give way to any vehicles using a bus lane, cycle lane or tramway from either direction that’s on the main road.
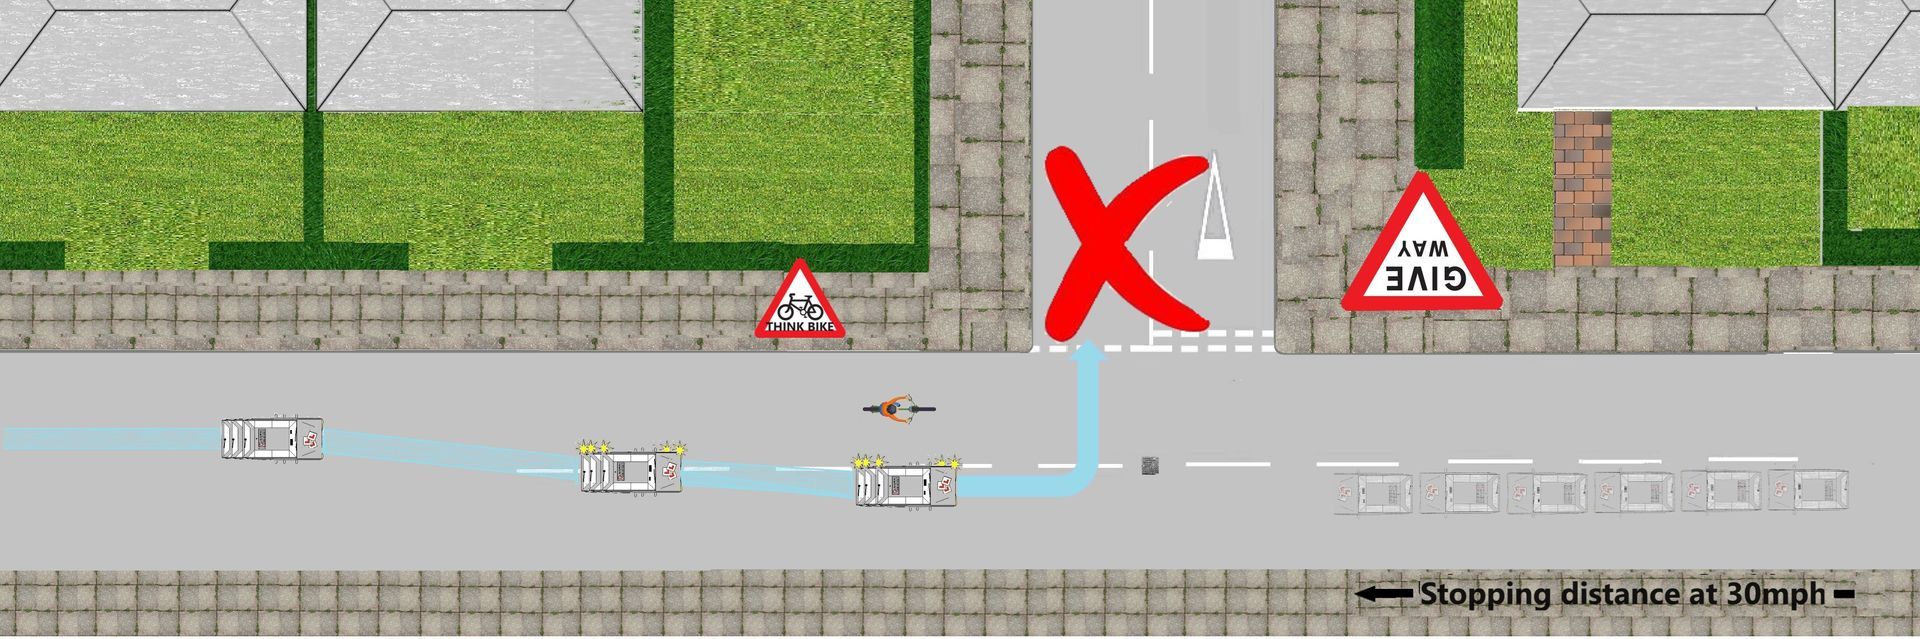
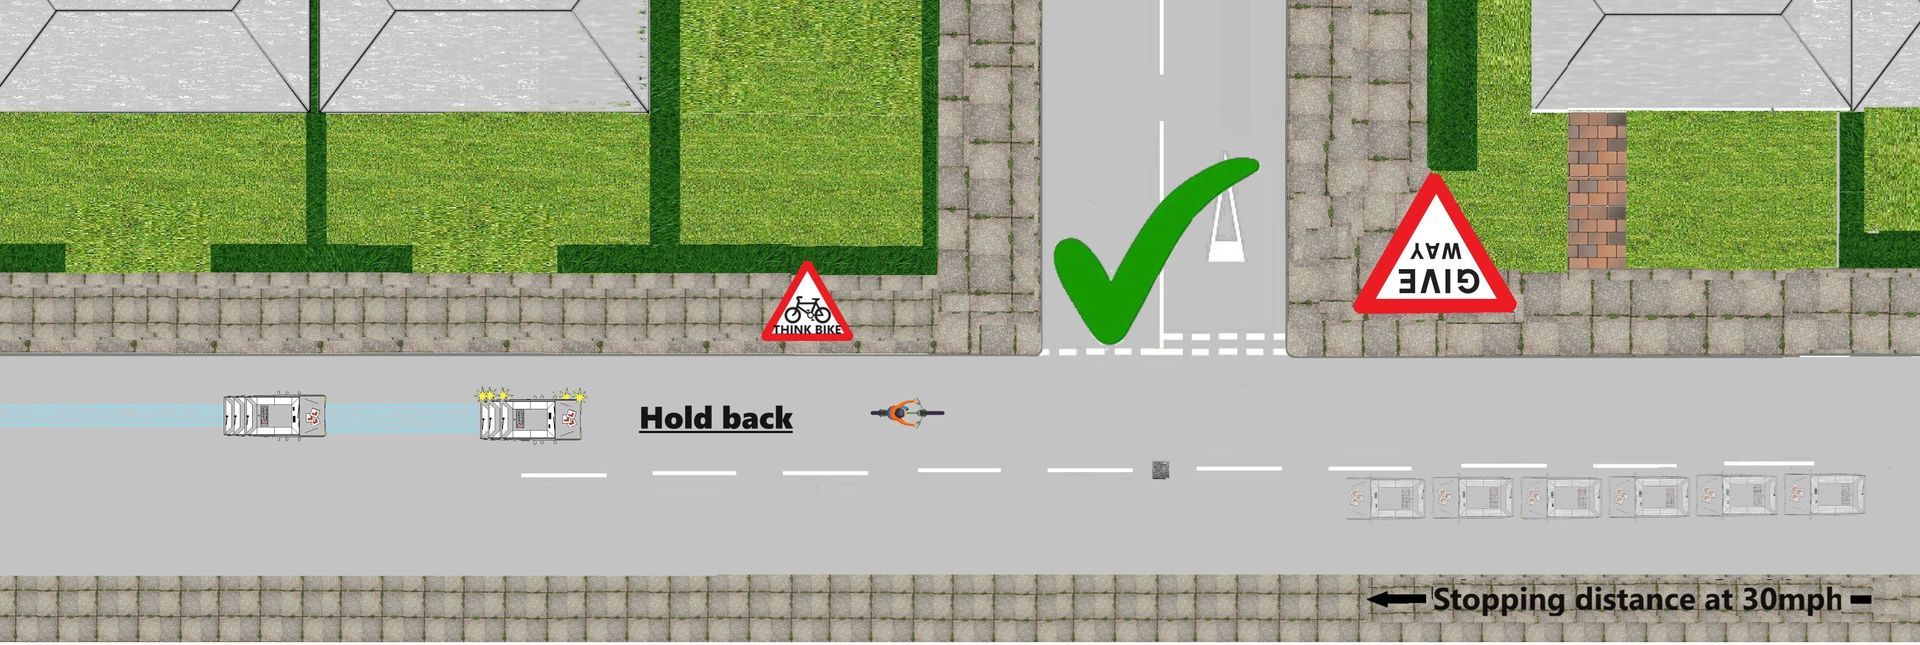
- Do not over take a cyclist or mobility scooter if they are close to the give-way or stop line, hold back and be patient.
Look right and left in to the main road you are wanting to emerge into on the approach to see if the junction is an open or closed.
Anticipate parked cars (even cars illegally parked on double yellow lines), pedestrians walking across the road you intend to drive into and cyclists at the mouth of the junction you are approaching.
Strategy on getting to the give-way/stop line
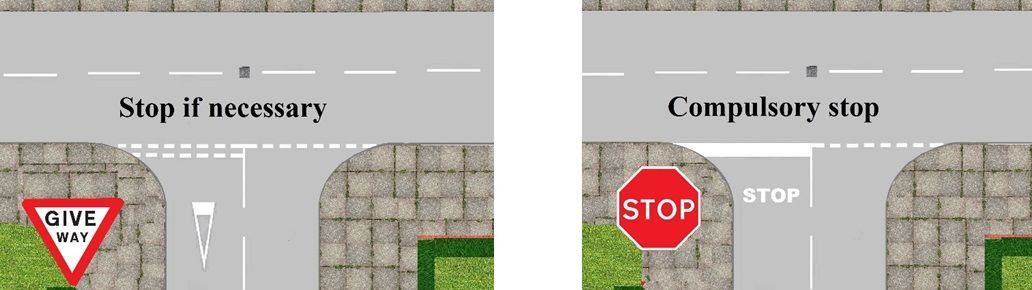
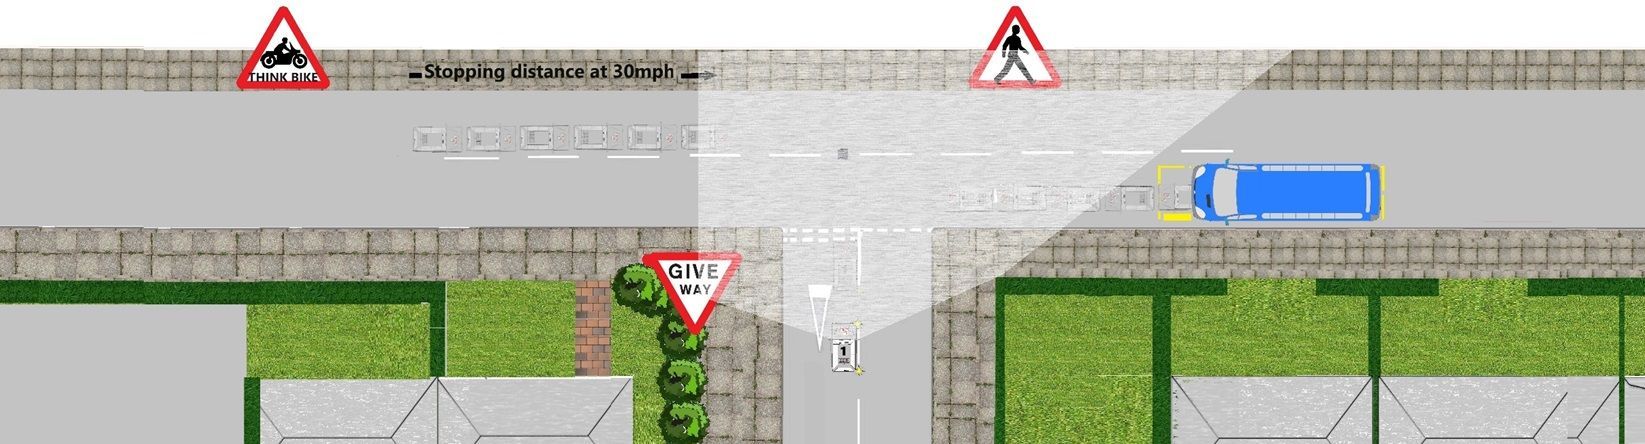
If you are confronted by an octagon stop sign, this is a command for you to stop. Ensure you 100% stop at the solid white stop line (your correct stopping P.O.T), this is very important as if you go too far forward you could make the vehicles already travelling on the main react and potentially slow down due to your actions (as they could think you are not stopping).
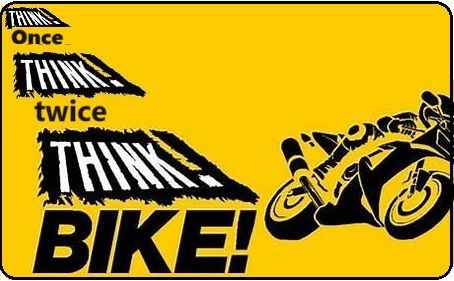
The key is if the junction is a stop junction it is probably a high risk area for accidents, so stopping is the safest thing to do. There is no time limit in the Highway Code for how long you have to stop for, however working in conjunction with the Think campaign encourages all road users to think once, think twice, think bike.
Evidence below with a link to the think bike campaign

0.3 0f a second?
Not so long back I was told there is no time on stopping at a stop line, however just by watching the short video (1) think car, (2) think bike and (3) look again..... so how long will this take?
Now get your stop watch out and time how long it takes to take you to look right and left effectively THREE TIMES.
Now tell me .3 or .6 of a second is fine.
You can not put an observation time limit on someone’s well being or life.
Stop means stop and look for hazards and proceed when safe.
Hesitation and planning
If you stop too early you will probably not open the view of the junction, this will make it more difficult for you to see the oncoming traffic (using the technique of putting your wing mirror on the white line will help you achieve the optimum view). This will improve your hesitation with the correct point of turn (P.O.T).
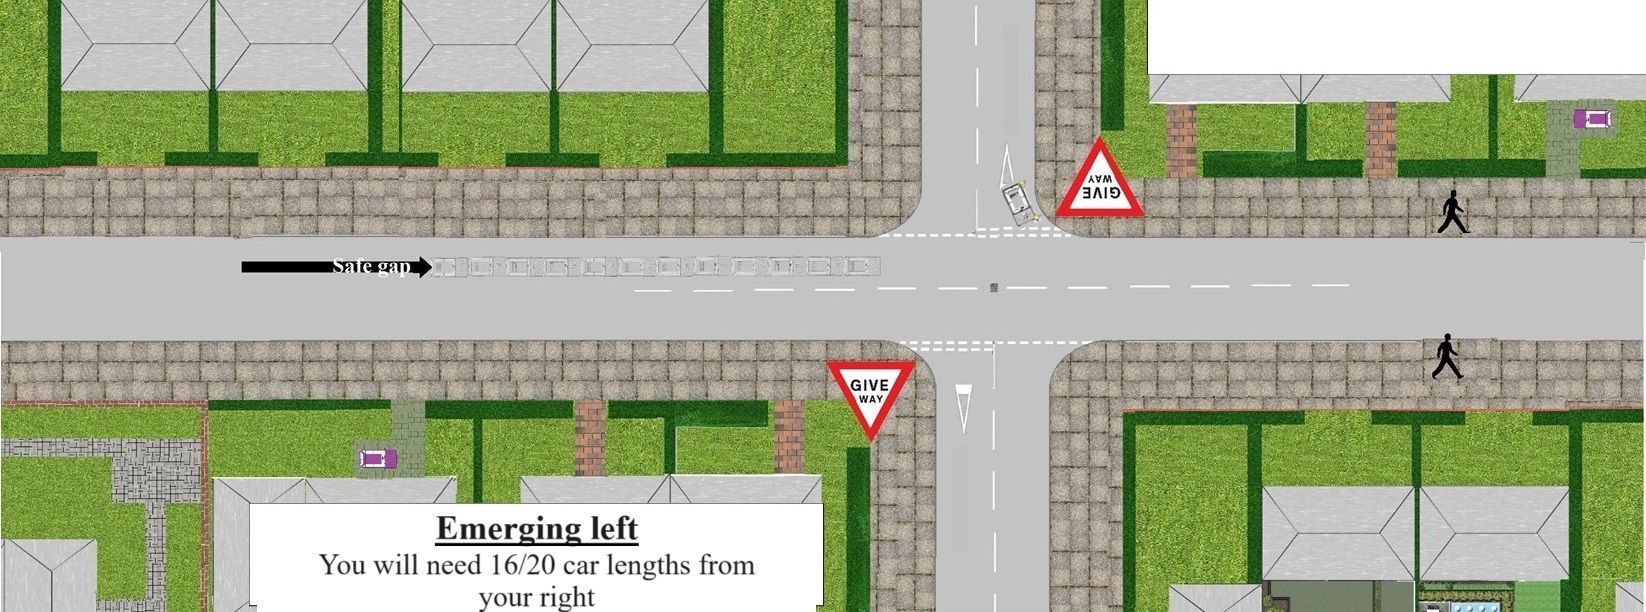
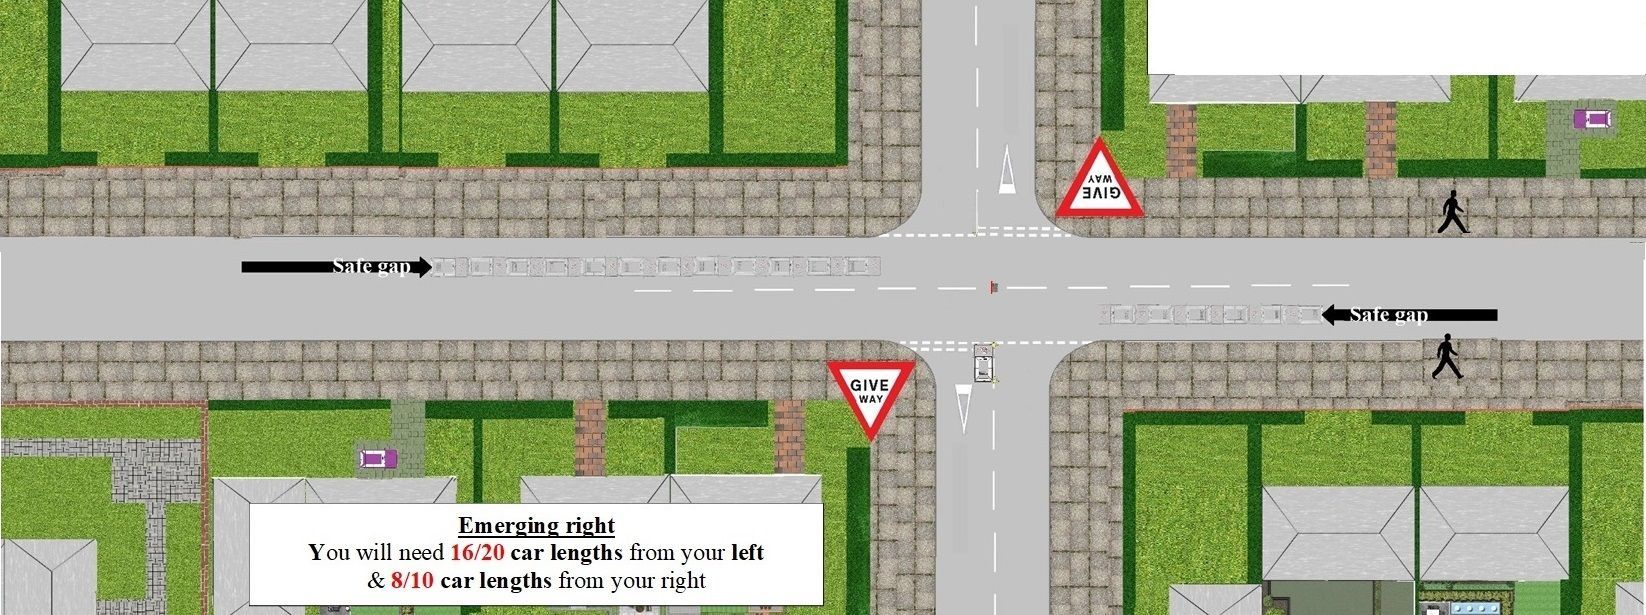
Distance of gap to your right when emerging left
Entering a main road the vehicle on the right hand side of you will needs a safe gap of 12/16 car lengths away from you (about a block of houses or 3/4 sets of lampposts).
The vehicles on the left hand side should not be a problem unless the vehicle has to overtaking something stationary or slow moving.
Why this much gap (based on a 30MPH road)?
You are stationary and the main road will potentially doing 30 mph, you will need this time to match the speed of the cars on the main road when you are emerging.
Technique to use
Reflect on how long it takes you to walk across the road and put it into practice crossing and emerging. Crossing into a side road is the time it takes you to walk across the road and emerging is walk across the road and back.
Emerging left
Emerging right
- L.A.D.A to see where the turning is and assess and parked vehicles near the junction
- Mirrors to see what is behind
- Mirrors to the right.
- Signal right.
- Position so you’re close to the centre line.
- When turning right keep as close to the left of the centre white line as is safe and practicable
- Speed reduced (OPEN JUNCTION IS A WALKING PACE, CLOSED IS A CRAWLING PACE).
- Gear down.
You were marked on:
- overtaking
- meeting
- crossing
You needed to show good judgement when overtaking, meeting and crossing other road users, such as knowing when to proceed, and when to wait for a safer opportunity.
You needed to make your intentions clear, and understand the intentions of the other road users
Examples of fault
Some of the most common faults for this area include:
- not giving way to road users that have priority
- reacting late when meeting an approaching vehicle
- being too close to a cyclist when overtaking
- crossing the path of an oncoming vehicle when turning right
Your examiner may have explained the specific details of any faults you made.
Show you can improve in this are
If you made faults in this area during your test, or if you want to improve in this area, you should:
check rules 162 to 169 and rules 179 to 183 of The Highway Cod
read section 7 of ‘The Official DVSA Guide to Driving: the Essential Skills’ (2022 edition)
If you need to rebook the test, spend time practising this skill with your driving instructor or supervising driver.

Peep and creep information
- Control of your training vehicle
- Observation
- Awareness
- key decision making.
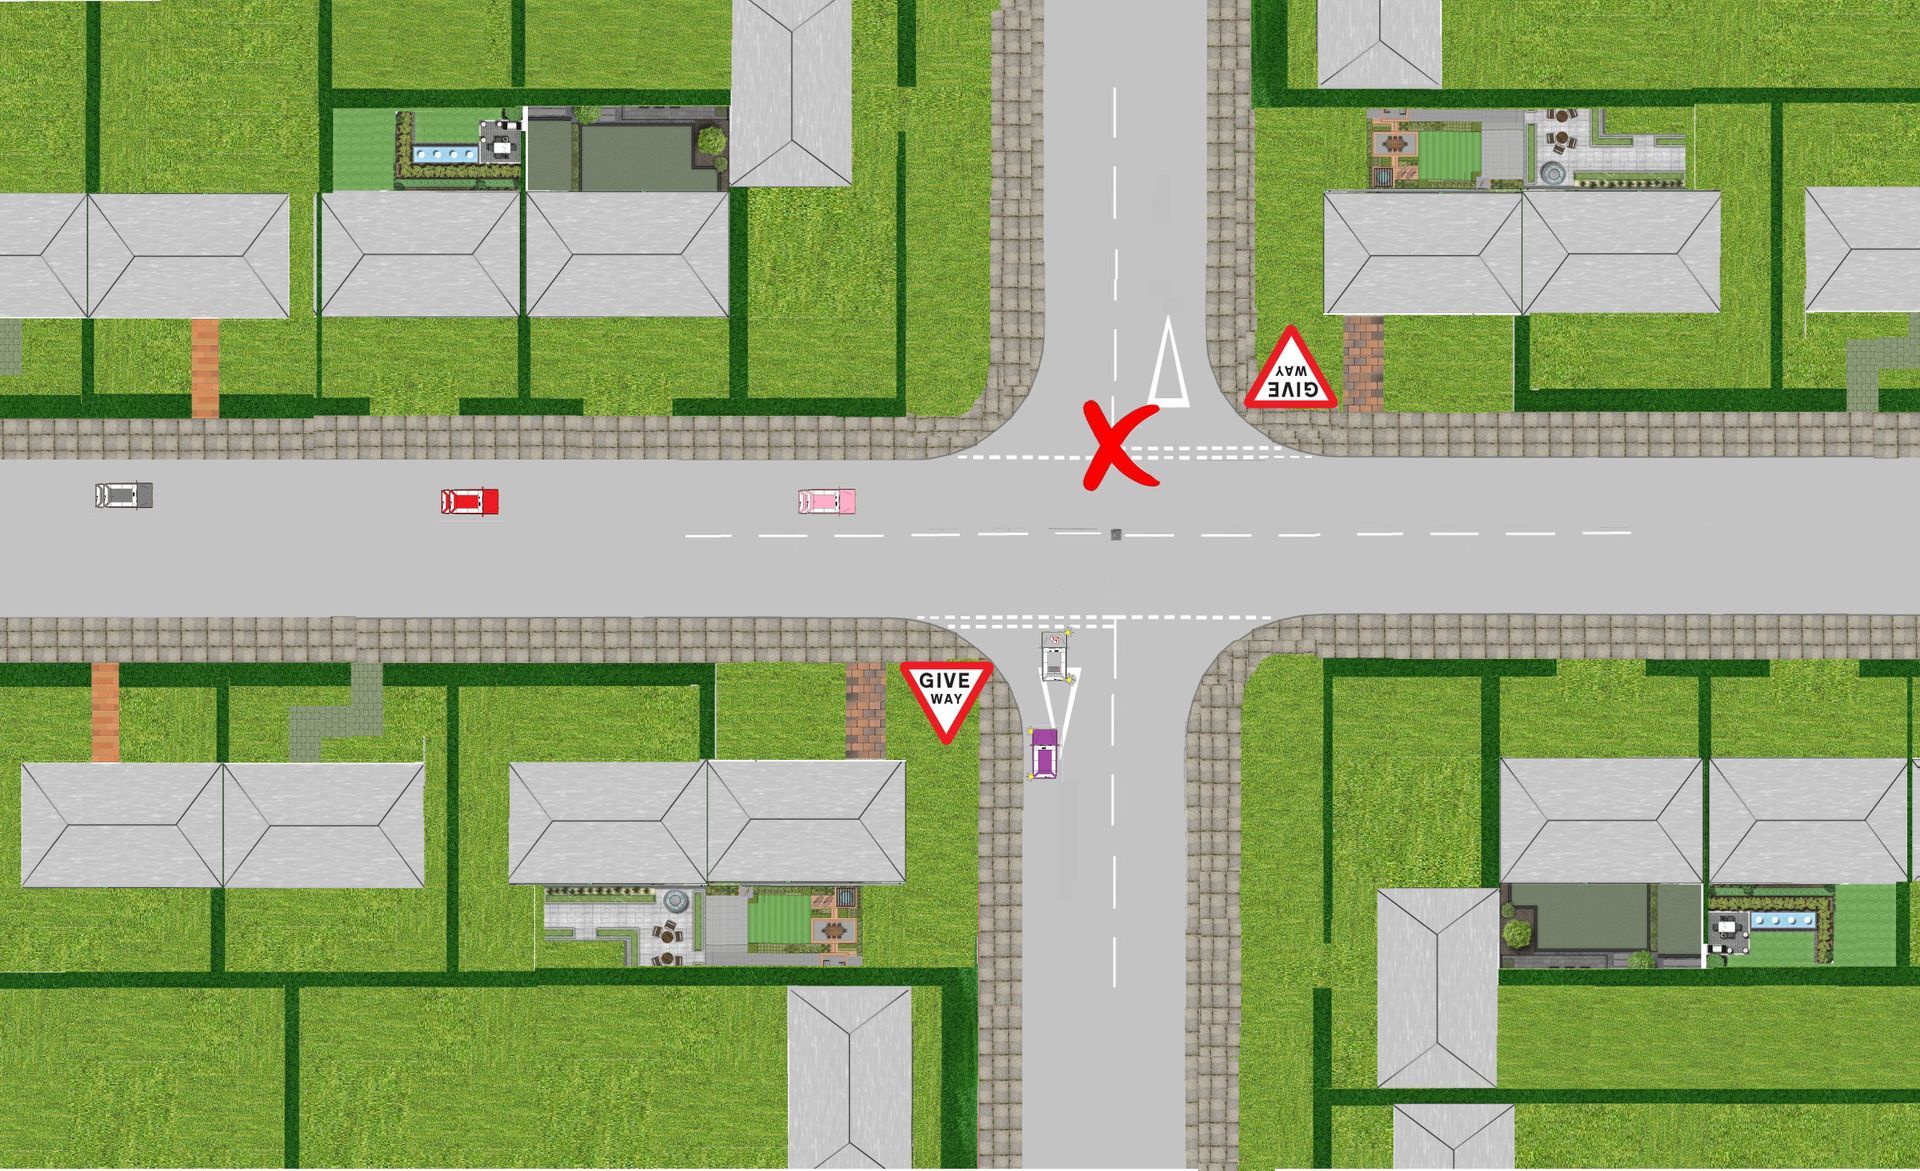
Now in the next diagram the blue bus has passed, you still have a closed junction on your left, slowly move your training vehicle a few inches forward at a time until the view opens up (peep and creep).
Once both sides have opened up and you have achieved your point of turn and its safe to turn continue your direction turn.
Discuss and agree your next lesson goals
Learning techniques and strategies
Practice achieving and improving the timing of the M.S.P.S.G & L.A.D.A routine's at busier T junctions and crossroads. Continue to improve negotiating oncoming vehicles and turn nearside to nearside and offside and offside crossings. While fine tuning awareness, planning, the two second gap, holding back position, adequate clearance when overtaking stationary and slow moving vehicles.
Once you have practiced a few situations a few times your instructor will reduce his/her support transferring his responsibility over to you (that's if you agree with this).
Lesson Planning
- Agree learning goals and needs of todays lesson
- Agree appropriate lesson structure (full, partially or independent level of instruction)
- Practice in a suitable training area
- Agreed if needed to adapt the lesson plan to help the pupil work towards their new learning goals if any verbal or physical intervention was made by the instructor
Risk Management
Fully understood how the responsibility for risk of the lesson would be shared on the lesson plan between instructor and student.
- Directional instructions will be given in ADI format (Alert, direction and identify manor) given to the pupil clear and given in good time
- Agree if the students made a minor, serious or dangerous error on your lesson it will be broken down using F.I.S.H (fault, implications, solution & help) this method of feedback helps pupils understand what fault is being made and how to strategies on how correct the faults.
Teaching & Learning Strategies
Like mentioned earlier every student is induvial and each and everyone of you will progress at different rates so driving will adapt their lesson plan to help you achieve your driving goals.
- Your driving instructor will adapt their teaching style to suite your ability and ability
- Your driving instructor will continue to encourage you on your lesson and analyse any problems made and allow you to take responsibility for your own learning goals by giving you technical information to improve your techniques. Your technical feed back from your instructor will be ether given on the move or if feel needed by pulling you up on the side of the road somewhere safe, legal and convenient.
Rote learning (WikipediA)
Rote learning is a memorization technique based on repetition. The method rests on the premise that the recall of repeated material becomes faster the more one repeats it. Some of the alternatives to rote learning include meaningful learning, associative learning, spaced repetition and active learning.
At the end of your lesson
At the end of your lesson you will have a debrief with your instructor giving you the opportunity to reflect on your performance on your lesson then you can set up new goals for your next driving lesson.
This will also give you the opportunity to research any new topics that will be brought into on your next agreed lesson. So remember your instructor is there to HELP you, so on your driving lesson if you have any uncertainties or need anything rewording or recapping to make things any clearer, just ask.

