- L.A.D.A & M.S.P.S.G routines on junctions you approach
- Two second gap. hold back position
- Meeting , overtaking, adequate clearance when overtaking stationary & slow moving vehicles
- Awareness and planning
- Traffic calming measures
- Hill/angle starts
- Full talk through
- Prompt
- Independent
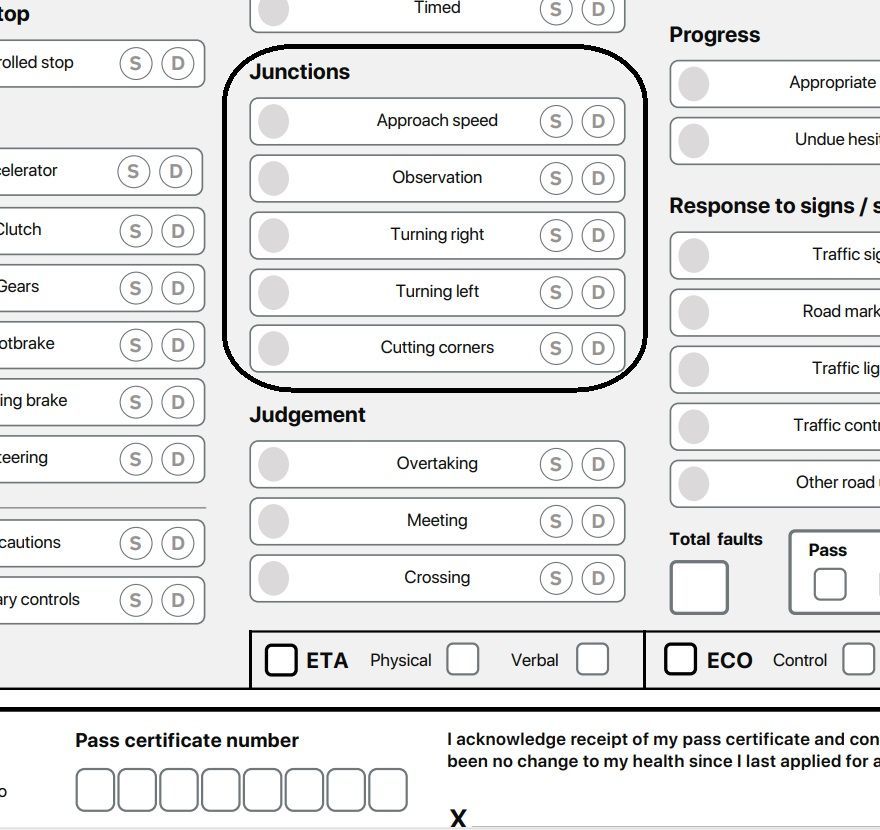
Junctions (including roundabouts)
- You were marked on:
- approach speed - your ability to approach junctions at an appropriate speed
- observation - your effective observation and judgement of your surroundings
- turning right - your position when turning right
- turning left - your position when turning left
- cutting corners - your ability to avoid cutting corners when turning
- You needed to show you can drive through junctions safely. You should have observed your surroundings, made your intentions clear, followed road signs and signals, and properly controlled the car.
Examples of faults
- Some of the most common faults for this area include:
- incorrectly judging the speed of an oncoming vehicle, forcing it to slow down when emerging from a junction
- not checking for other road users when emerging from a slip road, onto a dual carriageway
- being positioned too far to the left when turning right onto a minor road, holding up vehicles behind you
- approaching a junction too fast, making it difficult to make observations
Your examiner may have explained the specific details of any faults you made.
- How you can improve in this area
- If you made faults in this area during your test, or if you want to improve in this area, you should:
- check rules 170 to 190 of The Highway Code
- read section 8 of ‘The Official DVSA Guide to Driving: the Essential Skills’ (2022 edition)
- If you need to rebook the test, spend time practising and improving this skill with your driving instructor or supervising driver. You could work on:
- using the mirrors - signal - manoeuvre (MSM) routine
- using the position - speed - look (PSL) routine to improve your manoeuvres
- approaching and emerging at a variety of different junctions
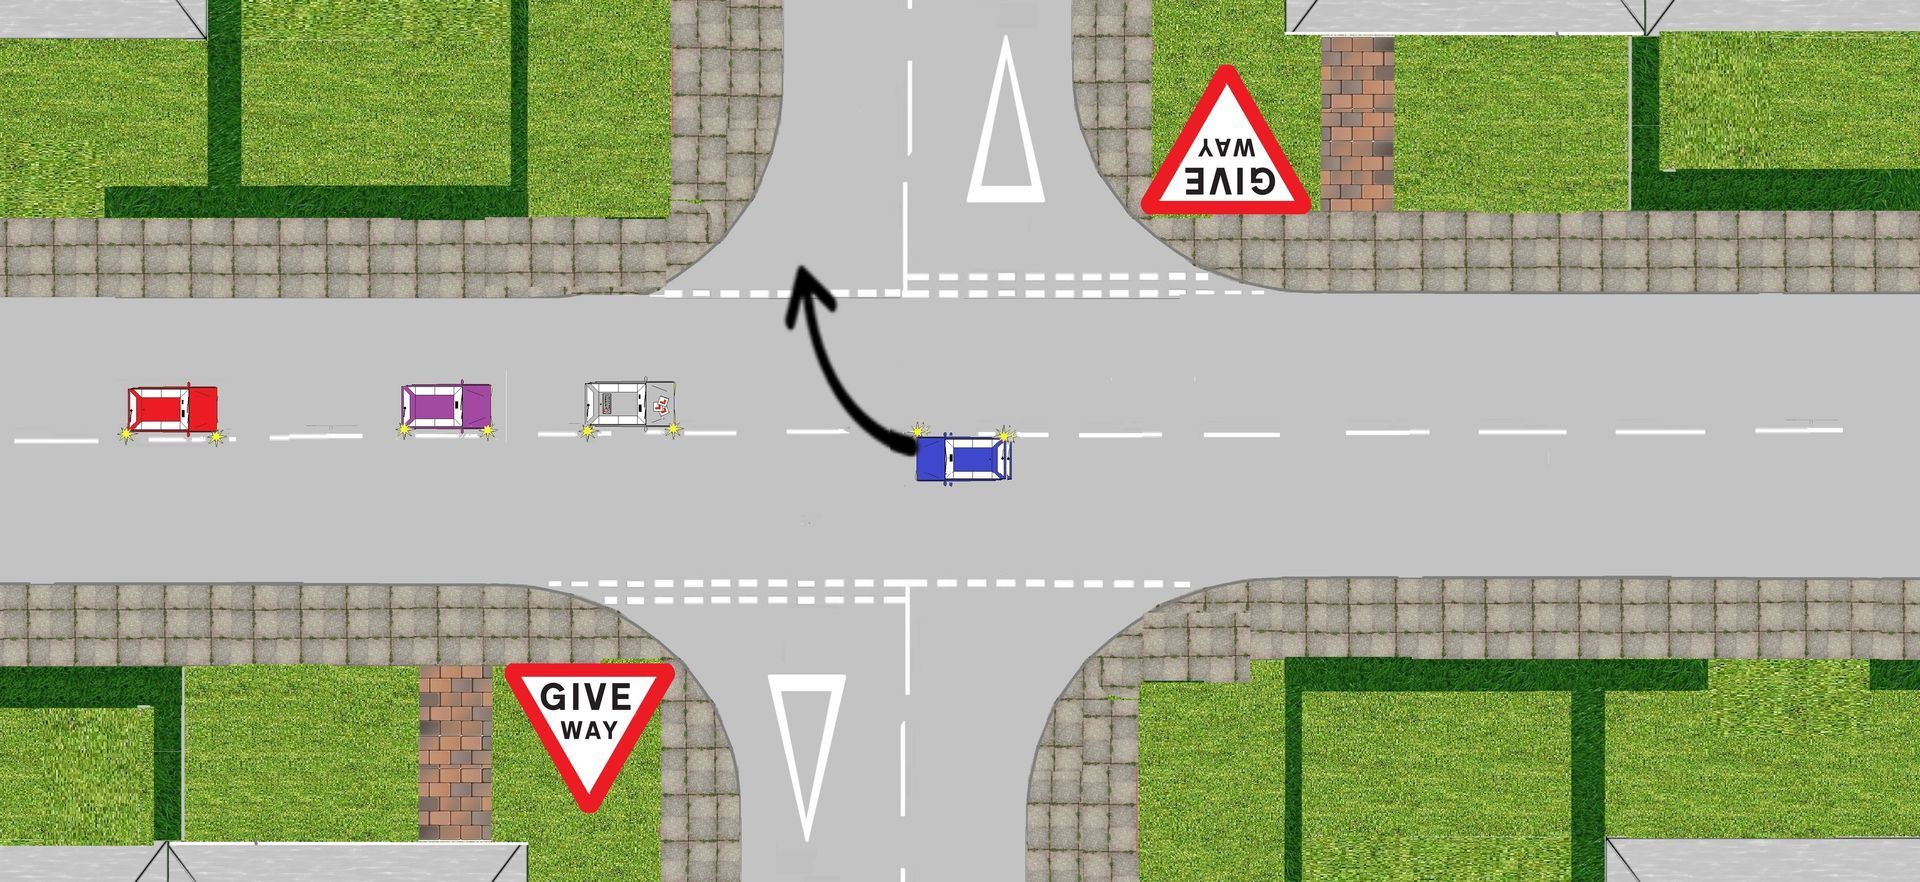
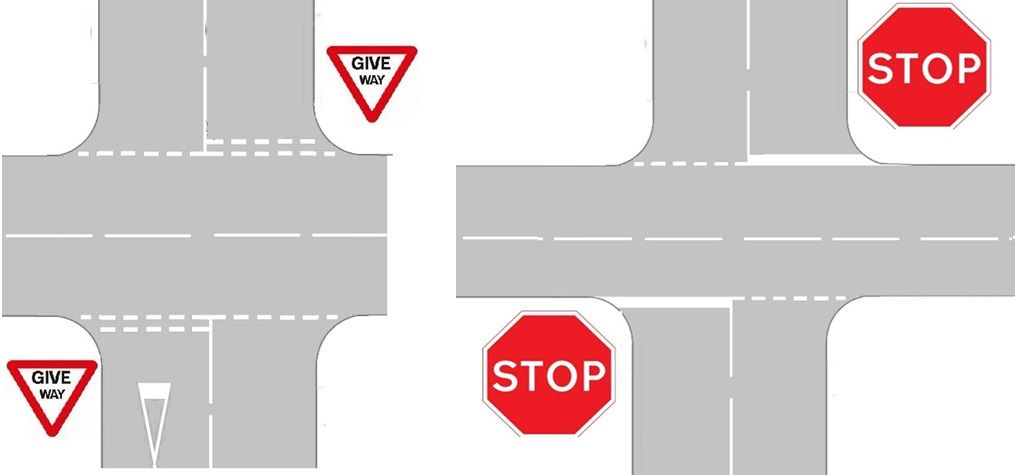
T junction
As you already been mentioned the difference between a T junction and a crossroads is there is an extra road. Above diagram show a T junction and below show a crossroads. Your objective is to work out the best strategy to negotiate an on coming vehicle also turning right with one off the three methods (options) set out on the lesson brief.
Triangle sign
The sign you will see when you are approaching a crossroads is a red triangle with a cross roads emblem in it.

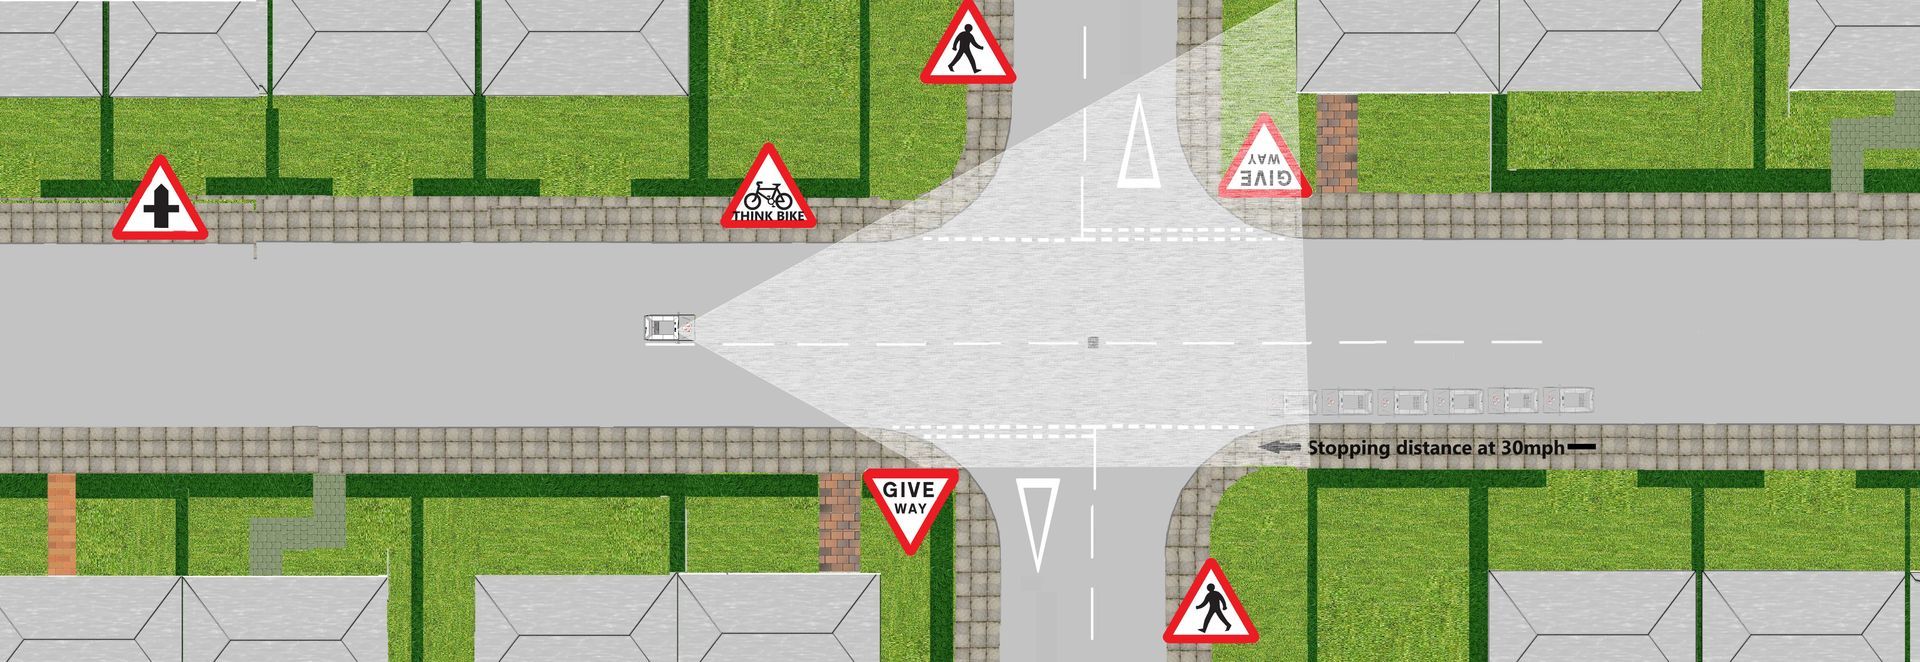
Crossroads
L.A.D.A
L.A.D.A is one of the best safety sub skills you will continue to use throughout your lessons and driving career.

M.S.P.S.G
Mirror, signal, position, speed and gear is your safety routine, you always need to check your mirrors before you slow down, speed up, change direction, moving off from a parked position and stopping on the left hand side of the road.
The three options:-
- Nearside to Nearside
- Offside to Offside
- Hold back and wait
Nearside to nearside and offside to offside crossing
Usually vehicles turn ether
nearside to nearside
or
offside to offside
at crossroads,
is says in the highway code offside to
offside is safer, you can as you see more ahead oncoming traffic before turning. However their is a 50/50 split on what drivers will do, so it is important to plan ahead and do the turn safely. If you aim to do
nearside to nearside
and the oncoming driver was approaching to far forward and was aiming to do
offside to offside, the 3rd option is to
hold back and wait. There's on wrong choice for safety.
Information you should already Know when turning right
When you are driving on a main road turning right at a crossroads and travelling at 30MPH we would advise this:-
- Look ahead/behind, Assess when to come of the gas pedal to start reducing your speed
- Look and assess then to start Mirror, Signal, position, Speed down (using brakes), gear down
- Look and assess behind you and into the new road for any dangers then Mirrors into your new road to make progress.
Or stop just before the point of turn.
Main road turning left
- Do not overtake just before you turn left
- Look well ahead and use your mirror's to assess for traffic that could approaching on your left
(fast moving e scooter) Kerb side
- Check your mirrors again before you make the turn (cyclists, motorcyclists and other electric road users in particular as they may be hidden from your view (blind spot)).
- Use your mirrors and give a left-turn signal well before you turn left.
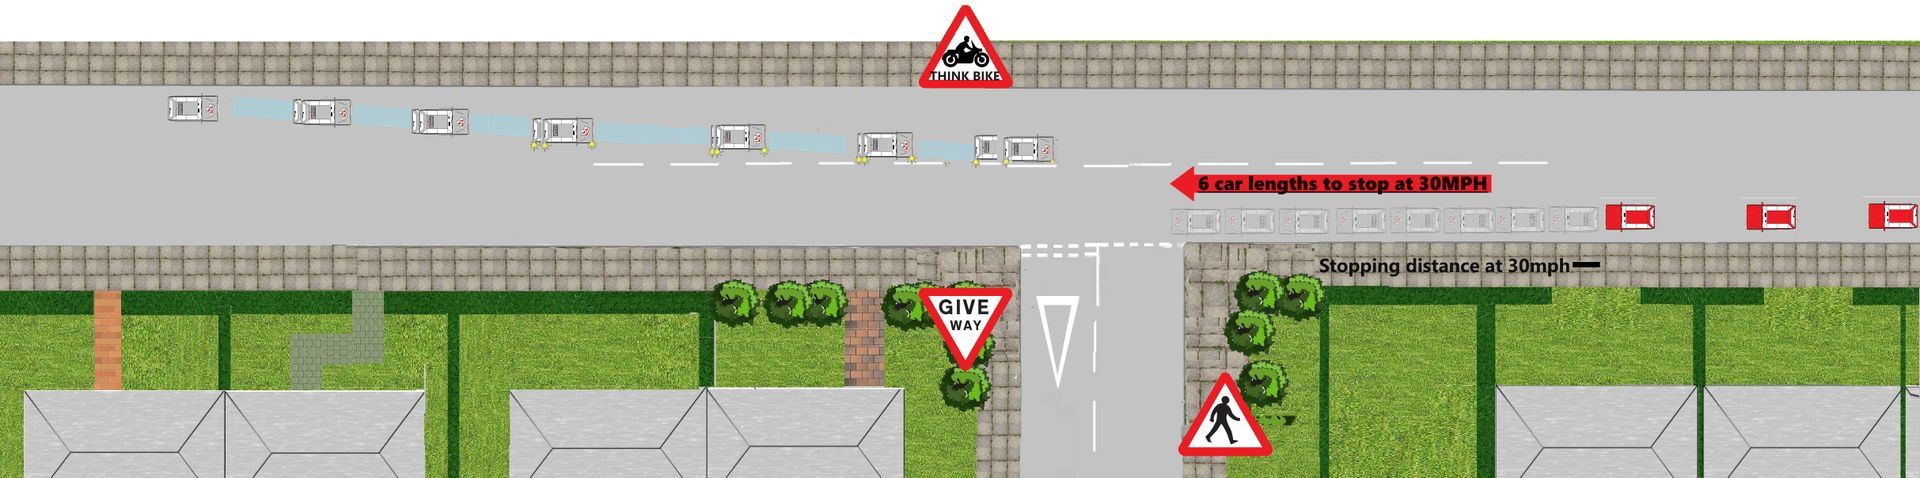
Main road turning right (same principle when crossing at a T junction or crossroad's)
The timing you need when on a main road turning right from your point of turn is 8 to 10 car lengths gap from the on coming vehicle (depending on your confidence), We put your walking strategy in to this thought process, if you had enough time to walk full across the road (with out a little jog at the end) you have enough time to cross and drive into the road.
The other issue you are looking for before you commit to turn right is for any pedestrian's walking across the road you are wanting to drive into or any parked vehicle in the side road . If their is you may need a bigger gap from ahead.
Nearside to Nearside
Offside to Offside
Hold back and wait
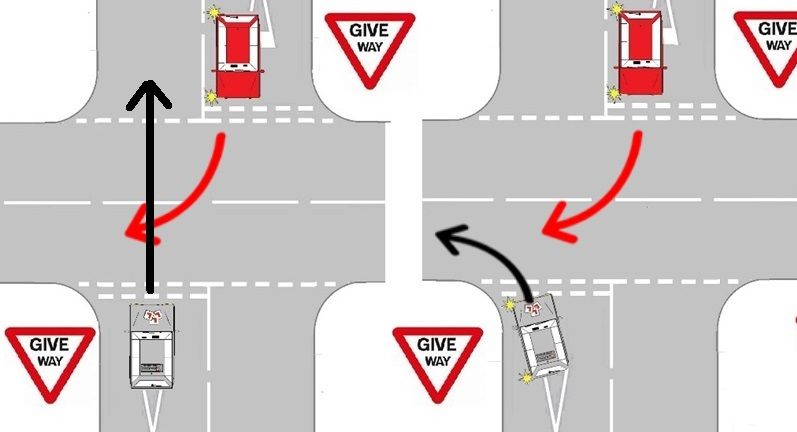
Correct method to turning right
When turning right you may be faced with an oncoming vehicle also wanting to turn right, neither vehicle has priority.
So let’s break it down, use L.A.D.A and the HAZARD routine's on the approach to gain information.
Anticipate and plan ahead with what’s coming towards you.
Then start the hazard routine
● Mirrors to the right
● Signal right
● Position so you’re close to the centre line
L.A.D.A if it’s safe to continue
● Reduce your Speed
● Gear (2nd or 1st) on the approach
Cross when clear
Point of turn
Achieving the correct point of turn (P.O.T) is important as you need to allow the vehicle that is approaching you also wanting to turning right, so you do not confuse other drivers.
Using your drivers side wing mirror can help you achieve the correct P.O.T.

Holding back out of junctions, yellow boxed junctions and KEEP CLEAR areas
Always keep the side junctions clear when it is busy on the road in front, this will enable the vehicles wishing to emerge out of the side road to emerge safely and make progress.
Yellow box junction rule
These have criss-cross yellow lines painted on the road. You MUST NOT enter the box until your exit road or lane is clear. However, you may enter the box and wait when you want to turn right and only stopped from doing so by oncoming traffic, or by other
vehicles waiting to turn right. You MUST NOT enter the box if your exit road is not clear.
White hatched markings
Hatched markings is an area of diamond white paint in the middle of roads.
Their function is to separate streams of traffic, particularly those approaching from opposite directions. In places where a traffic island would not be appropriate, the hatched markings act as a virtual island to keep drivers apart.
Use of hatched markings
Hatched road markings have failed a considerable amount of students on driving tests due to a learner driver dealing with them inappropriately. Hatched road markings are simply used to separate traffic for safety reasons. Many learner drivers try to avoid driving on them at all costs, when in reality if it’s legal to do so, it can on many occasions be far safer to drive on the hatched markings.
Move into the hatched markings when safe to do so, this will avoid slowing the vehicle behind you wanting to continue ahead when your aiming to turn right.
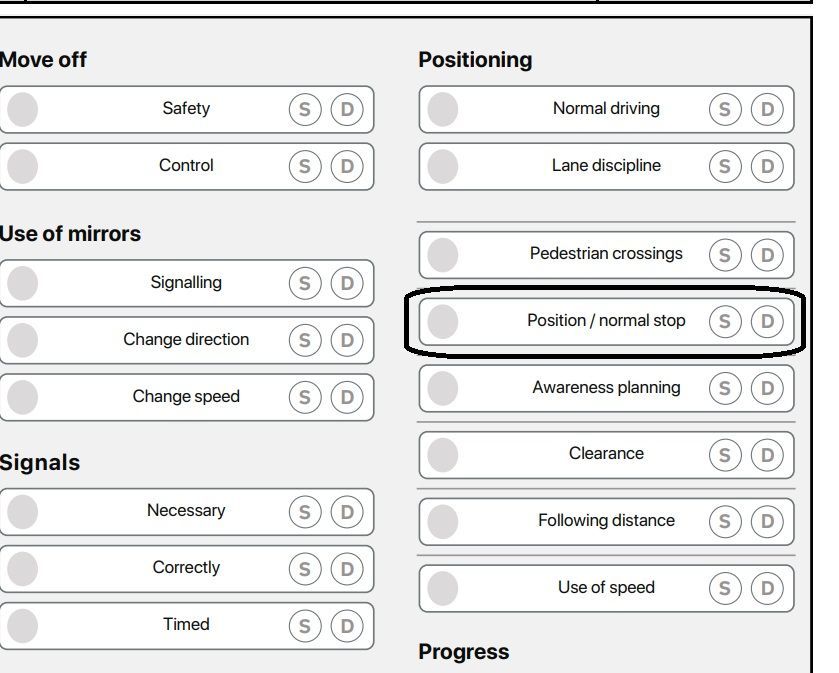
Positioning and normal stop
- When asked to by your examiner, you needed to pull up and stop at a safe place on the side of the road. This needed to be done in the first safe place available.
- When parked, your car should not have been a hazard to other road users.
Examples of faults
Some of the most common faults for this area include:
- partially or completely blocking a driveway
- obstructing other road users
- parking with one or more wheels on the pavement
- parking too far from the kerb
- Your examiner may have explained the specific details of any faults you made.
How you can improve in this area
- If you made faults in this area during your test, or if you want to improve in this area, you should:
- check rules 239 to 252 of The Highway Code
- read pages 243 to 250 of ‘The Official DVSA Guide to Driving: the Essential Skills’ (2022 edition)
- If you need to rebook the test, spend time practising and improving this skill with your driving instructor or supervising driver. You could work on:
- spotting safe and legal places to stop on the side of the road
- stopping on a hill or gradient
Park up on the left somewhere… (safe, legal & convenient)
As a driver it is your responsibility to ensure you fully understand the highway code and follow the rules as once you have past your driving test you are on a two year probation period and could easily loose you licence.
Do you know the road paint below?
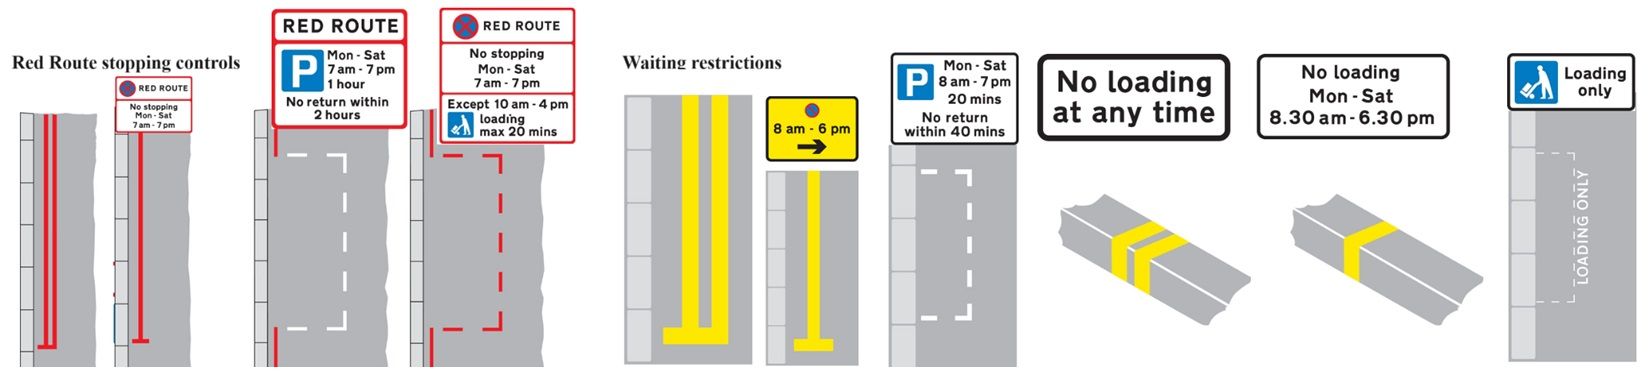
Below is a link to the highway code road markings
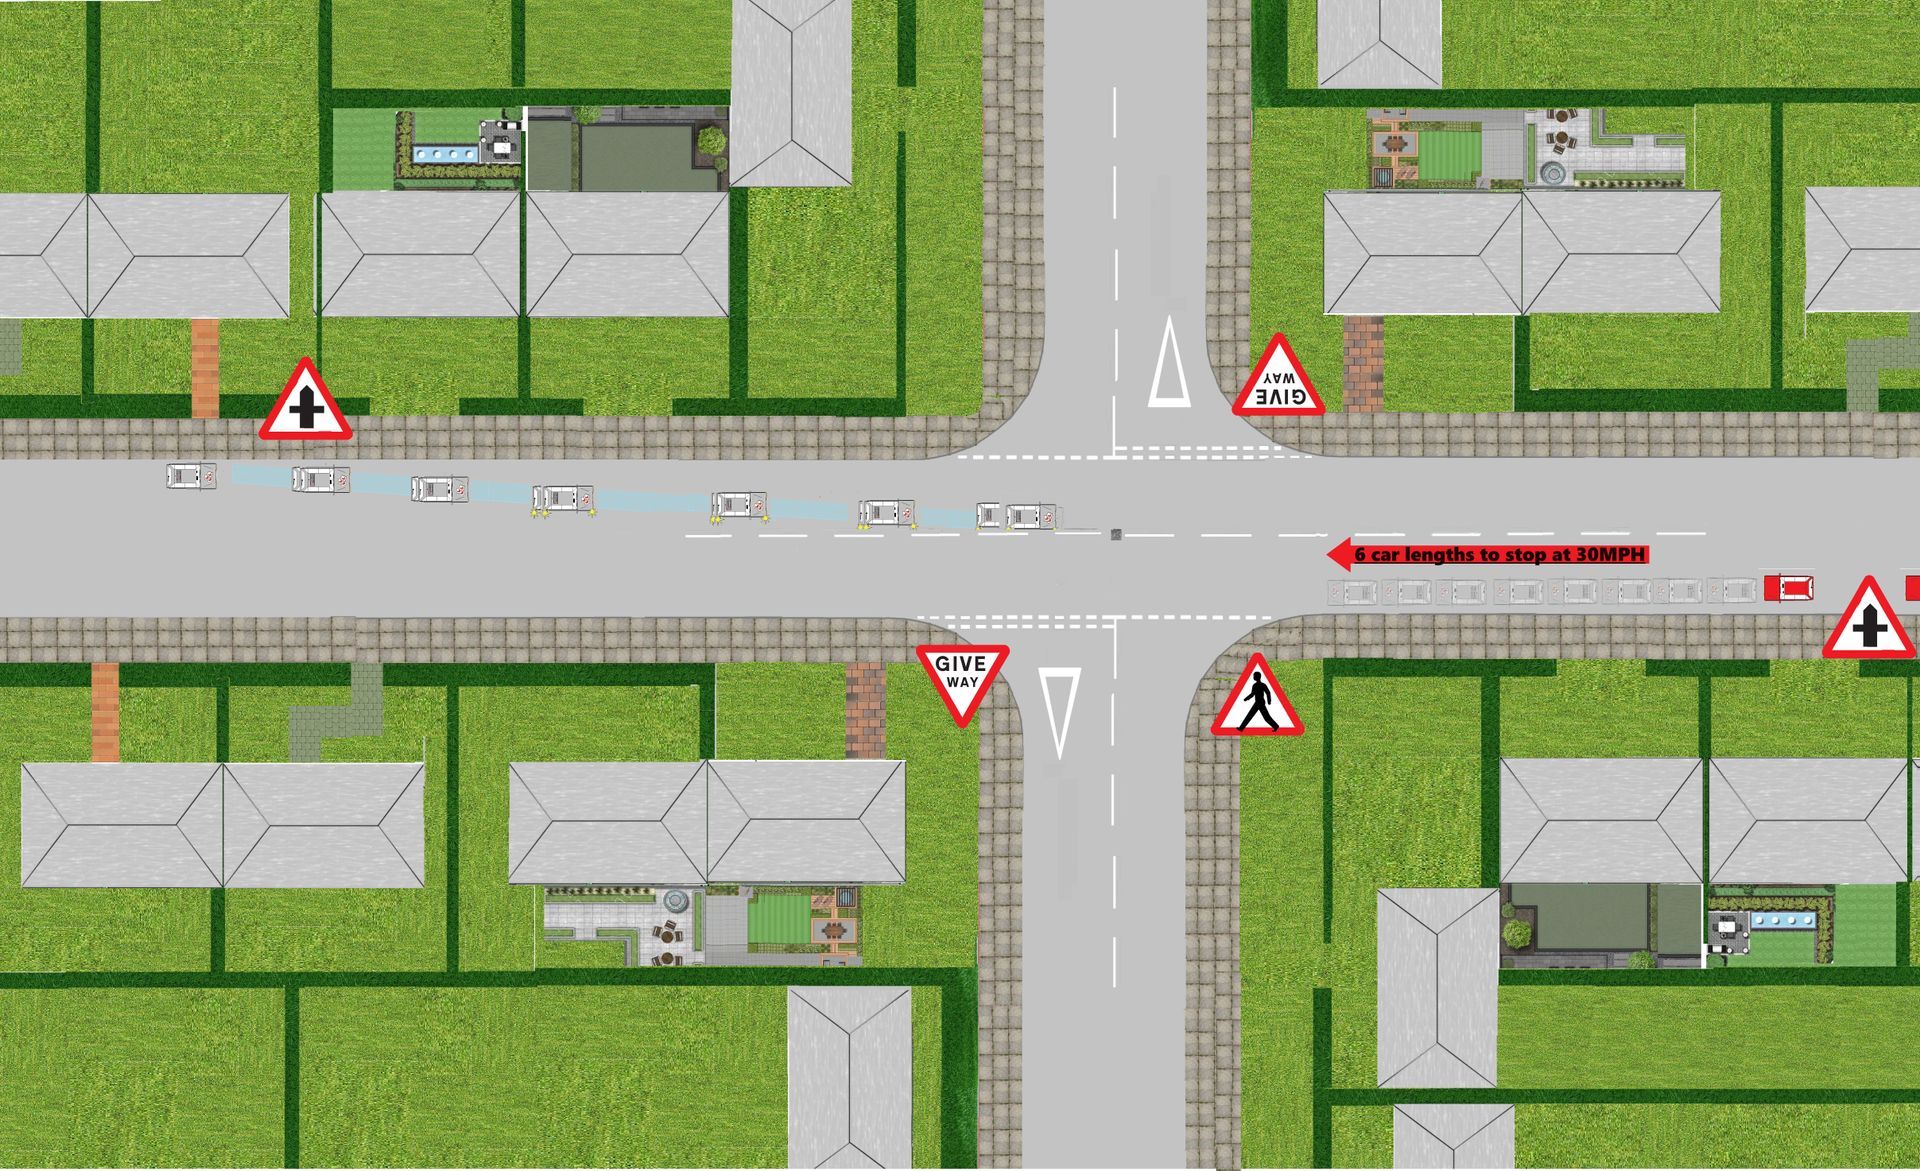
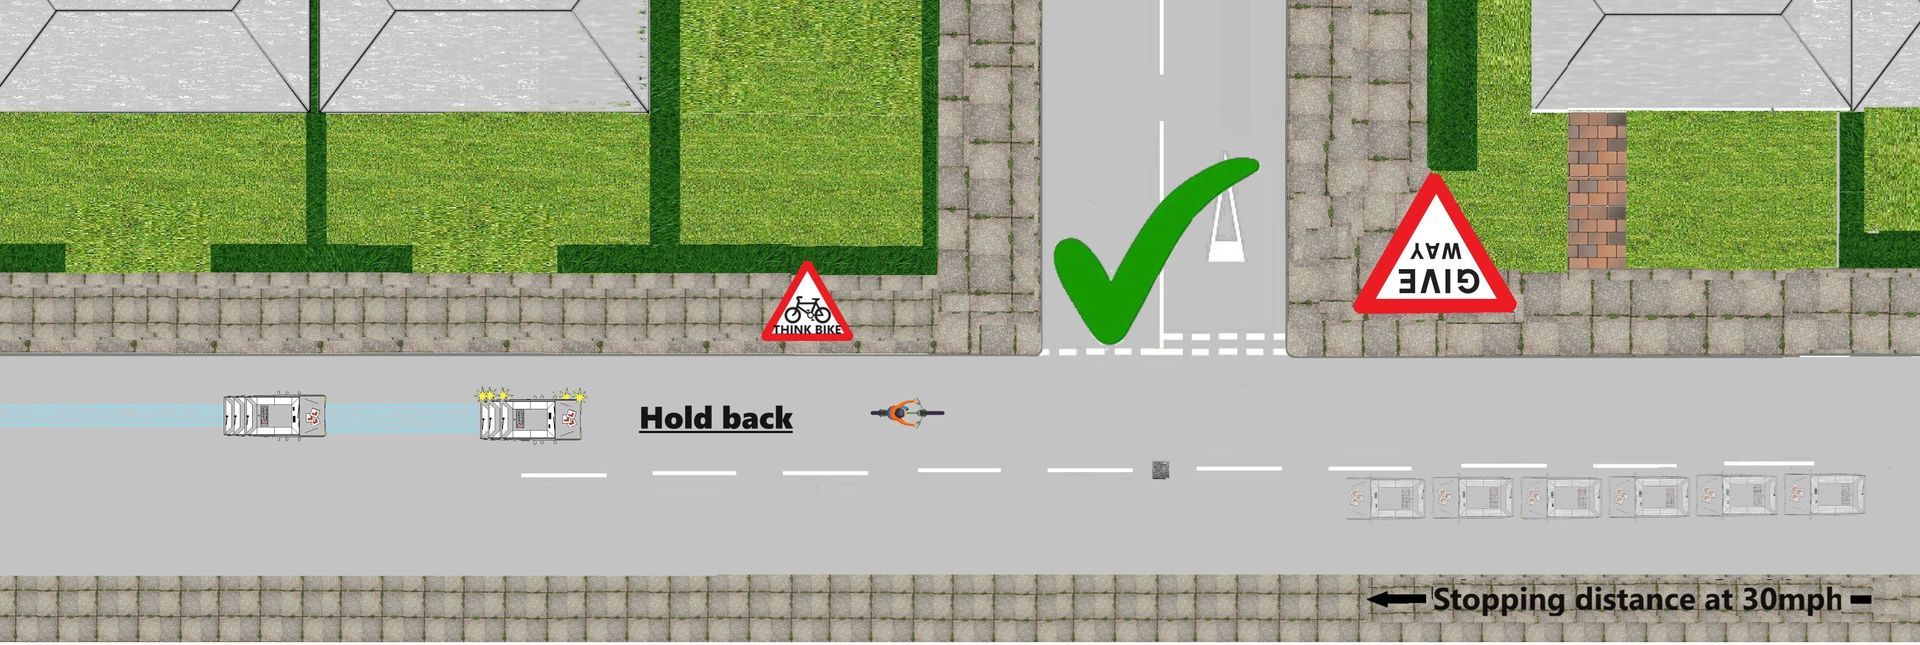
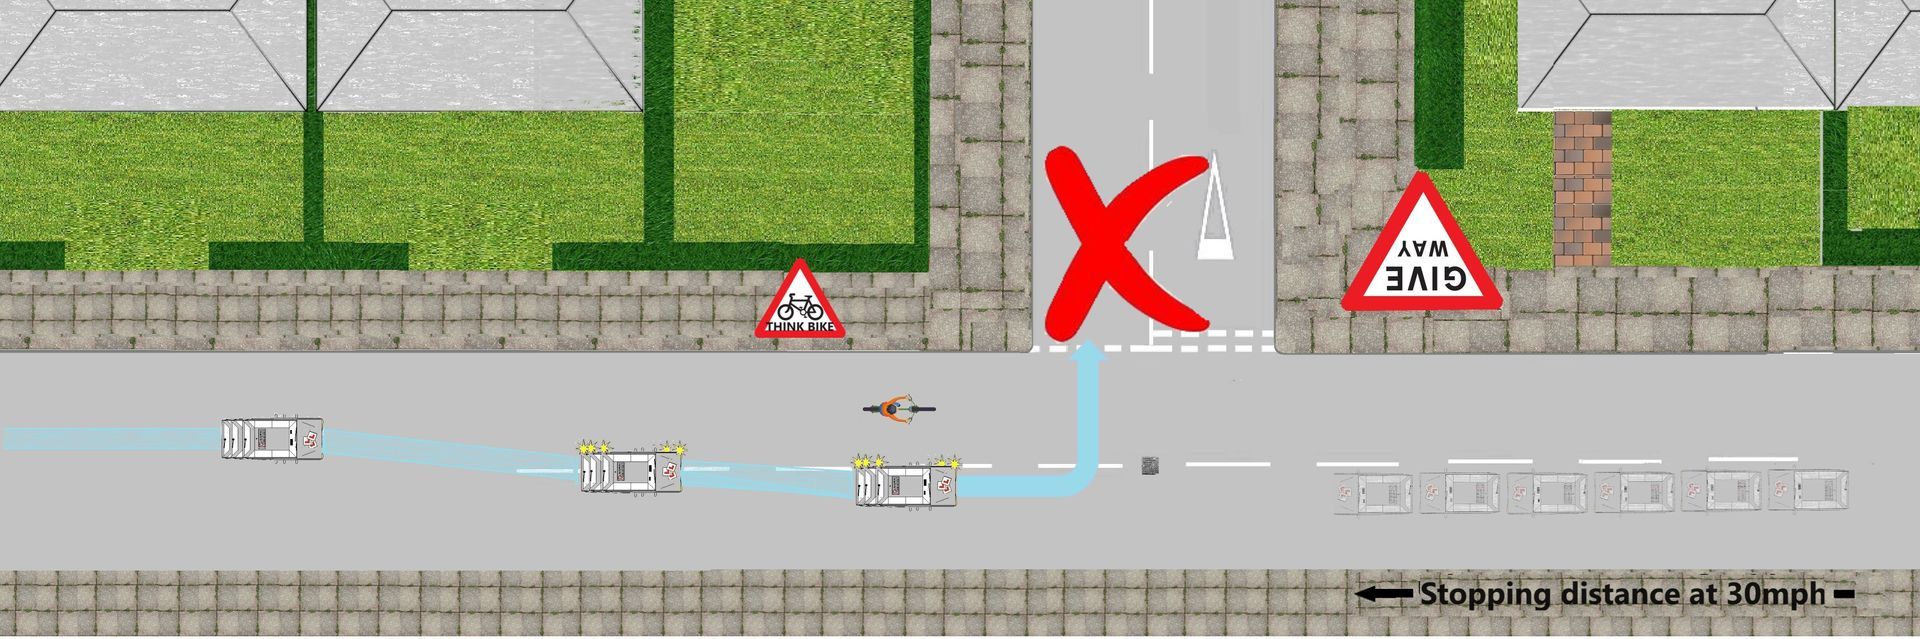
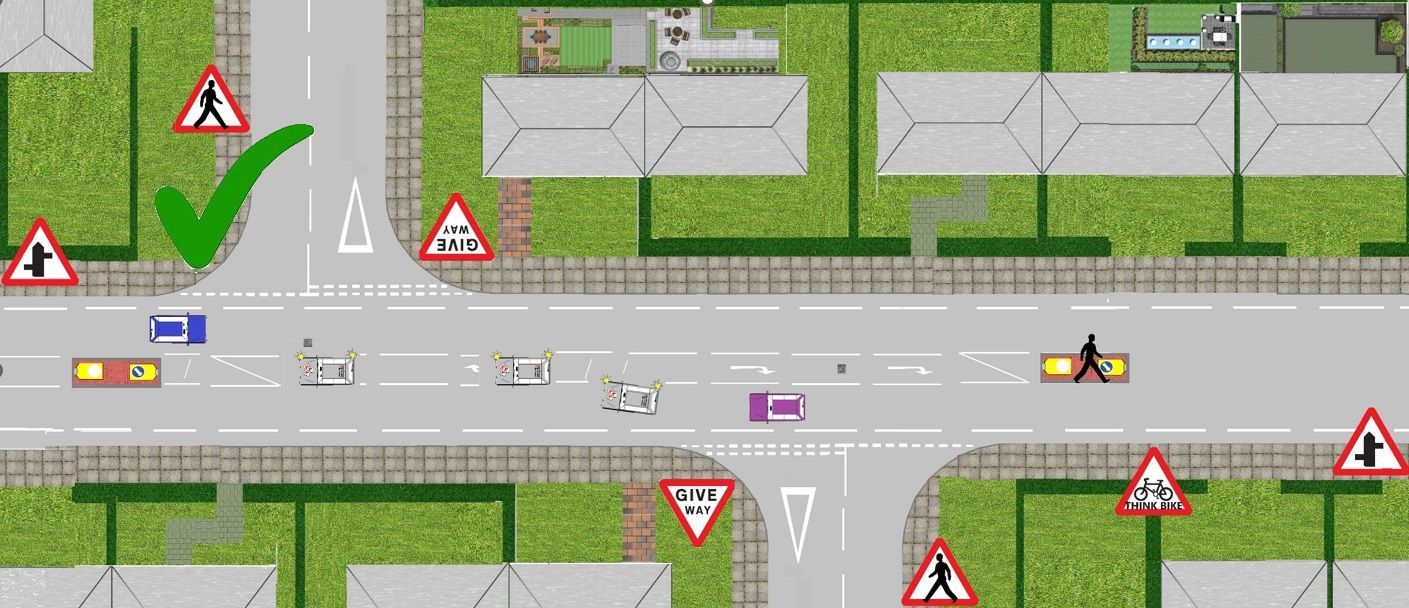
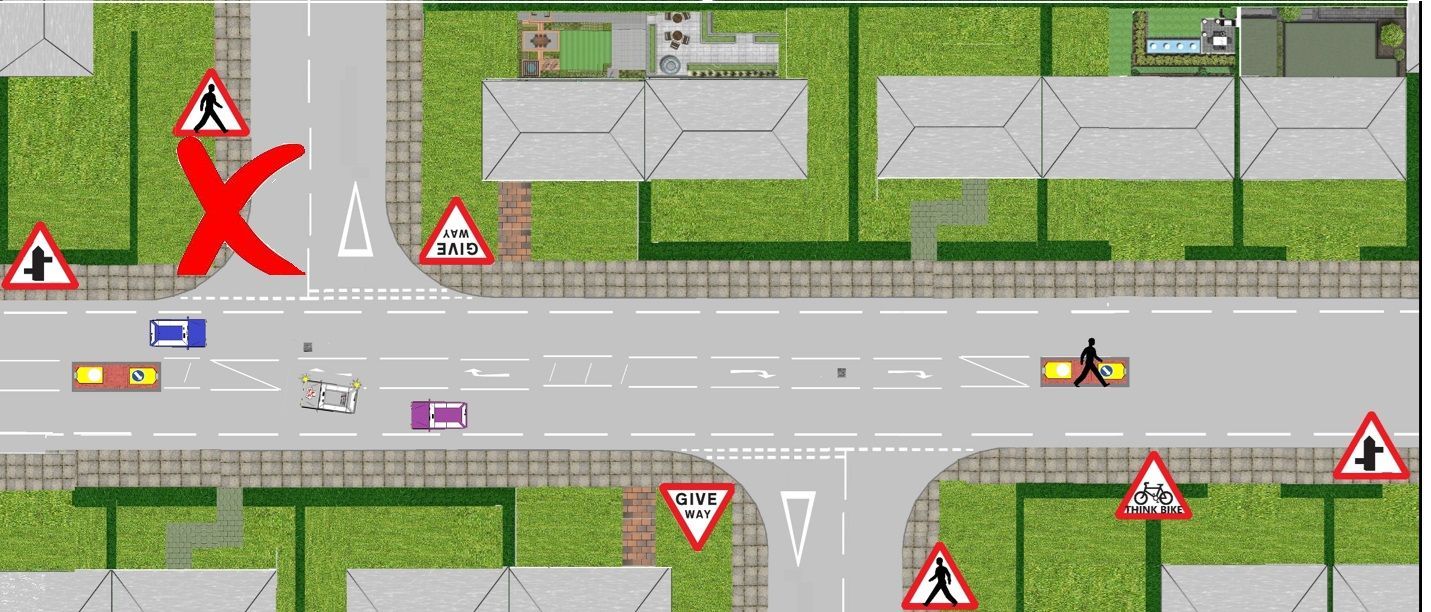
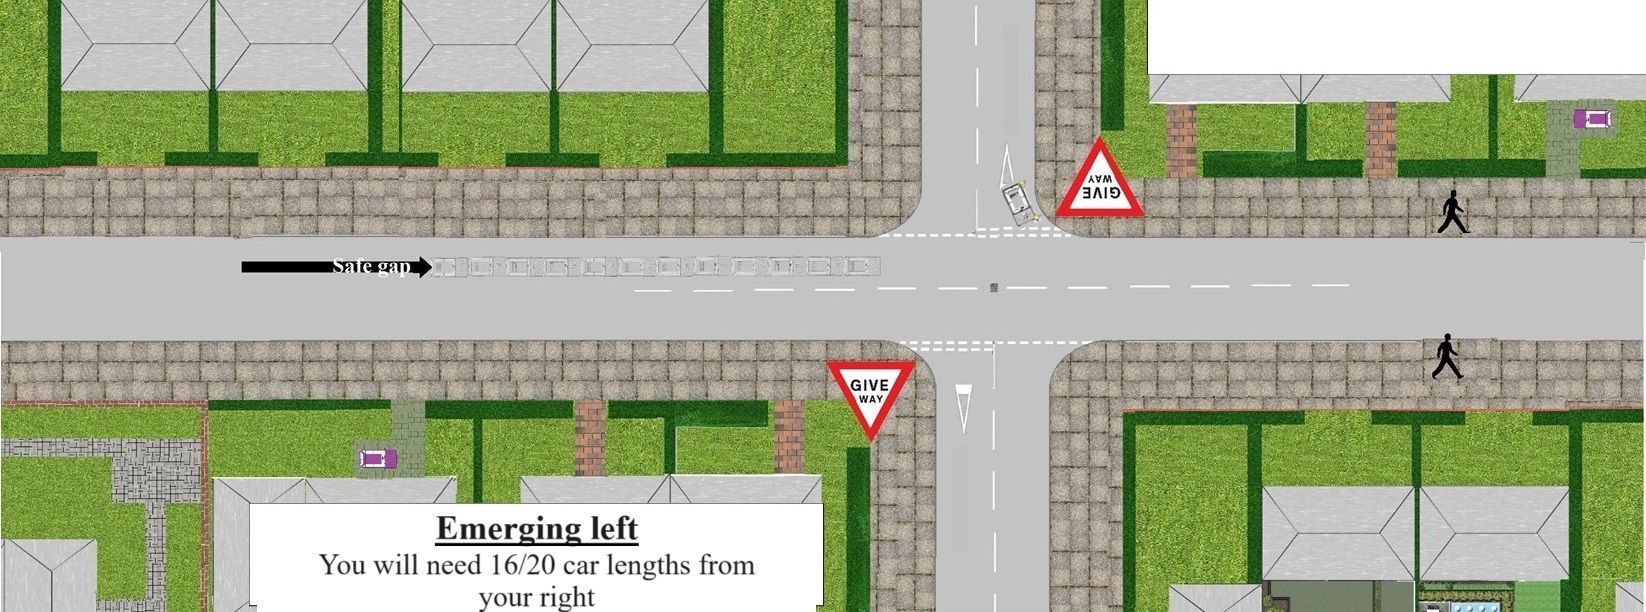
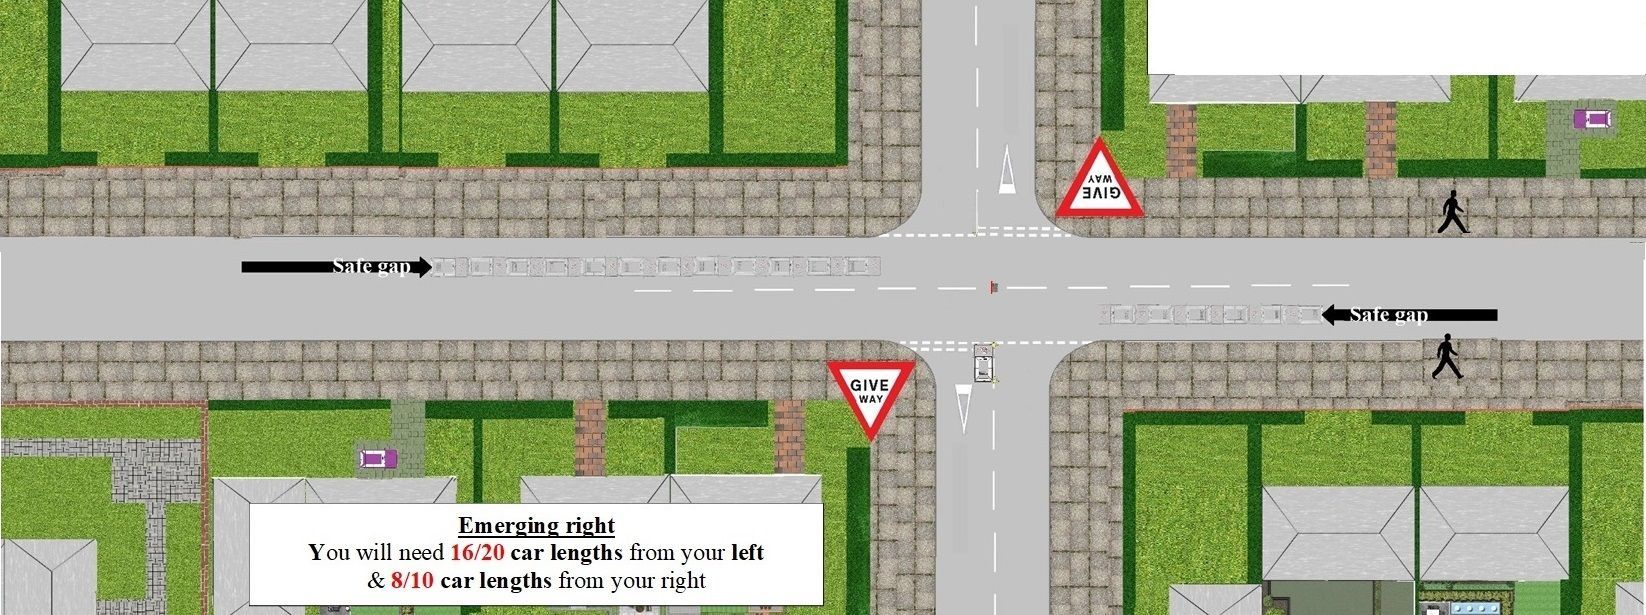
Emerging out of a crossroads onto a main road
When emerging out of a sideroad at a crossroads, you will also have to consider the opposite side of the road (unlike when emerging out of a T junction), the principle is more complex as there is now an extra adjacent road to consider. In the below diagrams grey learner tuition vehicle is turning out from a side road into a main road.
Priority
In the 1st two diagram of the below diagrams the grey learner tuition vehicle has priority, Why?
Just like when your on the main road when your going straight ahead or turning left you have the right of way, the same applies when your emerging. As the red vehicle is crossing your tuition vehicle you have the right of way.
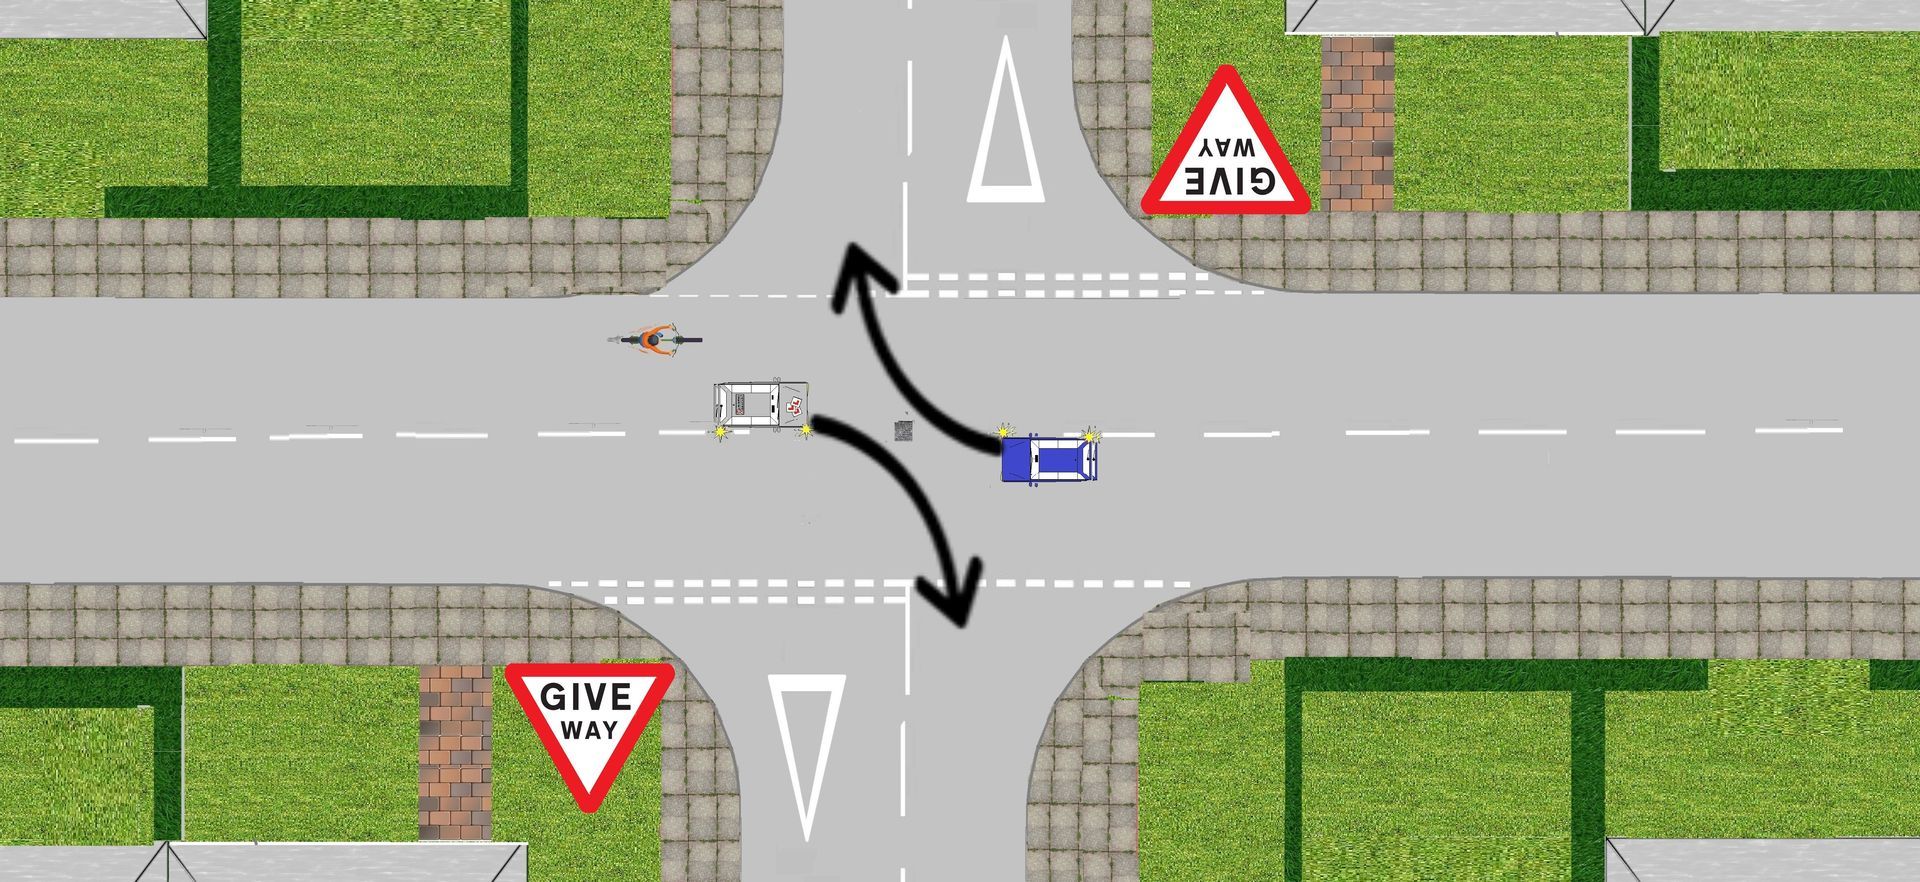
Emerging turning right
When emerging out of the side road and now turning right you would normally work with the opposite (red) vehicle and turn nearside to nearside.

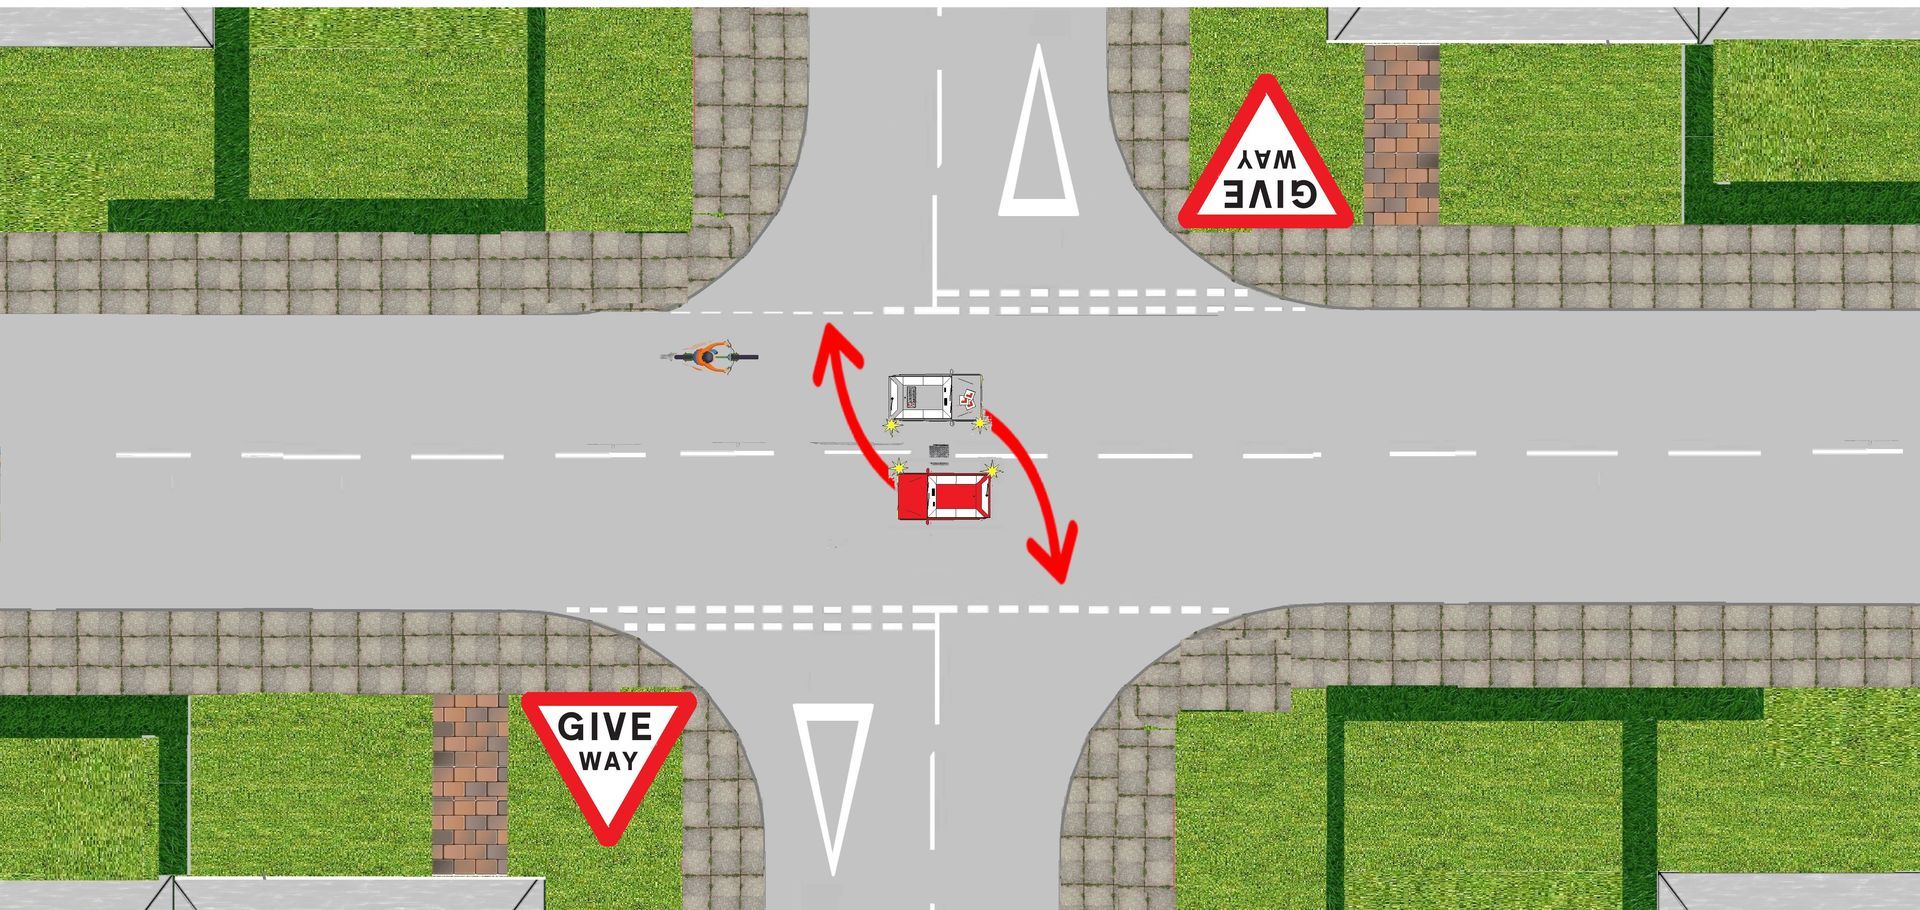
Emerging at a staggered crossroads
When your going straight ahead at a staggered crossroads you have the right of way. As the red vehicle is crossing your tuition vehicle you have the right of way.

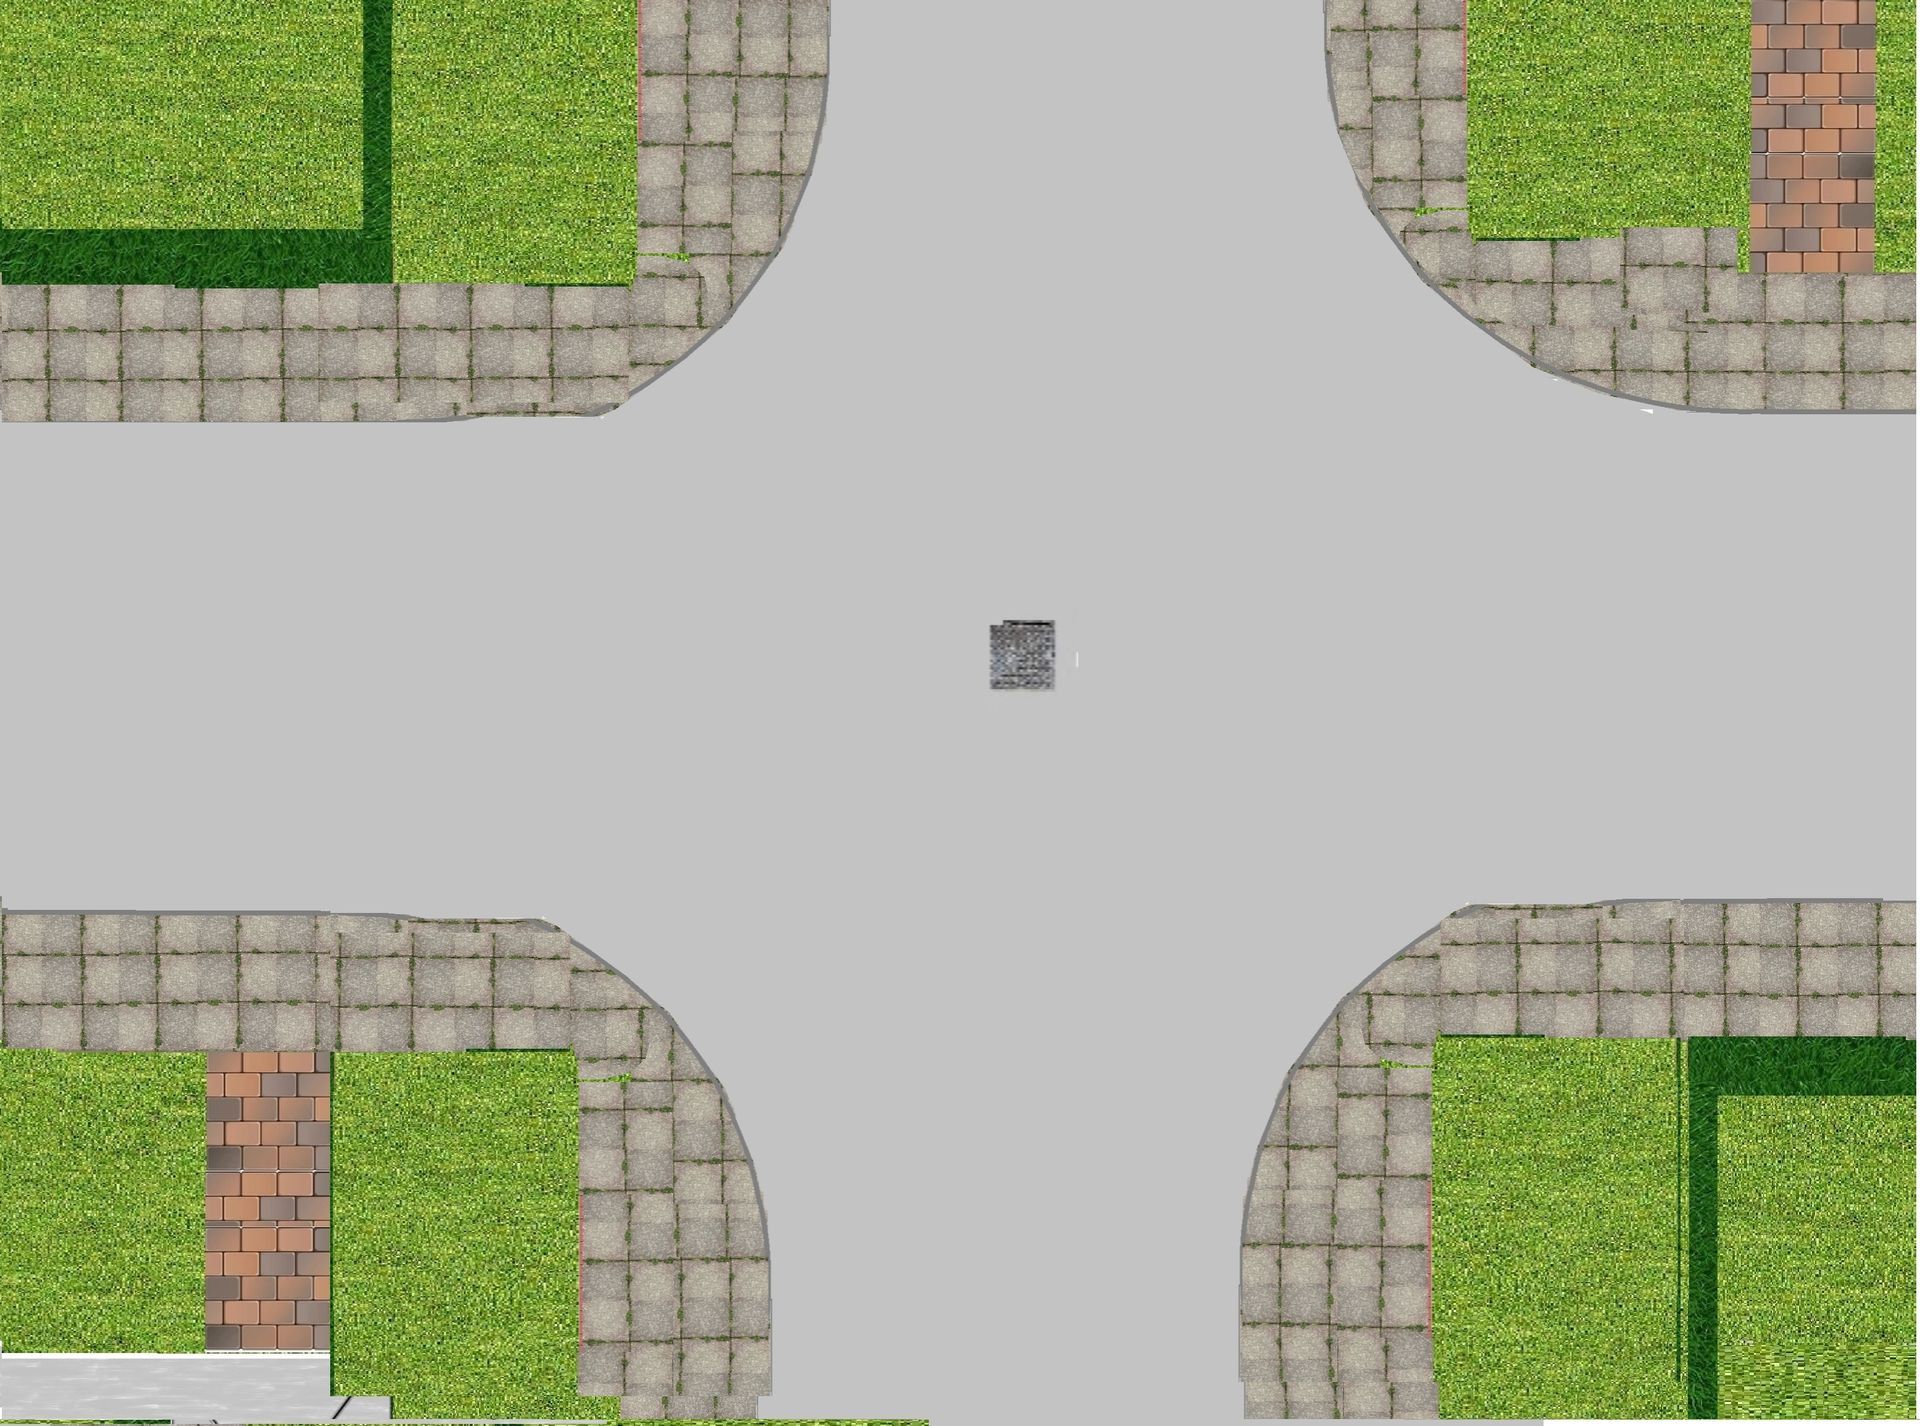
Unmarked Crossroads
Unmarked crossroads have nothing that “controls” the junction i.e. no ‘Stop’ or ‘Give Way’ signs or lines, no traffic lights and no police or other authorised person directing the traffic.
Approach at a low speed and treat unmarked crossroads as if you face a 'Give Way' sign. At unmarked crossroads
no one has priority so if there is no road signs or no road markings do not assume that you have the priority. Remember that other drivers may assume they have the right to go.
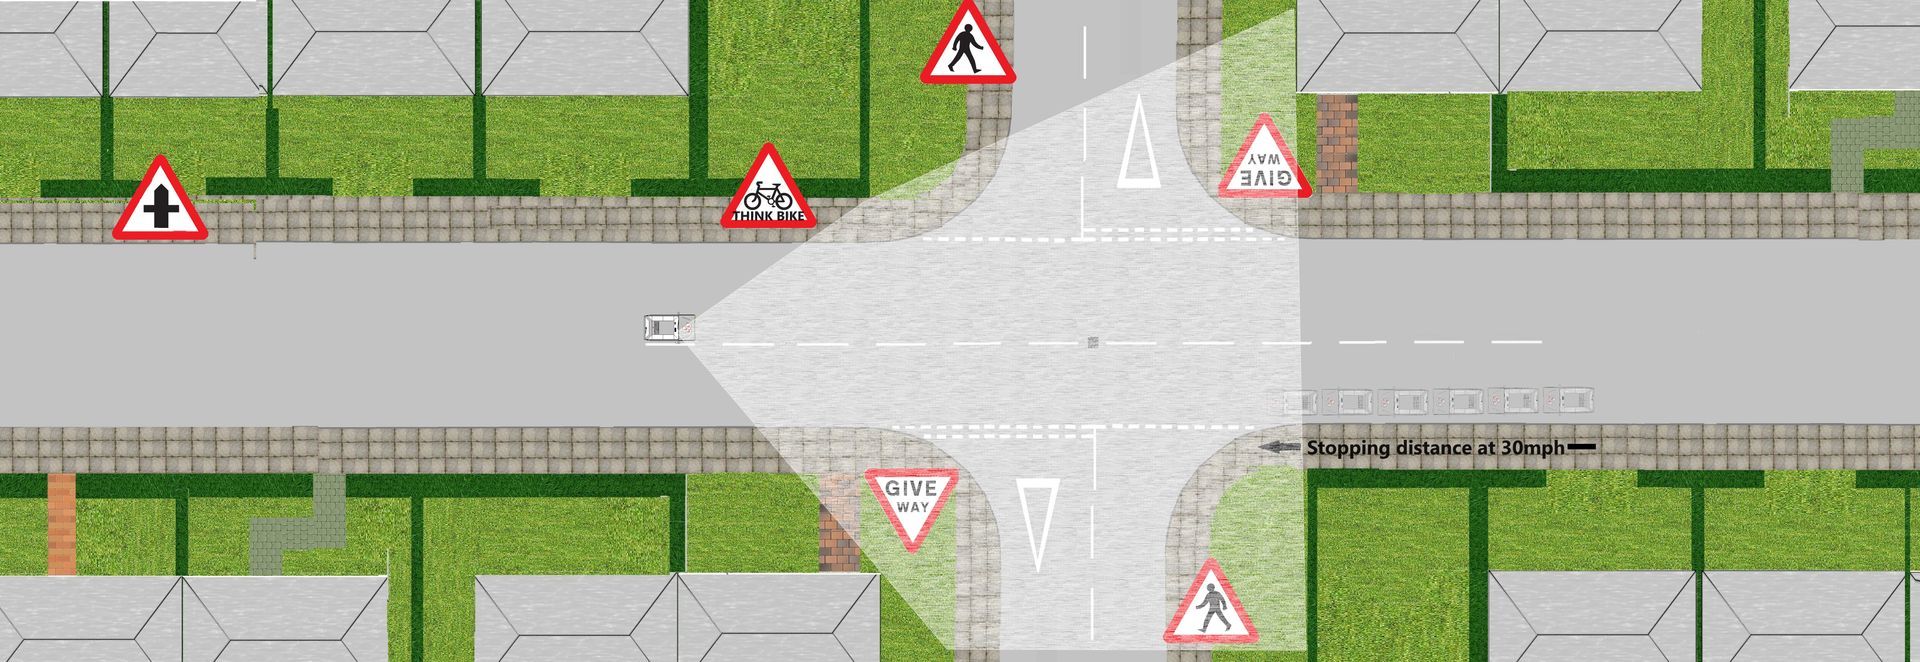
Closed crossroads
Open crossroads
- Agree learning goals and needs of todays lesson
- Agree appropriate lesson structure (full, partially or independent level of instruction)
- Practice in a suitable training area
- Agreed if needed to adapt the lesson plan to help the pupil work towards their new learning goals if any verbal or physical intervention was made by the instructor
- Directional instructions will be given in ADI format (Alert, direction and identify manor) given to the pupil clear and given in good time
- Agree if the students made a minor, serious or dangerous error on your lesson it will be broken down using F.I.S.H (fault, implications, solution & help) this method of feedback helps pupils understand what fault is being made and how to strategies on how correct the faults.
- Your driving instructor will adapt their teaching style to suite your ability and ability
- Your driving instructor will continue to encourage you on your lesson and analyse any problems made and allow you to take responsibility for your own learning goals by giving you technical information to improve your techniques. Your technical feed back from your instructor will be ether given on the move or if feel needed by pulling you up on the side of the road somewhere safe, legal and convenient.