Emergency stop

Emergency stop
Introduction

At this stage of your training you will be improving full control your training vehicle-
  • You will be moving off using the P.O.M routine 
  • Pulling away with clutch control
  • M.S.M/P.S.G & L.A.D.A routine's when stopping, turning, emerging at junctions will be improving
  • Co-ordination of foot controls will be fluent
  • Steering/pulling when parking up on the left also turning and emerging at junctions will be improving
  • Gear changing up and down should now be independent
  • Adequate distance around stationary vehicles and slower moving vehicle (cyclists and pedestrians) should be nicely improving. 
The emergency stop can be briefed from lesson five onwards but please note instructors teach this brief at different stages of your training. You could be at various standards of your training, so you could be at a basic or trained level. 

Agreed lesson is covering :-

The lesson that you and your instructor will be covering today will be the dreaded emergency stop.....
I really enjoy the time I say emergency stop brief, but once we get to a safe location to practice it all students (well most anyway) enjoy the and feel safer knowing how to stop under full control.

You will continue to develop with last lesson brief on the way to the training area:-
  • L.A.D.A & M.S.P.S.G (at junctions)
  • Two second gap
  • Hold back position
  • Meeting , overtaking, adequate clearance when overtaking stationary & slow moving vehicles Continue working on open & closed junctions 
  • Junction work
Agree level of instruction

Intervention

Agree if any of the lesson is going to be a instructor-lead-lesson or a client-centred-lesson and if it is client-lead agree if the instructor has to intervein verbally, take control of the training vehicle by ether using the dual control or take the wheel the lesson plan may need to be changed until the fault is fixed.

F.I.S.H
Fault
Implication
Solution
Help

Lesson aims and strategies

The aim of today’s lesson is to Have a Q&A on use of mirrors and incorporate the hazard (drill) and L.A.D.A routine's while driving to a training area to learn how to do the emergency stop under full control.  Once at the training location complete the emergency stop exercise using the brakes and clutch (in correct tempo and order), keeping full control of the vehicle at various speeds while doing the emergency stop and have the correct observations before you drive on. So it’s very important you understand your overall stopping distances on this lesson too. 

Risk responsibility objective's

You and your instructor will agree lesson plan support to ether:-
  • Full talk through
  • Prompt 
  • Independent. 
This is important to ensure that the instructor and student understands who has the main responsibility on the control of the training vehicle on the set lesson plan.
Your level of instruction will be given by your instructor to a level to suit you from full talk through then reducing your support to either prompt or independent.

Lesson brief

An observant driver would rarely have to stop in an emergency as he/she would always be on the look out for potentially dangerous situations and act accordingly (looking, assessing, deciding and acting while anticipation while driving.
Nevertheless a situation may arise that could not have been ready for and as you did not anticipate and plan in a situation your only course of action might be to undertake an emergency stop. 

Lesson brief

At the start of the lesson you will be asked questions on the use of mirrors and why.

Use of mirrors before you:- 
• Speed up 
• Slow down 
• Change direction

Then on the way to your training location you will be assessed on the use of your mirrors including the L.A.D.A & M.S.P.S.G routines

At the training location


One learner out of three to get the emergency stop exercise on a driving practical test.


Your examiner will pull you up on the left hand side of the road at some part of your driving test, then will explain to you the following once you have pulled over:-

  • I would like you to demonstrate the emergency stop exercise
  • Before I give you the instruction, I will look over my right shoulder to ensure its safe to give you the instruction and my verbal instruction will be to STOP!
  •  Please DO NOT anticipate the examiner will say STOP as soon as they look over their shoulder. 

Then the examiner will ask you to drive on when it is safe to do so.


Before you drive on and start the exercise.

  • P.O.M up and drive on when it is clear behind you. 
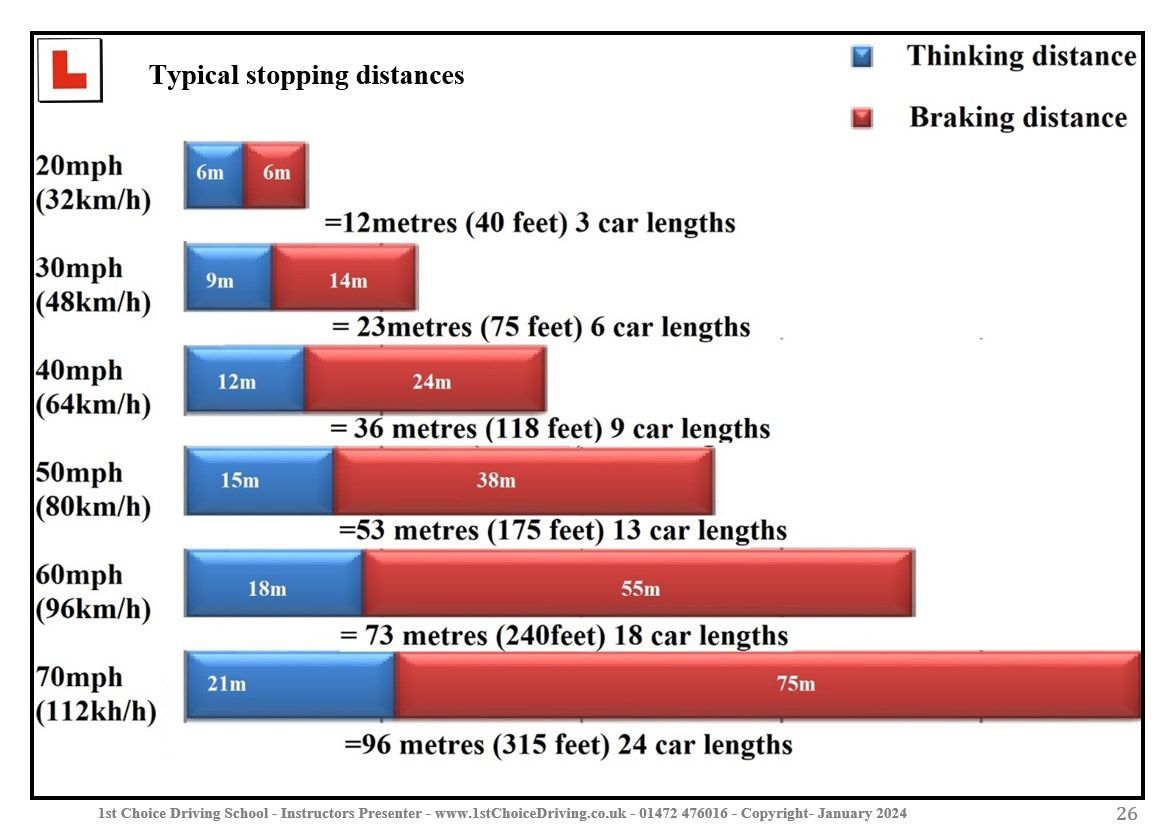
  • When you get your speed up to about 20/30mph you will be given the instruction of "STOP"!! 
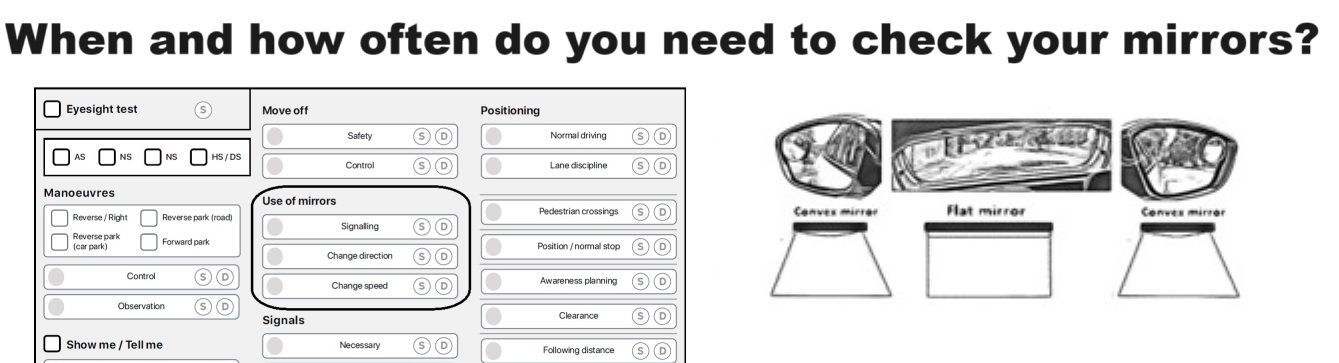
  • At this point you DO NOT need to check any of your mirrors (as you should be checking them every 6-10 seconds) as you should know what is behind you before you pulled away to do the emergency stop. 
Highway code rule 159

You need quick reactions to stop safely whilst maintaining full control of your vehicle


The correct use and tempo of pedals

Remember AB and C

  • Come off your Accelerator
  • Squeeze your Brake 
  • Clutch down


Engine braking


  • If you press the clutch first your training vehicle no longer has engine braking as you have separated the engine and gearbox. Therefore there will be no engine/gearbox breaking so it will probably take longer to stop and may become difficult to control. 
Highway code rule 122

Timing of reactions to your pedals


An easy way to get the timing right is by Saying STOP in your head and when you are told to stop. 

Press the foot brake on the S and press the clutch pedal down on the P, giving you a method to stop with the correct use of pedals.


What you will be assessed on when stopping:- 

  • The overall time it has taken you to stop
  • The correct use of the brake and the clutch
  • Correct control (so you DO NOT skid)
  • Placement of your hands throughout the exercise

Once you have stopped


Apply your handbrake and put your gearstick into neutral


Then once the vehicle has stopped you will be asked to drive on


Preparing to drive on

Make sure you do your P.O.M routine.

  • Prepare with 1st gear.
  • Observe all around including the left and right blind spots.
  • Move (drive on) when it is safe to do so. 

Take extra observations before moving away checking both blind spots.

Highway code rule 159

Additional information


Keep both hands on the steering wheel until the car has stopped, this will help keep control of the vehicle when you brake firmer as usual (as the weight of the car is thrown forwards due to the engine’s weight). 

Hold the steering wheel with a firm grip this will help to maintain direction or correct skids if one occurs. 


Do you know what is ABS? 


Answer - Anti-lock Braking System (ABS)

Controlling a skid
 
If your car skids in a straight line during an emergency stop you have pressed the brake to hard/aggressively so to correct this issue ease off the brake and re-apply the footbrake with less pressure.  This will allow the tyres to regain their grip on the road surface. 

You could also lose control of the vehicle with it swerving to the left or the right. If this happens, look and steer in the direction you want to go. 

The emergency stop video
Speed and stopping distances.

The distance it takes to stop a vehicle depends upon the weight, speed, brakes, tyres and suspension of the vehicle. It also depends upon your reaction speed and thinking time and the road surface itself. The Highway Code contains a guide to normal stopping distances assuming a typical dry road surface and average vehicle characteristics. 
At the end of your lesson agree your next lesson

learning techniques and strategies

Practice the emergency stop while keeping full control of your vehicle, learning the correct technique's to stop within the correct stopping distance of your road speed and also drive on safely once you have completed the exercise.

Once you have practiced a few situations a few times your instructor will reduce his/her support transferring his responsibility over to you (that's if you agree with this).

Lesson Planning
  • Agree learning goals and needs of todays lesson
  • Agree appropriate lesson structure (full, partially or independent level of instruction)
  • Practice in a suitable training area
  • Agreed if needed to adapt the lesson plan to help the pupil work towards their new learning goals if any verbal or physical intervention was made by the instructor

Risk Management

Fully understood how the responsibility for risk of the lesson would be shared on the lesson plan between instructor and student.
  • Directional instructions will be given in ADI format (Alert, direction and identify manor) given to the pupil clear and given in good time
  • Agree if the students made a minor, serious or dangerous error on your lesson it will be broken down using F.I.S.H (fault, implications, solution & help) this method of feedback helps pupils understand what fault is being made and how to strategies on how correct the faults.
Teaching & Learning Strategies

Like mentioned earlier every student is induvial and each and everyone of you will progress at different rates so driving will adapt their lesson plan to help you achieve your driving goals.
Your driving instructor will adapt their teaching style to suite your ability and ability
Your driving instructor will continue to encourage you on your lesson and analyse any problems made and allow you to take responsibility for your own learning goals by giving you technical information to improve your techniques. Your technical feed back from your instructor will be ether given on the move or if feel needed by pulling you up on the side of the road somewhere safe, legal and convenient.

Rote learning (WikipediA)

Rote learning is a memorization technique based on repetition. The method rests on the premise that the recall of repeated material becomes faster the more one repeats it. Some of the alternatives to rote learning include meaningful learning, associative learning, spaced repetition and active learning.

At the end of your lesson 

At the end of each lesson you will have a debrief with your instructor giving you the opportunity to reflect on your performance on your lesson then you can set up new goals for your next driving lesson.
This will also give you the opportunity to research any new topics that will be brought into on your next agreed lesson.
Share by:
Driving school & instructor courses in Grimsby, Intensive lessons & course Louth/Scunthorpe Driving schools in Grimsby & Cleethorpes, trailer training lessons