Turn in the road
Introduction
At this stage of your training your:-
- P.O.M routine (moving off)
- Steering to a safe driving position and pulling up on the left
- Clutch control
- Co-ordination of foot controls including gear changing up and down
- M.S.M routine at junctions and stopping
- Adequate clearance around stationary vehicles and slower moving vehicle (cyclists and pedestrians)
- T, Y junctions, crossroads including more complex junctions and timing of gaps right
should be improving and getting more (independent) client-centred
Agreed lesson is covering :-
The turn in the road exercise
Agree level of instruction on the way to the training location
Intervention
On the drive to the reversing location you will assessed on the skills and drills from the above lesson briefs:-
Agree if any of the lesson is going to be a instructor-lead-lesson or a client-centred-lesson and if it is client-lead agree if the instructor has to intervein verbally, take control of the training vehicle by ether using the dual control or take the wheel the lesson plan may need to be changed until the fault is fixed.
F.I.S.H
- Fault
- Implication
- Solution
- Help
Lesson aims and strategies
The aim of today’s lesson is to incorporate the Look, Asses, Decide and Act and Mirror, Signal, Position, Speed, Gear routine's when turning the training vehicle around. Previous reversing (straight line reverse ) would of already helped you to develop your clutch control. remember to move the clutch to the biting point then move the clutch pedal a £1 thickness up and down so you keep full control throughout the manoeuvre.

Risk responsibility objective's
On the way to the training location you and your instructor will agree the level off support from your instructor:-
- Full talk through
- Prompt
- Independent.
This is important to ensure that the instructor and student understands who has the main responsibility on the control of the training vehicle on the set lesson plan.
Your level of instruction will be given by your instructor to a level to suit you from full talk through then reducing your support to either prompt or independent.
Please note from November 2017 your driving test changed the reversing around corners and the turn in the road exercises has been replace with parking up on the right hand side of the road and reverse back 2 too 3 car length and driving into a parking bay then reverse back out of it.
However you will still be taught learnt the reversing around corners and the turn in the road exercises manoeuvres at a lower structured level from your driving instructor.
Why just think if you are on your driving test and you go the wrong way (like a dead end road) and you was unable to turn your training vehicle around safely.....
The turn in the road exercise will be taught to you at a certain point in your training as all driving instructors alter lesson briefing to suit all students needs, however all lesson briefs are agreed at the end of each lesson lesson, so this will give you the opportunity to read the relevant brief (gestalt).
Lesson brief
The safest and easiest way to turn your training vehicle would be to drive around the block and alter your direction at a junction or to go all the way around a around a roundabout. If this is not possible the next best and most common solution is to reverse into an opening on the left/right or if their is no side road you can do the turn in the road exercise.
Just ensure you are not on a one way street at this point......
The turn in the road exercise is about using forward and reverse gears with out touching the kerb.

Location.
Once you have got to the training location you will be asked to park up on the left some where safe, legal and convenient on the left hand side of the road.
Once you have parked up you will be asked to drive across the road to start the manoeuvre.
Remember to park up slightly wider (and parallel) from the Kerb.
Make sure you are parked somewhere safe, legal and convenient.
- Park (roughly) a 1ft (drain width) from the curb.
- Ensure it’s free from parked vehicles, obstructions and no debris on the road as you don’t want to
get a (puncher) flat tyre.
- Never reverse on a main road and DO NOT reverse on a one way street for a long period of time.
£1 up and down from the biting point
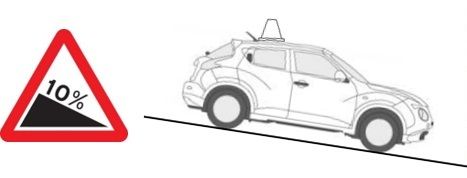
It is easy to lose control with this manoeuvre as you will have different gradients of camber.
Pervious skills involved will be hill start at point B and C.

The beginning of the manoeuvre
Point A to B
Prepare
Clutch down, select 1st gear find the biting point

Observations
Normal 6 point check so go from your left shoulder to the right shoulder.
Move
Once you have assessed it is safe to start the manoeuvre (when no vehicles are driving towards you), release your hand brake and start to steer full lock to the right.
Starting the first leg (point A to point B)
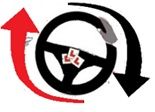
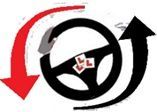
When safe to do so start to move slowly forward and put full right hand lock (brisk hands) using the pull push method of steering.
While moving your vehicle forward (using clutch control) across the road. If you do find yourself going to fast use your foot brake to slow yourself down or even just stop for second then continue once you have control again continue the maneuverer.

How far to go forward?
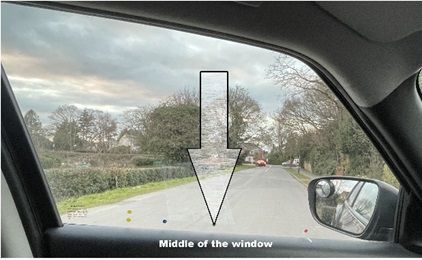
Stop the vehicle when your vehicle is 1/2 too 3/4 across the road, I put a marker in the middle of the front windows and don't go ant further than 3/4 across the road (or run the kerb behind the passengers wing mirror or no further than the wing mirror is sat on the kerb.
Challenge is to change your steering to the left
Try to change the lock of the steering wheel just before you reach point B and point C is the key to completing the manoeuvre in as few movements as possible.
When to give way to approaching vehicles, cyclists and pedestrians.
Using the emergency stop stopping distances will help to stop when obstacles are coming towards you:-
- Motor vehicle 6 car lengths from you.
- Cycle about 3 cars lengths from you.
- Pedestrians 1.5 car lengths from you.
Reverse manoeuvre (point B to point C)
Camber of the road
Before you start the reverse you will need to find the biting point as you will be on a down hill gradient. Think back to your hill start brief and training and find the right amount of bite so you DO NOT roll forwards the objective is that you slow reverse backwards when you take your hand brake off.
However ensure you do not have to much biting point and reverse backwards out of control (£1 up £1 down for best control).
Prepare to reverse from point B to point C
Prepare
Clutch down, reverse gear and find the biting point
Observations
Reverse the 6 point check so go from your right shoulder to the left shoulder, so you’re looking the correct way (over your left shoulder).
Move
Once you have assessed it is safe to start the manoeuvre (when no vehicles are driving towards or behind you), release your hand brake and start to steer full lock to the left.
Reverse from point B to point C
When it is safe to start reversing turn your wheel briskly to the left using the pull push method of steering maintaining observations over you left shoulder (looking for pedestrians in your path).
Using clutch control, maintain a slow and safe speed (crawling pace) keeping a look out all around for other vehicles/pedestrians.

Distance to reverse back
Reverse until the vehicle is half way across the road changing your view over your right shoulder and apply steering to the right (again using the pull push method of steering).
As you are sat in the drivers seat you will look like you are roughly 3/4 across the road.
Stop before Offside rear wheel gets close to the kerb.
(This will be discussed on your brief).
Before you start the next leg you may need to do another hill start depending on the camber of the road so apply your hand brake.
Use of brakes
If any vehicle are coming towards your vehicle use your brakes to warn the vehicle you have seen them and stopped.

Point C to D
Prepare
Clutch down, 1st gear and find the biting point (this will prevent the car from rolling backwards).
Observations
Normal 6 point check so go from your left shoulder to the right shoulder.
Move
When no vehicles are driving towards you.
release your hand brake (ensuring you have your biting point and drive forward and park up at point D somewhere safe legal and convenient.
Before you start this stage you will need to find enough biting point for a hill start (this will depend on the camber of the road).

Give way to approaching vehicles, cyclists and pedestrians
Before and during going forward ensue there are no vehicles waiting, if necessary apply your foot brake to tell the driver you are waiting (use of brake lights).
When it is safe to start moving forward turn your wheel to the right using the pull push method of steering maintaining observations ahead (looking for pedestrians in your path).
If the vehicle are patient and are waiting for you to complete this exercise DO NOT RUSH IT, just take your time as if you lose control you might have to reverse back and forward again. So everyone will be waiting longer than necessary.
Using clutch control, maintain a slow and safe speed keeping a look out all around for other vehicles/pedestrians.
As your vehicle is half way across the road changing your steering to the right using the pull push method of steering.
Using clutch control maintain a slow and safe speed keeping a look out all around for other vehicles.
Pull up on the left.
Pulling up on the opposite side of the road and making the vehicle safe.
Reflect & Review
So remember your instructor is there to HELP you so on your driving lesson if you have any uncertainties or need anything rewording or recapping to make things any clearer, just ask.
Your training Vehicle is fitted with dual Controls and if necessary could be used throughout your lesson if needed. These are here for your safety so we can step in to keep you safe.
So don’t worry if the issues arise we will aid & guide you VIRBALLY or PHYSICALLY and we can go over the situation if happens to correct if in the future.
Risk management
Physical control of your vehicle
The aim is for you the student to have full control of this lesson with previous lessons and have full talk through on the new topic and then reducing the support throughout with you decision making as best you can.
Your instructor’s job is to analyse any faults or new faults that may accrue in this lesson and put them right.
Talk about any issues if the situations happen on the driving lesson and put issues right.
Fault identification.
Fault analysis.
Remedial action.
Level of instruction on your lesson
Full talk through.
Prompt.
Independent.
End of lesson
Feed back at the end of your lesson.
Student’s responsibility of lesson and improvements.
Plan for the next lesson.