Pedestrian crossings
Introduction
By this point of your training (P.O.M) moving off from the side of the road and stopping on the left and right hand side of the road (smoothly), gear changes, clutch control, hill including angle starts and busier junctions should now becoming independent, this includes anticipation, awareness and planning with the road ahead, behind, reacting safely to pedestrians, cyclists while driving, so it’s now to look at dealing with different type of pedestrian crossings.
This briefing could be taught before or after multi lane traffic lights, however you will be giving your new lesson topic for your next driving lesson at the end of your lesson from your instructor.
Agreed lesson is covering :-
On this lesson you have agreed with your instructor you will be working on devolving your awareness and planning on the approach to pedestrian crossings. You will be using and incorporating the L.A.D.A and hazard routine's during this lesson including on the way to the training location when you approach:-
- Negotiating crossroad and decide the best technique "Nearside to Near side or Offside to Offside
- Meeting, overtaking, adequate clearance when overtaking stationary/slow moving vehicles, hold back and maintaining a two second gap
- Traffic calming measures and 20 zones
- Hill and angle starts
- Busier and more Complex junctions, roundabouts/mini roundabouts and traffic lights
- Awareness and planning
Agree level of instruction
Intervention
Agree on what part of the lesson is going to be a instructor-lead-lesson and client-centred-lesson and if it is client-lead agree if the instructor has to intervein verbally and take control of the training vehicle by ether using the dual control, verbally or take the wheel the lesson plan may need to be changed until the fault is fixed.
F.I.S.H
- Fault
- Implication
- Solution
- Help
Lesson aims and strategies
Todays briefing will be using the L. A. D. A and M.S.P.S.G routine's on the approach to different types of pedestrian crossings and work on planning of pedestrian walking towards crossings and have the correct reactions if they walk onto the crossing (especially a zebra crossing). These routine's will be broken down to help you develop your skill to organise your approach and planning when approaching pedestrian crossings.
Risk responsibility objective's
You and your instructor will agree lesson plan support to ether:-
- Full talk through
- Prompt
- Independent
This is important to ensure that the instructor and student understands who has the main responsibility on the control of the training vehicle on the set lesson plan.
Your level of instruction will be given by your instructor to a level to suit you from full talk through then reducing your support to either prompt or independent.
Pedestrian crossings
There are different types of pedestrian crossing:-
- School crossing (lolly-pop)
- Zebra
- Pelican
- Puffin
- Toucan
- Pegasus
In each case you must identify the crossing early, react to the different light sequence and employ your L.A.D.A and hazard routine's.
Approaching all crossing
Apply your L.A.D.A routine and take observations and assess for :-
- Slowing down vehicles (brake lights) in front of you.
- The amount of pedestrians approaching a crossing
- Even pedestrians crossing the other side of the crossing (more information in this brief)
Signs you may see on the approach to a pedestrian crossing
Also you may see this flashing amber audible flashing light
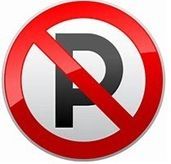
Law on zigzag lines
What is the law on zig-zag lines?
Zig-zag line is an
order:
NO parking
and
NO overtake
(including slower moving vehicles like cycles and mobility scooters) and never wave a pedestrian on the crossing.

Waving a pedestrian across a crossing
Never wave a pedestrian's across a crossing or even to beckon them to walk across the road, it could be unsafe for the pedestrian if as another vehicle was approaching from the opposite side of the crossing and was not intending to stop. If you see a pedestrian waiting to cross a pedestrian crossing,
Slow, stop
and
wait
at the while stop line and allow the pedestrian to cross.
Information about the DL25
On your driving test your examiner will expect you to demonstrate consideration and courtesy for pedestrians approaching and aiming to cross.
You needed to recognise each type of pedestrian crossing and react correctly to each.
Examples of faults
Some of the most common faults for this area include:
- stopping on a crossing (not before)
- moving off before a pedestrian has completely cleared the crossing
- approaching a crossing too fast
- failing to stop at a crossing
Your examiner may have explained the specific details of any faults you made.
How you can improve in this area
If you made faults in this area during your test, or if you want to improve in this area, you should:
- check rules 191 to 199 of The Highway Code
- read pages 188 to 192 of ‘The Official DVSA Guide to Driving: the Essential Skills’ (2022 edition)
If you need to rebook the test, spend time practising and improving this skill with your driving instructor or supervising driver. Practise in an area that passes different kinds of pedestrian crossings.
Routine's to use when approaching all crossings
Use L.A.D.A on the approach - To identify the amber belisha beacon or the green/red pedestrian crossing light.
No pedestrian approaching or crossing check your:-
- Mirrors
- Signal (will be your brake lights if you need to slow down)
- Position to the left (drain width unless the road marking dictate otherwise)
Keep scanning the crossing and continue if safe to do so
- Speed (No need to slow down unless becomes unsafe to carry on)
- Gear (Should be no need to alter your speed or gear)
If you have anticipated pedestrians are approaching the crossing and you have assessed it is not safe to continue.... Check:-
- Mirrors
- Signal will be your brake lights if you need to slow down.
- Position to the left (drain width unless the road marking dictate otherwise)
- Speed Stop at the stop line
-
Gear (1st Gear and if it changes go to 2nd gear if clear and keep on going).
L.A.D.A is very important on the approach (always them use 2/3 times on the approach to all crossing’s).
Information about all crossings
While approaching any PEDESTRIAN crossing continually keep looking both sides of the road looking and also listening for pedestrians not paying attention and rushing across the crossing.
On the approach to all crossings always consider the road conditions as your vehicles will need more time to stop when the road is slippery (Please look at your stopping distance in dry, wet & icy conditions).
Lets look at the different types of pedestrian crossings
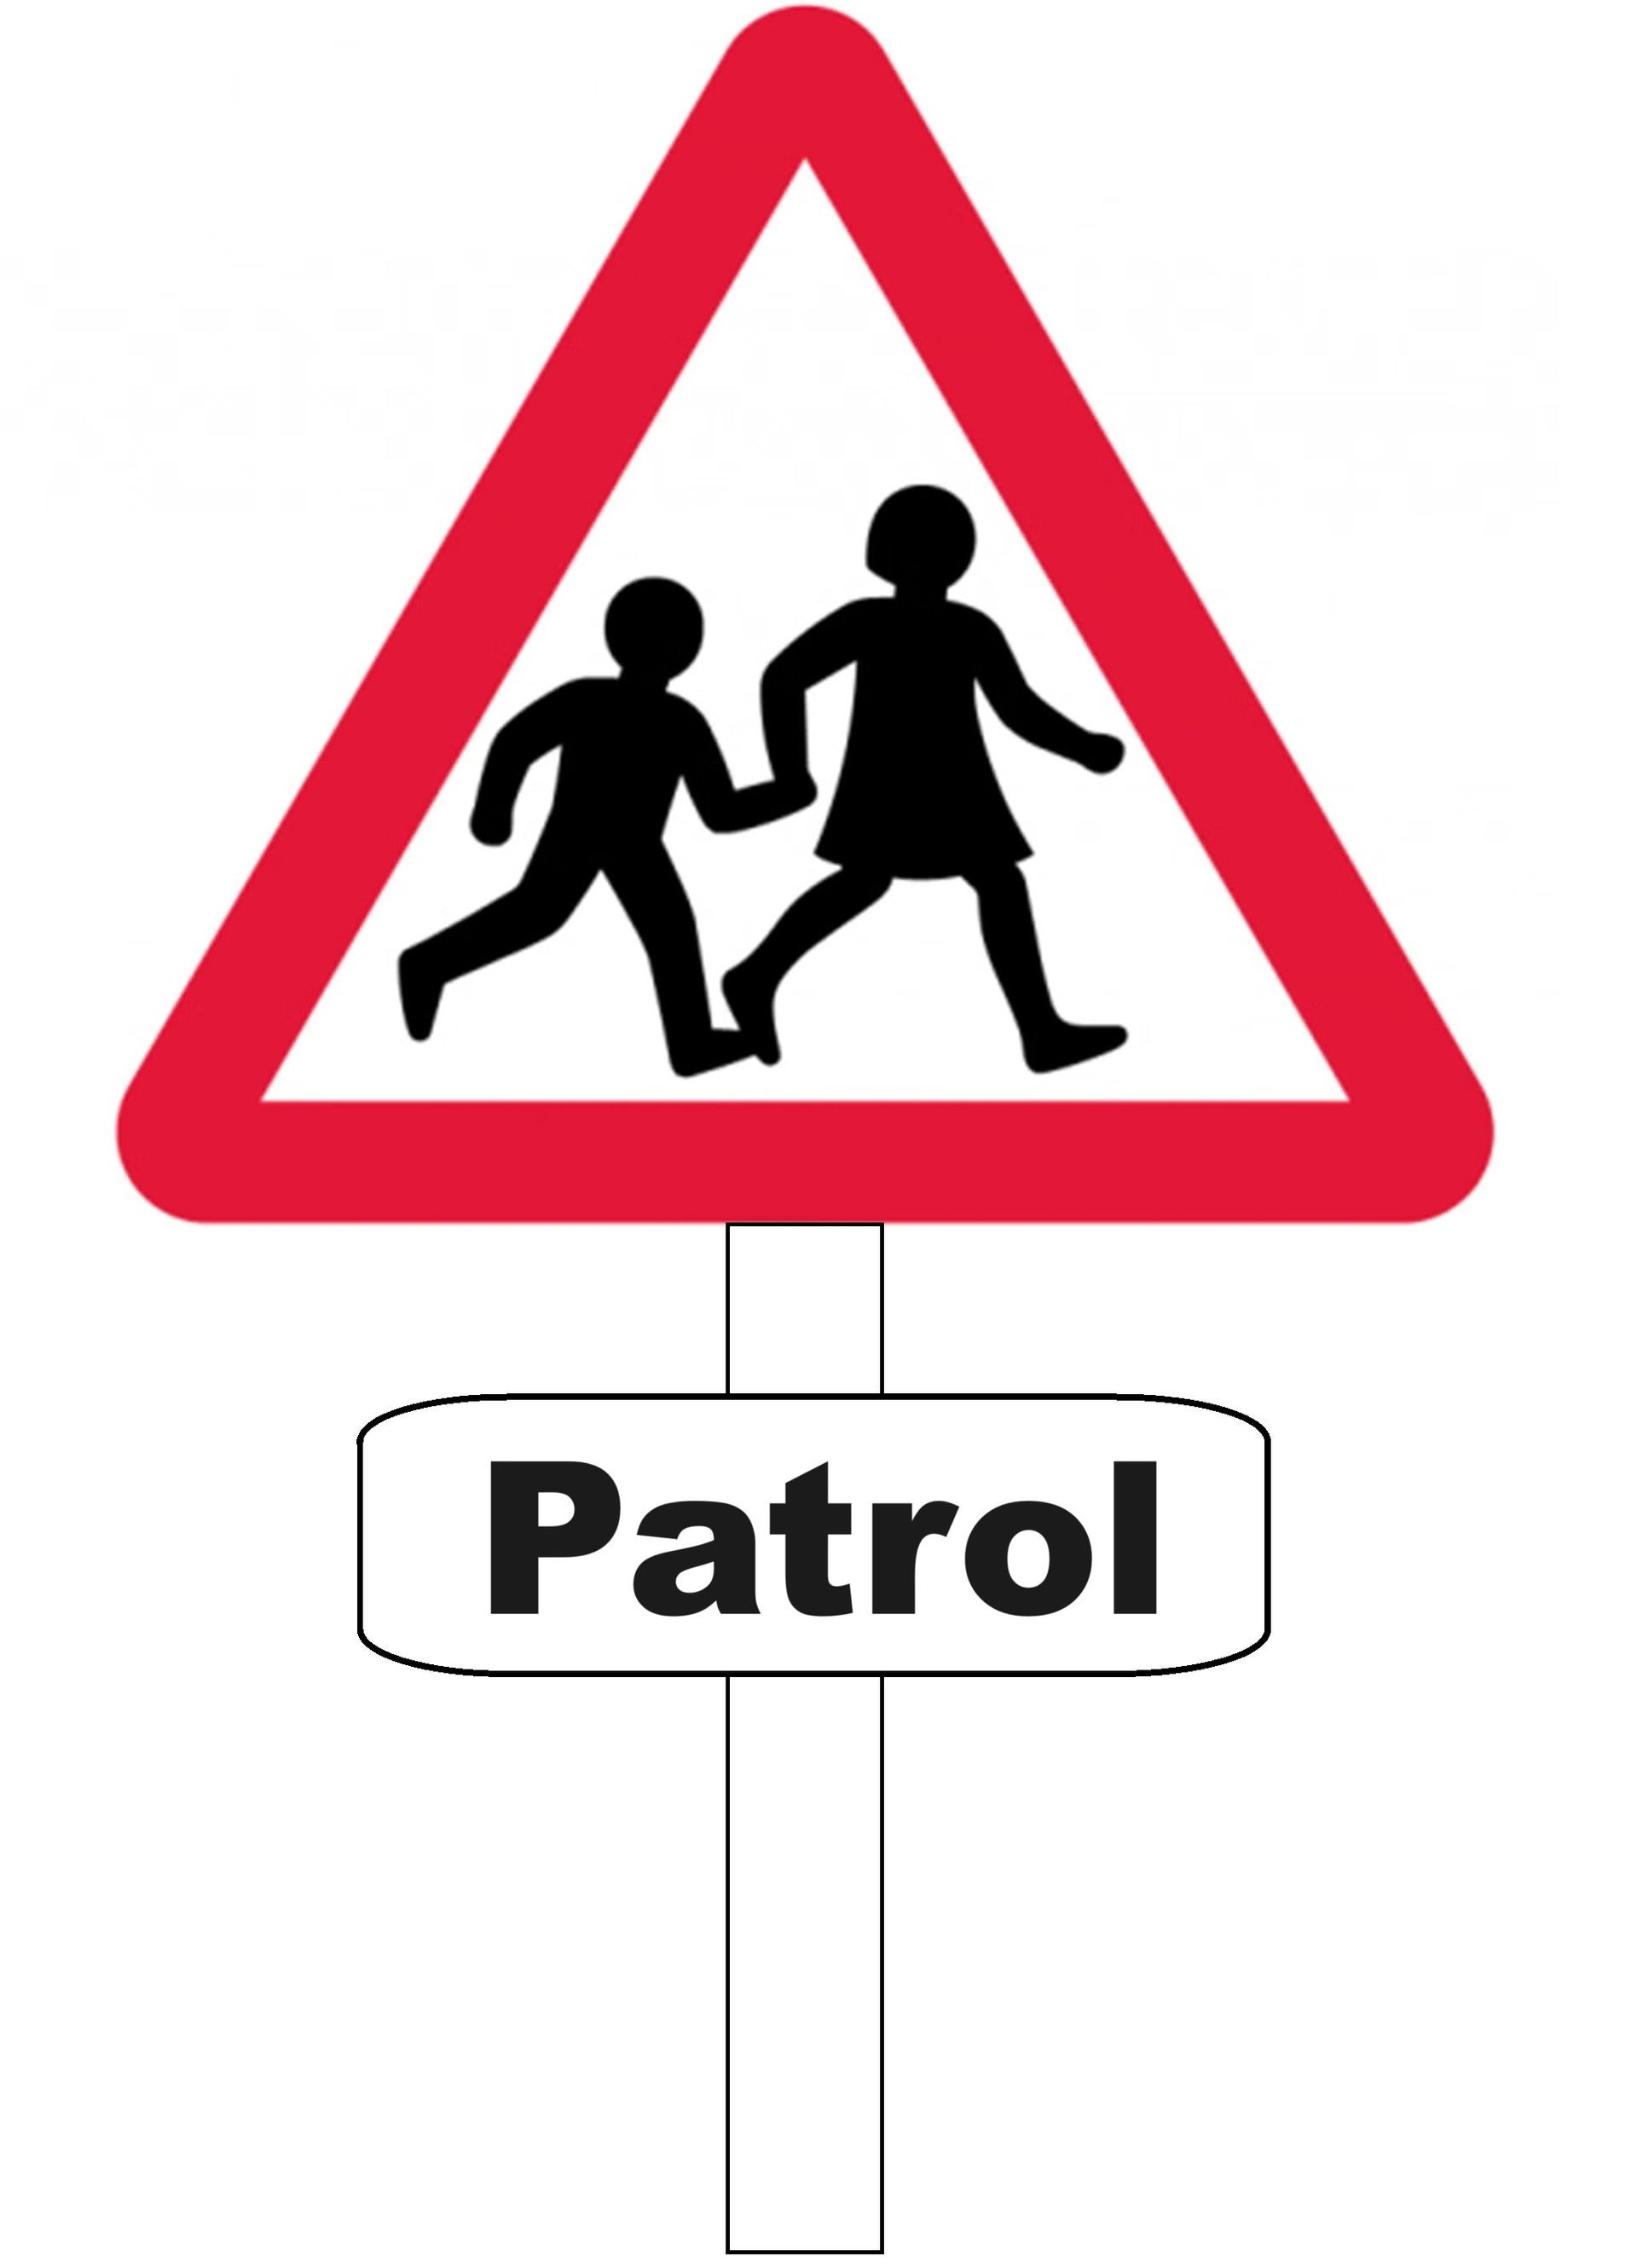
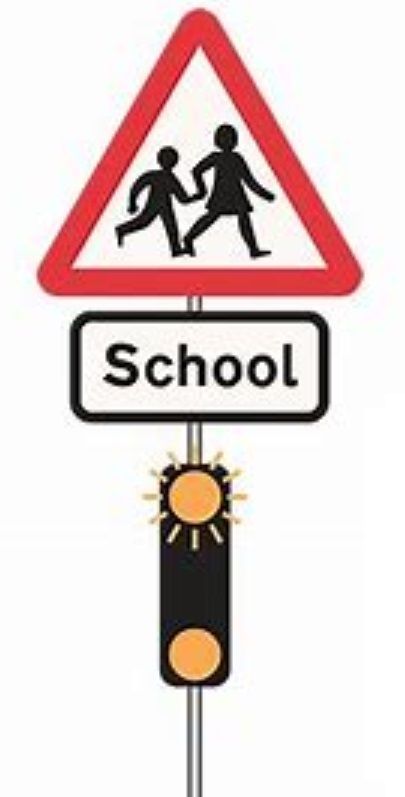
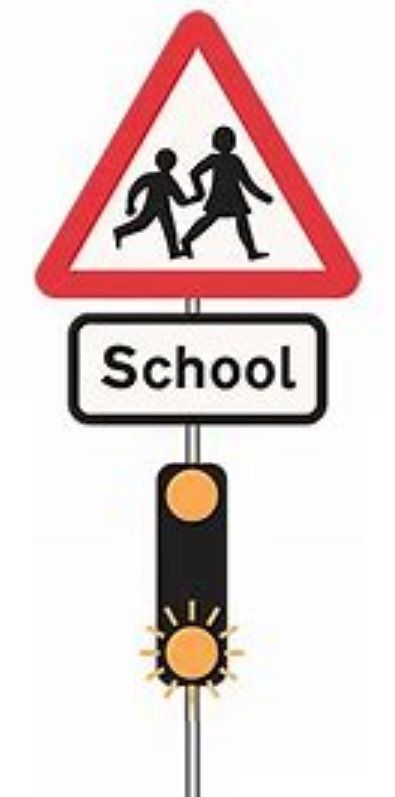
School crossing (patrol)
- Crossing (lolly pop) patrol operative will be found before and after school times
- Drive slowly until you are clear of the area (normally 20mph zones, the order sign could be RED or GREEN)
- Be particularly careful as children will be crossing the road (normally in operation at school starting/leaving times) with and without an adult
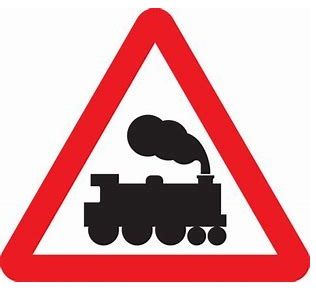
- You will normally see a red triangle sign before you get to the operative
- You will normally see a red triangle sign before you get to the operative
- There may be a flashing amber signal below the school warning sign to alert you that children may be crossing the road ahead
- Use your all around observations (using the LADA & Hazard routine's)
- When a school crossing patrol officer raises his/her stop sign and before he/she steps into the road you must stop ( There are three signals when the lolly-pop operative moves their stop, below is the information)
- Also be cautious when passing a stationary bus showing a school bus sign

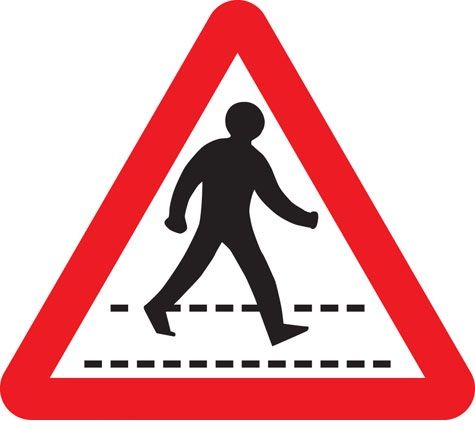
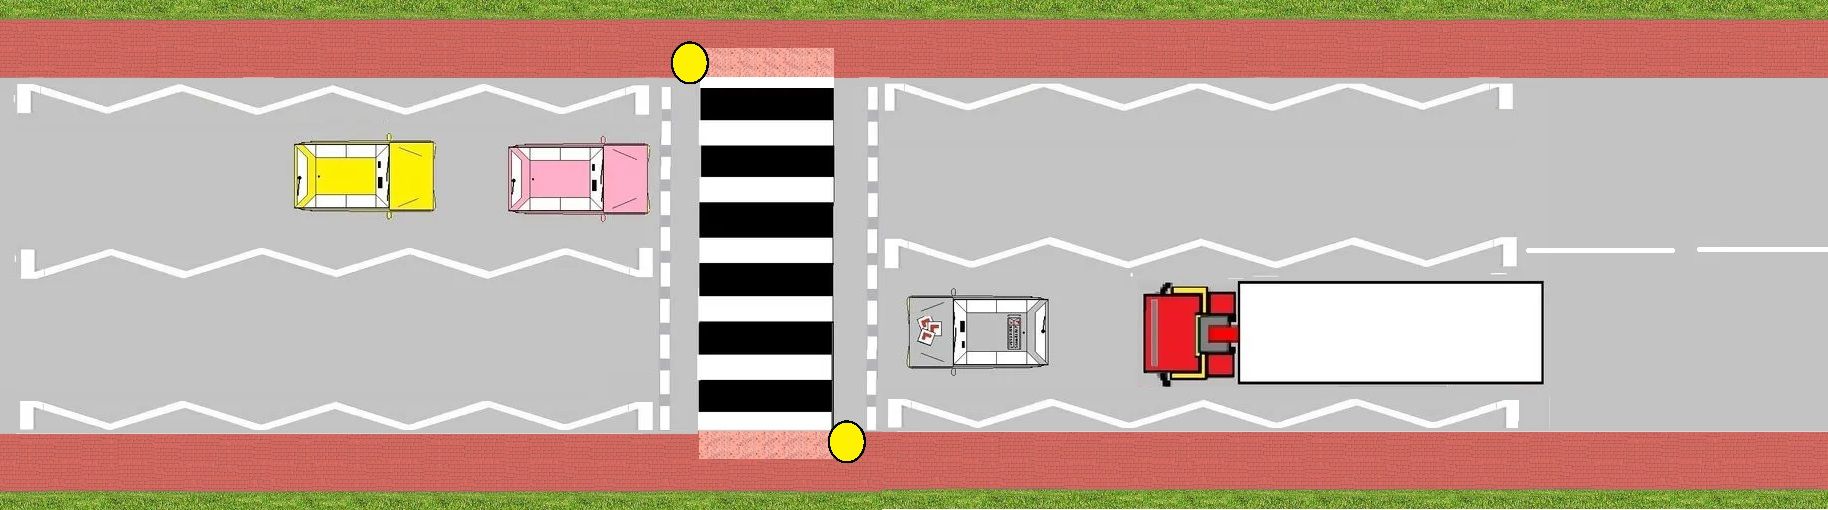
Zebra Crossing
A Zebra crossing has a black and white striped path across a busy road where pedestrians may cross.
PEDESTRIANS using the crossing should give traffic plenty of time for road users to react, slow down and stop. But unfortunately some pedestrians walk straight out with no consideration to any road users driving towards the zebra crossing, so you the driver will need to be alert all the time and prepare to STOP.
- Your strategy is to identify that you are approaching a Zebra crossing
- Your objective is to identify early the black & white poles with flashing yellow (bellisa) beacons and the white zig-zag road markings
- As you approach a zebra crossing if a pedestrian is walking towards the crossing you may need to
slow down, give-way
and stop
if they proceed onto the crossing
- Always
stop before the white solid line and not after it
- In heavy traffic
NEVER cross over the studded give way line or enter the crossing if you cannot fully clear the crossing area
- On the approach always make good use of your mirrors so you know exactly what traffic is behind you just in case you have to brake suddenly
- NEVER wave people onto the crossing as this could be dangerous if another vehicle is approaching from the opposite direction and not seen the crossing
- Try and make eye contact with anyone waiting but NEVER flash your headlight or even sound your horn!
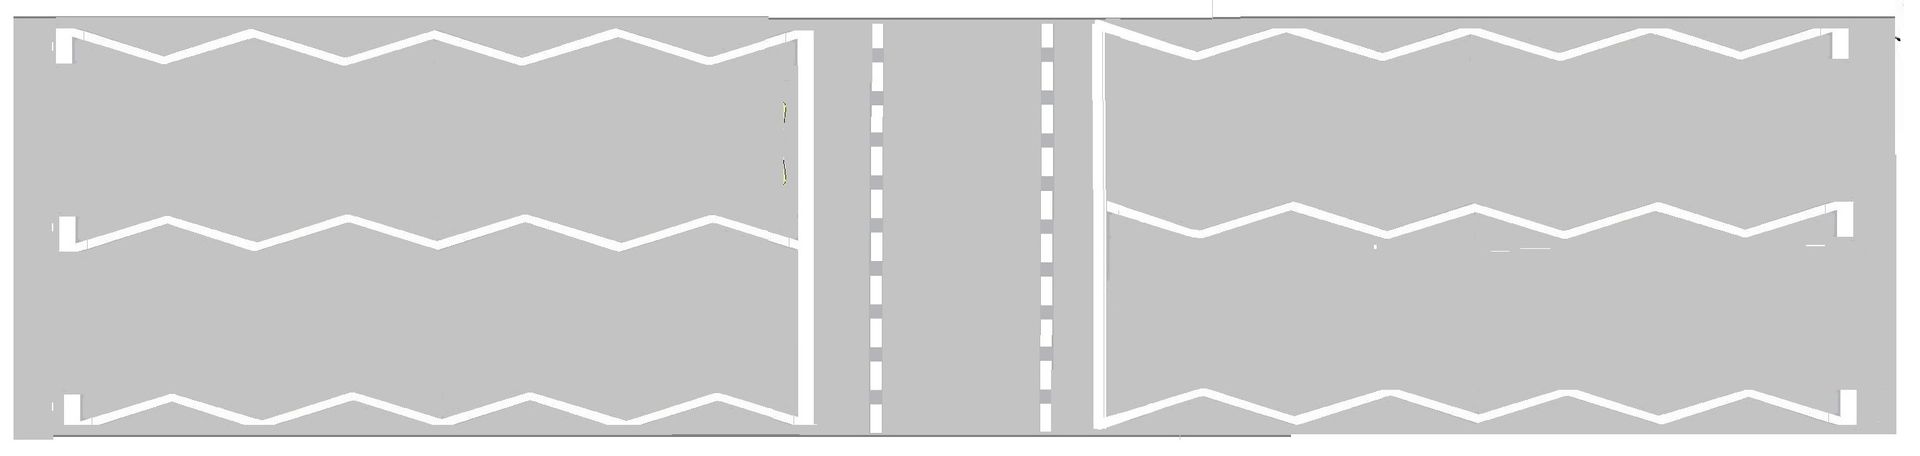
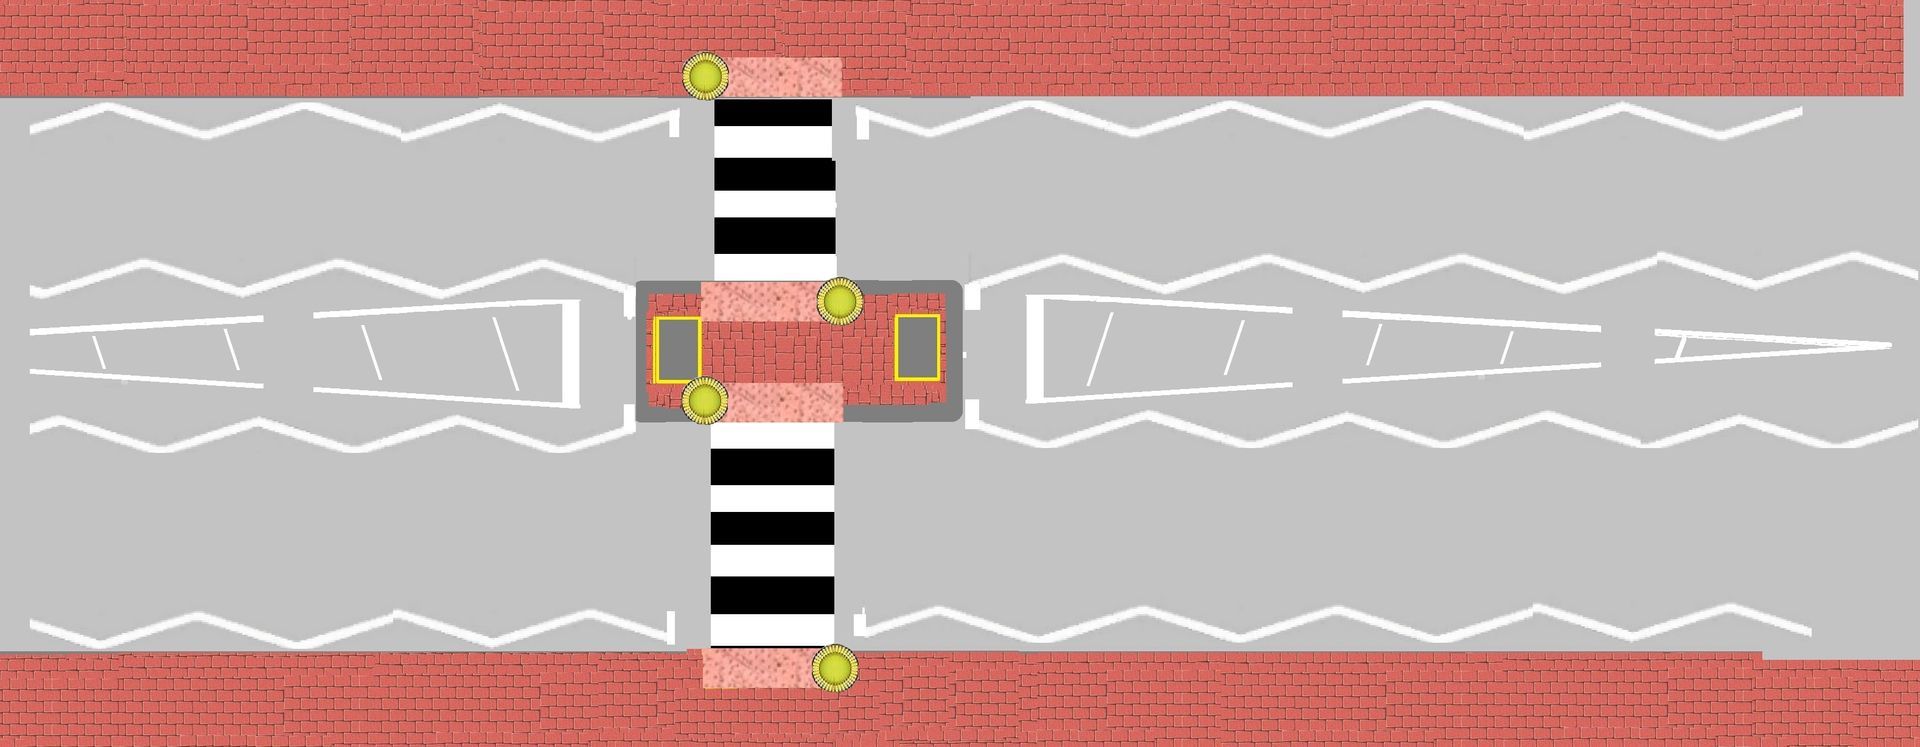
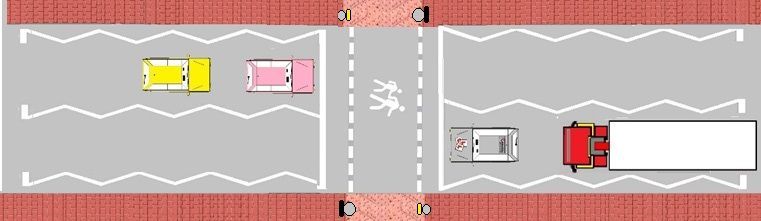
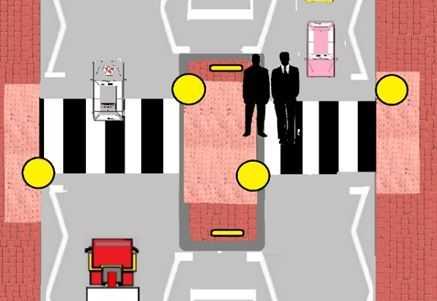
Identify if the zebra is one or two crossings
If there is an island in the middle of the zebra crossing and an extra set of belisha beacons it is classed as two crossings.
One crossing
Two crossings

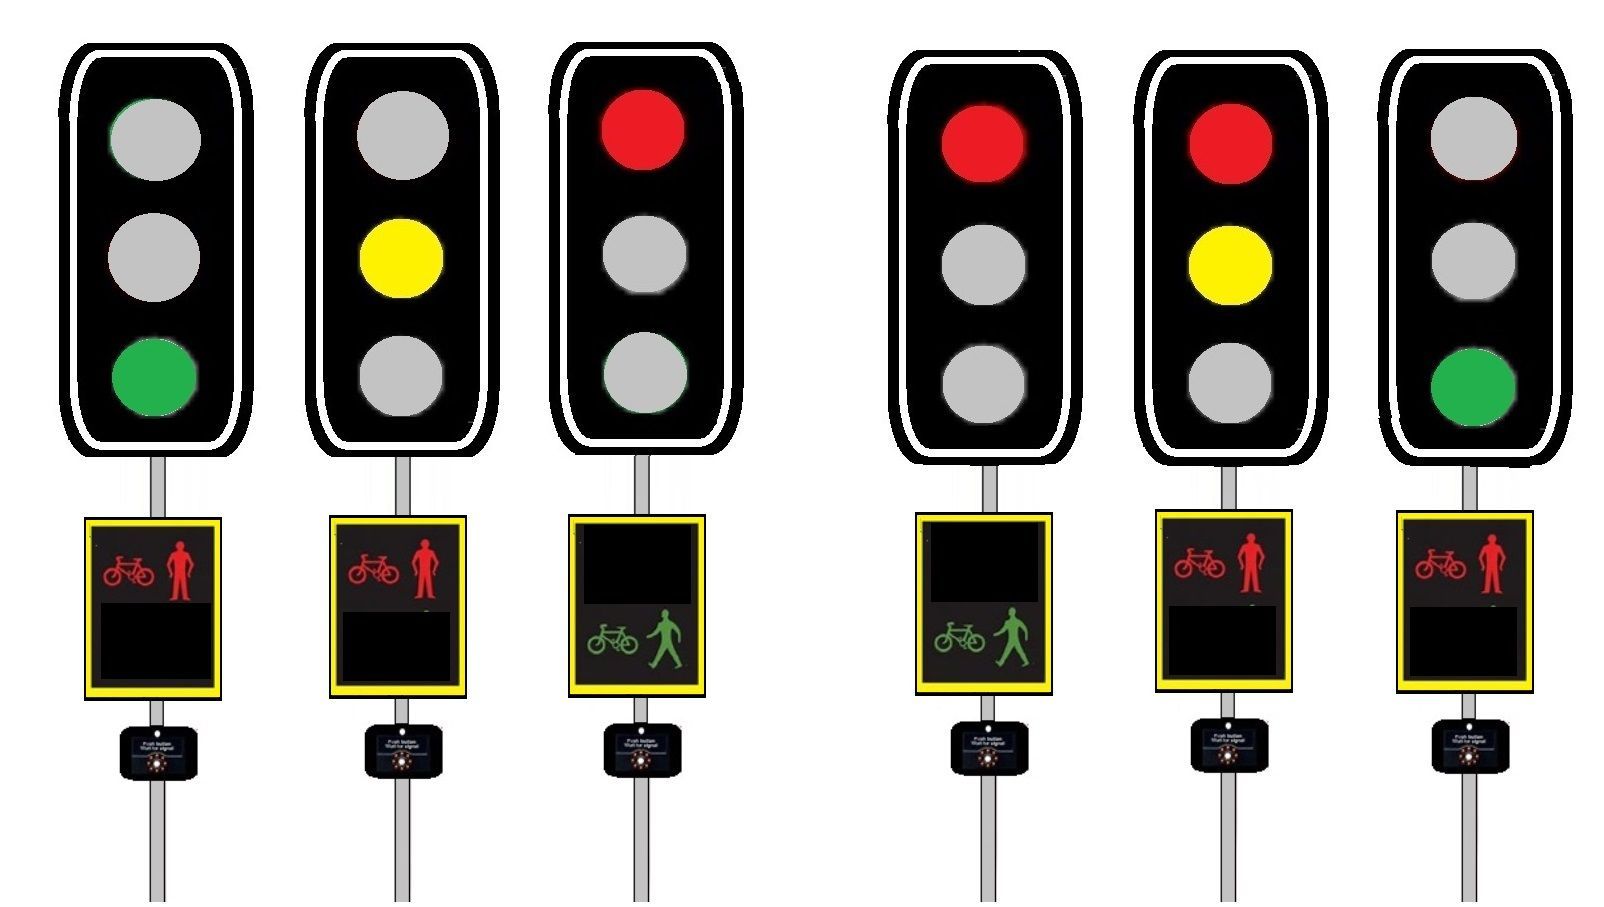
Pelican crossing (operated by pedestrians)
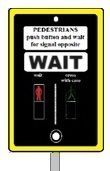
You will know you are approaching a pelican crossing because of its traffic light and the yellow push button box, on a pelican crossing the push button box is facing the pavement.
Unlike a zebra the next 4 sets of pedestrian crossings have a traffic light type sequence and push button box that controls the traffic lights and will only transition from green to red once a pedestrian has physically pressed the button on the push button box.
It is essential that all road users plan with pedestrians approaching and waiting at the crossing and react safely when the traffic lights change from green to amber to red as you are approaching them.
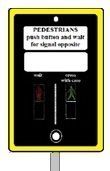
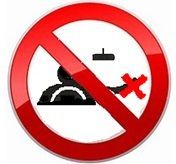
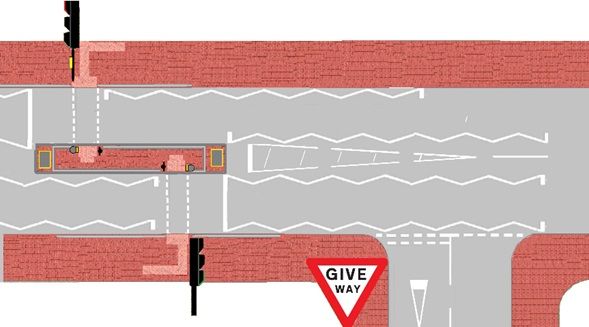
On the approach to all crossings you will see white zig-zag line (these mean NO PARKING and NO OVERTAKING in the zig-zag area).
There is a solid white road markings line where you need to stop and wait behind when the red light comes on.
There is also a small white dashed line area, this is the safe area for the pedestrians to cross safely.
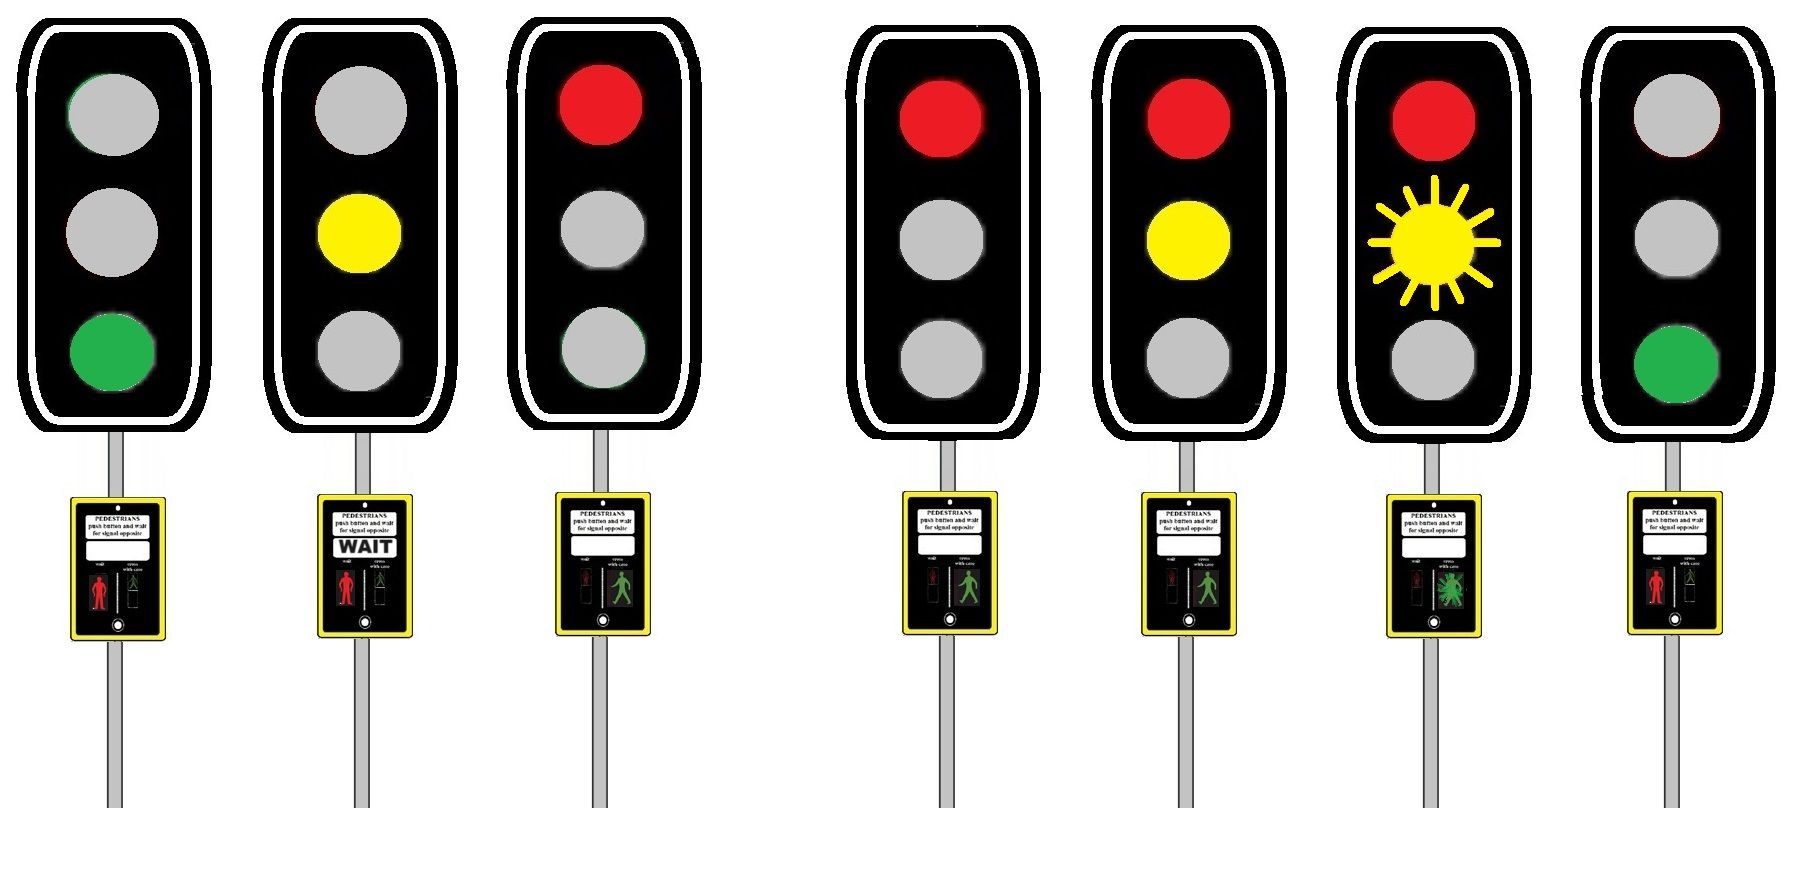
Flashing amber phase
When the light go to red stop and wait for the pedestrian's to cross on a pelican crossing there is a flashing amber phase before the lights go back to green.
The
amber
phase means if pedestrian's are still crossing all road users must
WAIT.
However if the crossing is clear of pedestrians road users can safely proceed and drive on (with caution).
Always plan ahead “If the lights are on green always look for pedestrians that are waiting at the crossing and be prepared to react and slow down if the lights could turn to amber to red at any time"
- You MUST always stop when the red light shows.
- The pelican crossing is the only crossing that has a flashing amber phase.
- When the amber light is flashing you MUST always give way to any pedestrians on the crossing.
- However if the amber light is flashing and there are no pedestrians on the crossing road users may proceed (BUT )with caution.
- Watch out for pedestrians making a last minute dash and be prepared to let them cross but do not wave them onto the crossing.

Puffin crossing (User-Friendly Intelligent crossings)
You will know you are approaching a puffing crossing because of the LED traffic light set up it has two yellow boxes, one with the button you press to entre it and the other box that has the icons on the (red and green) Pedestrian in it.
When the traffic light are on red stop and wait for the pedestrian's to cross the PUFFIN crossing.
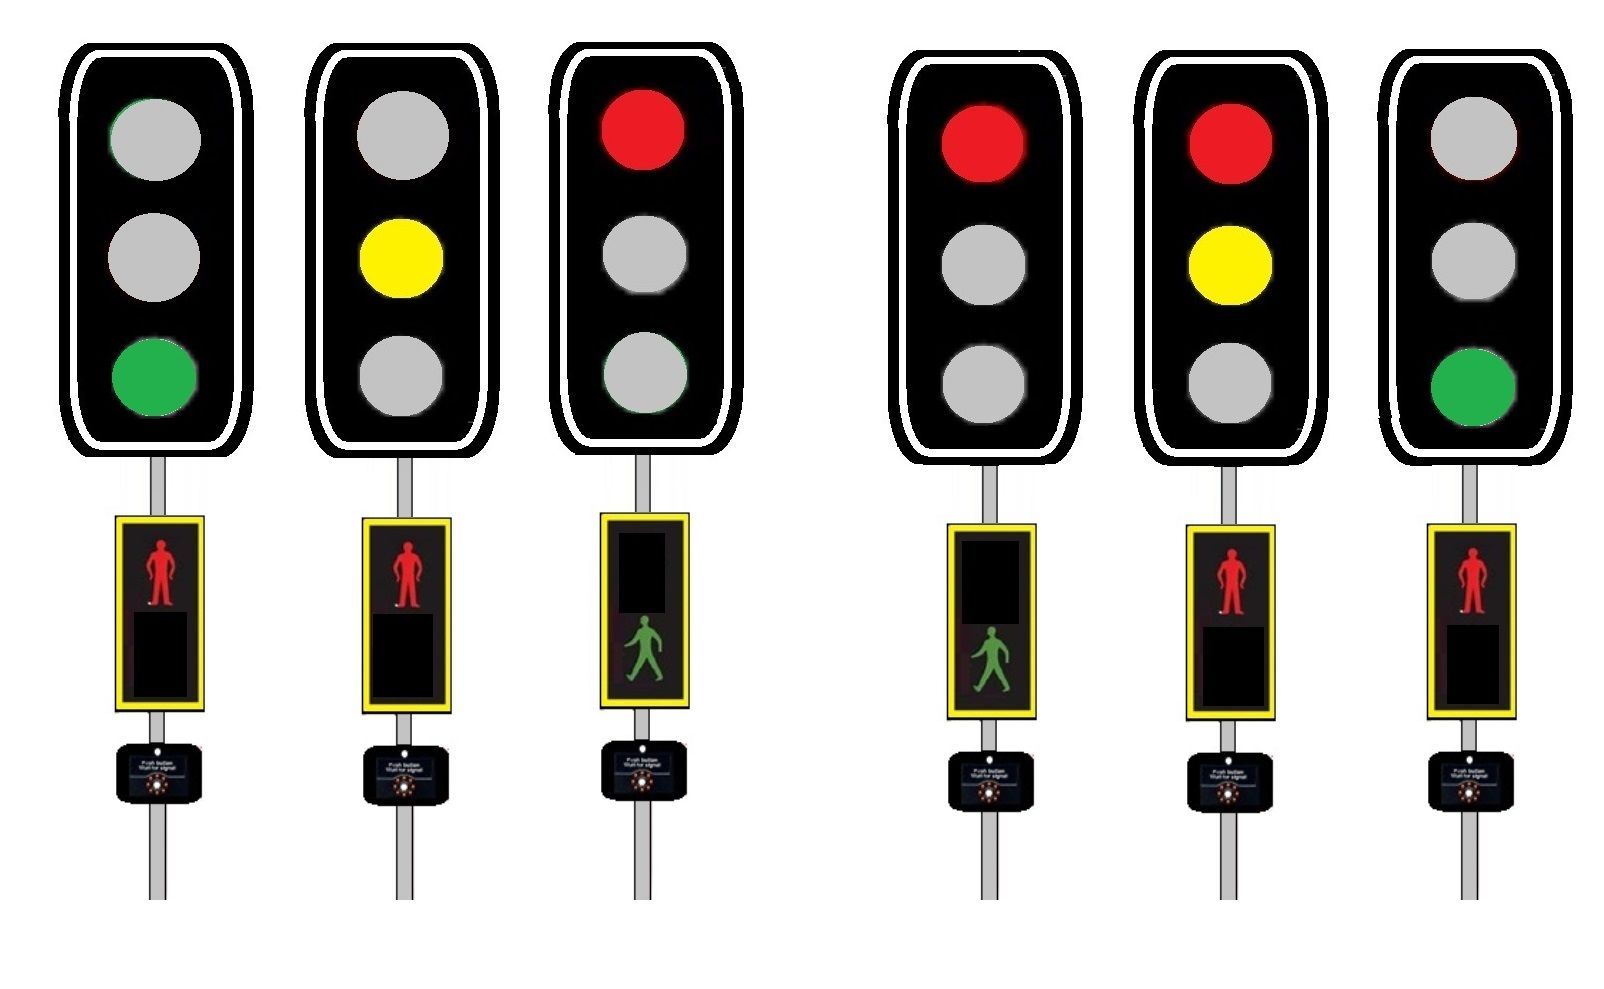
The difference to the light sequence on the puffin/toucan crossings to the pelican crossing is that there NO amber flashing phase.
On these crossing you have to wait until the lights go from red, red/amber to green (this sequence is just like a normal set of traffic lights).
Once the lights goes from red to green drivers/riders may proceed unless pedestrian's are still walking across the crossing just WAIT patiently and once the crossing is clear you can proceed with caution.
You will know you are approaching a Puffin
- There are solid white lines zig-zag road markings (These are the same all the crossing).
- Iron railings are usually used to stop pedestrians entering the road away from the crossing.
- The puffing crossings are User-Friendly and intelligent as they have infra-red cameras attached to the traffic lights to help elderly or disabled pedestrians cross the road.
- This cameras help by reducing the time drivers see the red phase so they are not waiting for any reason.
- The infra-red cameras are similar to those used to find earthquake victims trapped under rubble.
- The new “smart” system also uses heat sensors to tell if pedestrians are waiting on the pavement and can even override the red light shown to drivers if they've already got to the other side.
- These lights have NO flashing amber phase, so the lights just change like a normal traffic light at a junction.


Toucan (two-can cross)
A Toucan crossings are set up the same way as the Puffin crossings except that they are designed to be used by cyclists and pedestrians and there is still no flashing amber phase.
You will know you are approaching a Toucan crossing because of the LED traffic light set up it has two push button yellow boxes, one with the button you press to activate the crossing and the other box that has the icons on the red and green Pedestrian and cyclist in it. On the road on ether side of the crossing are white zig-zag lines and a solid white road markings line where you need to stop and wait when the red light comes on.

The difference to the light sequence on the Toucan crossing is that there no amber flashing phase so you have to wait until the lights go from red, red/amber, green (just like the Puffing crossing and a normal set of traffic lights.
Once the traffic lights green you (the driver/rider) may proceed unless pedestrian's and cyclist's are still walking across the crossing just WAIT patiently and once the crossing is clear you can proceed with caution.
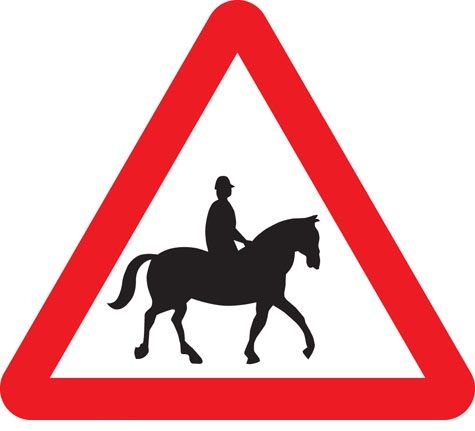
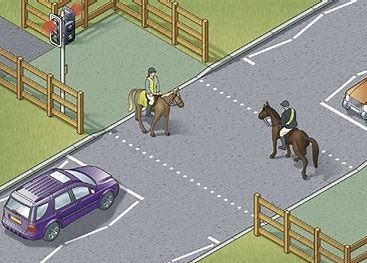
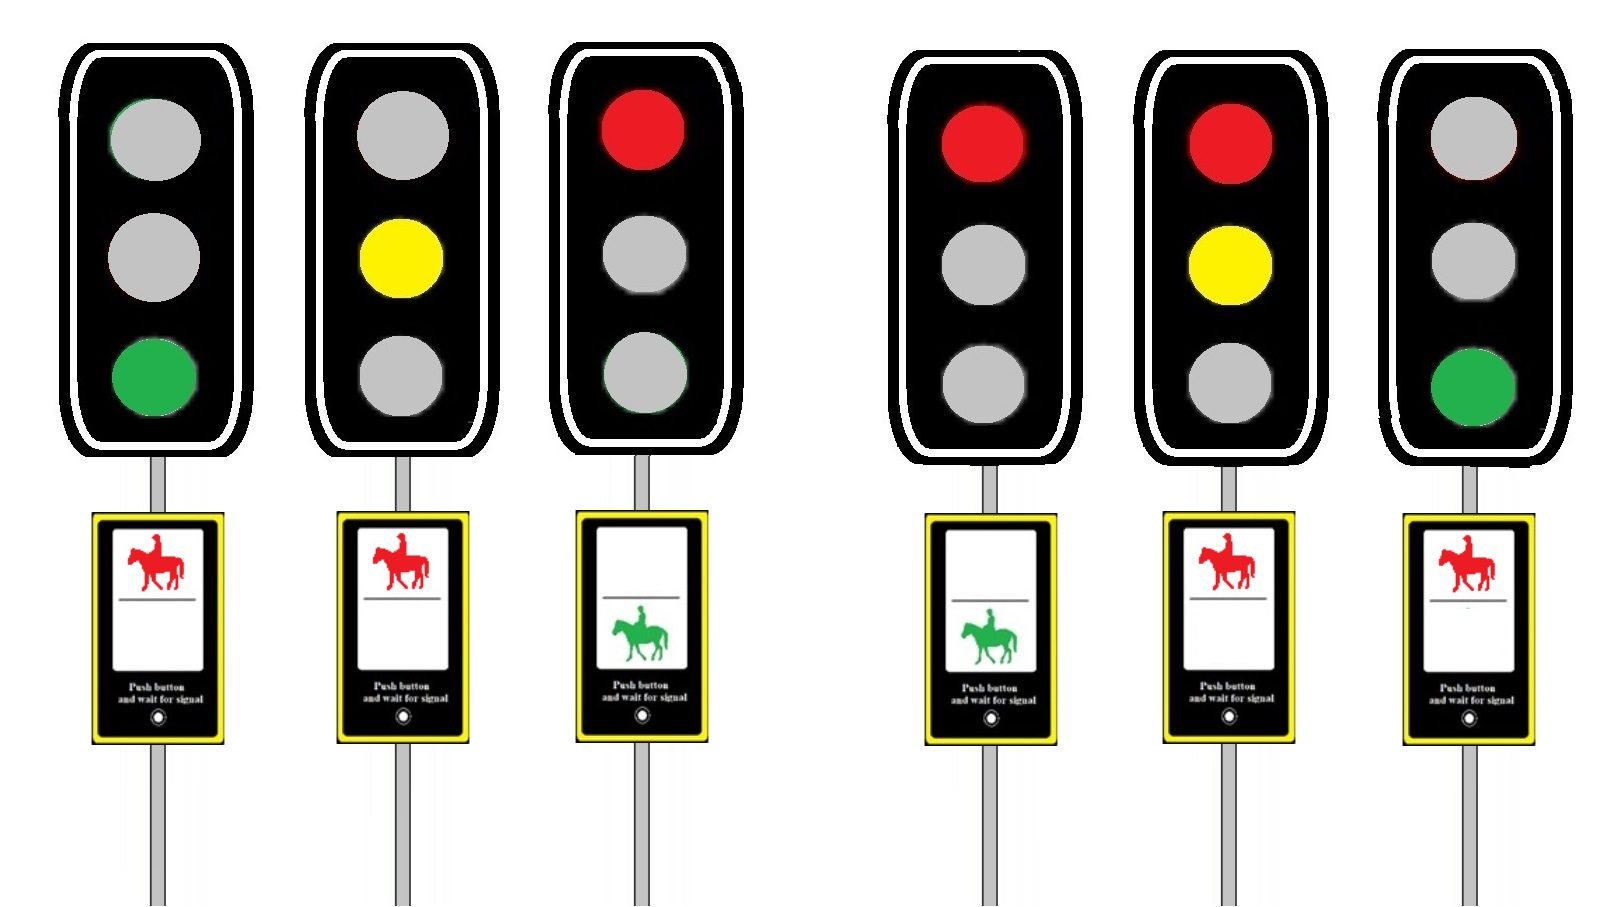
Pegasus
A Pegasus crossing, also known as an equestrian crossing, is a type of signalized pedestrian crossing designed to accommodate both pedestrians and horse riders. These crossings are primarily used in the United Kingdom and Peru.
Pegasus crossings resemble pelican crossings or puffin crossings, but with two control panels:-
- One at the usual height for pedestrians or dismounted riders
- Another two meters above the ground for mounted riders.
Instead of the standard “green man” (walk) and “red man” (stop) pictograms, Pegasus crossings display horse symbols.
- Additional safety features may include wooden fences or barriers and wider crossing areas to keep horses farther away from vehicles.
- You will know you’re approaching a Pegasus crossing because of its traffic light set up, yellow push button boxes, zig-zag/solid white road markings.

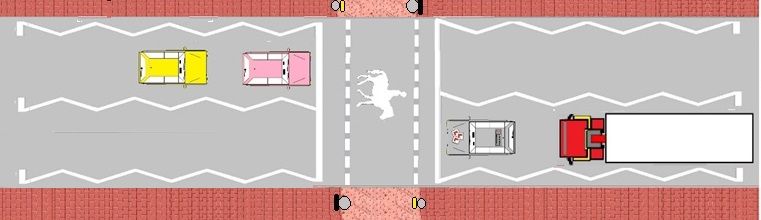
Two crossing's
The above crossing are classed as a single crossing and by law you have to stop for any pedestrian's, cyclist's or horse ride's approaching who looks like the are going to cross, pedestrian's waiting to cross and anyone already on the crossing.
When there is a break in the road separating the road into two half's it is classed as two crossings.
On the below zebra crossing diagram the the learner car and red lorry can keep making progress until the pedestrians have reached the centre island and then would have to slow down and stop until the pedestrians have walked across the zebra and reached the pavement.
A toucan and Puffin crossing there will be a break/stagger in the crossing and once the button on the crossing have been activated it will slow and stop only one side of the road.
Level crossings
When traveling you may come across train lines so be ready to stop at the red and white railing that come down to stop traffic while a train is coming through the junction.
Take early observation's will ensure you know you are coming up to a train line
How would you know you was approaching a train line?
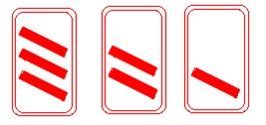
You will see a warning sign and three red count down markers on the approach to the train line. they are a white sign with red count down markers on them, they are 100 years apart
You may see the Audible amber flashing lights (like at a school crossing) you will see this on the approach to the train lines.
Before the train barriers come down a flash amber sign at the crossing will flash and you will hear an audible sound
Then the train barriers will come down once the red flashing lights are on the sign the audible sound will stay on until the train has passed.
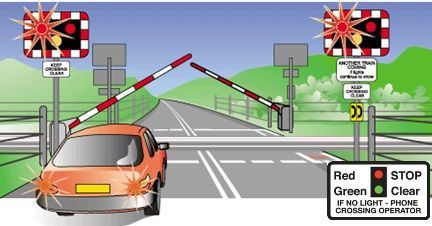
- The amber then red lights flashes alternately and means that the train is coming so you must give way and stop
- Stop behind the solid white road marking
- Wait until the red lights stop until you proceed your journey.
Question what do you think the proper procedure is if your car breaks down on a railway crossing?
Highway code 299
- Get your passengers out of your vehicle and to safety.
- If there is a railway telephone, use it to warn the signal operator.
DO NOT PUSH YOUR VEHICLE OF THE TRAIN LINES UNTIL YOU ARE TOLD IT IS SAFE TO DO SO
BY THE SIGNAL OPERATOR
Teaching & Learning Strategies
Like mentioned earlier every student is induvial and each and everyone of you will progress at different rates so driving will adapt their lesson plan to help you achieve your driving goals.
- Your driving instructor will adapt their teaching style to suite your ability and ability
- Your driving instructor will continue to encourage you on your lesson and analyse any problems made and allow you to take responsibility for your own learning goals by giving you technical information to improve your techniques. Your technical feed back from your instructor will be ether given on the move or if feel needed by pulling you up on the side of the road somewhere safe, legal and convenient.
Rote learning (WikipediA)
Rote learning is a memorization technique based on repetition. The method rests on the premise that the recall of repeated material becomes faster the more one repeats it. Some of the alternatives to rote learning include meaningful learning, associative learning, spaced repetition and active learning.
At the end of your lesson
At the end of your lesson you will have a debrief with your instructor giving you the opportunity to reflect on your performance on your lesson then you can set up new goals for your next driving lesson.
This will also give you the opportunity to research any new topics that will be brought into on your next agreed lesson. So remember your instructor is there to HELP you, so on your driving lesson if you have any uncertainties or need anything rewording or recapping to make things any clearer, just ask.

