Introduction
The aim of this lesson is to help you learn how to control your vehicle at faster speeds, negotiating different types of bends on out of town roads and also breakdown how to safely overtake different vehicles travelling at different speeds when the opportunity arises on 50/60MPH roads.
Strategy
On this lesson we are going to start looking at urban (out of town) driving and fine tune your forward planning on faster roads using your hazard and L. A. D. A. routines.
Believe it or not A + B roads are the most difficult subjects that you will ever undertake in driving. As there are no pavements but there are grass verges, tree, sharp bends and ditches as you have a lot of slower moving vehicles like Racing bikes, Tractors and a lot of cars only wanting to do 40mph on a 60mph road. So if you plan wrong it could be very dangerous.
Lesson aims
The aim of today’s lesson is to understand the difference between progressive driving (eco driving) and reckless speeding (you will see someone driving beyond their own limits every day and these drivers cause accidents). You will be briefed on the correct road positioning while negotiating different bends safely, keeping full control of your vehicle with the correct speed and gear, while understand the risks that could be involved when overtaking slower moving vehicles.
During this lesson you will be assessed on your general drive but I will be giving you as much support as you need.
Objectives
Your objective will to be as independent as possible on your general drive to the training location and given as much help on the new topic brief. By the end of your lesson you will have a better understanding on the skill you will need to go around sharp country roads corners and develope your hazard perception and highten defensive driving skills.
lesson brief
Progressive driving is about making maximum progress on your journey without putting anyone else into danger. Unfortunately slower traffic and long queues get drivers angry and they will take unnecessary risks to overtake when they are not 100% sure it was safe too. When you’re driving always think of the weather and road conditions. What I am saying is in rainy weather your stopping distance is longer (X2), your tyres will have less grip on the roads that you are on. Also your observations could be compromised as the rain could have misted your front windscreen or the sun could be in your eyes.
Golden rules
1. Never drive beyond your limits.
2. Allow more time when your vision is compromised.
3. Always keep the two seconds safety gap.
Remember speeding can result in a waste of time, waste of energy, waste of fuel. Unfortunately there are driver’s that drive like this all the time or there could be a time that you was just running late for an appointment! One mistake could cause a serious accidents or worse deaths. You may think its fun to take a corner or bend at 50/60mph,
PLEASE think of the consequences if you get hurt by losing control and going into a ditch or even worse a tree (a tree will not move like a lamppost). However you could be the lucky one and it could be someone else that got hurt. Could you live with yourself if you ruined life just because you can!! It takes a split second to ruin a life .
THINK.
Speed V progress
Speed does not necessarily equal progress! Remember you are in a killing machine and one wrong decision can be fatal. Imagine you were driving in a queue of slow moving traffic that had very few gaps to overtake, there would be little point in racing to overtake at every opportunity. You would probably cut a 60 min journey by 5 or 10 minutes. But think of the carnage you could leave behind you.
Constant accelerating and braking will affect your suspension, fuel consumption and energy from all of the extra concentration you would need to cope with when overtaking and the constant changes of speed.

Start to reduce your speed to 40/30 MPH 6 lines from the start of the corner (or at the triangle sign):-
Mirrors (all).
Position (middle of the road).
Speed (reduce to 25/30MPH)
As your negotiating the left bend:-
Mirrors (left).
Position (middle/over to the left of the road).
Speed (increase to 40/50MPH)
L.A.D.A to scan the road ahead and make progress.
Right hand bends.
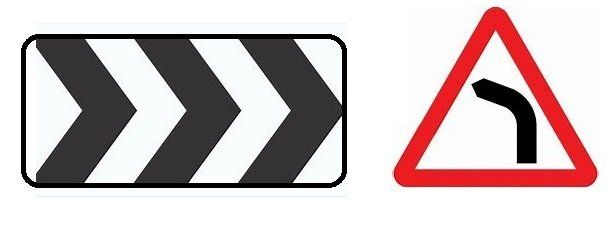
L.A.D.A to scan the road for the triangle sign and the black and white chevrons (or even assess the tree line).

Town roads and Country roads
Plan ahead with road marking and signs as your approaching bends, on sharp bends their will always a triangle sign (warning bends ahead) and a black and white chaveron sign. In town you want to be 10/12MPH and 2nd gear two to three stright lines before the corner and on a faster road 25/30MPH and 3rd gear.
Left hand bend
The position on a left hand bend you need to position your vehicle closer to the centre white line and as your going around the bend you move more to the centre of your lane or the curb.
Right hand bend
The position on a right hand bend you need to position your vehicle closer to the curb and as your going around the bend you move more to the centre of your lane.
When driving on blind small country roads consider the extra dangers:-
1. Vehicles driving too close to the centre line
2. Overtaking dangerously on bends
3. Drivers driving too fast
Always pay attention to road marking and warning (signs) triangles

Start to reduce your speed to 40/30 MPH 6 lines from the start of the corner (or at the triangle sign):-
Mirrors (all).
Position (more to the left hand side of the road).
Speed (reduce to 25/30MPH)
As your negotiating the right bend:-
Mirrors (right).
Position (middle of the road).
Speed (increase to 40/50MPH)
L.A.D.A to scan the road ahead and make progress.

- Mirrors (all) to see if anything is overtaking you.
- Position (closer to the line).
- Speed (maintain the same speed of the road)
- Mirrors (right).
- Signal (right).
- Position (right side of the road and overtake).
- Speed (maintain the same speed of the road)
- Gear (sometimes you might need to change gears down depending on an incline of a road or if the slower moving vehicle decides to speed up, Yes it does happen!).
- Mirrors (interior and left), once you have seen the headlights of the vehicle you have just overtaken you have adequate clearance to move back to the left.
- Signal (left)
- Position (back to your normal road position).
- Speed & Gear (adjust to maintain progress).
- Fault identification.
- Fault analysis.
- Remedial action.
- Full talk through.
- Prompt.
- Independent.
- Feed back at the end of your lesson.
- Student’s responsibility of lesson and improvements.
- Plan for the next lesson.

All Rights Reserved | 1st Choice driving school Grimsby 2024
