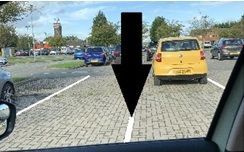
Reversing in to a parking bay
Introduction
At this stage of your training your:-
- P.O.M routine (moving off)
- Steering to a safe driving position and pulling up on the left
- Clutch control
- Co-ordination of foot controls including gear changing up and down
- M.S.M routine at junctions, moving off and stopping
- Adequate clearance around stationary vehicles and slower moving vehicle (cyclists and pedestrians)
- T, Y junctions, crossroads including more complex junctions (traffic lights and roundabouts) and timing of gaps right
should be improving and getting more (independent) client-centred
Agreed lesson is covering :-
Reversing into a parking bay exercise in a car park
Agree level of instruction on the way to the training location
Intervention
On the drive to the reversing location you will assessed on the skills and drills from the above lesson briefs:-
Agree if any of the lesson is going to be a instructor-lead-lesson or a client-centred-lesson and if it is client-lead agree if the instructor has to intervein verbally, take control of the training vehicle by ether using the dual control or take the wheel the lesson plan may need to be changed until the fault is fixed.
F.I.S.H
- Fault
- Implication
- Solution
- Help
Lesson aims and strategies
The aim of today’s lesson is to incorporate the Look, Asses, Decide and Act and Mirror, Signal, Position, Speed, Gear routine's when turning the training vehicle around. Previous reversing (straight line reverse ) would of already helped you to develop your clutch control. remember to move the clutch to the biting point then move the clutch pedal a £1 thickness up and down so you keep full control throughout the manoeuvre.

Risk responsibility objective's
On the way to the training location you and your instructor will agree the level off support from your instructor:-
- Full talk through
- Prompt
- Independent.
This is important to ensure that the instructor and student understands who has the main responsibility on the control of the training vehicle on the set lesson plan.
Your level of instruction will be given by your instructor to a level to suit you from full talk through then reducing your support to either prompt or independent.
Please note from November 2017 the DVSA changed the format of the driving test changed, the reversing around corners and the turn in the road exercises has been replace with parking up on the right hand side of the road and reverse back 2 too 3 car length and driving into a parking bay then reverse back out of it.
However you will still be taught learnt the reversing around corners and the turn in the road exercises manoeuvres at a lower structured level from your driving instructor.
Why still teach the turn in the road and reversing around a corner?
Why just think if you are on your driving test and you go the wrong way (like a dead end road) and you was unable to turn your training vehicle around safely.....
The turn in the road exercise will be taught to you at a certain point in your training as all driving instructors alter lesson briefing to suit all students needs, however all lesson briefs are agreed at the end of each lesson lesson, so this will give you the opportunity to read the relevant brief (gestalt).
Lesson brief
It is better to reverse into a parking space as you will find it easier to drive out. Imagine trying to back out of a parking space with your rear window steamed up due to condensation, not forgetting the volume of people with trolleys passing the rear end of your vehicle and also not forgetting children in their own little world.
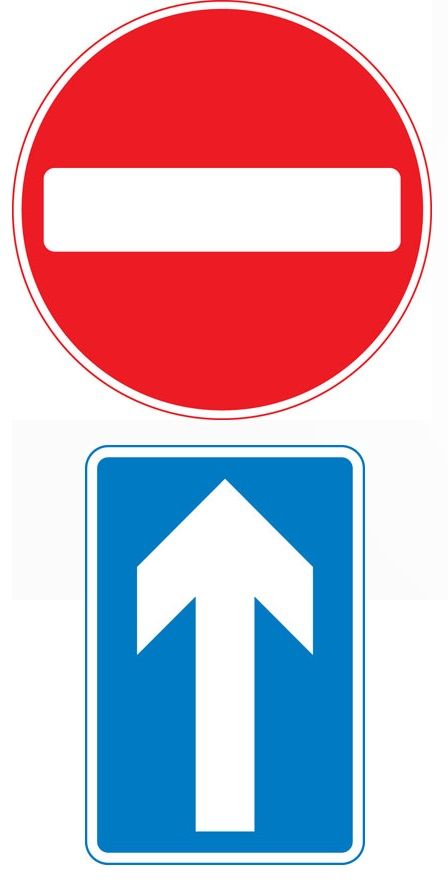
PLESE BE AWARE THAT SOME CAR PARKS CAN BE ONE WAY SYSTEMS SO PLEASE LOOK OUT FOR THE SIGNS.
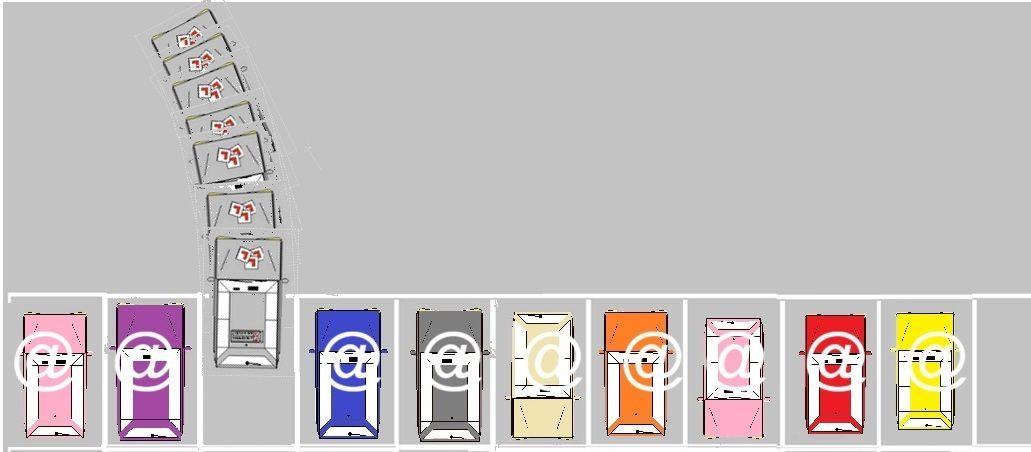
Revering in to a parking bay exercise on the left and the right using reverse gears with reversing to far and then driving out.
Location
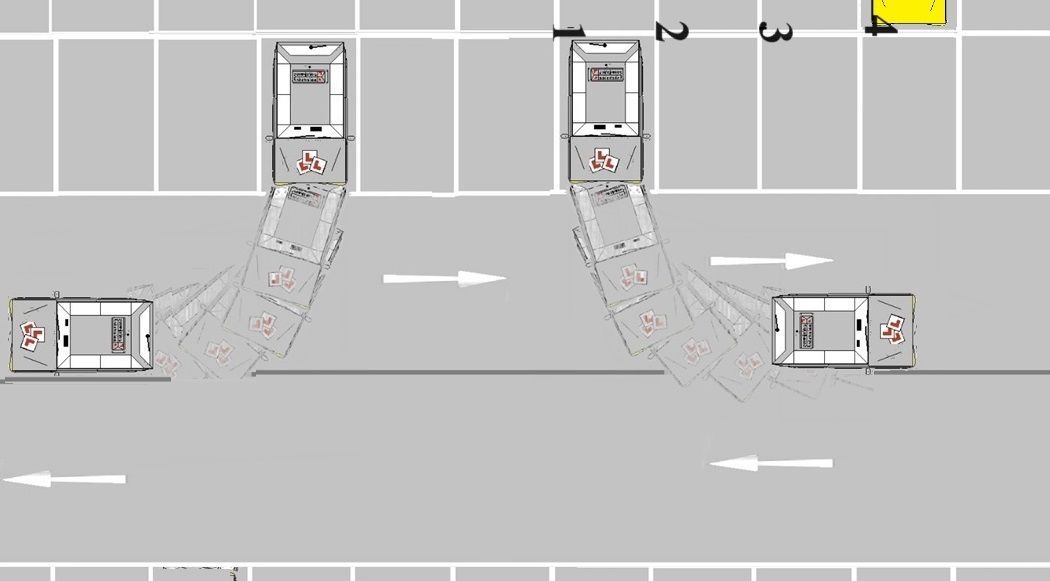
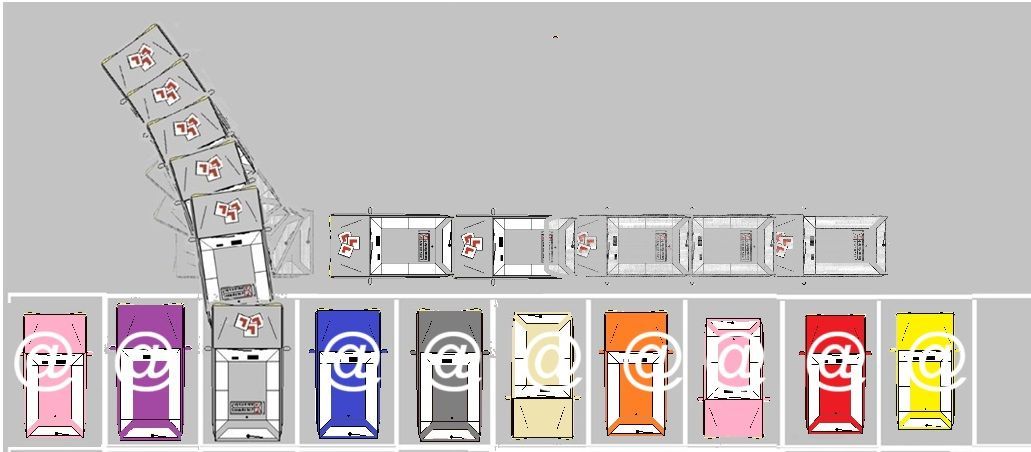
Once you have got to the training location (carpark) you will be asked to park up a door length away from the bay side you intend to reverse into.
Correct positioning
This positioning will stop you from cutting the corner of the bay you are revering back into. Just imagine parking next to a vehicle already parked in the next parking bay and as you are reversing into the target bay you shave the blue vehicle it or even hit it just because you started too close to the bay......
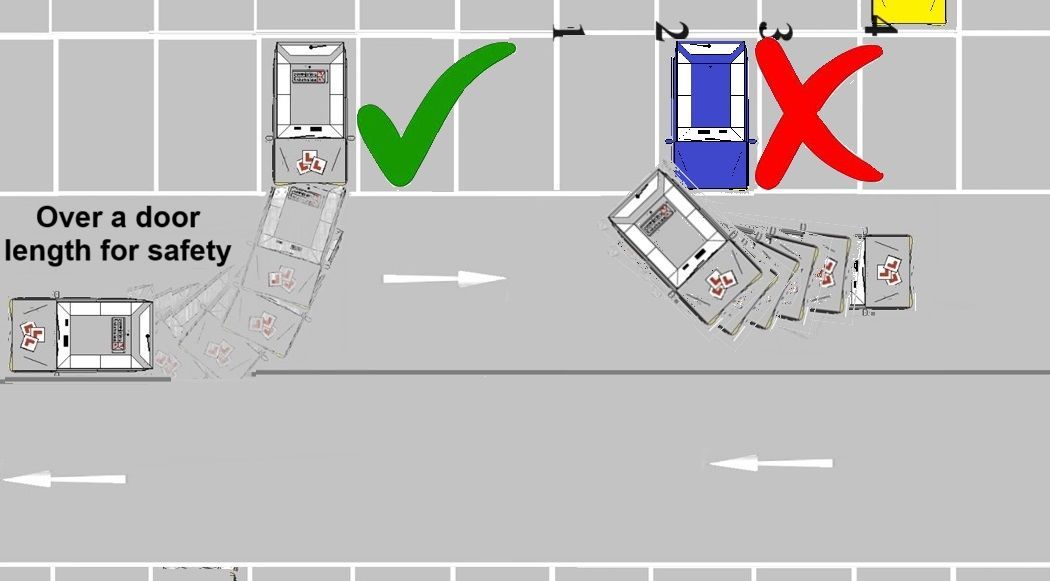
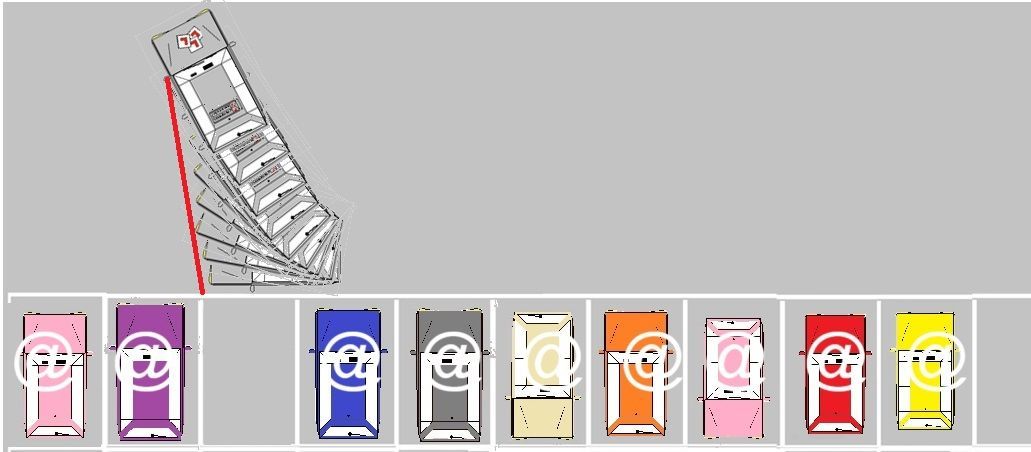
Incorrect position (too wide)
You will have the same issue if you start to wide from the side you wanted to reverse into.
When you are over a door length even on the opposite side of the cark park lane you are more at risk of hitting the blue or yellow vehicle that is next to your off side of your vehicle. For safety be a door length (1 meter) and no more than a door length and a half (1.5 meter).
M.S.M routine
On the approach to to start the manoeuvrer ensure you do your mirror, signal manoeuvrer routine to ensure you know what is behind you.
Reference point to reverse into a parking bay
Once you have parked up a door length from the bay you are intending to reverse into you instructor will give you a reference point so you ae accurate to reverse straight into the bay. You will be advised to line a part of your front door with line 4 (explained more on your lesson).
On your initial lesson brief you will be asked to make the training vehicle safe (handbrake and neutral) before your start the manoeuvrer.
Once you have understood the reference point and confident to undertake the manoeuvrer independently you will be asking to reverse into a bay of your choice on the left or on the right.
Make sure you assess and reverse into a parking bay somewhere safe, legal and convenient
- Park (roughly) a 1m from the bay.
- Ensure it’s free from parked vehicles, obstructions and no debris on the road as you don’t want to get a (puncher) flat tyre.
Carparks
Please remember some carparks can be one ways systems so once you have reversed into a bay never drive out the bay and go the wrong way as it is your responsibility to read road marking and signs on public the road and in carparks.
Use of steering
Just like all the other set reverse manoeuvrer's you need to briskly move the steering wheel with accurate clutch control will guarantee success.
Remember quick hands and slow/controlled foot pedals (Fast steering and good clutch control).
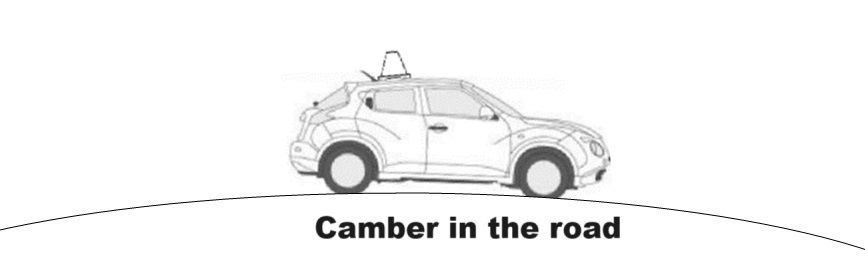
Camber of the road.
Most roads have cambers and a carpark is no different and the extra issue you may have is there could be an up or down hill slopes that you could be challenged with, however with you already trained on hill starts this should not be a problem on this reverse manoeuvre. Just remember to keep control of your training vehicle just using good clutch control
(£1 up and down from the biting point) and always demonstrate good clutch control throughout the manoeuvrer.
P.O.M
Once you have parked up prepare to reverse into the parking bay.
Please note reverse gear can be in different places so your instructor will guide you on correct position on the gear stick.
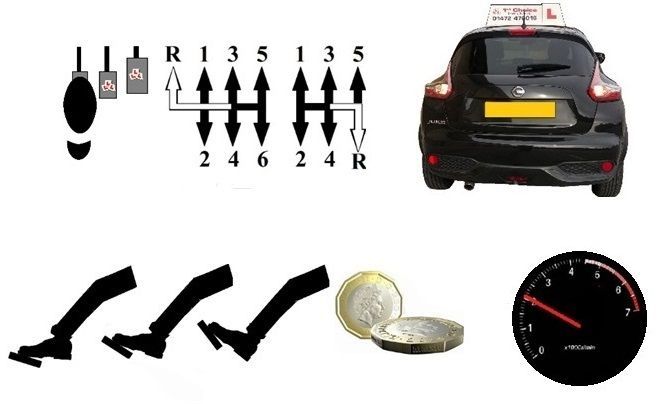
Select reverse gear
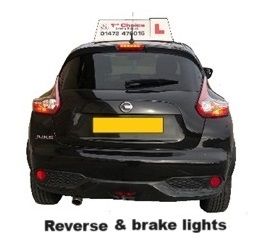
When selecting reverse gear remember the white lights on the back of your vehicle come on, so the vehicle coming toward (from behind) you will know your reversing so you will need to press your brakes to activate your brake lights telling them you have stopped.
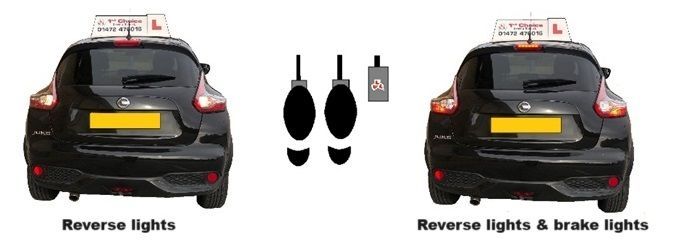
Use of brakes
If any vehicle drive towards the rear of your vehicle use your brakes to warn the vehicle you have seen them and stopped.
Hand(s) position
When reversing you would usually hold the steering wheel with the right hand at the 12 or 1 o’clock position and the left hand at the 6/7 o’clock position. This will hopefully keep the vehicle to stay in a straight line when you are looking out of your rear window when reversing.
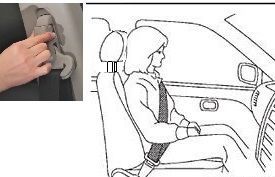
Use of seat belt.
By law you are allowed to remove your seatbelt, however it’s not practical as you could forget to put it back on or if you need to abandon your manoeuvre because a vehicle has come behind you. You will need to put it back on before you drive forward.
Releasing your seatbelt can help, however if you shuffle around in your seat you can look through the rear window by looking over your left shoulder a lot easier.
All around observations
Constantly for look around for and give way to approaching vehicles, cyclists and pedestrians on all 4 sides of your training vehicle, that's on your left, right in front and behind you. Not forgetting road users emerging or wanting to leave another parking space.

When reversing who do you give way too?
This could help when to stop when obstacles are coming towards you:-
- Motor vehicle 6 car lengths from you.
- Cycle about 3 cars lengths from you.
- Pedestrians 1.5 car lengths from you.
Use of brake lights
Always pause and wait if a vehicle appears from your rear, press your foot brake as this will identify and show that you have seen the vehicle and stopped.
Reference points (so accurate)
The reference point will be the white line of a parking bay roughly in the middle of your drivers door (this is when you are reversing on the right hand side of the car park. On the left hand side your reference point will be on a different point on the passengers front door (discussed more on lesson)
Starting the manoeuvre
Once you have your P.O.T prepare your vehicle to reverse into the chosen parking bay.
Prepare - Clutch down, reverse gear and find the biting point.
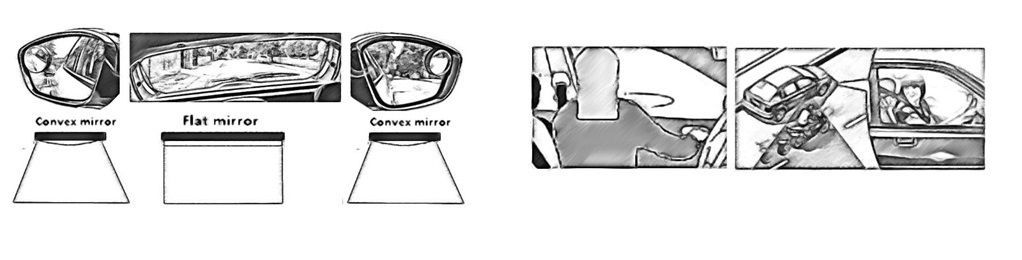
Observations
Reverse the 6 point check so go from your right shoulder to the left shoulder, so you’re looking the correct way (over your left shoulder)
Move
When no vehicles are driving towards you (that's both sides of your vehicle) release your handbrake, steer and start to reverse back SLOWLY (crawling pace).
At the point of turn
This is the point as w will start on the right hand side bay you start to turn your steering wheel right (using the pull push method) using both hands while continuing all around observations (6 point checks) including over you left and right shoulder.
Steering
With this manoeuvre you will need to briskly move the steering wheel with accurate clutch control, this will guarantee success.
The key to this manoeuvre is quick hands and slow feet (Fast steering and good clutch control).
Remember to achieve best clutch control is to move your clutch £1 up and down for the biting point position.
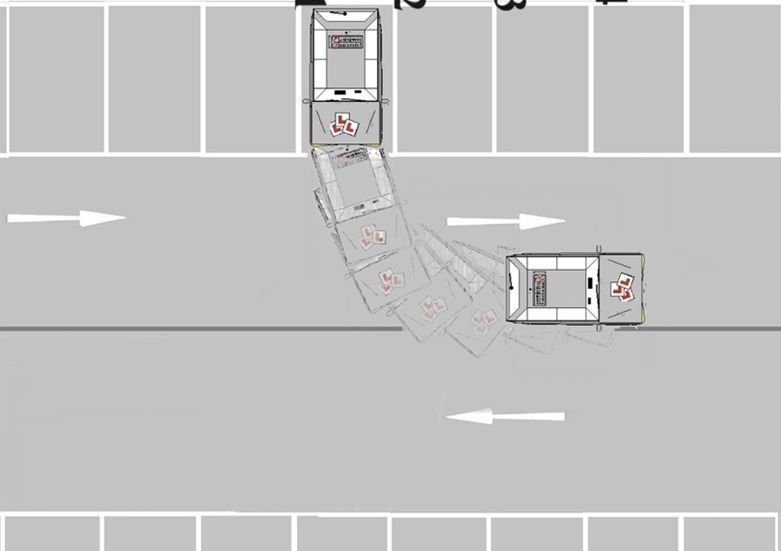
Once you have full lock on your training vehicles front end will start to move out into the road so ensure there are no hazards in your way - Remember YOU will need to stop for vehicles, cyclists and Pedestrians.
Dealing with other road users
While reversing to the parking bay be prepared to stop or even abandon the manoeuvre if this is the best risk assessment.
Clutch control
All the set manoeuvres should be undertaken at a very slow speed by using slow clutch control by moving your clutch a £1 thickness up and down from your biting point.
Straighten your wheel when your front end of your training vehicle is at 12 o’clock
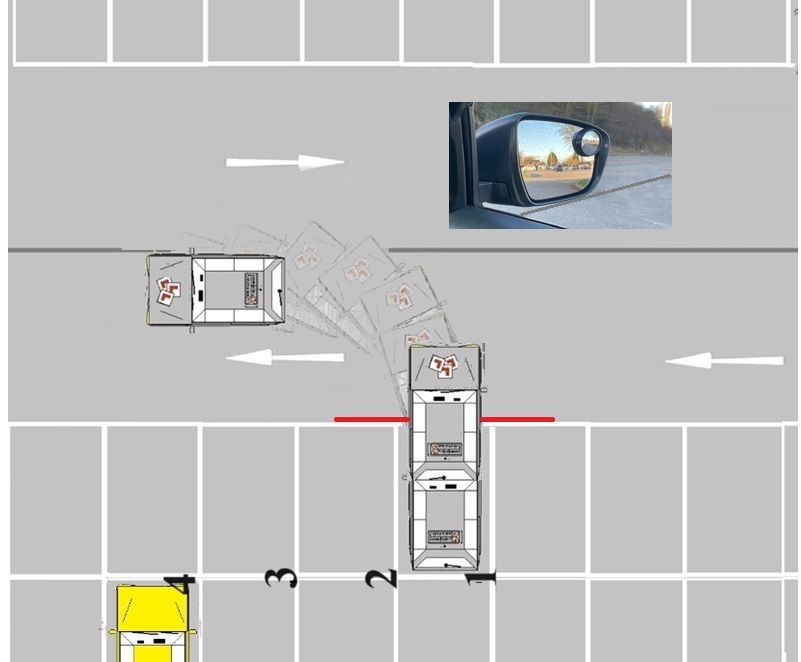
Judging when to straighten up is when you are Parelle between the two white bay lines. This is done by using your nearside and offside mirror's and the front end of your vehicle look square in the bay.
How far to reverse into the bay
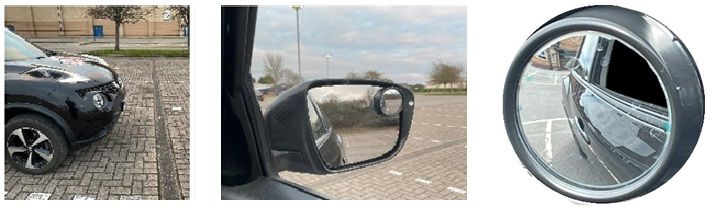
Reverse into your selected bay until the middle of your front drivers door or your elbow is roughly half way into the bay (or your wing mirror is on the front bay line in diagrams below). You can also use (if your training vehicle has one) is your blond spot mirror and put the back dividing line of line behind your vehicle just above the centre of your rear wheel.
Once exercise is completed you will practice it a few times so to work on the control, accuracy and observations needed for this manoeuvrer.
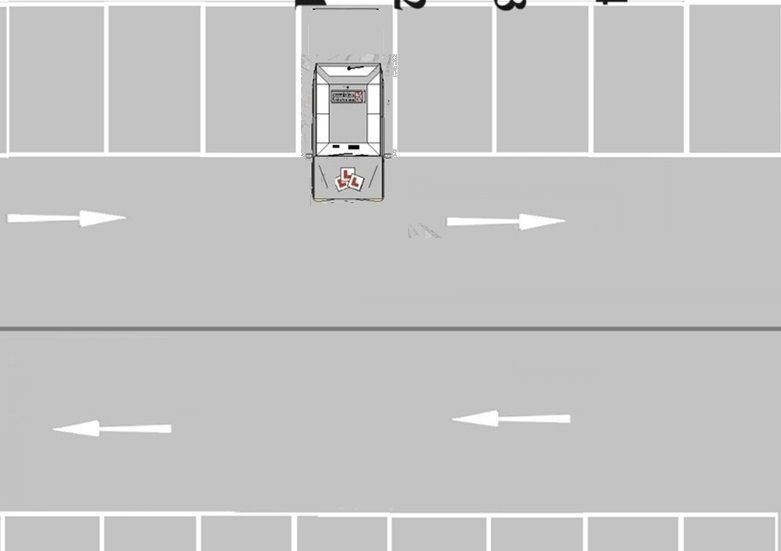
P.O.M to go forward
Prepare
Clutch down, reverse gear and find the biting point

Observations
Reverse the 6 point check so go from your right shoulder to the left shoulder, so you’re looking the correct way (over your left shoulder).
Move
Once you have assessed it is safe to start the manoeuvre (when no vehicles are driving towards or behind you), release your hand brake and start to steer full lock to the left.
Then go back to your start position and then repeat the manoeuvre.
When leaving the parking space ensure you drive out of it like you would leave a junction.
Reference point
Drive forward and make sure your wing mirror is at the centre line of the carpark bay before you turn right or left to leave the space you are in.
Risk management
This will ensure you are far enough out of the bay so when you turn out of it you do not hit a parked vehicle that could be potentially in a bay next to you.
All round awareness
Because you are parking in a car park extra observations are needed to ensure you do not miss anything especially children.
Extra observations are also needed to the front as the front of the car will swing out as you turn and may present a hazard to passing traffic in the car park.
Use the same method when reversing to the left and the right.
This is a universal reversing brief so reversing to the right hand bay is exactly the same.
Use the same technics as above but just reverse the steering and observations.
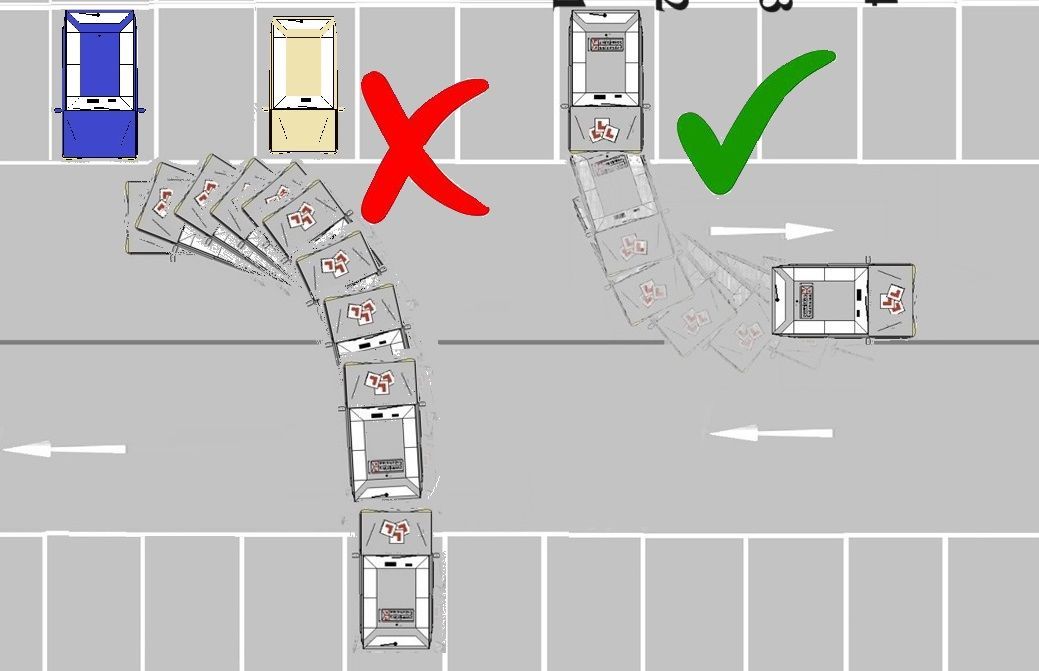
Second technique for bay park.
Positioning of the vehicle
Pull your vehicle as close and alongside the bay you propose to park in. This will allow sufficient room to swing your vehicle out to get the angled required. 1st gear is needed for control.
Place your wing mirror in the middle of the bay you wish to reverse into.
(The reference for your vehicle will be discussed more on the brief)

Beginning the manoeuvre (11/12 o’clock position)
Once you have done P. O. M drive slowly forward putting full lock right on to get an angle until you are at 10 or 11oclock. Visually you will see the nearside white line and then put your drive wheels stright.
Prepare to go backwards
- Clutch down, reverse gear and all round observations.
- Reverse back pull pushing the steering wheel to the left.
Once you have guided your training vehicle into the bay and your Parelle to the white bay lines straighten your front wheels up and reverse back into the parking bay.
Make the Vehicle safe
Once you are in the parking bay apply the handbrake and make the training vehicle safe.
Once you are ready to drive on prepare the training vehicle to drive forward and follow the same steps as the first manoeuvrer.
Reflect & Review
So remember your instructor is there to HELP you so on your driving lesson if you have any uncertainties or need anything rewording or recapping to make things any clearer, just ask.
Your training Vehicle is fitted with dual Controls and if necessary could be used throughout your lesson if needed. These are here for your safety so we can step in to keep you safe.
So don’t worry if the issues arise we will aid & guide you VIRBALLY or PHYSICALLY and we can go over the situation if happens to correct if in the future.
Risk management
Physical control of your vehicle
The aim is for you the student to have full control of this lesson with previous lessons and have full talk through on the new topic and then reducing the support throughout with you decision making as best you can.
Your instructor’s job is to analyse any faults or new faults that may accrue in this lesson and put them right.
Talk about any issues if the situations happen on the driving lesson and put issues right.
Fault identification.
Fault analysis.
Remedial action.
Level of instruction on your lesson
Full talk through.
Prompt.
Independent.
End of lesson
Feed back at the end of your lesson.
Student’s responsibility of lesson and improvements.
Plan for the next lesson.