- L.A.D.A & M.S.P.S.G routines on junctions and crossroads you approach
- Nearside to near side and offside to off side then crossing
- Two second gap. hold back position
- Meeting , overtaking, adequate clearance when overtaking stationary & slow moving vehicles
- Awareness and planning
- Traffic calming measures
- Hill/angle starts
- Busier junctions
- Full talk through
- Prompt
- Independent
Approaching a roundabout
All drivers need to be constantly scanning the roads for road markings, road signs and adapting their speed and road/lane position as and when needed. The strategy here is to look ahead for relevant sign information Look, Assess, Decide & Act (L.A.D.A). As a rule of thumb on a 30MPH road and the road is flowing you would potentially come of the accelerator pedal a lamp post before the information sign
M.S.M routine
Start your hazard routine and your lane change for the direction you are planning to take at the round sign (10/12 car lengths from the roundabout).
Roundabouts can be open or closed (so L.A.D.A early so you can assess the flow of traffic on the roundabout as your approach).
The purpose of early planning is to give you the time to adjust your speed (usually 2nd gear) so if possible you can safely merge into a gap on your right without stopping.
- Mirrors interior mirror and left door
- Signal left

- Mirrors interior mirror and left door
- Signal left
Rule 187 is very important
In all cases watch out for and give plenty of room to:-
- pedestrians who may be crossing the approach and exit roads
- traffic crossing in front of you on the roundabout, especially vehicles intending to leave by the next exit
- traffic which may be straddling lanes or positioned incorrectly
- motorcyclists
- long vehicles (including those towing trailers). These might have to take a different course or straddle lanes either approaching or on the roundabout because of their length. Watch out for their signals.

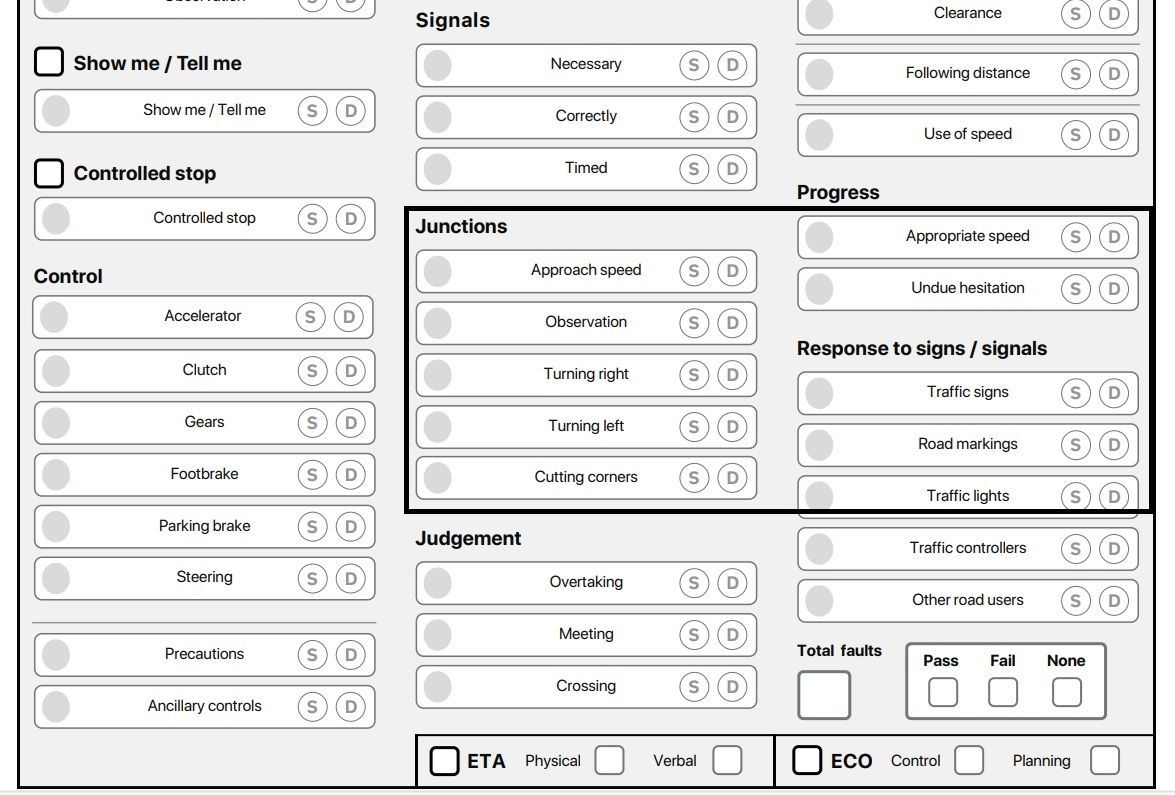
Observations approaching and leaving a roundabout
Always plan your approach when coning up to a roundabout and also look out for
- Pedestrians who may be crossing the approach and exit roads
- Traffic crossing in front of you on the roundabout, especially vehicles intending to leave by the next exit
- Traffic which may be straddling lanes or positioned incorrectly
- Motorcyclists
- Cyclists
- Vehicles towing trailers)
- HGV's
Towers and HGV's might have to take a different course or straddle lanes either approaching or on the roundabout because of their length, watch out for their signals.
Multiple roundabouts
At some complex junctions, there may be a series of mini-roundabouts at each intersection. Treat each mini-roundabout separately and follow the normal rules.
- Not emerging from a junction when it is safe to do so
- Driving too slow unnecessarily, holding up following traffic
- Driving well below the speed limit on clear roads
- Waiting unnecessarily for another road user to pass who has clearly given way to you
- Check rule 146 of The Highway Code
- Read pages 254 to 261 of ‘The Official DVSA Guide to Driving: the Essential Skills’ (2022 edition)
- Keeping up with the flow of traffic and making confident decisions when emerging
- Driving in different weather conditions
Planning and strategy
Most roundabouts are open and you can see the opposite side (12 o'clock) of the roundabout quite clearly most of the time, so by the time you are 6 white lines from the roundabout you should have a clear picture in your mind to see how busy the roundabout you are approaching is from ahead and from your immediate right.
Timing on reducing your speed (based on a 30mph road)
When travelling at 30mph use a land mark such as a lamppost (as lampposts are roughly 30/50M apart from each other) and only if it is safe behind you come off your accelerator to see how much speed you naturally reduces you will be surprised, it will be roughly 5MPH.
Also try it at 40/50/60 and 70MPH.
If you use this rule of thumb - A roundabout sign is roughly double your stopping distance from the roundabout you are approaching it, use the roundabout sign as a slowing down template.
However we start learners to come off the gas pedal a lamp post from the roundabout sign, so by the time you get to the roundabout sign you are roughly 25MPH and have more time to read the road (L.A.D.A routine). Then when you are at the roundabout sign (6 to 8 car length) where the hazard white road marking start the hazard routine (M.S.P.S.G.(L)).
Who do you give way to on a roundabout?
All vehicles give way to their immediate right, so your right will have to give way to their right, their rights gives way to their right and your left gives way to you.
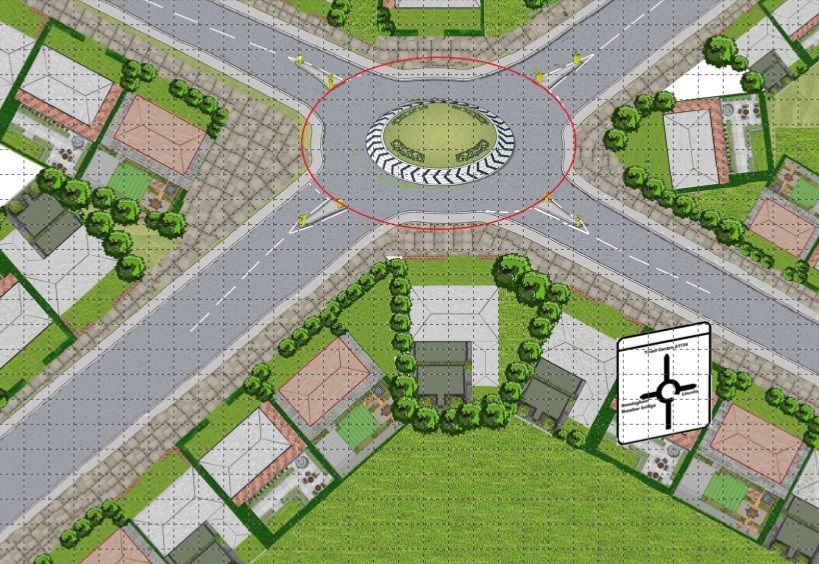
Mechanical shield
While approaching a roundabout look ahead and left to see how busy the roundabout is at 12 o'clock and 9 o'clock. The reason for this planning as that vehicles approaching from ahead (12 o'clock) or from the left 9 o'clock can become a mechanical shield if you work your approaching speed and gear on the approach.
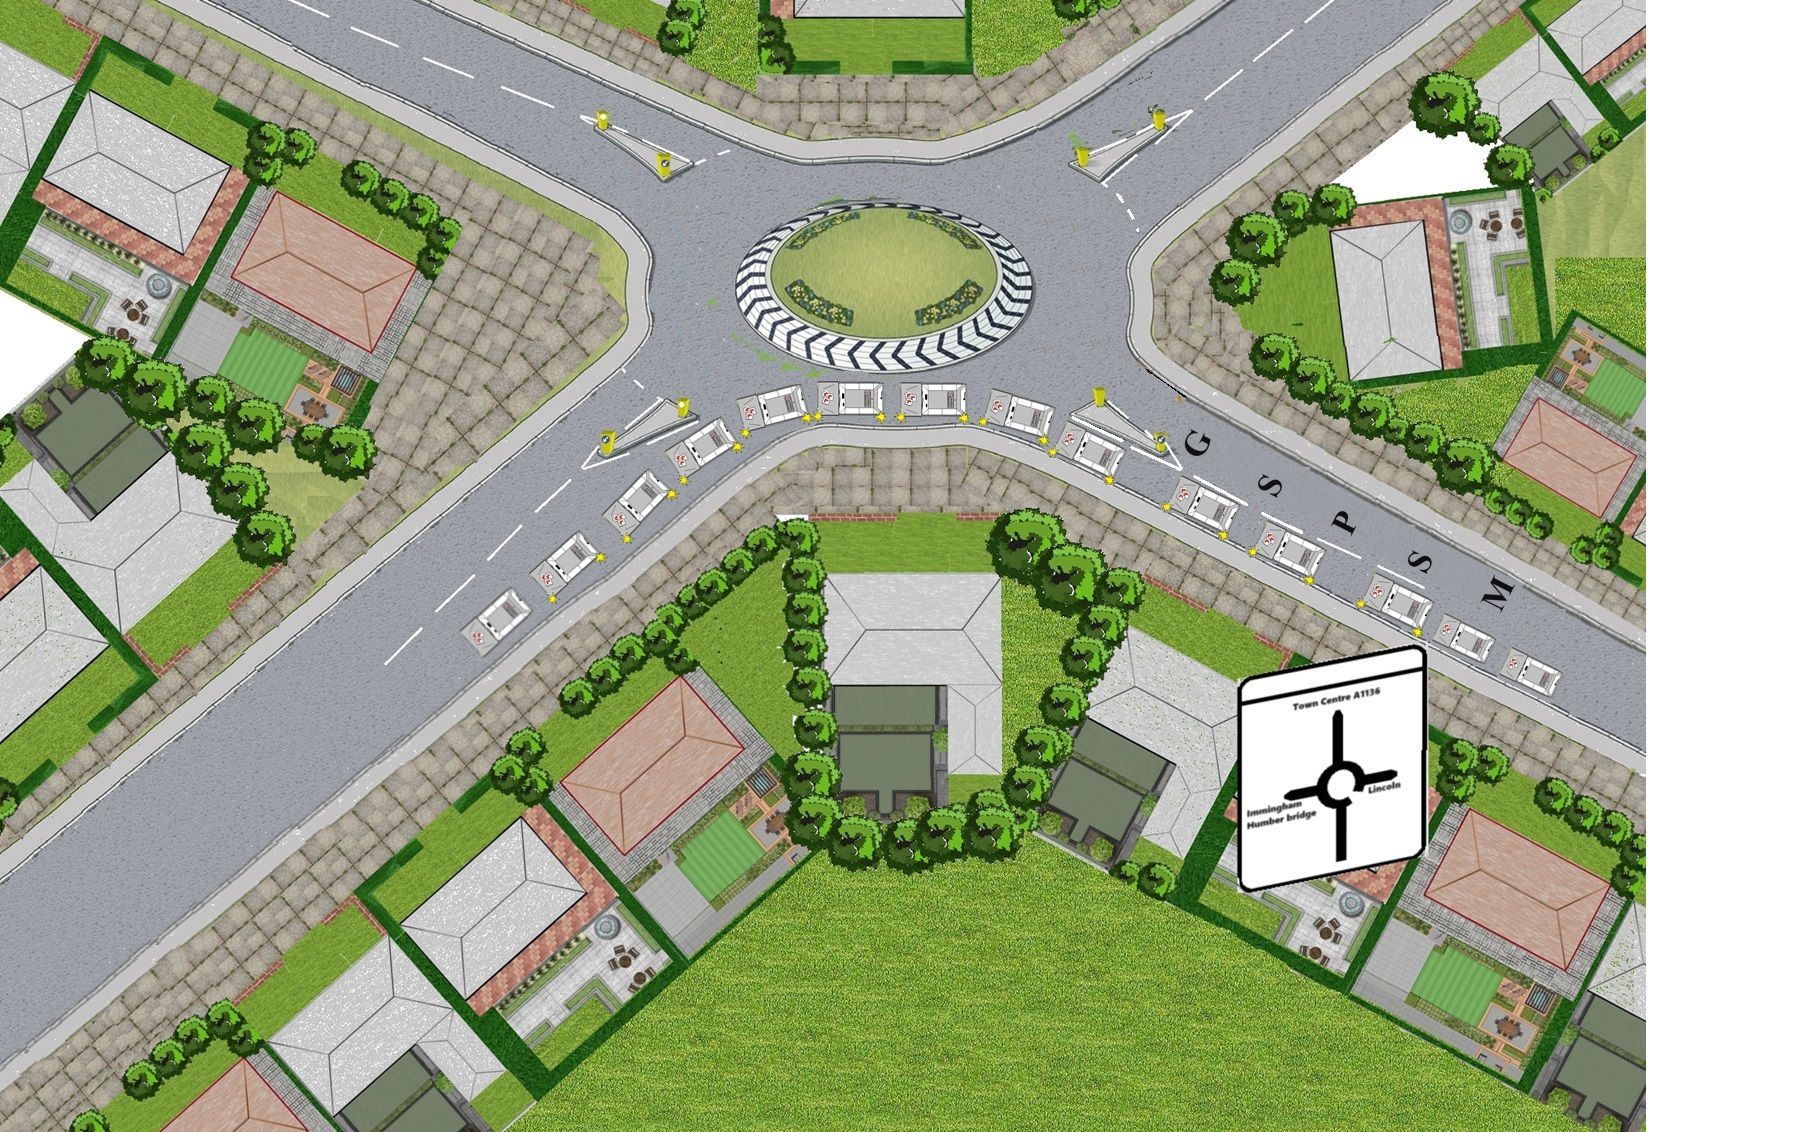
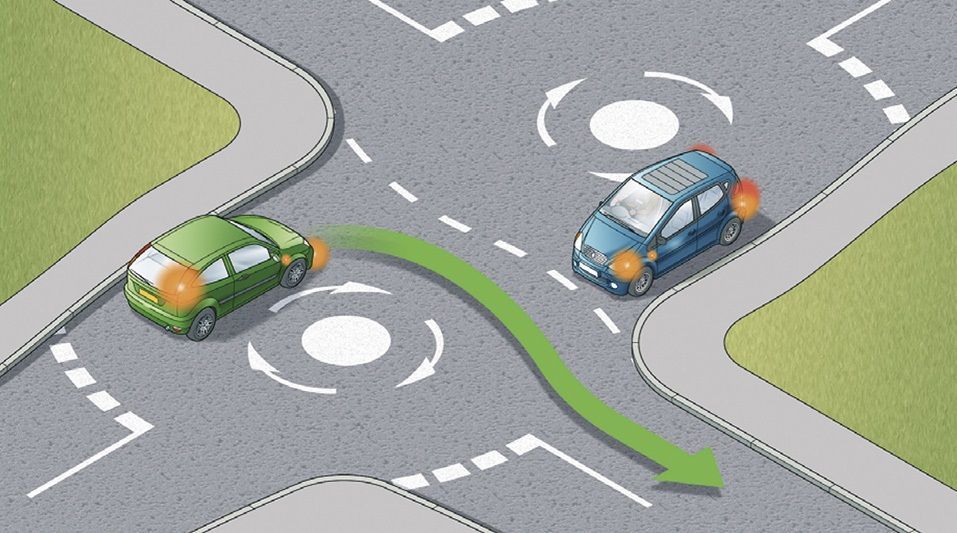
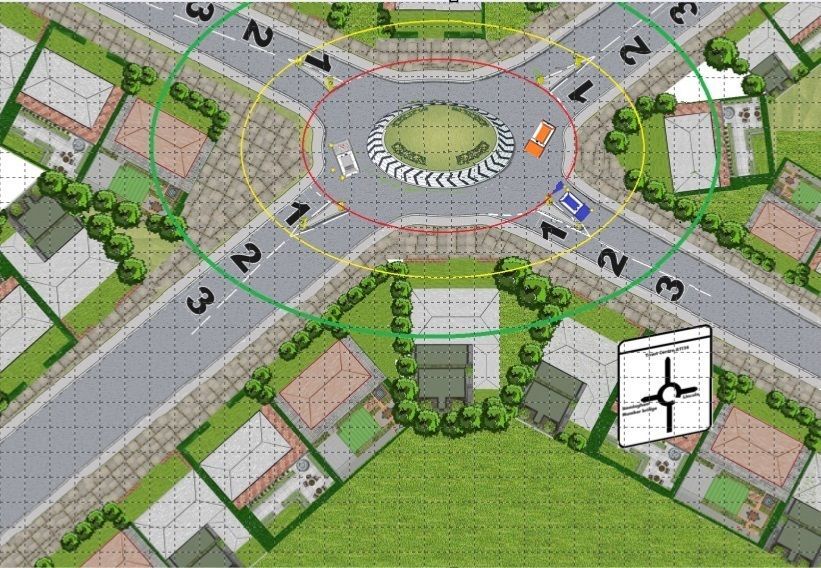
Diagram 1
For example in diagram 1 (below) you can see on the right (3 o'clock) an orange vehicle is roughly the same distance from the roundabout as your learner vehicle.
Ahead is a blue vehicle, but on the immediate right of you is a green vehicle and they will be on the roundabout before you get 2 car lengths to the roundabout give way line and you can see that it has a right indicator on.
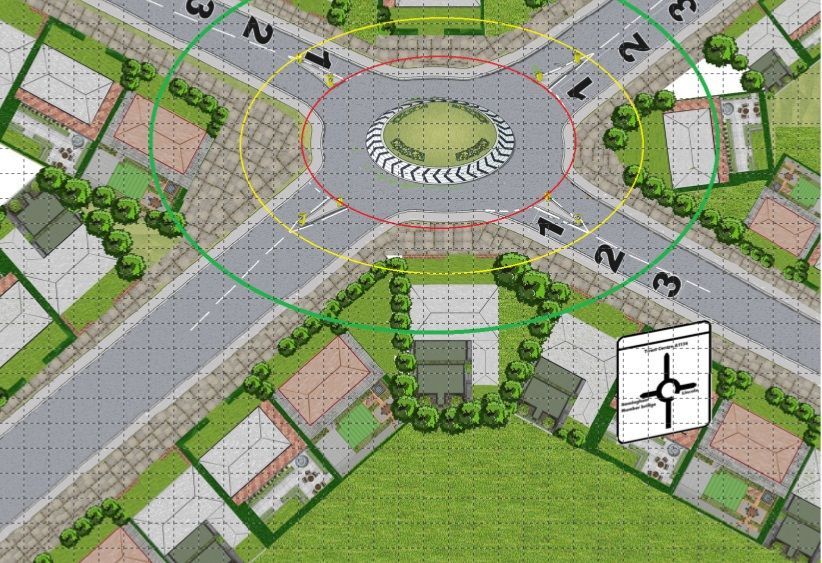
With this level of planning you know the blue vehicle by law has to give way to their right and by the time the orange vehicle gets to the white give way line it will also have to give way to the green vehicle as it will know be on their immediate right.
So unless the green vehicle goes all the way around the roundabout you will have an opportunity to keep on flowing.
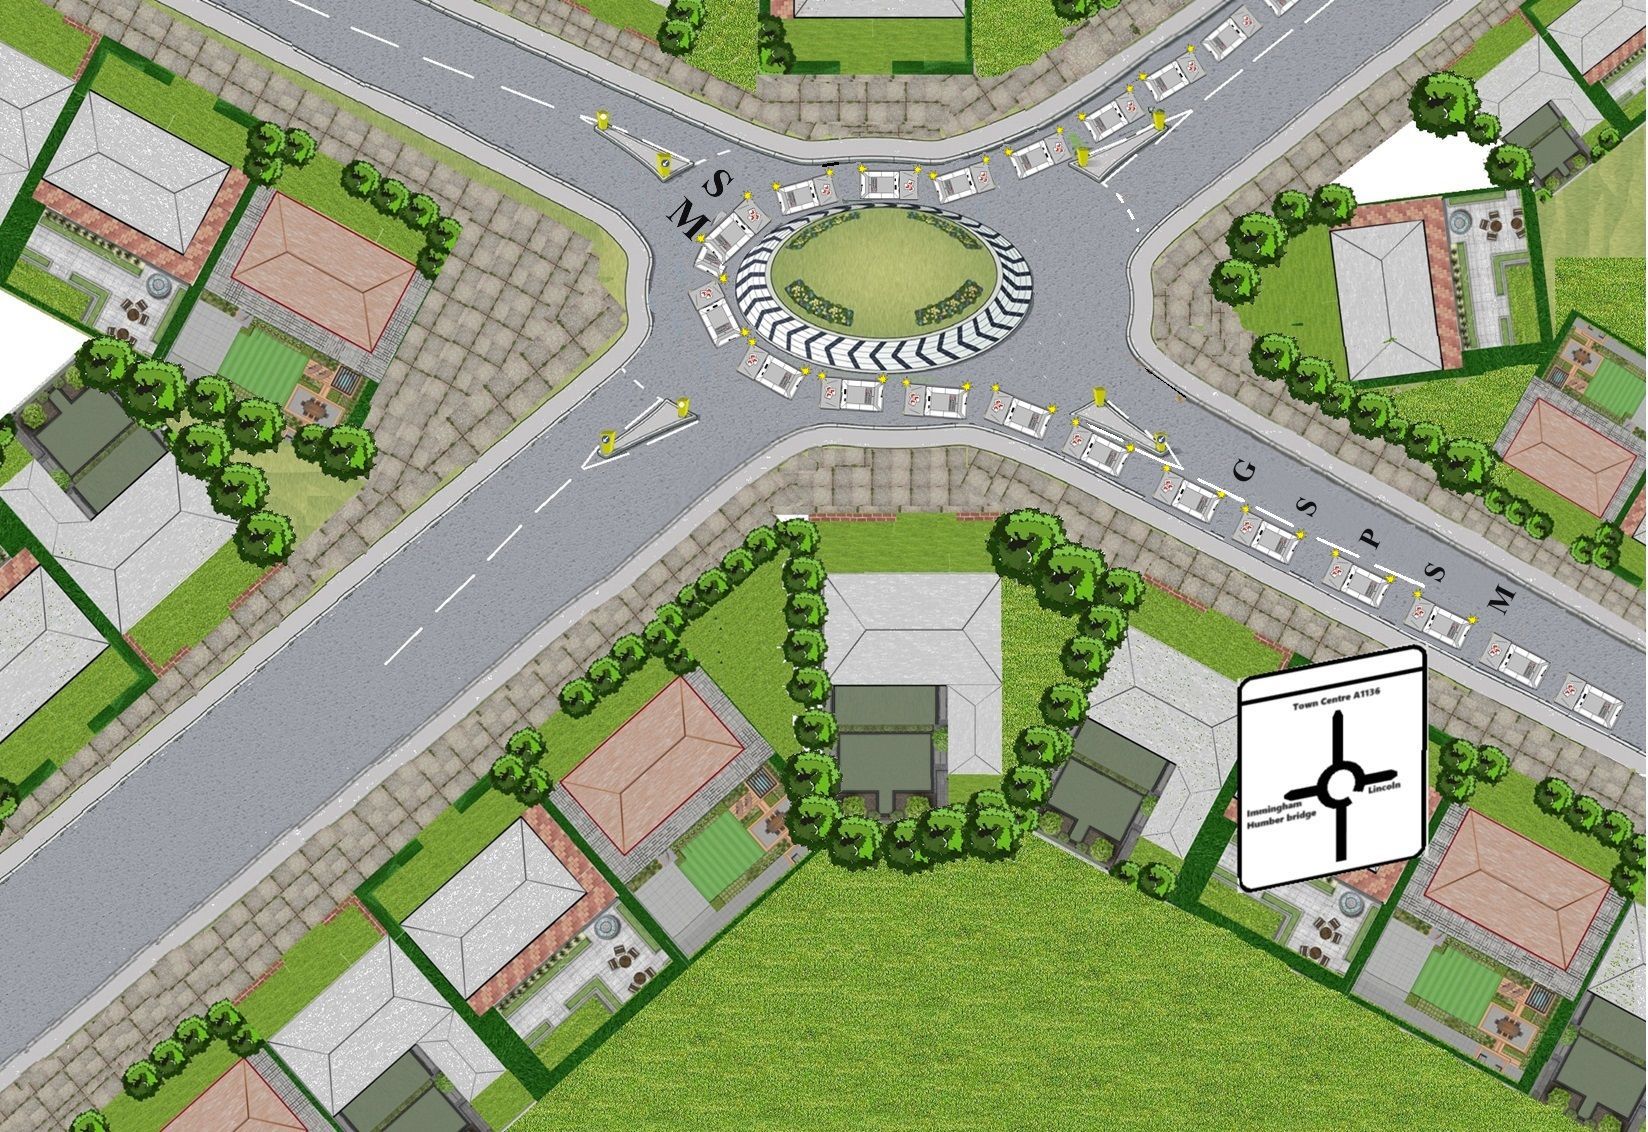
In diagram 2 the green vehicle has indicated to leave to the road you are emerging out off. We call this a blocker vehicle or a mechanical shield, with this type of planning you will reduce your hesitation.
Diagram 1
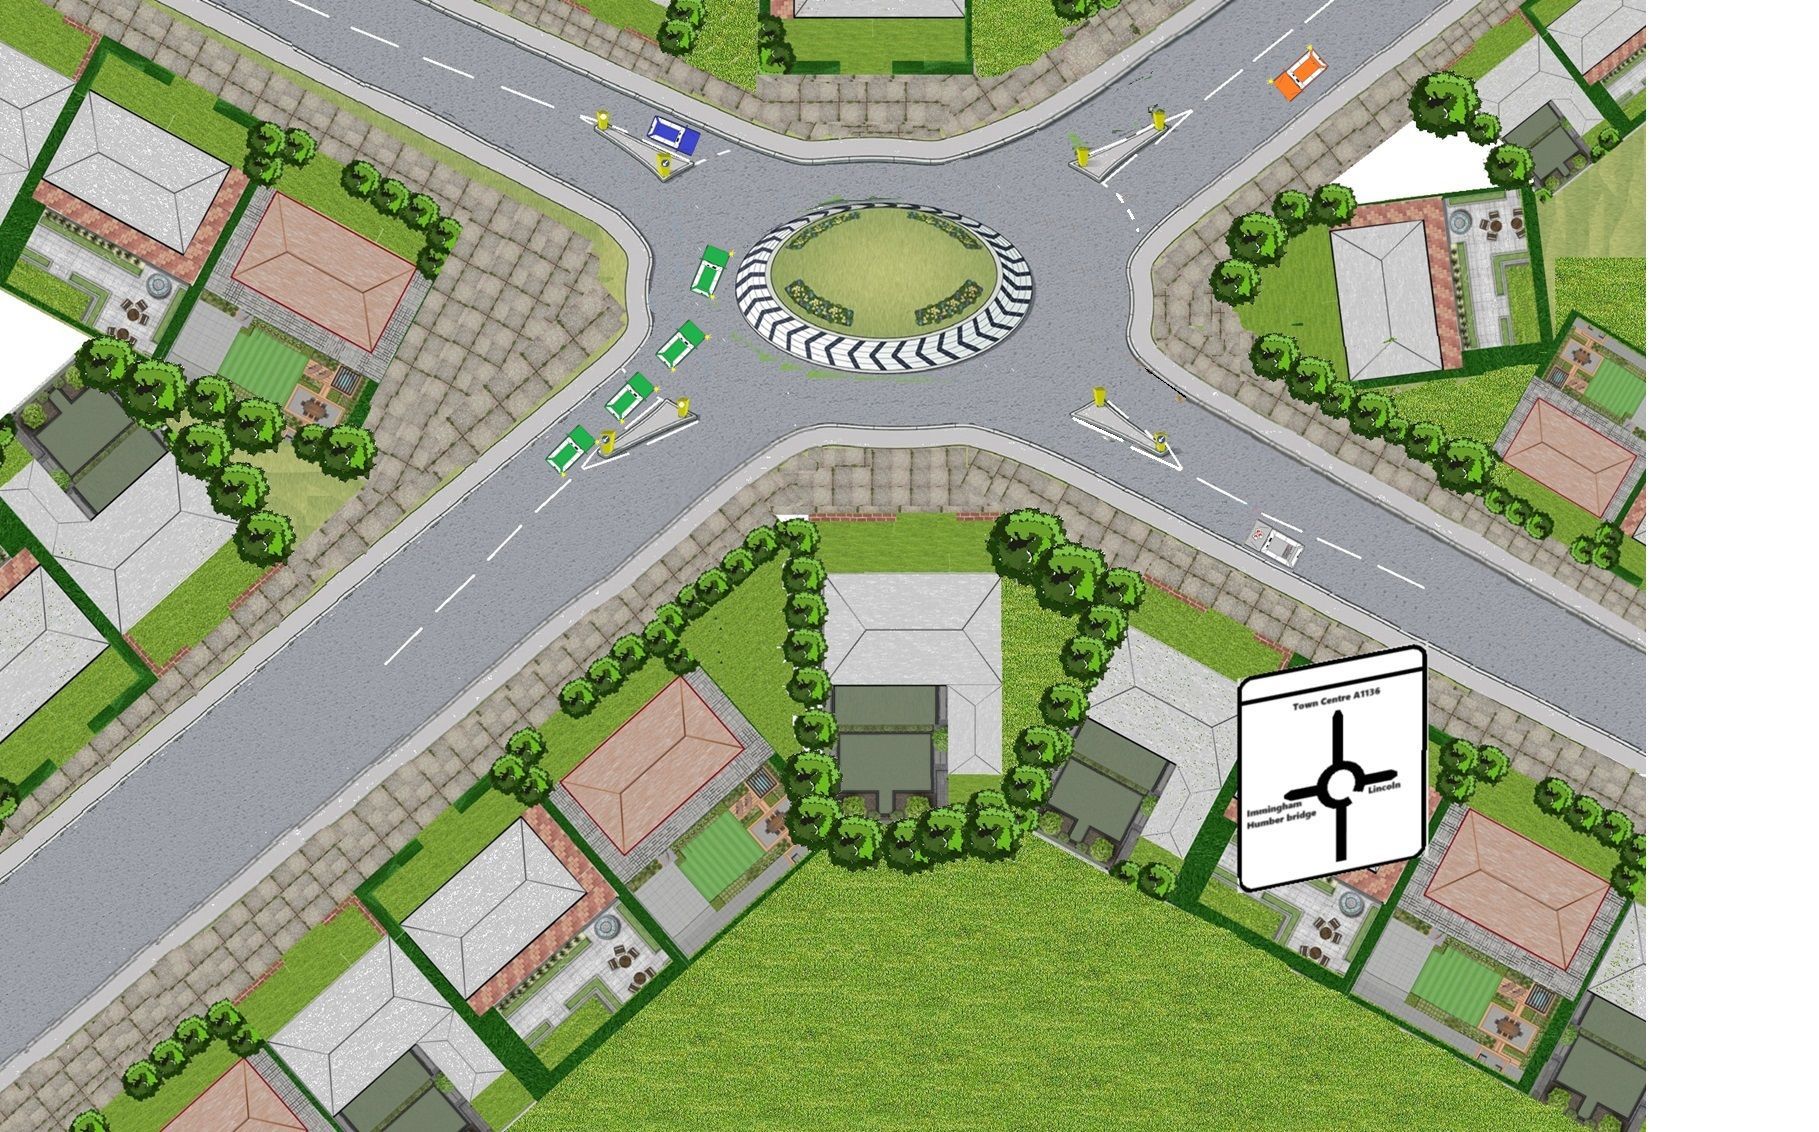
Diagram 2
Misleading signal
Unfortunately you will also get the drivers that do not indicate correctly so looking at other tells can help you.
- Look at the drivers hands are they moving the steering a lot? If the driver is coming from 12 o'clock and travelling to 6 0'clock (your direction) they will only need to move the steer slightly. But if they are travelling around three quarters round (past out exit) they will steer more.
- Look at the front wheels, are the looking like they are being moved more that needed?
- Look at the front end of the vehicle, are you seeing more front end and even the passengers (nearside) wing mirror?
- Is the driver looking at you? That's normally a tell that the driver is making an error or has a faulty indicator(s) on their vehicle and hoping your going to react in a safe manor?
- Learners don't know if they have enough time to safely make progress
- Learners struggle (to start with) with other vehicles lane position
Red zone - at the give-way line
Amber zone - 2 white lines from the give-way line
Green zone - 4 white lines from the give-way line
Then between the red and amber zone is area 1
Between amber and green zone in area 2
Green zone is area 3
Think of this all the way around the roundabout.


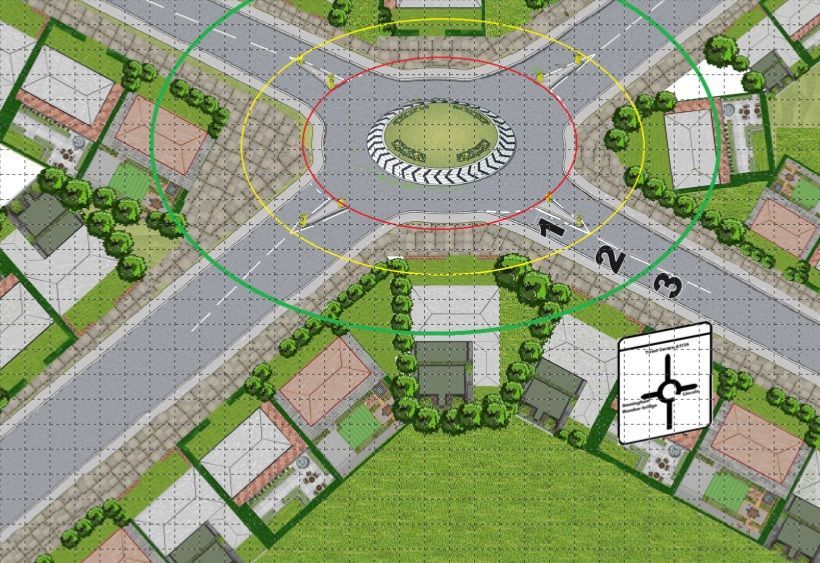

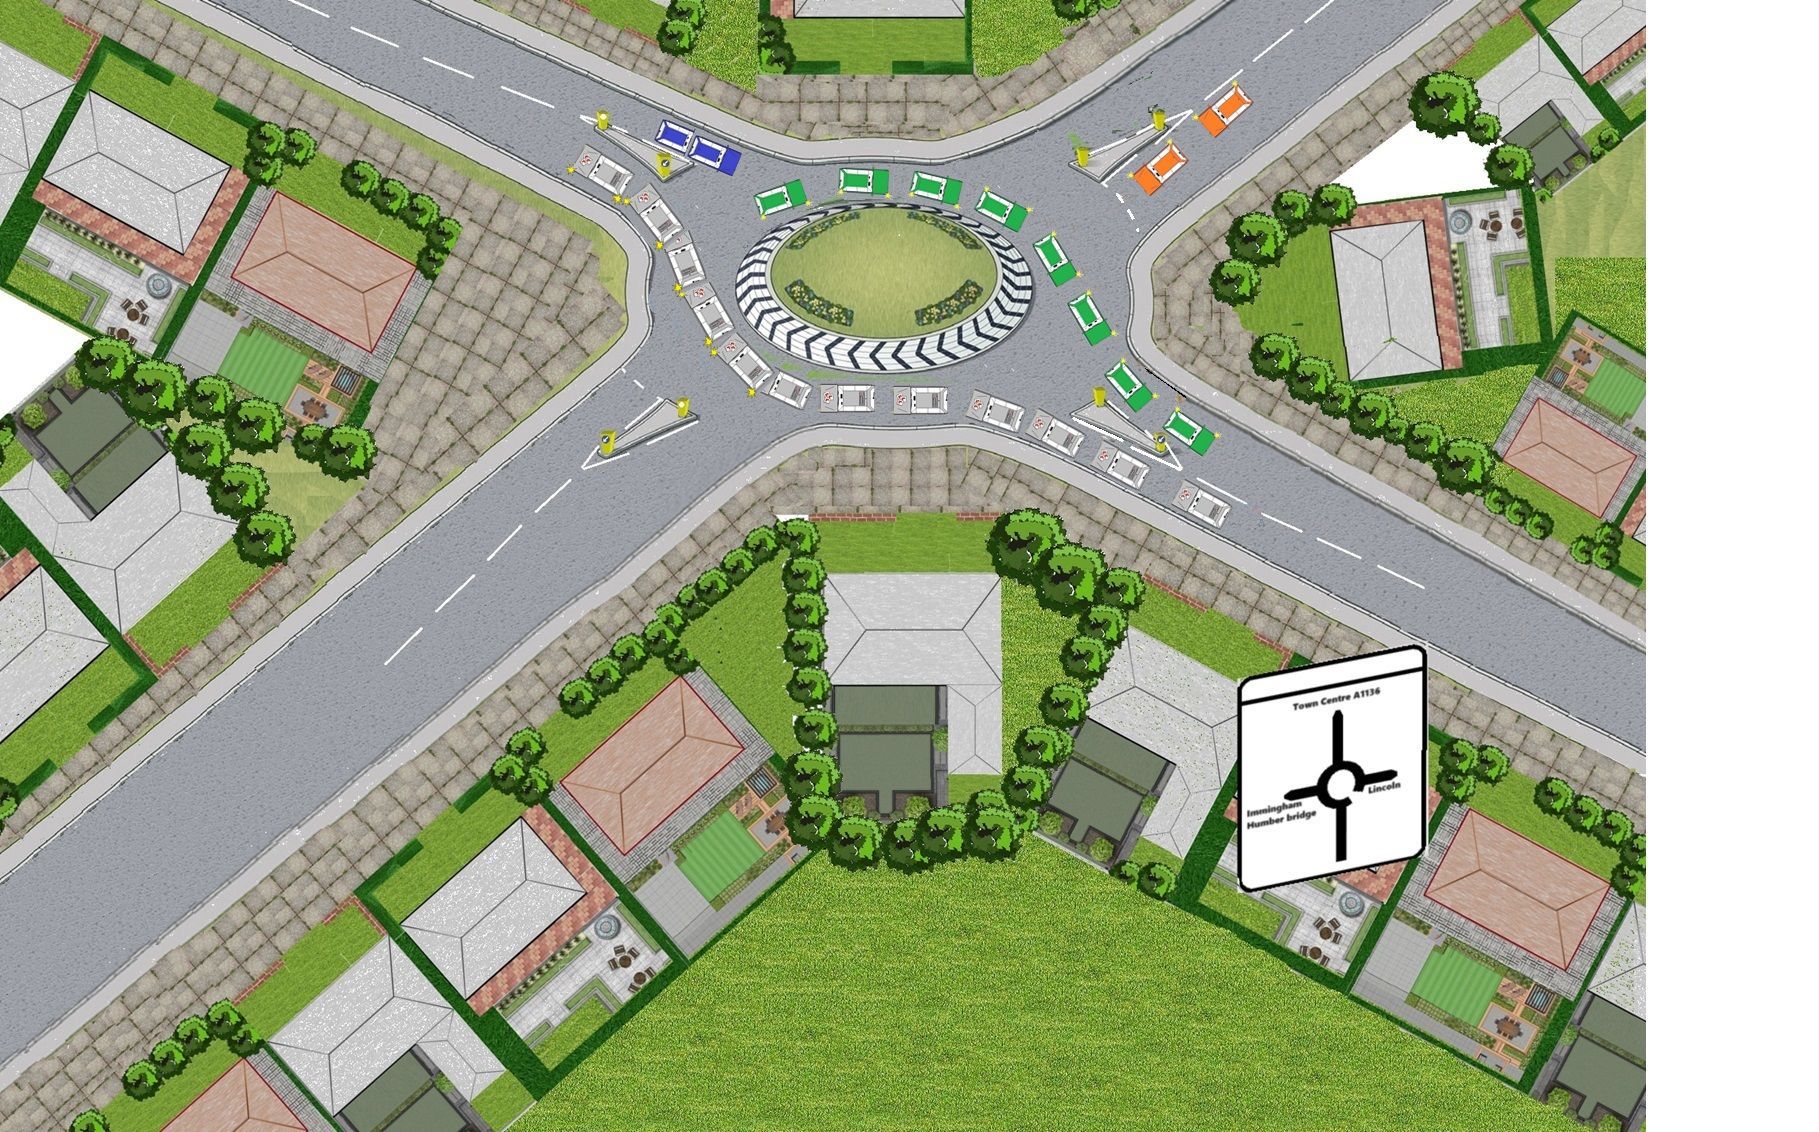
The immediate right (3 0'clock)
Now if your in zone 3 travelling towards the roundabout and the amber vehicle on your immediate right is in zone 3 at the same point as you, you are more than likely have to give way to that vehicle.
However if the vehicle is further back (say 2/4 white lines) before the green line it will be safe for you to continue.


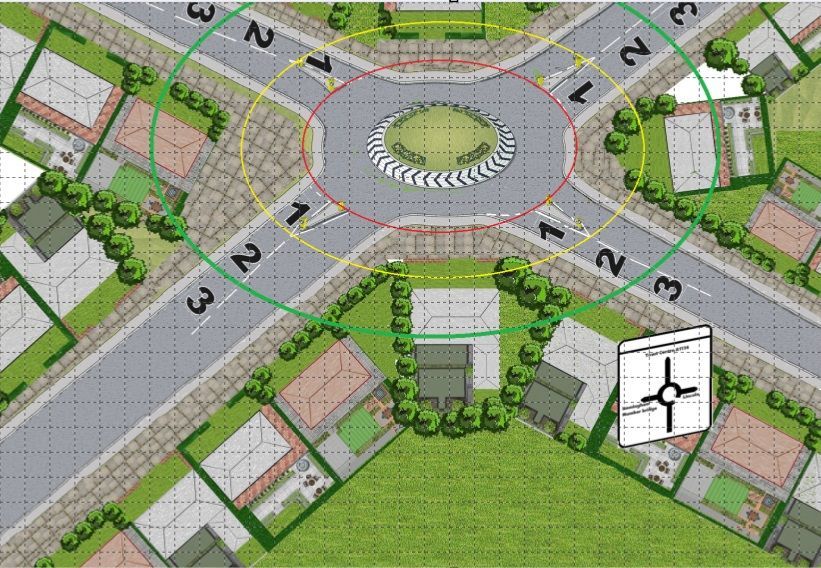
Ahead (12 0'clock)
The vehicles on your immediate right (3 0'clock Orange vehicle) will be effected by their immediate right (blue vehicle).
When approaching any round about the road immediately ahead (12 0' clock) and to the left of you (9 0' clock) can help you to continue if you are planning for a safe gap to emerge.


- Your driving instructor will adapt their teaching style to suite your ability and ability
- Your driving instructor will continue to encourage you on your lesson and analyse any problems made and allow you to take responsibility for your own learning goals by giving you technical information to improve your techniques. Your technical feed back from your instructor will be ether given on the move or if feel needed by pulling you up on the side of the road somewhere safe, legal and convenient.