Straight line revers on the left hand side of the road.

Introduction

At this stage of your training your:-

  • P.O.M routine (moving off)
  • Steering to a safe driving position and pulling up on the left
  • Clutch control
  • Co-ordination of foot controls including gear changing up and down 
  • M.S.M routine at junctions and stopping
  • Adequate clearance around stationary vehicles and slower moving vehicle (cyclists and pedestrians)

should be improving and getting more independent


Agreed lesson is covering :-

  • Reversing in a straight line on the left hand side of the road


 You will continue to develop with last lesson brief:-

  • L.A.D.A & M.S.P.S.G (main road to side road)
  • Two second gap
  • Hold back position
  • Meeting , overtaking, adequate clearance when overtaking stationary & slow moving vehicles 


Agree level of instruction


Intervention


Agree if any of the lesson is going to be a instructor-lead-lesson or a client-centred-lesson and if it is client-lead agree if the instructor has to intervein verbally, take control of the training vehicle by ether using the dual control or take the wheel the lesson plan may need to be changed until the fault is fixed.


F.I.S.H

  • Fault
  • Implication
  • Solution
  • Help

Lesson aims and strategies


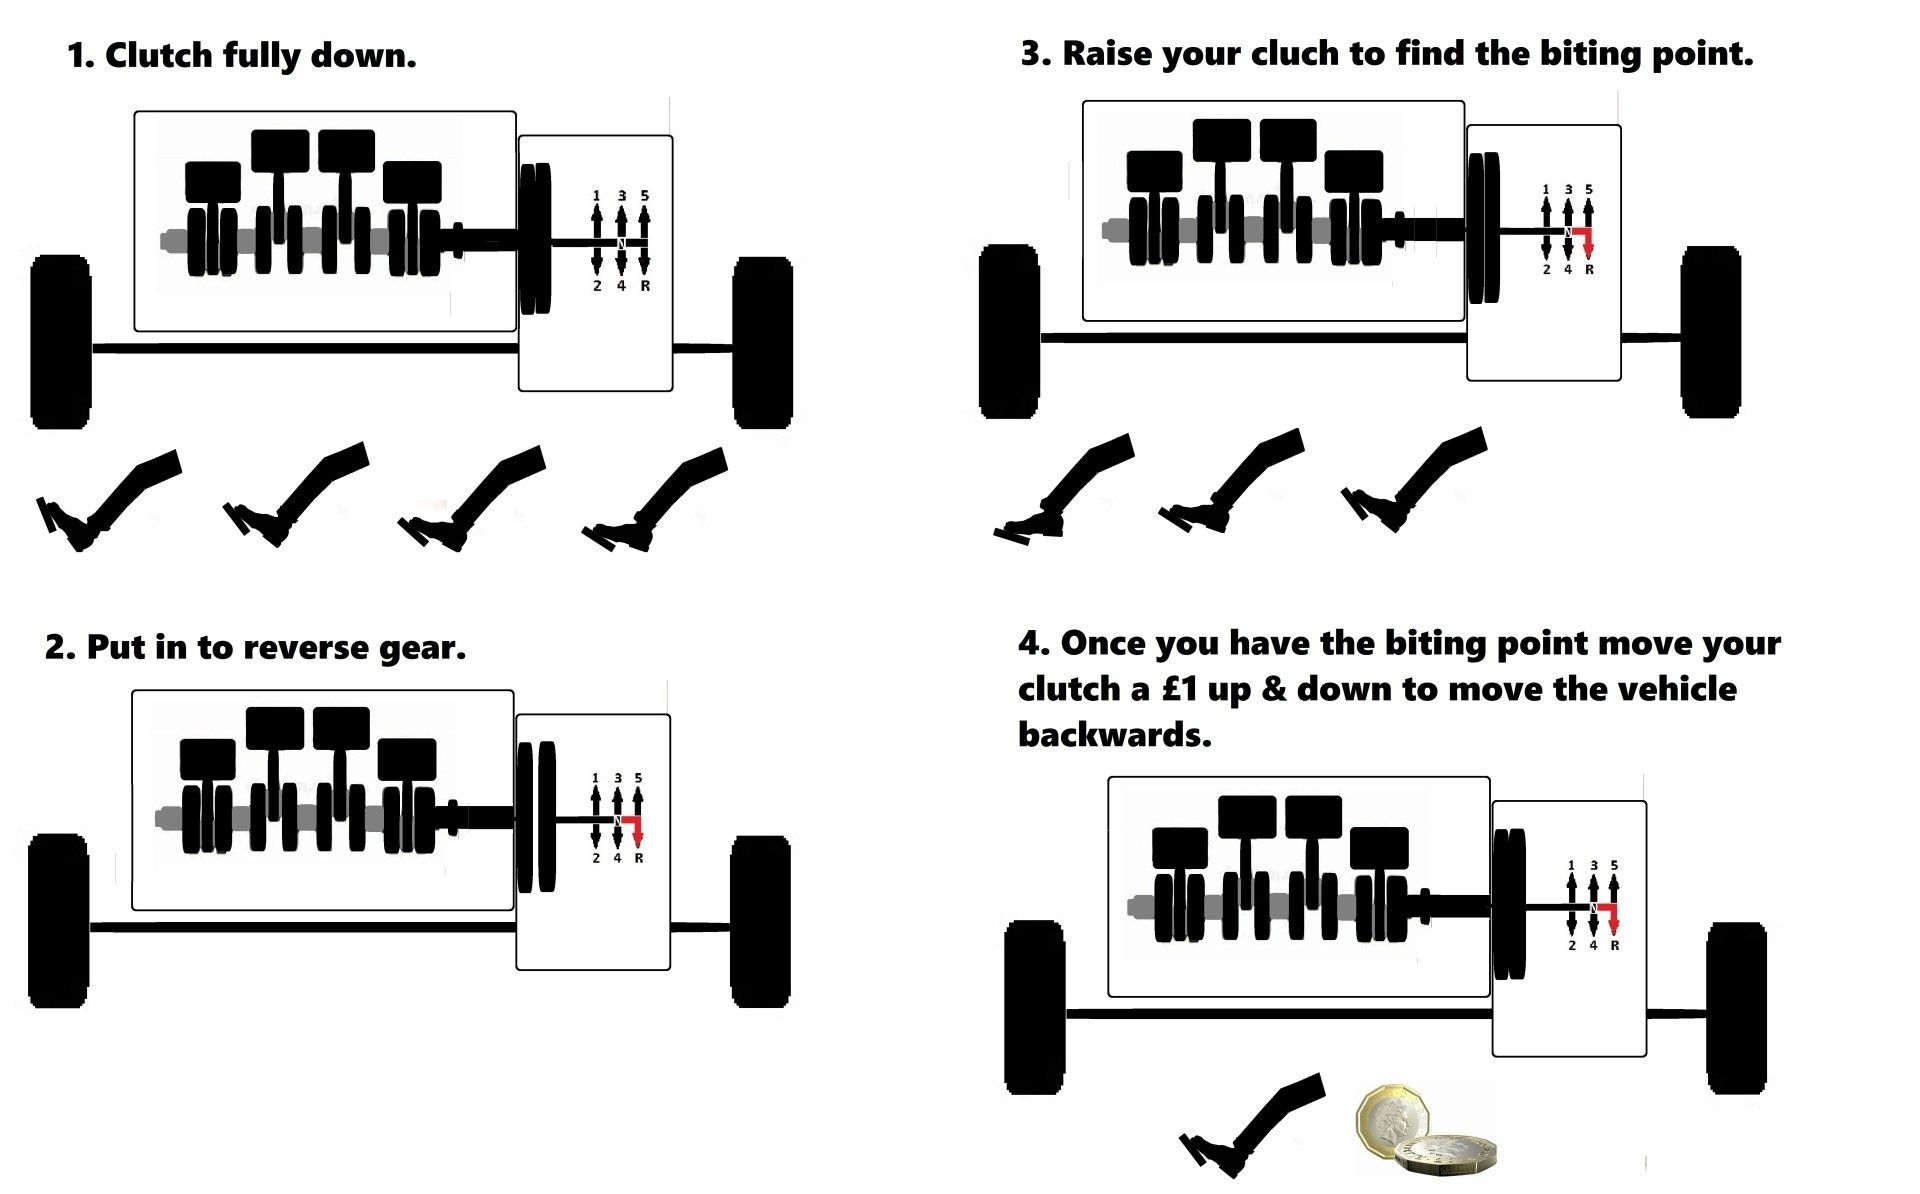
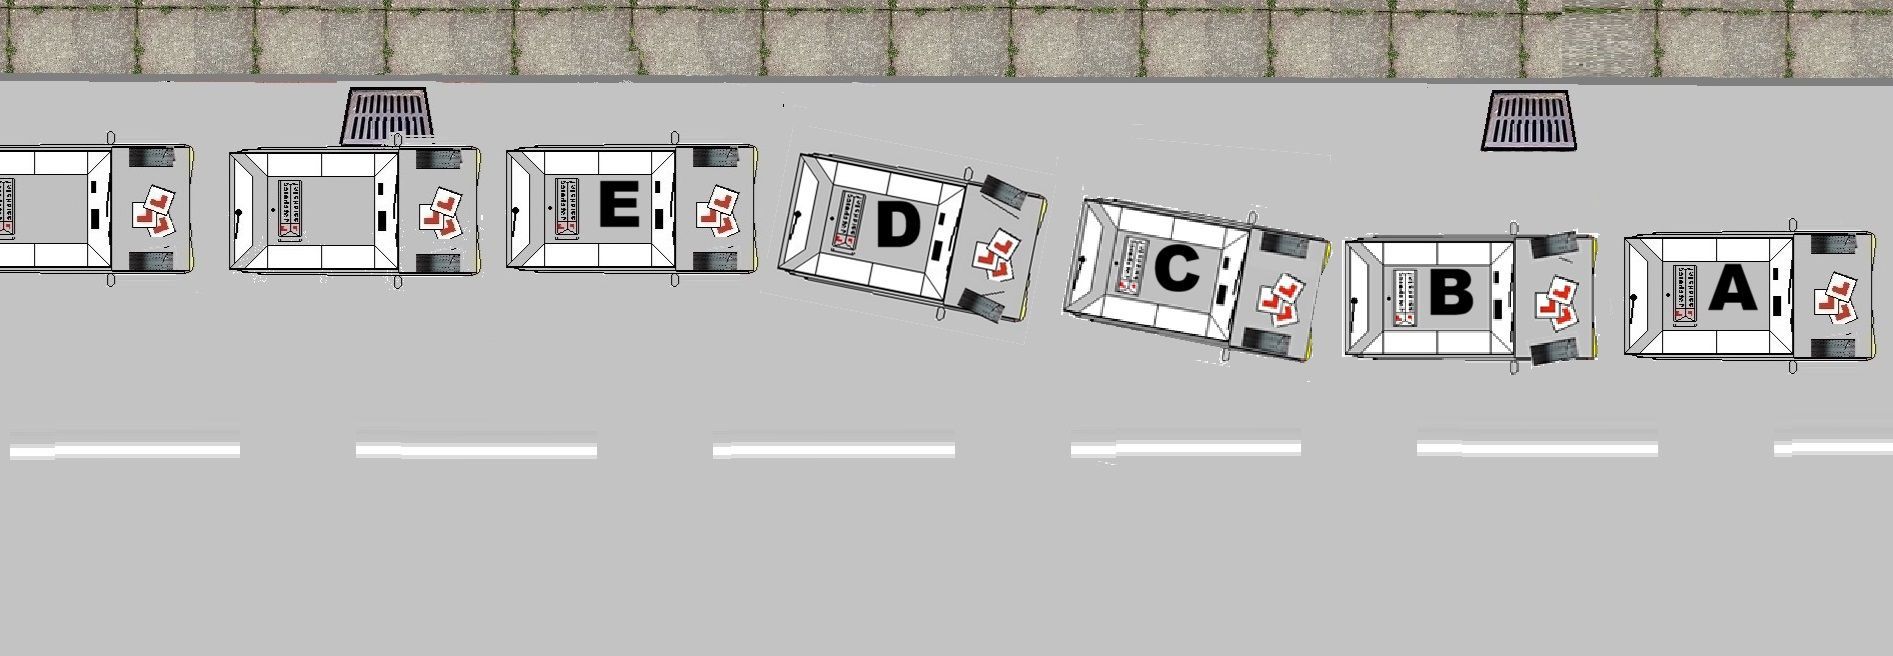
The aim of today’s lesson is to incorporate the Look, Asses, Decide and Act and Mirror, Signal, Position, Speed, Gear routine's when reversing in a straight line. Reversing in a straight line will help to develop your clutch control as you move the clutch from the biting point £1 thickness up and down from the biting point.  

Risk responsibility objective's


On the way to the training location you and your instructor will agree the level off support from your instructor:-

  • Full talk through
  • Prompt 
  • Independent. 

This is important to ensure that the instructor and student understands who has the main responsibility on the control of the training vehicle on the set lesson plan.

Your level of instruction will be given by your instructor to a level to suit you from full talk through then reducing your support to either prompt or independent.

Please note from November 2017 your driving test changed the reversing around corners and the turn in the road exercises has been replace with parking up on the right hand side of the road and reverse back 2 too 3 car length and driving into a parking bay then reverse back out of it.

However you will still be taught learnt the reversing around corners and the turn in the road exercises manoeuvres at a lower structured level from your driving instructor.

Why just think if you are on your driving test and you go the wrong way (like a dead end road) and you was unable to turn your training vehicle around safely.....


Lesson brief

The straight line reversing exercise will be taught to you at a certain point in your training as all driving instructors alter lesson briefing to suit all students needs, however all lesson briefs are agreed 

at the end of each lesson lesson, so this will give you the opportunity to read the relevant brief (gestalt).

Location.

Once you have got to the training location you will be advised to park up slightly wider (and parallel) from the curb.

Make sure you are parked somewhere safe, legal and convenient.

  • Park (roughly) a 1ft (drain width) from the curb.
  • Ensure it’s free from parked vehicles, obstructions and no debris on the road as you don’t want to

get a (puncher) flat tyre.

  • Never reverse on a main road and DO NOT reverse on a one way street for a long period of time.
Selecting reverse gear

Reverse gears are in different places in vehicles so your instructor will guide you on correct position on the gear stick.  
Two examples:-
  1. Reverse is next to 1st gear
  2. Reverse gear is oversite 5th gear
When selecting reverse gear the white reverse lights come on at the back of your vehicle, so the vehicle coming toward (from behind) you will know your reversing.  

As and when  a vehicle drives towards your back end of your training vehicle just press your footbrake to activate your brake lights telling them you have seen them and stopped.  Ensure you do this when they are 1 too 2 lamp posts from you.

Use of seat belt


By law you are allowed to remove your seatbelt, however it’s not practical (unless you are exempt from wearing a seatbelt or you have a restriction from looking around and releasing the seat belt helps observations) as you could easily forget to put it back once you have finished your manoeuvrer and drive on without putting your seatbelt back on, or if you need to abandon your reverse manoeuvre and you had to go back to the starting position because a vehicle has come behind you and you are in the way. 


Releasing your seatbelt can help, however if you shuffle around in your seat you can look through the rear window by looking over your left shoulder a lot easier. 


Camber of the road


Most roads do have cambers however they should not be a problem with straight line reverse manoeuvre. 

The camber is for drainage when it rains. The main manoeuvrer you will have a problem with is the turn in the road. Please visit the turn in the road brief for more information

The amount to steering

Hand position


Holding your steering wheel and correcting your road position by steering the correct way is crucial for development and success when your are reversing.  One main reason hand position is important is once you are using all around observations if you are not holding the steering wheel correctly you move your steering wheel without even knowing about it and this will move the course of your training vehicle. The right hand holds 1 to 2 o' clock position and the left hand holds the 7 to 8 o' clock position.

Clock face


Before you start moving your steering wheel and your front drive wheels are facing forward. We call the the top of the steering wheel 12 o' Clock position and 6 o' Clock is at the bottom of the wheel.

Reference points (so accurate)


To help you we will help you with simple reference point on straight line reverse:-


1.When you are sat in the drivers seat by glancing in your rear view mirror you will find the

curb roughly in the middle of the two head restraints on the nearside off the vehicle (diagram below).

2. Glancing in the nearside door mirror you will see how far away the nearside of your vehicle

is from the curb.

3.You may have a small blind spot mirror that’s will also be very helpful when reversing.

When you start reversing backwards and your reference point in the rear window starts to move out onto the road your vehicle is moving out into the road and the same with your nearside door mirror, and if the reference points go towards the curb or pavement you are getting to close to the curb. 

More information is given later on how to correct the fault.

Clutch control


All the set manoeuvres you will be advised to reverse at a very slow speed (some instructors may say a snails pace) this will allow you to ensure you have effective observations. 

For best clutch control use slow clutch from the biting point and move your clutch a £1 thickness up and down from your biting point.

All round observations


While reversing you should be taking observations all around your training vehicle and give way to any vehicles approaching from the rear of your vehicle. Also any pedestrians  walking behind your training vehicle


Below is the Dl25 marking sheet that you will be assed on on your driving test.  This will give you some idea on what you will be assed on by your driving examiner.

You were marked on:

  • control - your ability to control the car when reversing
  • observation - your ability to check your surroundings for other road users or hazards

You needed to pull up on the right hand side of the road, and reverse for 2 car lengths. You should have remained reasonably close to the pavement, without touching it.

Examples of faults

Some of the most common faults for this area include:

  • not being aware of a hazard or other road user when reversing
  • relying on just the mirrors to check surroundings
  • touching or driving onto the pavement
  • not judging oncoming traffic safely when moving across to the right
  • being too far from the pavement when parked

Your examiner may have explained the specific details of any faults you made.

How you can improve in this area

If you made faults in this area during your test, or if you want to improve in this area, you should:

If you need to rebook the test, spend time practising and improving this skill with your driving instructor or supervising driver. You could work on:

  • Making effective all round observations when reversing
  • Practicing pulling up on the right on a variety of roads

As you can see the main two reason you could fail when reversing is lack off control and lack off observations. 

The main information you will get from your instructor is:-

  1. Having good clutch control you will have good control the speed of your vehicle
  2. Good control of your vehicle will give you good observations you will be aware of what is approaching from behind and who you will need to give way too
  3. Good observations and good control will ensure you also pay attention on your reference points so your training vehicle stays in a straight line


Use of wheel


The biggest problem with reversing backwards is over steering or snaking this happens when you steer too much unnecessary. In the diagram below vehicle A is too far from the curb.

By turning the steering wheel the way you want the vehicle to go, we need to move closer towards the curb, you would turn the steering wheel to the left (an hour).

Amount to turn


Lets break the above diagram down.

The strategy on this lesson is to guidance you on how much movement you will need to steer if you need to steer closer or further from the curb.  You only need to move the steering wheel only 1 hour the way you need to go.


Below is a step by step description on what will be taught.

A

Your vehicle is to wide from the curb.


Move the steering wheel the way you want your training to go.


B

Turn the steering wheel from 12 o'clock position to the 11 o'clock position (top of the steering wheel) and the 6 o’clock position rotates to the 5 o’clock position (Bottom of the steering wheel).  

C.

Hold that steering at the 11 o'clock position until your vehicle gets a small (10 degree) angle. Once you have an the 10 degree angle strighten your steering wheel back to 12 o' clock reverse back wards ang get closer to the curb

Now then steering wheel is at 12 o'clock (top) and 6 o’clock (bottom) position, now reverse back wards untill your nearside back wheel get a drain width distanse from the curb.

D.

Once you are close enough to the curb turn the steering wheel to 1 o'clock, once you are parallel to the curb straighten your your steering wheel back till 12  o' clock position

E.

Once you are parallel to the curb straighten your steering wheel and reverse back until you are asked to stop.

Lets put the P.O.M (Preparing, observing and manoeuvre) drill into the straight line reverse manoeuvre
  • Prepare to go backwards - Clutch down, reverse gear (you shouldn't need to set any gas unless on an uphill angle).
  • Observations - Reverse the 6 point check - Interior mirror- right door mirror - right shoulder check then Interior mirror- left door mirror - left shoulder check
  • Move - Reverse slowly backwards when it is clear (no vehicles are driving towards you from your rear).
Who to give way too

This could help when to stop when a vehicle, cyclist and pedestrians approach your training vehicle from behind you:-
  • Motor vehicle 6 car lengths from you.
  • Cycle about 3 cars lengths from you.
  • Pedestrians 1.5 car lengths from you. 
Always pause and wait if a vehicle appears from your rear, press your foot brake as this will identify and show that you have seen the vehicle and stopped. 
Watch for pedestrians/children on bikes or walking crossing the rear or around your vehicle, you will need to give way and wait for them to be clear before you can continue reversing. 
When crossing a driveway to your rear, watch for road users emerging or wanting to turn into the driveway.

Once reversed back 2 to 3 car lengths

Make the care safe and put your handbrake on.

Teaching & Learning Strategies


Like mentioned earlier every student is induvial and each and everyone of you will progress at different rates so driving will adapt their lesson plan to help you achieve your driving goals.

  • Your driving instructor will adapt their teaching style to suite your ability and ability
  • Your driving instructor will continue to encourage you on your lesson and analyse any problems made and allow you to take responsibility for your own learning goals by giving you technical information to improve your techniques. Your technical feed back from your instructor will be ether given on the move or if feel needed by pulling you up on the side of the road somewhere safe, legal and convenient.


Rote learning (WikipediA)


Rote learning is a memorization technique based on repetition. The method rests on the premise that the recall of repeated material becomes faster the more one repeats it. Some of the alternatives to rote learning include meaningful learning, associative learning, spaced repetition and active learning.


At the end of your lesson 


At the end of your lesson you will have a debrief with your instructor giving you the opportunity to reflect on your performance on your lesson then you can set up new goals for your next driving lesson.


This will also give you the opportunity to research any new topics that will be brought into on your next agreed lesson. So remember your instructor is there to HELP you, so on your driving lesson if you have any uncertainties or need anything rewording or recapping to make things any clearer, just ask.