Emerging at T junctions
- P.O.M routine (moving off)
- Improving clutch control
- M.S.M routine when moving off and stopping
- Co-ordination of foot controls
- Steering to a safe driving position and pulling up on the left
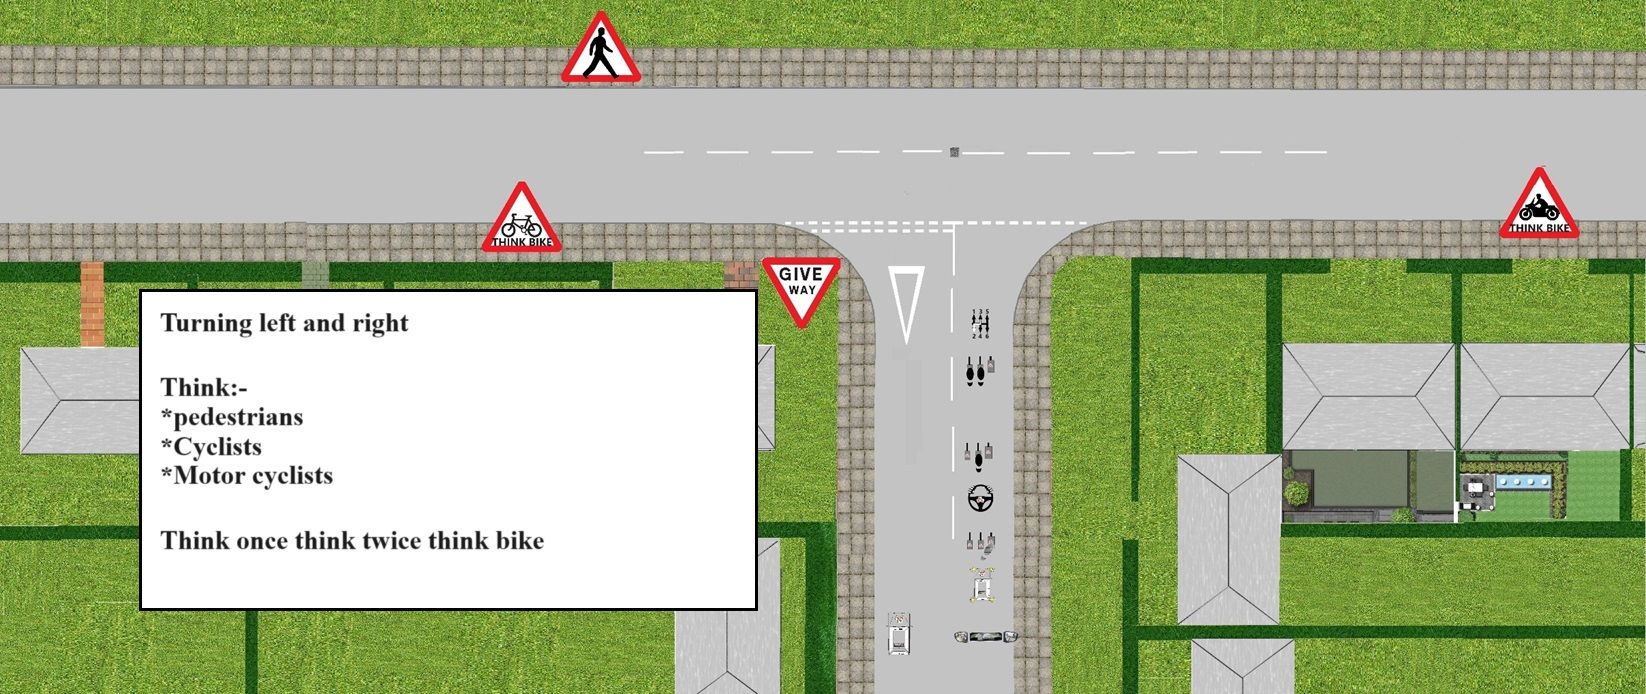
- Turning left and right from main to side roads
- Gear changing up and down
- Adequate clearance around stationary vehicles and slower moving vehicle (cyclists and pedestrians)
- Incorporate the L.A.D.A and M.S.P.S.G.L routine's (The hazard drill) from side road emerging into main roads to the left and right, start in a quiet junction areas. Then move onto more complex junctions once you get more independent (once agreed)
- Understanding open & closed junctions
- L.A.D.A & M.S.P.S.G (main road to side road)
- Two second gap
- Hold back position
- Meeting , overtaking, adequate clearance when overtaking stationary & slow moving vehicles
- Fault
- Implication
- Solution
- Help
- Full talk through
- Prompt
- Independent.

The use of the L.A.D.A and M.S.P.S.G routine's would of been covered on your last lesson brief but let's have a re-cap.
When driving you would of been coached to check your rear view mirrors every 6 to 10 seconds, however you would also have been coached to check your mirrors in pairs before:-
- Speeding up
- Slowing down
- Changing direction
Driving test report form
On the driving test report form (DL25) there are many sections but on this instance we are discussing USE OF MIRRORS.
Click on the below button will take you to another page to discus the DL25 form

You needed to show you can use your rear view mirror and door mirrors (wing mirrors) to see what’s behind or to the side of your car. This should be done in good time, well before appropriate situations.
You needed to show you can use them at the correct time, some situations where you needed to use mirrors include:
- signalling
- changing direction or lanes
- changing speed
Your examiner will monitor this throughout your test.
Examples of faults
Some of the most common faults for this area include:
- checking mirrors after or at the same time as signalling
- changing lanes on a roundabout without checking your mirrors effectively
- trying to change lanes on a dual carriageway without checking your mirrors effectively
- pulling up at the side of the road without signalling to following traffic when appropriate
Your examiner may have explained the specific details of any faults you made.
How you can improve in this area
If you made faults in this area during your test, or if you want to improve in this area, you should:
check rule 161 of The Highway Code
read pages 76 to 86 of ‘The Official DVSA Guide to Driving: the Essential Skills’ (2022 edition)
Use of mirrors
With the above information in mind I hope you can see why this is now understood.
You need to check your mirrors before:-
- Signalling
- changing speed
- changing direction
Use of L.A.D.A
When driving you constantly need to be Looking and Assessing ahead (beside and behind), Looking for any dangers ahead you may need to slow down for (use of brake lights (mirror, signal), this will potentially change your speed or even your direction.
While checking your mirrors every6-10 seconds you are making effective use of them and when your for example:-
- A main road turning right or left
- Emerging right or left
- Slowing for an on coming vehicle
We will encourage you to use the L.A.D.A routine a minimum of 3 times, as without effective planning ahead and not looking well ahead you would not identify any hazards until the last minuet.
Look
- Look into your rear view mirror to ensure you know what is behind you
- Look ahead down the road to look for any dangers
- Look into the new road as you have now joined the main road and give way to oncoming vehicles.
Remember - constantly scan, plan and react.
- Look ahead to see where the junction you have been asked to turn into (this will give you the information on when to start the M.S.M routine).
- Assess for any dangers you might have to slow down for.
- Decide the correct strategy (speed, gear, open/closed junction, give-way or stop line or sign).
- Act accordingly.
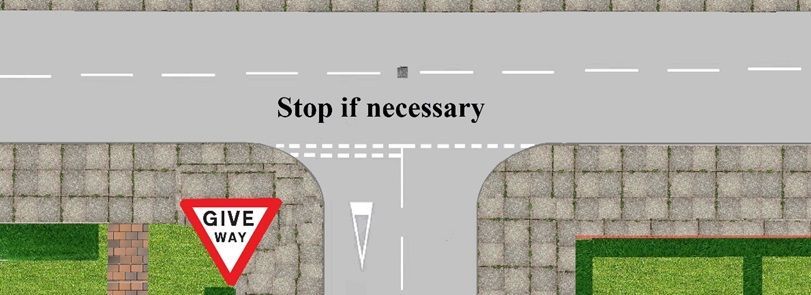
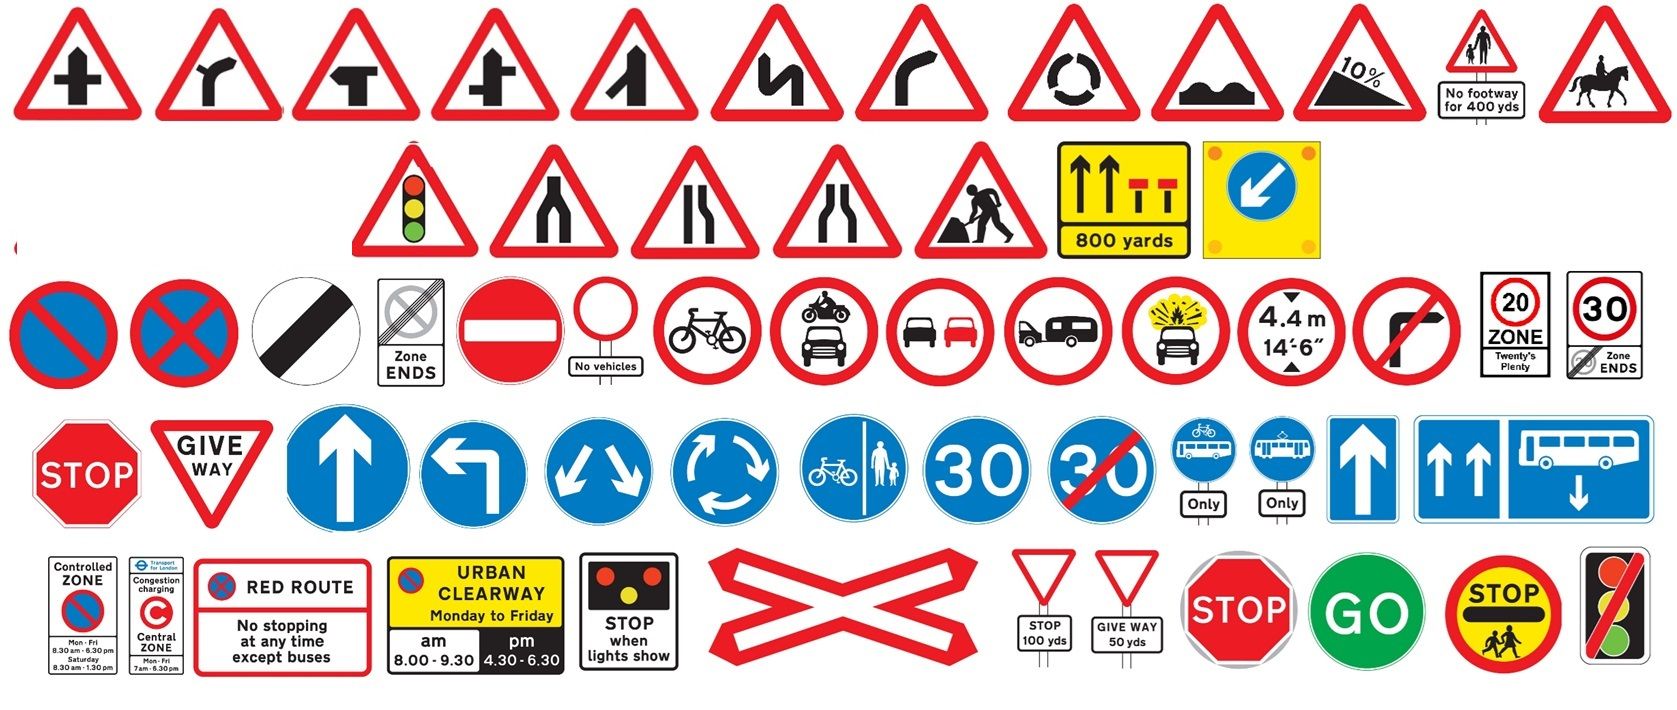
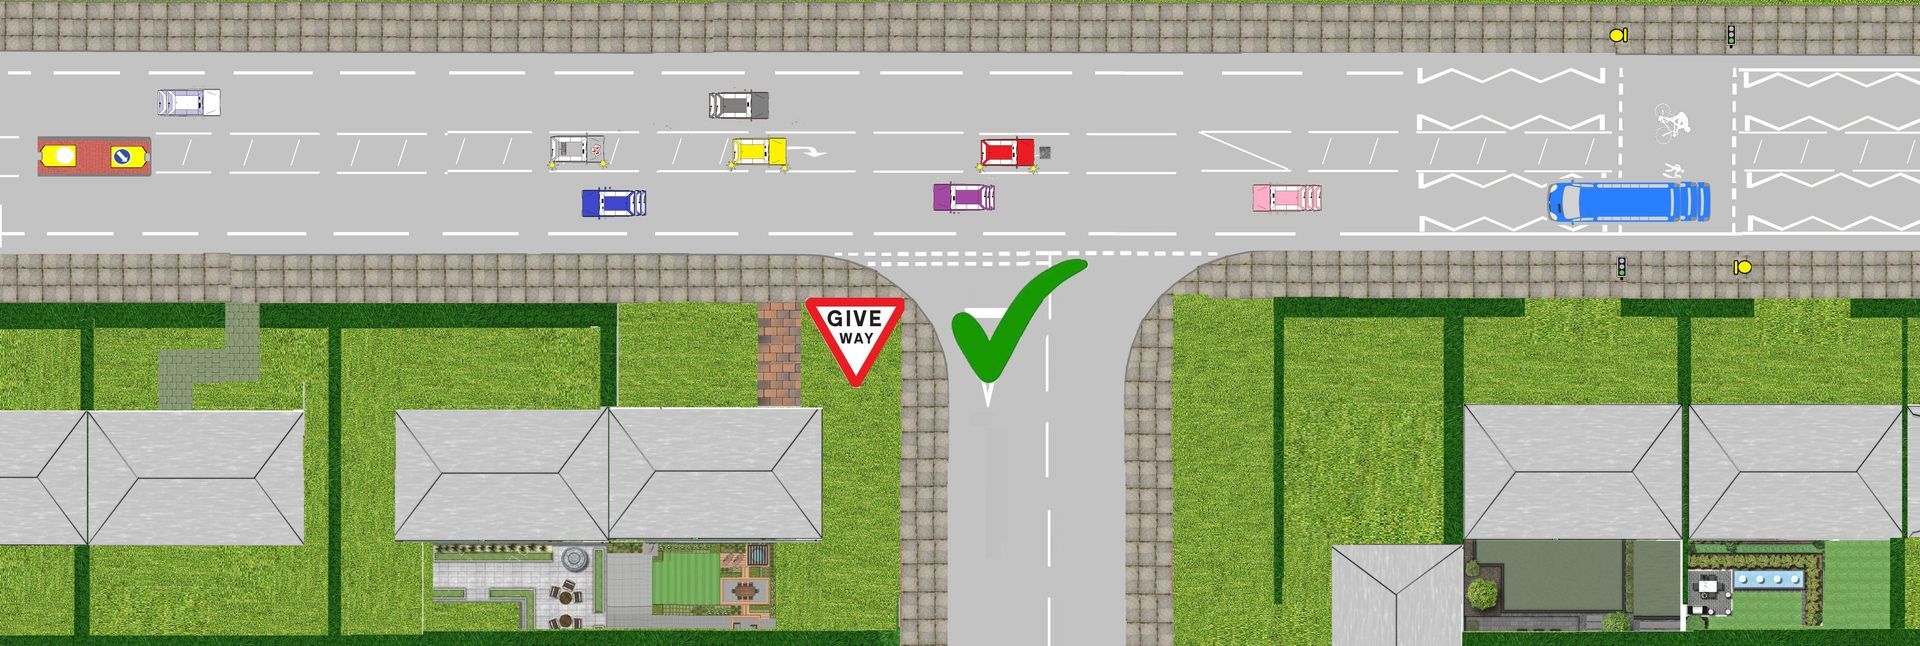
Give-way sign
A Give-way line has a double dotted lines on the left hand side and a single dotted on the right hand side of the road, so it separates the ins and outs on a road.
It also has an upside down warning triangle sign at the mouth of the junction.
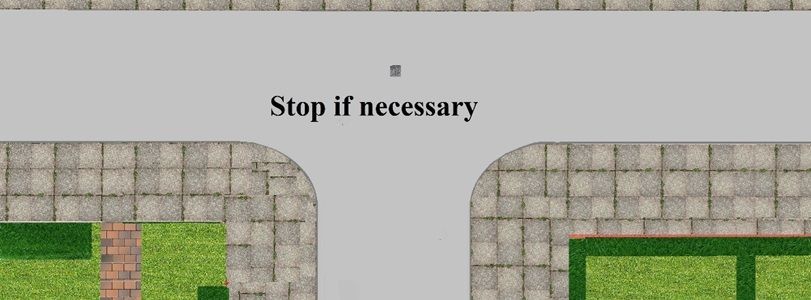
Unmarked junction
No road marking show NO priority so approach with caution and give-way accordingly. Be extra careful approaching an unmarked junction as someone might no be paying attention and not even look left and right and assume priority.
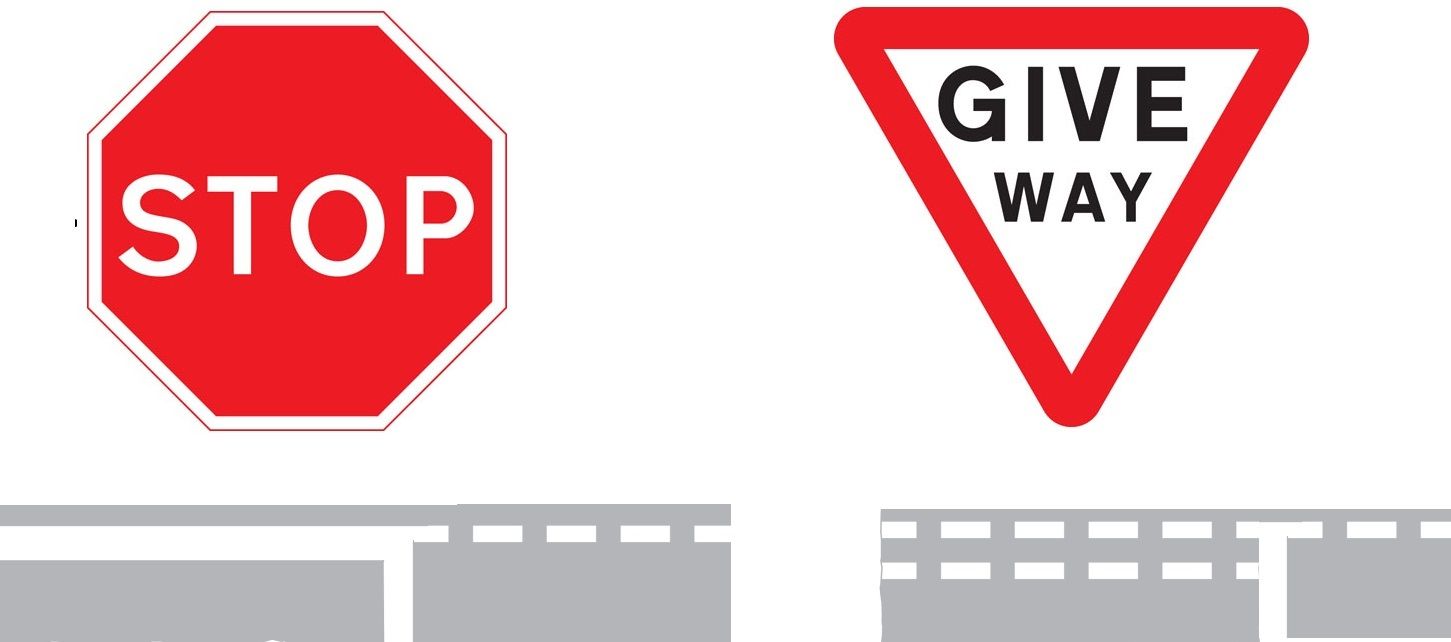
Why is the stop sign octagon and the give-way sign an upside down triangle?
The stop signs are octagons and the give-way sign is also unique due to it being upside down triangle, these shapes is distinctive and cannot be mistaken for other signs. This has been ingrained in driver education (theory), awareness and planning reinforcing the recognition and understanding of the meaning behind the sign.
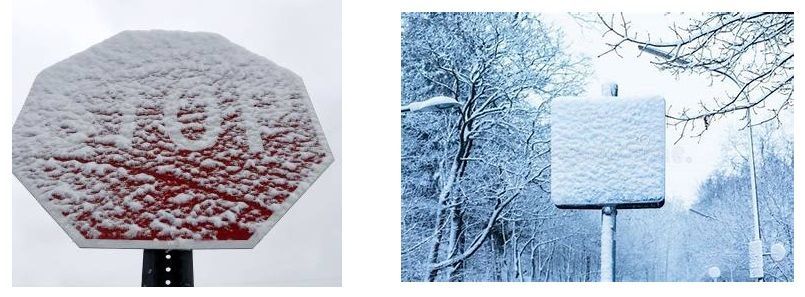
Winter weather
The signs are also noticeable when mother nature also covers them up with snow, an octagon and upside tringle signs are very distinctive and noticeable but a round or rectangle sign you would have no idea on the meaning if you was unfamiliar to the area.
Now with all this information let's look at the break down when emerging at T junctions
The hazard drill is exactly the same as turning left and right form main road to side road, let's look at end of the road and emerging procedure.
Mirror(s)
- Use your interior mirror and side mirror (the direction you are turning)
Signal
- Give signals in good time, ensuring it’s necessary and correctly timed.
- A signal helps ( as warns) other road users/cyclists and pedestrians of your intention.
- Be careful not to give a misleading signals.
Position
- When turning left be to the left hand side, near the kerb
- When turning right be close to the centre line as safely possible
- Determine the best position/course to negotiate stationary hazards
- Think before you change your position, be careful not to mislead others
Speed
- Adjust your speed so that you can negotiate the (open/closed) junction's
- Slow down to 10/12 mph (open junction) or even slower if it’s a sharper corner, if you need to stop you will need 1st gear
- A closed junction you will need to slow down to (6/8MPH) and you will need 1st gear the same as above you may need to stop and look for a bigger gap
- If it is too Busy to carry on, stop until your 100% that its safe
Gear
- Select the gear to match your speed and the power you need (2nd gear/walking pace) if open (1st gear/crawling pace) closed
- Make sure that the gear is selected before the hazard is negotiated
Correct road position
Your position at the end of the road before you emerge is very important for a few reasons.
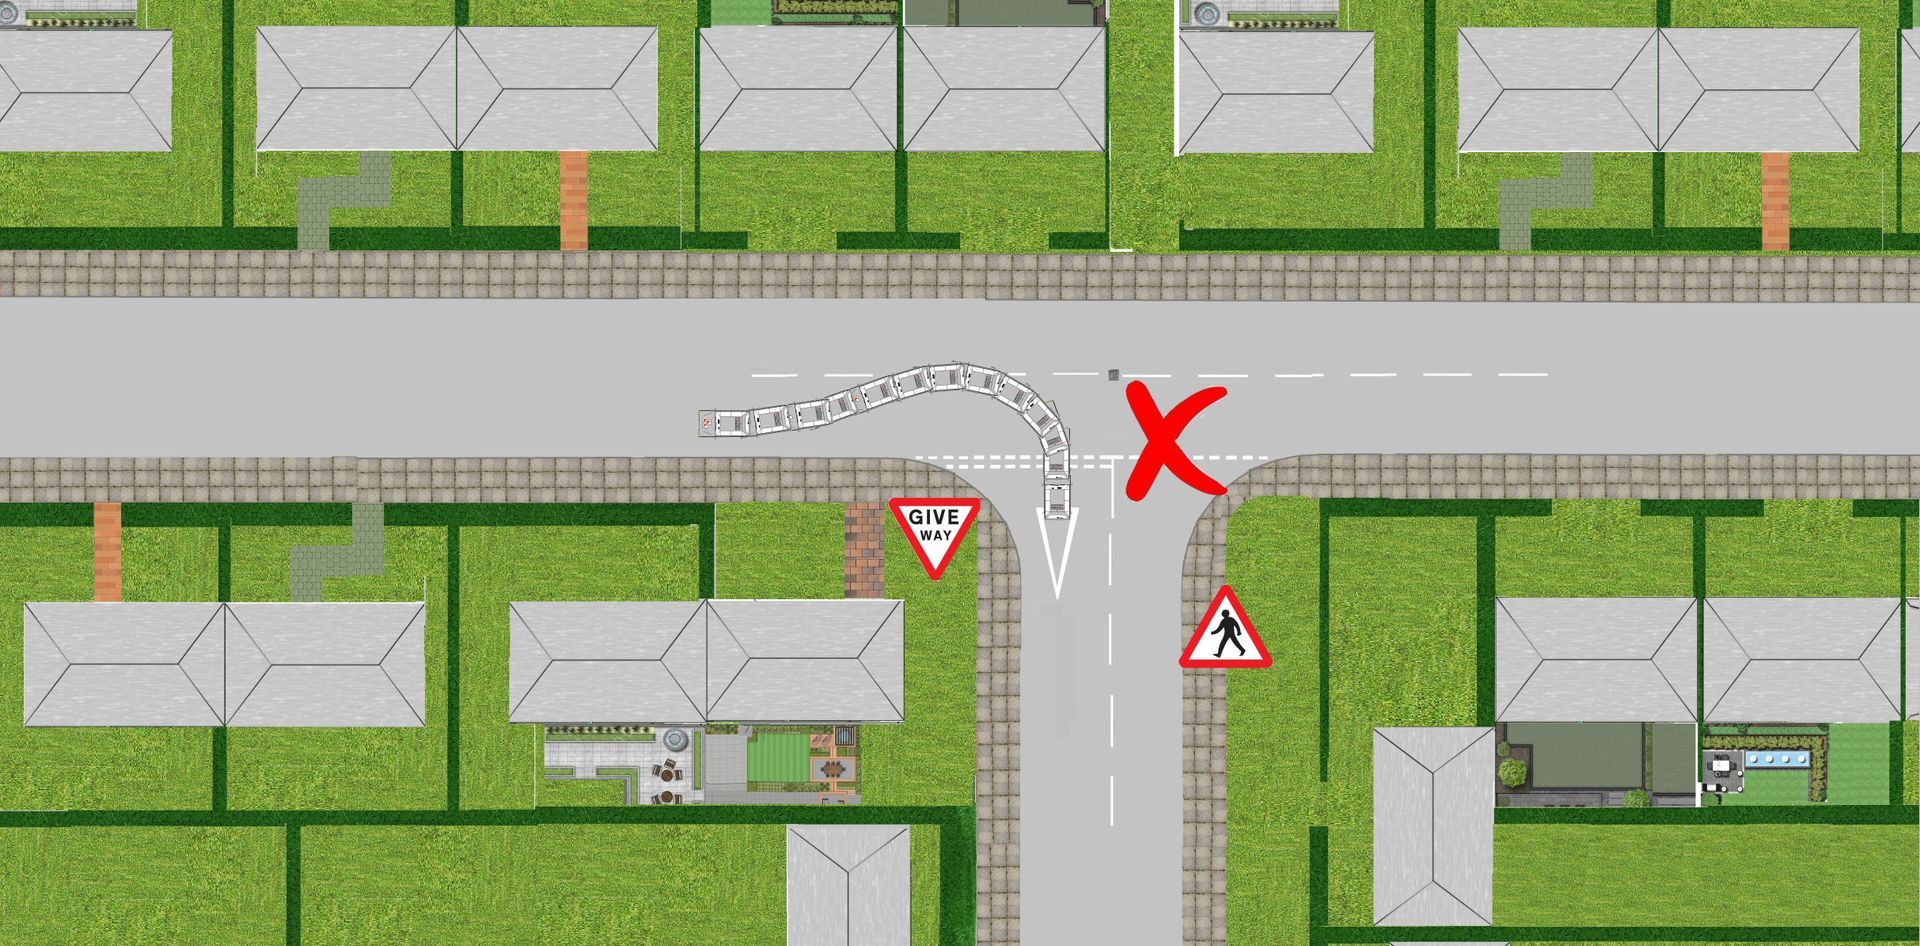
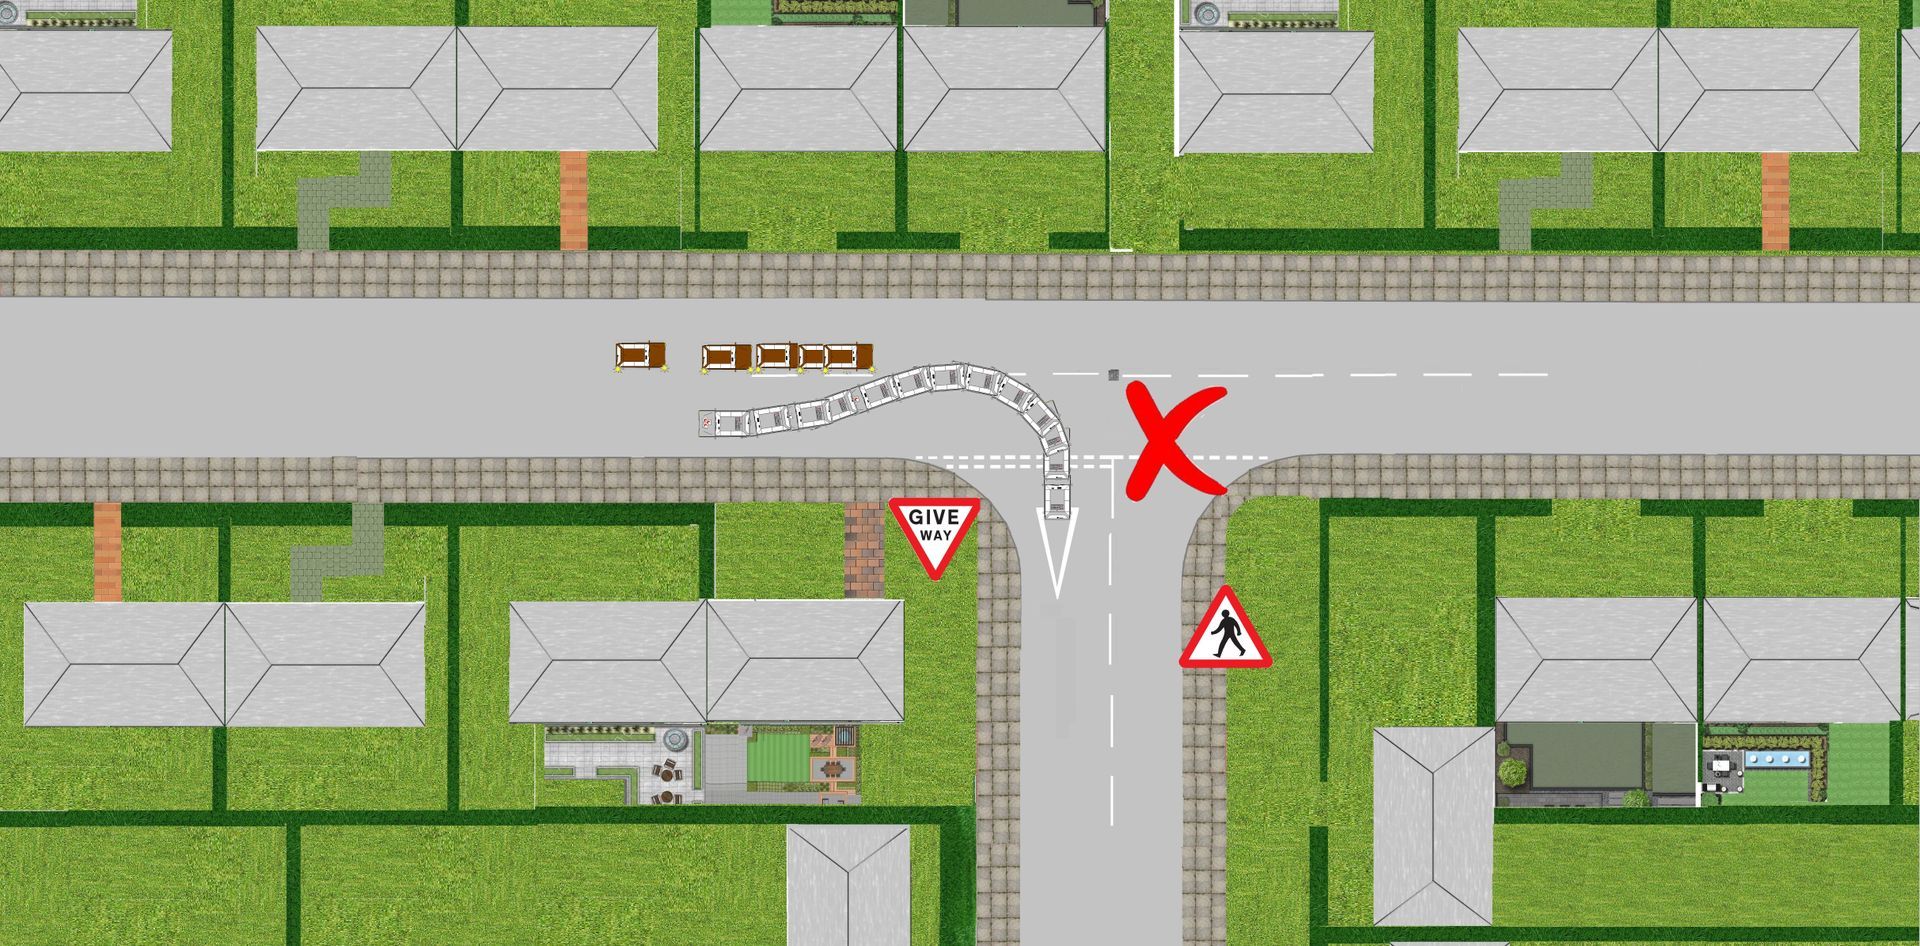
Correct position

Incorrect position
Pros v cons
With the correct positioning you can follow the kerb around, keeping a safe position and maintaining a positioning away from the centre line.
With an incorrect positioning (A) you are potentially going over the centre white hazard line in the new road and potentially slowing the main road down. Incorrect positing (B) any vehicles behind you wanting to turn right can not get past your vehicle being in this position.
(A) Incorrect position
(B) Incorrect position
Crossing traffic (Re-cap main road to side road)
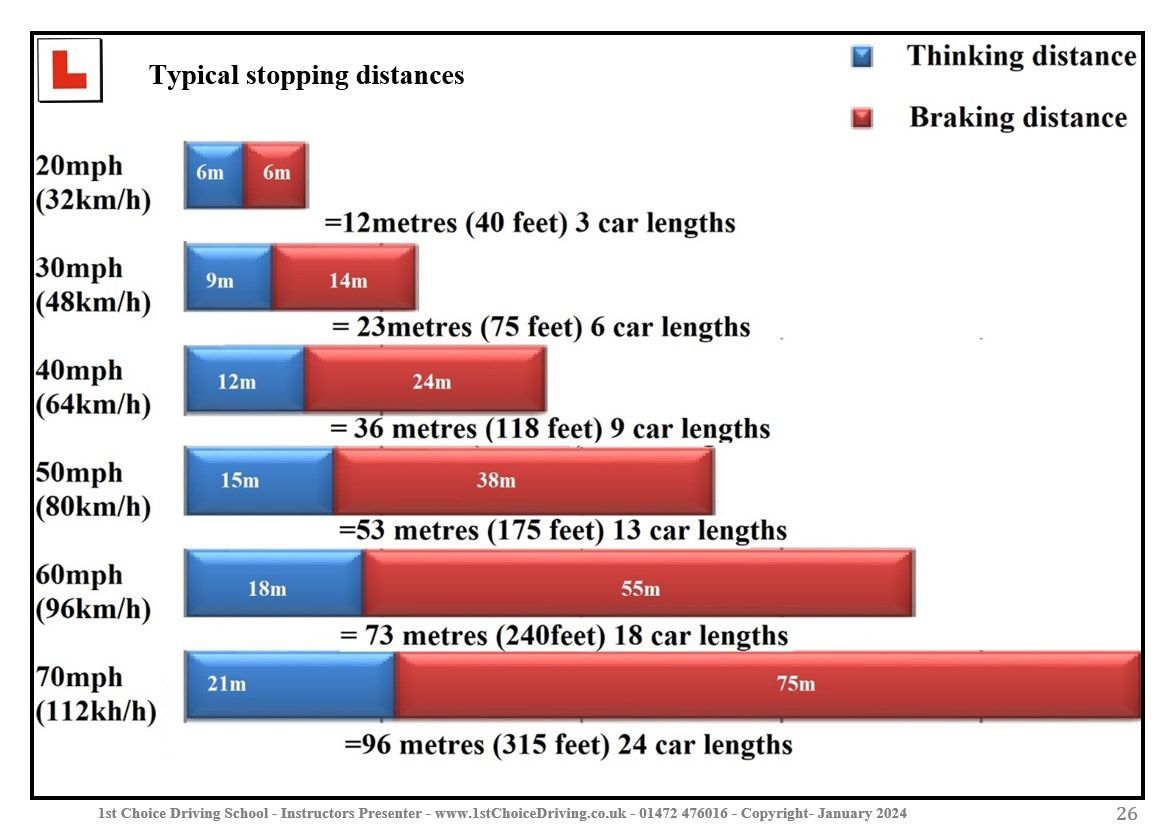
If you recall when you was briefed you on main road turning right your approaching vehicle from ahead we advised you need more 8/10 car lengths, why?
As the overall stopping distance at 30MPH is 23M, 75feet or 6 car lengths, to cross moving traffic, now think of the distance of the vehicle travelling towards you and once you are at your P.O.T is that vehicle still 8+ lines away from the junction, If you can walk across the road you have enough time to cross into the side road (8/10 car lengths is a student that is getting on to test standard).
Emerging into a safe gap
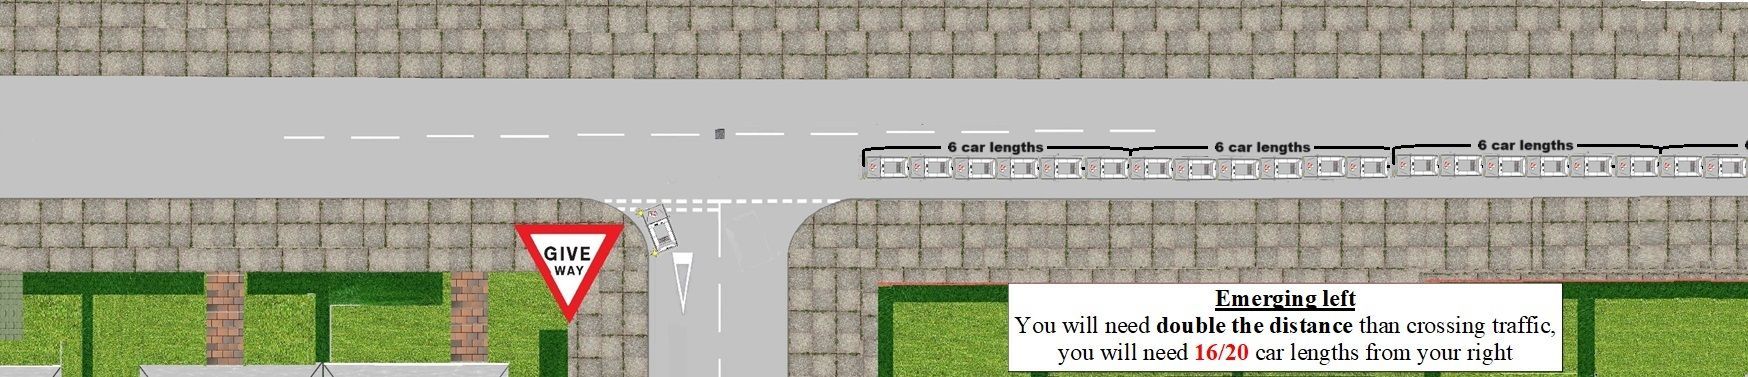
Emerging left
When your emerging left onto a 30MPH main road the gap you need will be a lot more time than crossing, why?
As you are exiting the side road and emerging with traffic travelling towards you, technically you are pulling out on moving traffic, to do this safely you will need a safe gap and not slow the main road down.
Once you are at test standard you will need roughly 12-16+ car lengths from your right. Why as much as that?
As the stopping distance at 30MPH is 23M, 75feet or 6 car lengths, to begin with due to your inexperience on using clutch control we will coach you to double or triple the stopping distances to emerge out safely (23M X 3=69M, 75F X 3=225F, 6 car lengths X 3=18 car lengths.
Lamp posts
What can be helpful here is using the lamp posts, due to them being 30/50M apart. 30M is 7M more than your stopping distance at 30 MPH. With this thought if the vehicle travelling towards you on the main road is more than 3/4 lamp post away from you you will find it will be safe to emerge.
Evidence on distance of UK lamp post
Street lamp posts in the UK are typically spaced approximately 30/50 meters apart.
However they may be positioned closer together at junctions and on bends. Keep in mind that the specific spacing can vary based on factors such as the luminaire output, column height, and the area in which they were designed.
Safe gap on your immediate right
Observations before emerging left
Ensure you look both ways looking for:-
- Pedestrians walking across the road
Vehicles could be overtaking a parked vehicle and could be over the centre white line
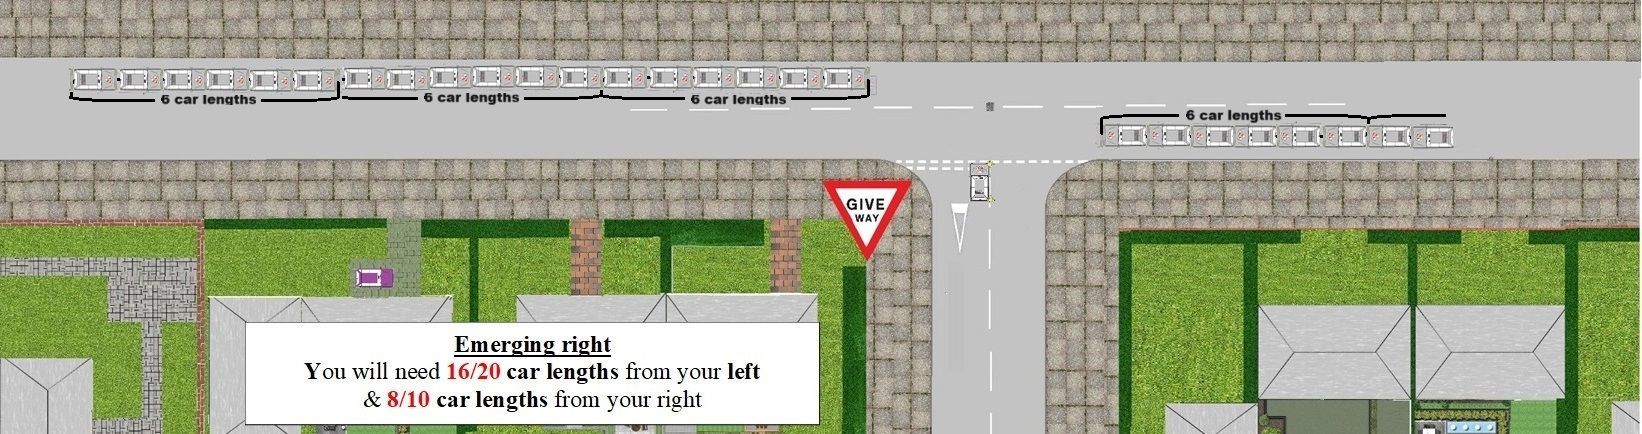
Emerging right
When your emerging right onto a main road the gap you need is roughly 6-8 car lengths from the right, and roughly 16-20+ car lengths from the left (depending on your confidence).
We are saying roughly with the timing of gaps as some students may not be as confident as others.
Planning
When you emerge from a side road onto the major road there is extra to consider before you emerge into the major road. In particular vehicles on the major road have priority over you, therefore you will need to slow down or stop to allow them to pass before you emerge.
Observations
Observations on the approach to junction's are crucial to determine whether you can emerge without stopping or just slowing down enough to keep on going so selecting the correct gear you will need to slow and flow needs to be met.
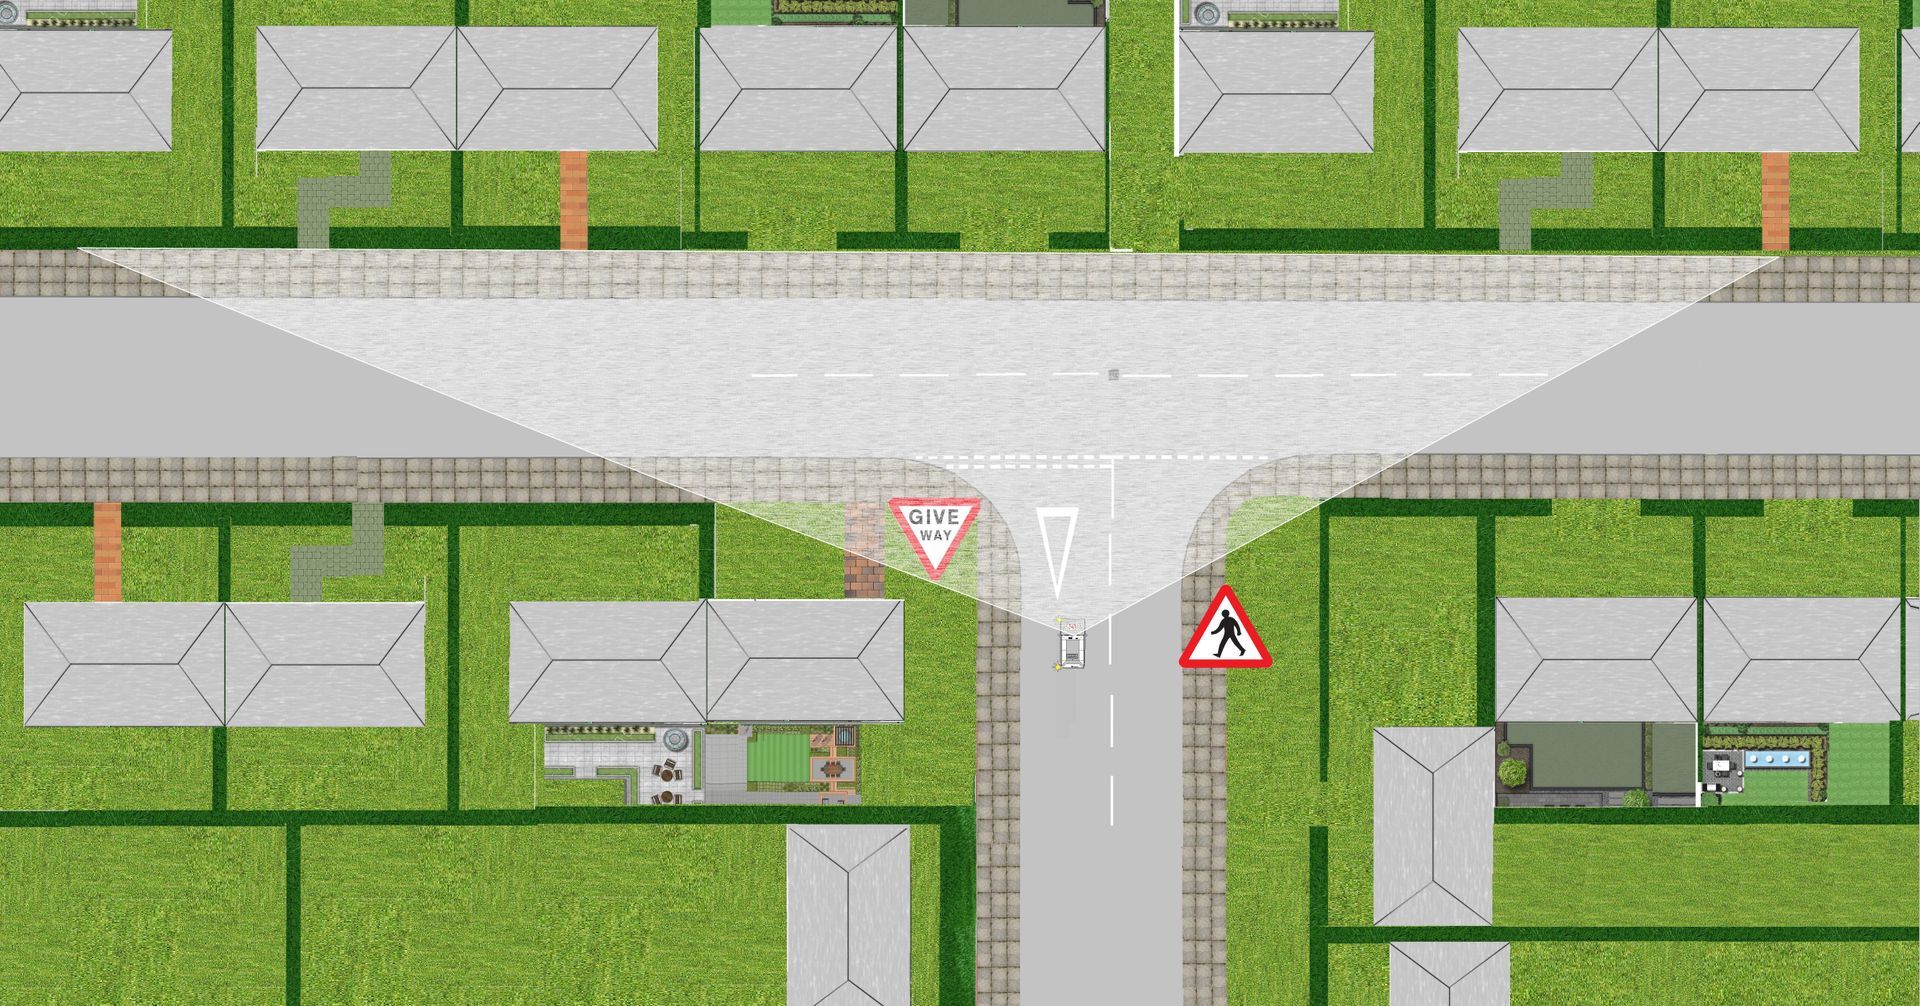

Closed junctions
Closed junctions will have extra obstructions and your view is more restricted blocking your view, you will need slow down to more of a crawling pace (6/8MPH) this will allow you to take better observations to the left and right so you could keep on flowing if no cars are on the main road but you will need 1st gear, however if you need to stop you will potentially need a bigger gap to emerge.
Starting your slowing down and using the routine's productively
When approaching a (T) junction ease off your gas pedal and start slowing naturally slowing down a couple of lamp posts away from the junction (Always check your mirrors before coming of your gas pedal).
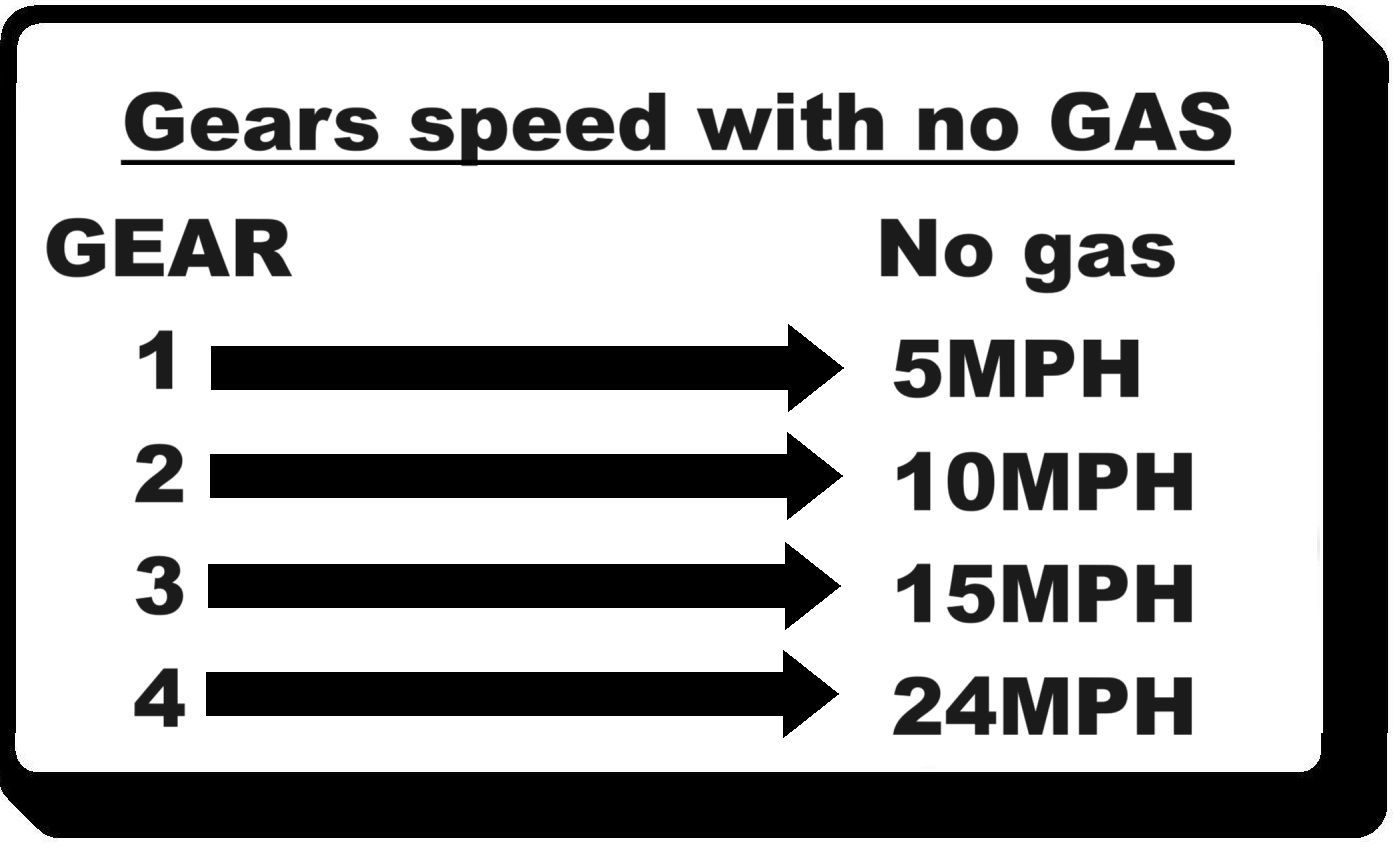
Think about your speed and distance when slowing down to a junction or even meeting an oncoming vehicle, reflect on what your instructor would of already spoken to you about with what speed each gear does with NO GAS (no acceleration), can you remember? let the diagram below will remind you.....
Time V distance
Your travelling on a 30MPH and you are asked to take the next road on the left, right or at the end of the road turn right or left. It's your objective to take as much responsibility on the control of your vehicle on your lessons. It is so important that you understanding that an engine will naturally reduce speed just by coming of the accelerator, reducing your speed in a safe and controlled will aid you to slow and flow and not react last minuet and rush.
From 20 years of teaching I know all vehicles will slow down 5MPH ever 30/50M when you are on a 30MPH road (30/50M is a set of lamp posts).
While approaching a junction (in 3rd gear) with no hazards in front, come of your gas pedal 3 lamp posts form the junction. By the time you get to the next lamp post
3rd gear should be holding your vehicle at roughly 20MPH (speed V distance). Then at the hazard warning white lines towards the junction (or last lamppost before the junction) start your slowing M.S.P.S.G routine. This technique is basic and very effective and
will give all learner students the understanding on how to make the vehicle slow and flow on a driving lesson and practical tests (allows all students to practice and repeat the procedure (R.O.T.E), this will allow your student to:-
- Correct time of M.S.M
- Approaching speed at junction
- Better observation's approaching junctions
- Improve their own judgement when meeting, overtaking and crossing traffic
- At the start of the routine make sure you have Looked into your rear view mirror to ensure you know what is behind you
- Look to see if you have any hazards ahead of the junction
- Look to see where the junction is
- Look to see if it is an open or closed junction
- Look into the new road and give way to oncoming vehicles
- Look into the road you are entering to scan for pedestrians, parked cars or vehicles coming towards you
T junctions turning left at an open junction
Timing of gaps emerging left out of a T junction
Do you know your road sign?
Complex T junctions
Turning right with hatched white markings
Broken hatched markings are often found at busy T junctions, crossroads or intersections.
The area has diagonal white lines followed by a designated right turn area, usually marked with a white right turn arrow.
When turning right, it makes sense to drive through these hatched lines as it allows you to position yourself correctly for the turn. By doing this you are avoiding the following traffic to needlessly slow down.
Remember that hatched markings are there to enhance safety and traffic flow. Always follow road signs and markings to ensure a smooth and secure driving experience.

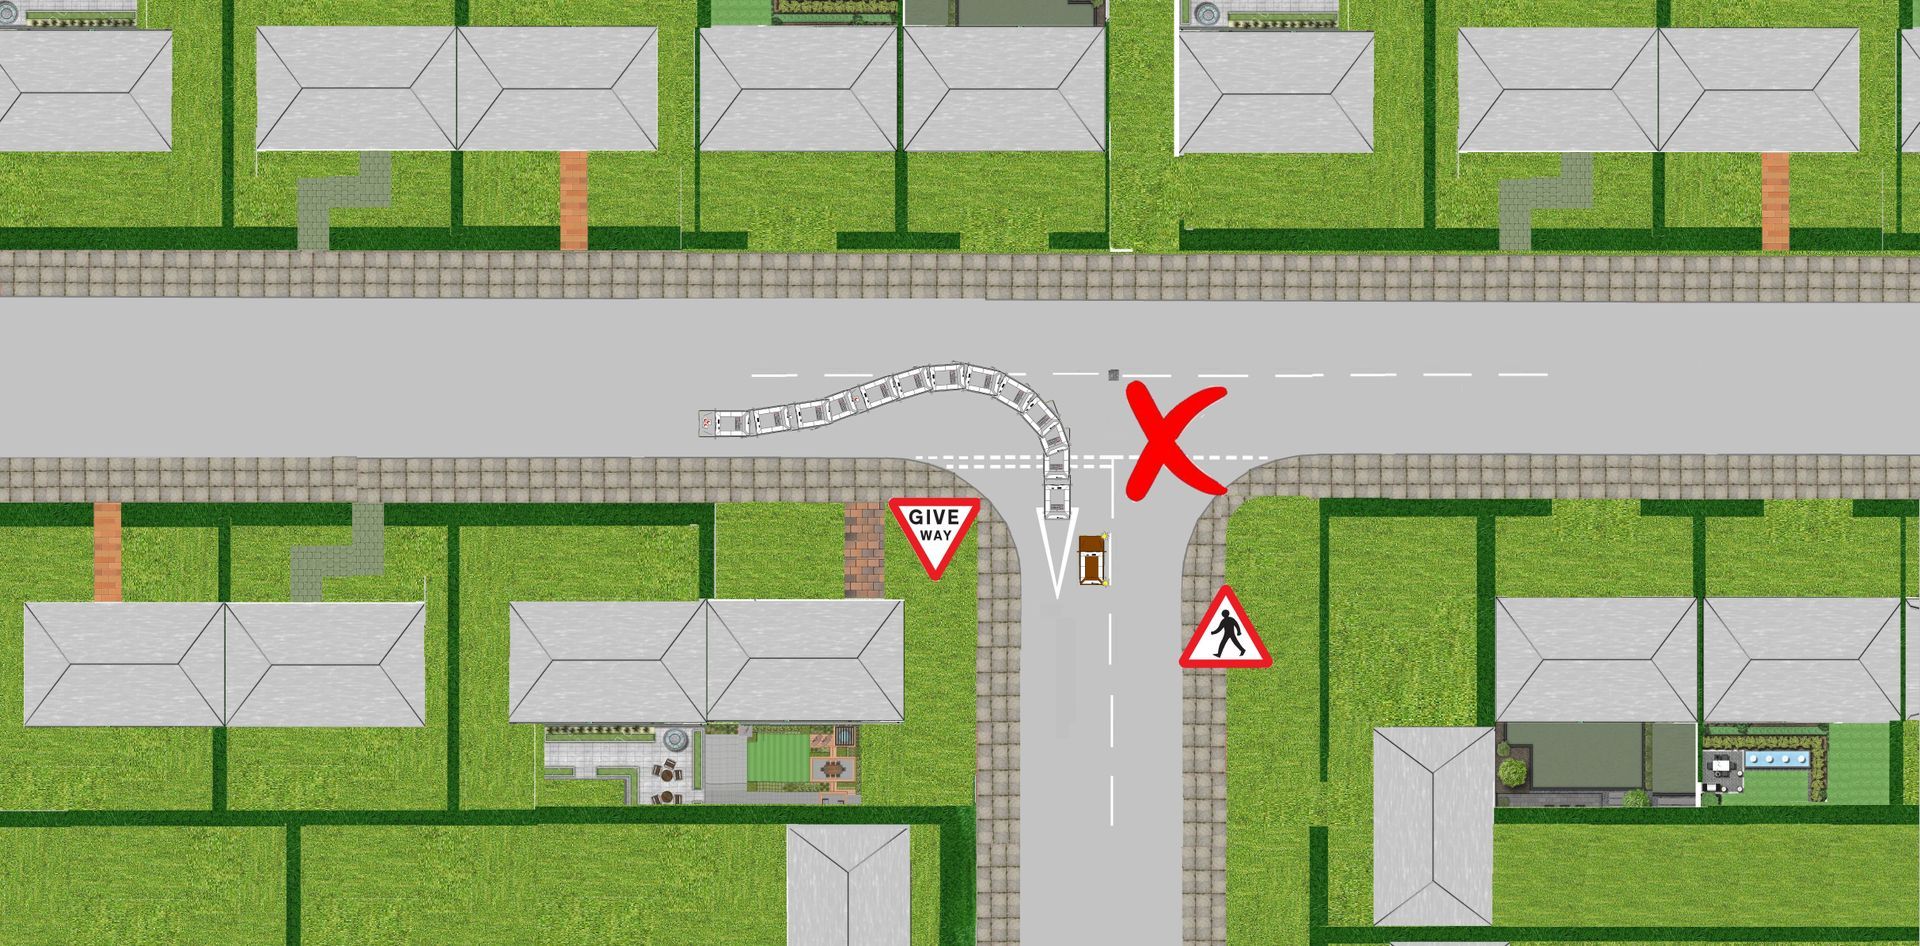
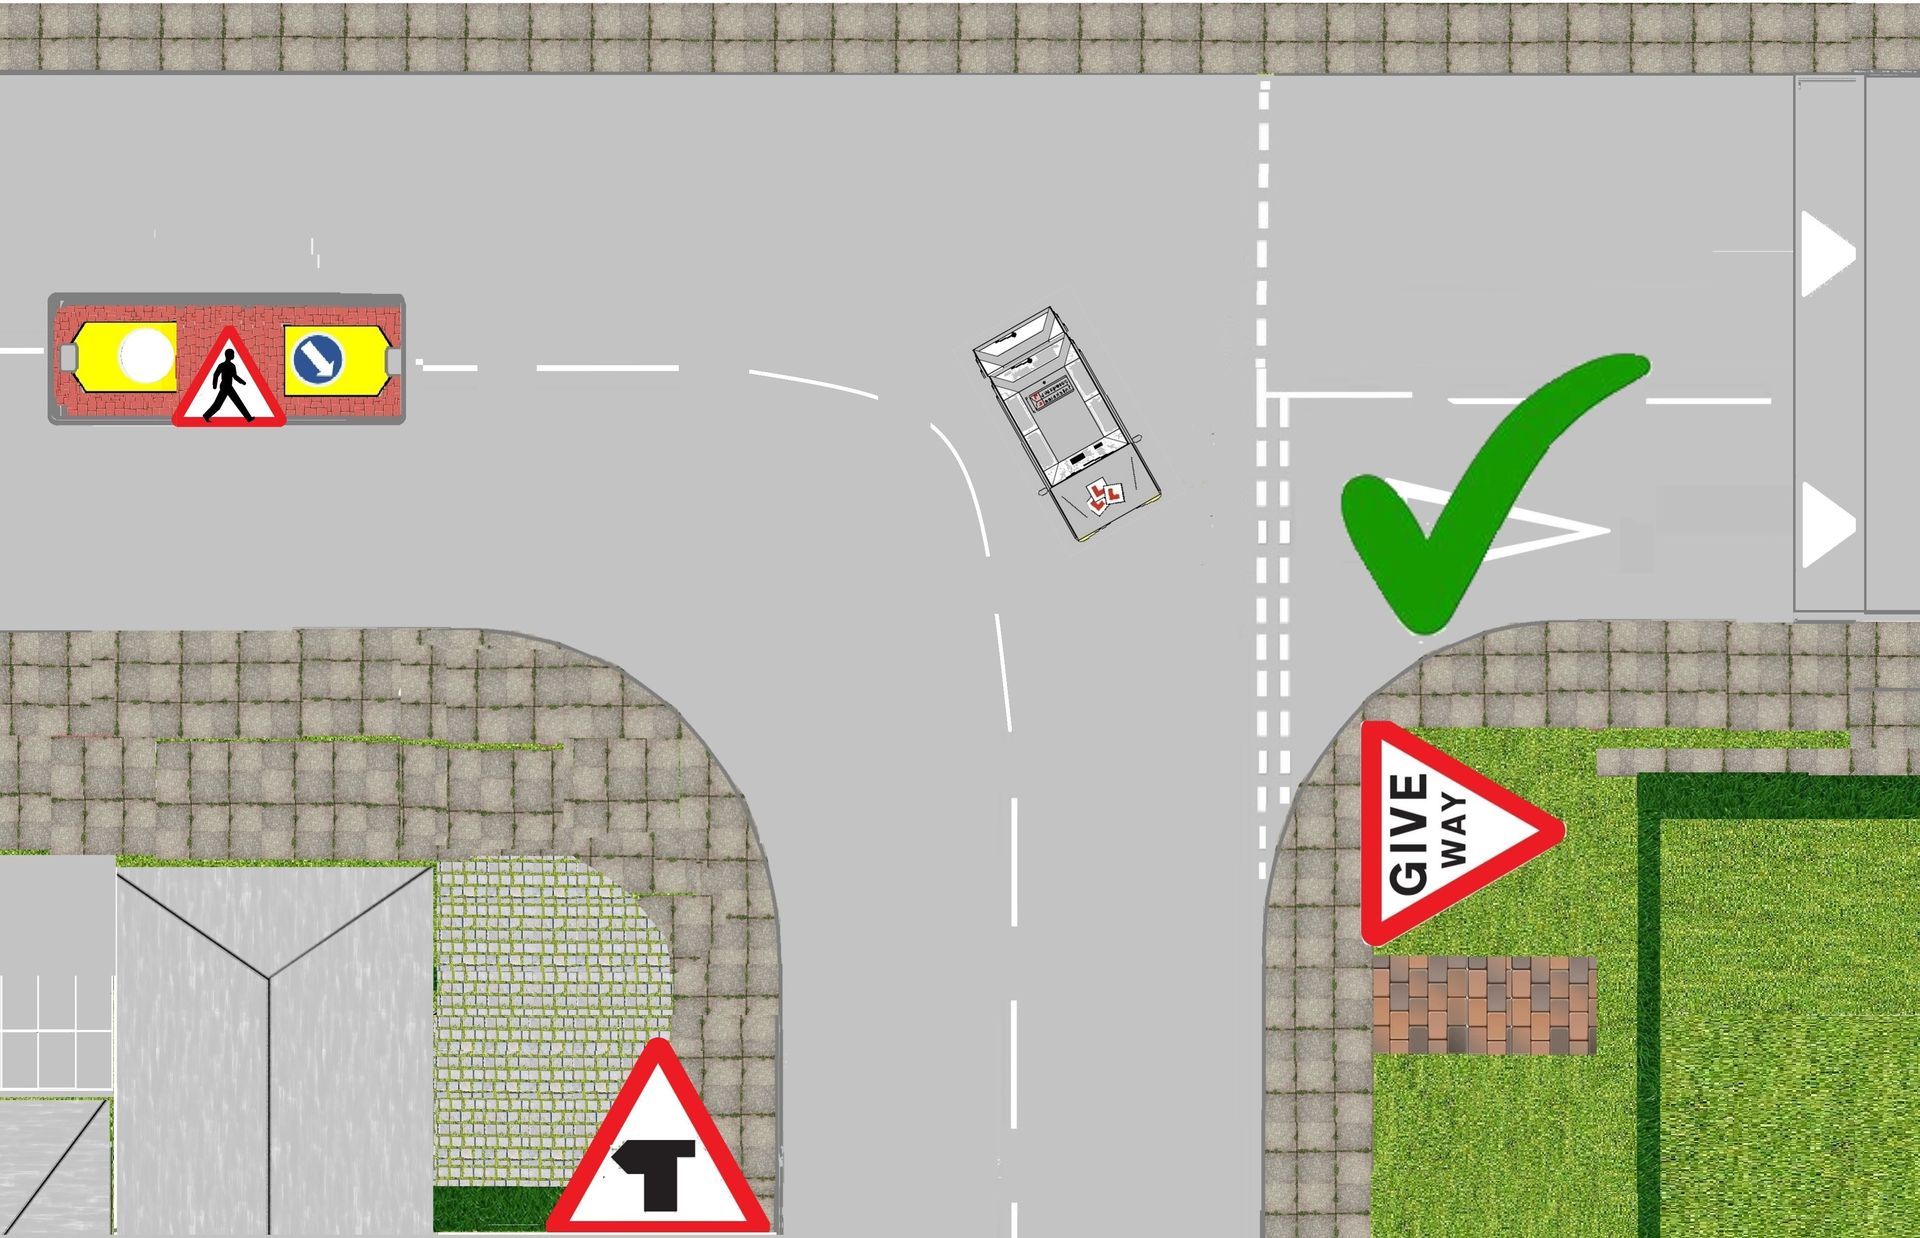
Following the road ahead
Your instructor will advise you at a certain part of your lessons and ask you to follow the road markings and signs ahead, in the diagram below you can see its a T junction with a slight difference the centre white line follows around the corner and not ahead into the new road. It will be your objective when you agree start to take control of your lesson with client-centred-lesson to always follow the road markings and signs head. On a driving test there is a section called Response to signs / signals and the fault will be Road markings. On the DL25 understand the driving test result form if you look on the below link to this information the description is below the picture.

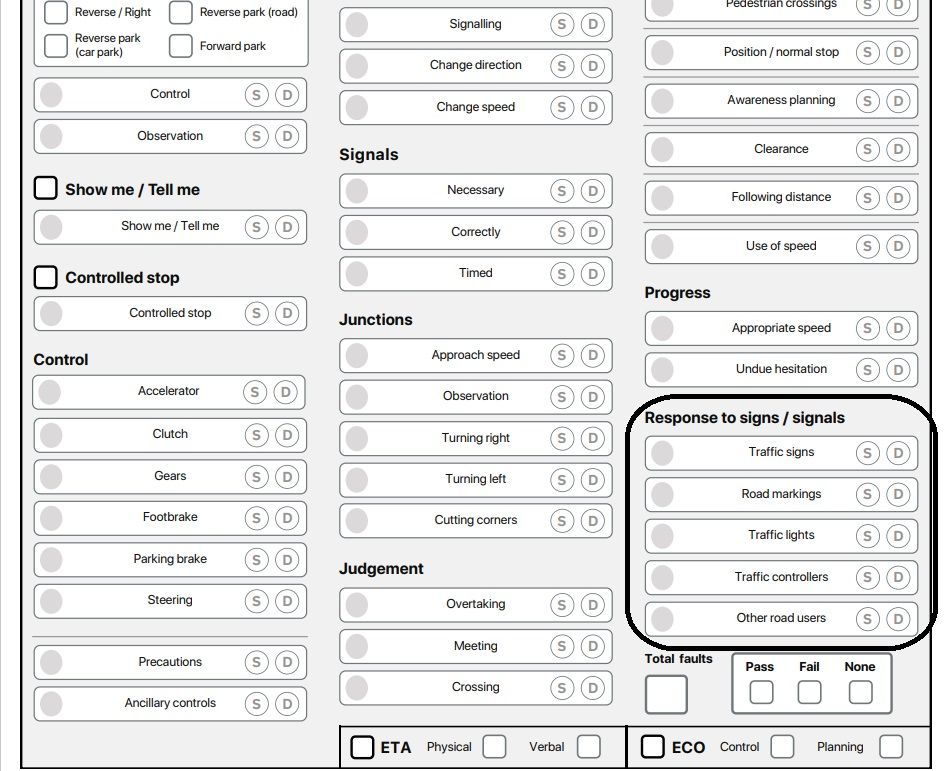
You should have recognised and reacted correctly to signs and signals on the road. This included:
- road signs
- road markings
- traffic lights
- traffic controllers
- other road users
Examples of faults
Some of the most common faults for this area include:
- taking up space meant for cyclists when stopping at a red traffic light
- reacting late or not at all to a speed limit change sign
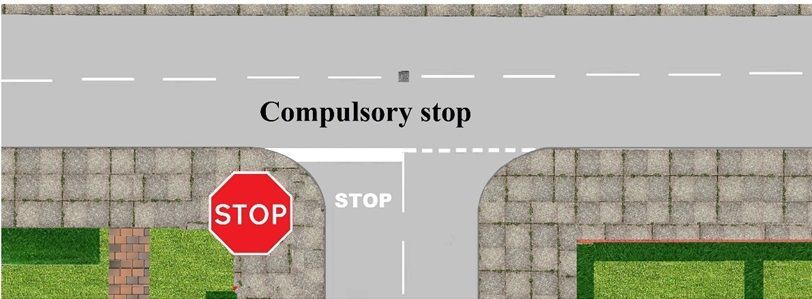
- not stopping at a compulsory stop sign
- driving in a bus lane when sign says you should not
- driving in an incorrect lane that was clearly marked
Your examiner may have explained the specific details of any faults you made.
How you can improve in this area
If you made faults in this area during your test, or if you want to improve in this area, you should:
check The Highway Code’s sections on traffic signs, road markings and signals by authorised persons
read ‘Know Your Traffic Signs’
read section 6 of ‘The Official DVSA Guide to Driving: the Essential Skills’ (2022 edition)
- Agree learning goals and needs of todays lesson
- Agree appropriate lesson structure (full, partially or independent level of instruction)
- Practice in a suitable training area
- Directional instructions will be given in ADI format (Alert, direction and identify manor) given to the pupil clear and given in good time
- Agree if the students made a minor, serious or dangerous error on your lesson it will be broken down using F.I.S.H (fault, implications, solution & help) this method of feedback helps pupils understand what fault is being made and how to strategies on how correct the faults.