Main road turning into side roads using the
L.A.D.A & hazard drill's
Introduction
At this stage of your training your:-
- P.O.M routine (moving off)
- Improving clutch control
- M.S.M routine when stopping (including turning)
- Co-ordination of foot controls
- Steering to a safe driving position and pulling up on the left
- Gear changing up and down should now be getting more independent
- Adequate distance around stationary vehicles and slower moving vehicle (cyclists and pedestrians)
The above points should be nicely improving.
Agreed lesson is covering :-
The M.S.P.S.G.L routine (The hazard drill) on a main road to a side road, to start with quiet junction location. Then move onto more complex junctions once you get more independent (once agreed)
Introduction to the L.A.D.A routine (LOOK, ASSES, DECIDE & ACT)
Understanding open & closed junctions
You will continue to develop with last lesson brief:-
- Pulling off using the P.O.M routine
- Mirror signal and manoeuvre when parking up on the left
- Two second gap
- Hold back position
- Meeting , overtaking, adequate clearance when overtaking stationary & slow moving vehicles
Agree level of instruction
Intervention
Agree if any of the lesson is going to be a instructor-lead-lesson or a client-centred-lesson and if it is client-lead agree if the instructor has to intervein verbally, take control of the training vehicle by ether using the dual control or take the wheel the lesson plan may need to be changed until the fault is fixed.
Fault identification using F.I.S.H
Fault
Implication
Solution
Help
Lesson aims and strategies
The aim of today’s lesson is to learn the M.S.P.S.G (hazard drill) and L.A.D.A (look, asses, decide and act) routine's and incorporate the drills when you turning main road to the left and right at T junctions (you may also need to cover the routine emerging at a T junction), then move onto more complex junctions once you gain your confidence.
Risk responsibility objective's
You and your instructor will agree lesson plan support to ether
- Full talk through
- Prompt
- Independent
This is important to ensure that the instructor and student understands who has the main responsibility on the control of the training vehicle on the set lesson plan.
Your level of instruction will be given by your instructor to a level to suit you from full talk through then reducing your support to either prompt or independent.
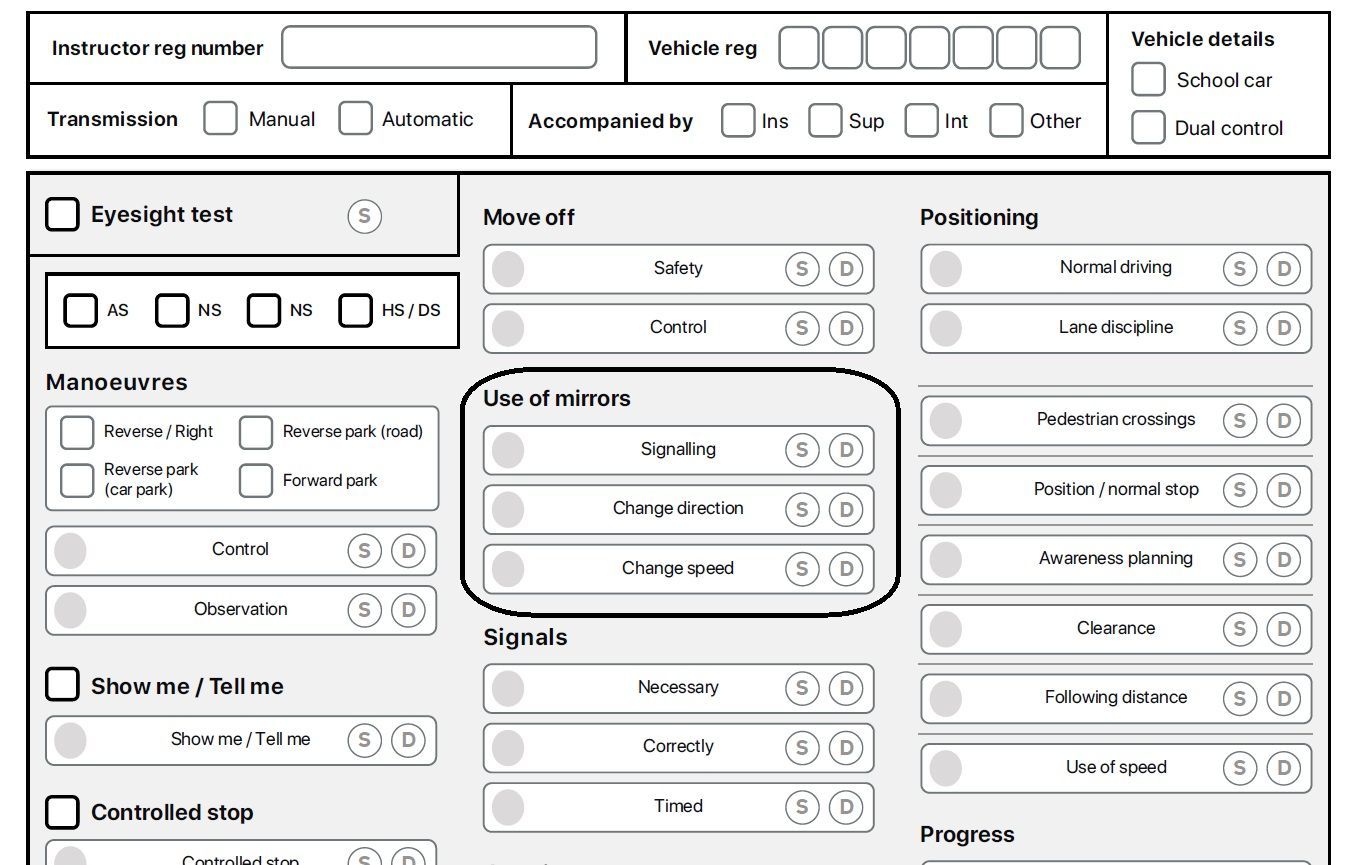
Use of mirrors
- You needed to show you can use your rear view mirror and door mirrors (wing mirrors) to see what’s behind or to the side of your car. This should be done in good time, well before appropriate situations.
- You needed to show you can use them at the correct time, some situations where you needed to use mirrors include:
- signalling
- changing direction or lanes
- changing speed
Your examiner will monitor this throughout your test.
Examples of faults
- Some of the most common faults for this area include:
- checking mirrors after or at the same time as signalling
- changing lanes on a roundabout without checking your mirrors effectively
- trying to change lanes on a dual carriageway without checking your mirrors effectively
- pulling up at the side of the road without signalling to following traffic when appropriate
Your examiner may have explained the specific details of any faults you made.
- How you can improve in this area
- If you made faults in this area during your test, or if you want to improve in this area, you should:
- check rule 161 of The Highway Code
- read pages 76 to 86 of ‘The Official DVSA Guide to Driving: the Essential Skills’ (2022 edition)
If you need to rebook the test, spend time practising and improving this skill with your driving instructor or supervising driver. You could work on using the mirrors - signal - manoeuvre (MSM) routine.
- Use your mirrors frequently so that you always know what is behind and to each side of you
- Use them in good time before you signal or change direction or speed
- Be aware that mirrors do not cover all areas and there will be blind spots.
- Give clear signals in plenty of time, having checked it is not misleading to signal at that time
- Use them to advise other road users before changing course or direction, stopping or moving off cancel them after use
- Make sure your signals will not confuse others. If, for instance, you want to stop after a side road, do not signal until you are passing the road. If you signal earlier it may give the impression that you intend to turn into the road.
- Your brake lights will warn traffic behind you that you are slowing down
- Use an arm signal to emphasise or reinforce your signal if necessary. Remember that signalling does not give you priority.
- Keep to the left, unless road signs or markings indicate otherwise. The exceptions are when you want to overtake, turn right or pass parked vehicles or pedestrians in the road
- Keep well to the left on right-hand bends. This will improve your view of the road and help avoid the risk of colliding with traffic approaching from the opposite direction
- Drive or ride with both hands on the wheel or handlebars where possible. This will help you to remain in full control of the vehicle at all times. You may use driver assistance systems while you are driving. Make sure you use any system according to the manufacturer’s instructions.
- Be aware of other road users, especially cycles and motorcycles who may be filtering through the traffic. These are more difficult to see than larger vehicles and their riders are particularly vulnerable. Give them plenty of room, especially if you are driving a long vehicle or towing a trailer.
- You should give way to cyclists when you are changing direction or lane – do not cut across them.
- Select a lower gear before you reach a long downhill slope. This will help to control your speed when towing, remember the extra length will affect overtaking and manoeuvring. The extra weight will also affect the braking and acceleration.
The next question is do you know the highway code changes that came in force in 2024? Take a look....
You can see the importance of updating your knowledge, however we will not keep showing updates here but i hope you get the idea on how important it is to keep updated.
Routines to improve
The routine's you will be encouraged to use is Look, Assess, Decide, Act & Mirror, Signal, Position, Speed, Gear, you will be coached on the steps but you will find you will not always have to use each step of the hazard drill but it does need to be placed in order.
For example
While overtaking a parked vehicle you may not need to signal (indicate) as it could be misleading if there was a side road on the right so you would use Look (ahead), asses (for dangers), decide (Commit when it is safe) and act (and overtake) then Mirrors (right), position (to a safe position) and once past the parked vehicle you would look, asses (to ensure you have enough clearance from the parked vehicle), decide and before you move back in you use mirrors (left) before you act and move back to your normal road position.
Use of mirrors
You need to be checking your interior mirror (on average every 6 to 10 seconds) when you are driving down any road to see what is behind you all the time .The L.A.D.A and hazard drill's is effectively used a minimum of three times when you are approaching any junction.
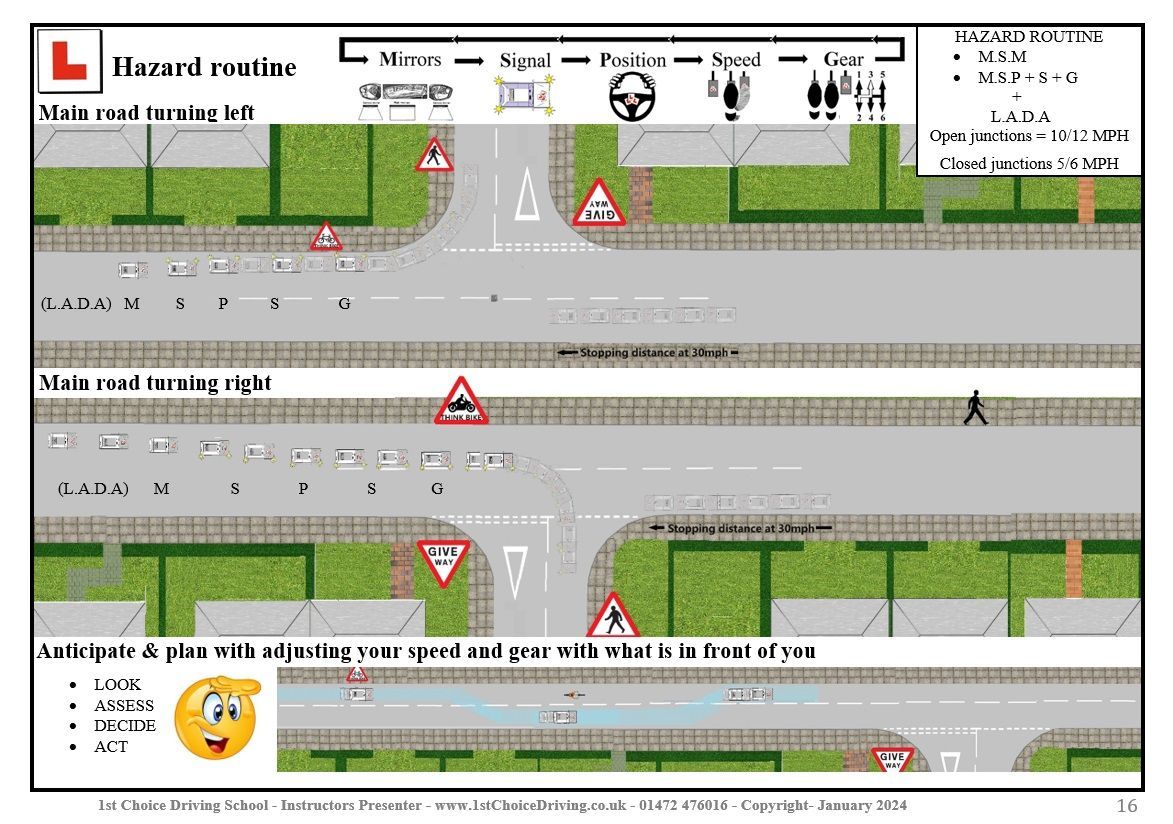
When entre, passing or exit a junction you would do the following on the hazard routine:-
- On the approach - Use mirrors and alter your position on the approach to the junction you wish to turn into (or going to drive past).
- Starting the routine - Use mirrors, signal and alter your road position, then lower your speed then change your gear down (or just mirrors if your driving ahead).
- Mirrors again before you turn into your road (think pedestrian/bike).
When entre, passing or exit a junction you would do the following on the L.A.D.A routine:-
- On the approach - Use Look and Assess on the approach to the junction you wish to turn into (or going to drive past).
- Before starting the routine - Use Look and Assess for any dangers (react accordingly)
- Before you turn into your road Look and Assess for pedestrian/bike that you may need to give-way too.
As you can see it is very important of take early observations before, during and after you turn, Can you appreciate why you have to continue to Look, asses, decide & act when you are driving and not just before during and after the turn.
Using these two routines will reduce any driver errors, as you have a strategy in your mind giving you full control of any situation that you can and can not foresee.

- Interior mirror and side mirror (the direction you are turning)
- Signals in good time, ensuring it’s necessary and correctly timed (using a hand signal helps or warn other road users/cyclists and pedestrians of your intention if your indicators are not working)
- Brake lights are your slowing down signal for the vehicles behind
- Turning left be over a drain width from the curb (30cm), this position could be wider deepening on the shape of the corner (explained more on your lesson)
- Turning right be just left of the centre line
- Determine the best position/course to negotiate stationary hazards
- Adjust your speed so that you can negotiate an open junction 10/12 mph
- Adjust your speed so that you can negotiate an closed junction 4/6+ mph
- Remember if its safer to stop than to carry on that's the correct thing to do
- Select the correct gear to match your engine speed and the power you need (2nd gear if an open junction & 1st gear if i's a closed junction)
- Making sure that the gear is selected as you get to the corner
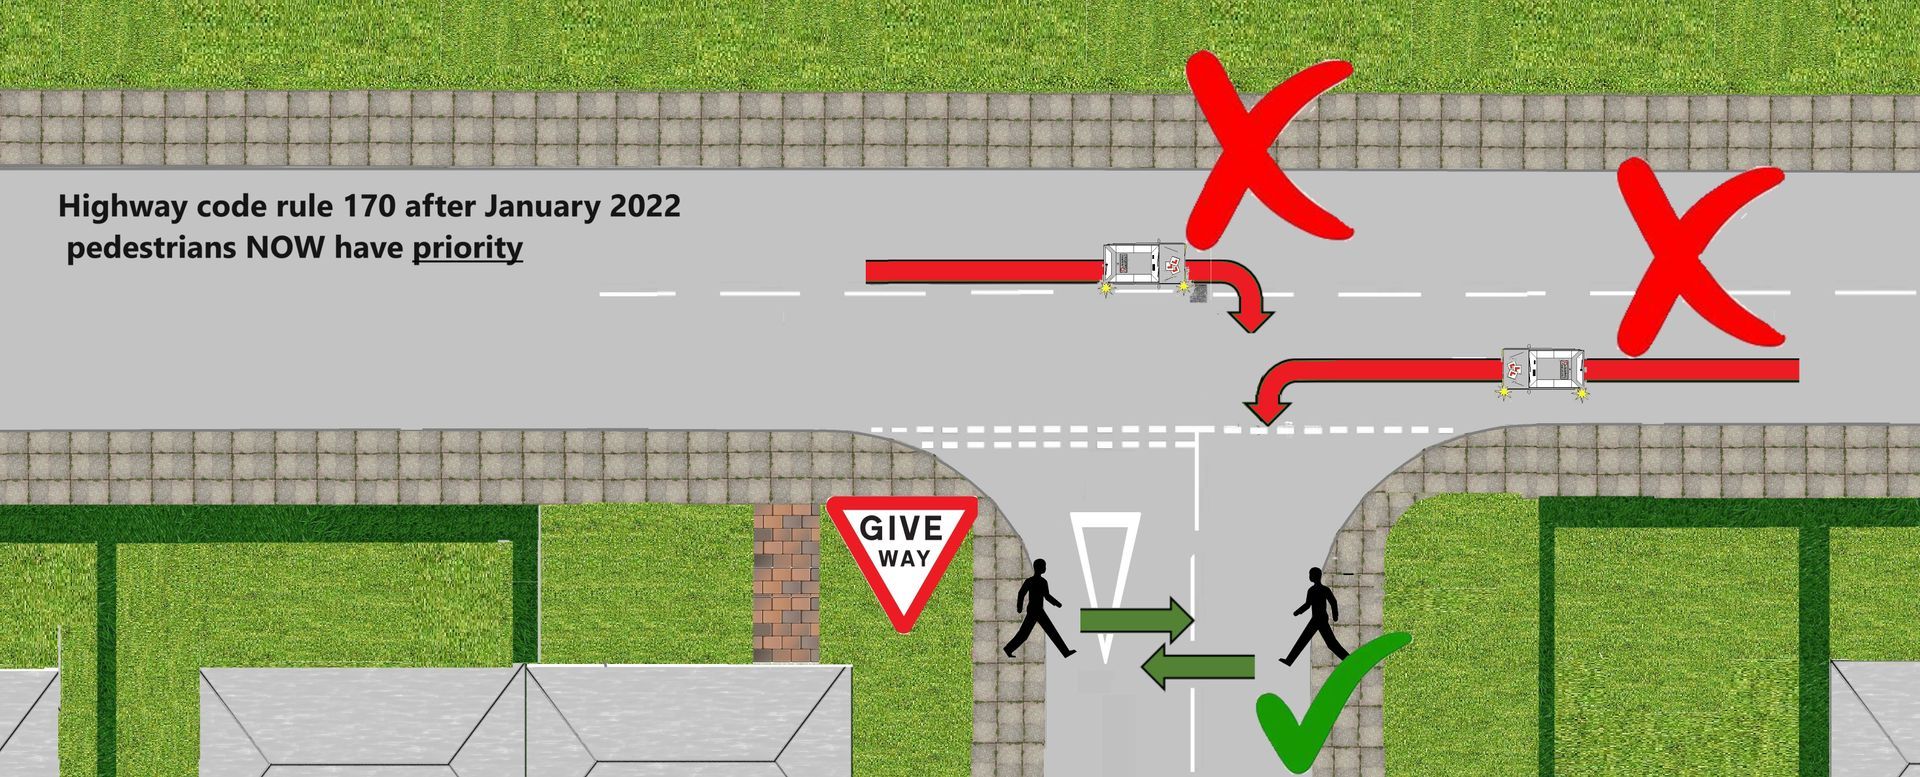
New rule pictures turning into a junction
Highway code rule 170 before January 2022 Vehicles had priority

Highway code rule 170 after January 2022 - Pedestrian's now have priority
Look, Assess, Decide, Act
20 years ago I was taught to teach the hazard route in this order M.S.P.S.G.L which stands for MIRROR. SIGNAL. POSITION.SPEED.GEAR. LOOK, the last part of the hazard drill is LOOK this is for you to gain extra information. The driving tests has changed over the years and has made this basic route too basic and does not allow you to keep your vehicle slowing and flowing if you look very last minute. You must agree if you are not constantly looking and scanning the road ahead you are not looking for any dangers on the road that could be oncoming or even behind you. The new version of routines will be L.A.D.A & M.S.P.S.G.
Another example
When you are approaching a junction and are travelling at 30MPH we would advise this:-
- Look ahead/behind, Assess when to come of the gas pedal to start reducing your speed
- Look and assess then to start Mirror, Signal, position, Speed down (using brakes), gear down
- Look and assess behind you and into the new road for any dangers then Mirrors into your new road to make progress

- Look into your rear view mirror to ensure you know what is behind you
- Look ahead to see what is driving towards you that could potentially slow you down or stop you
- Look into the new road you want to entre as this is the new main road (to you) and you need to give-way to any pedestrian's crossing the road you are wanting to entre, parked vehicles parked closer than 10 meters to the junction
- Look into the road you are entering to scan for pedestrians, parked cars or vehicles coming towards you.
- Look
ahead to see where your junction is that you have been asked to turn into (this will give you the information on when to start the M.S.M routine)
- Assess
for any dangers you could have to slow down for
- Decide
the correct strategy
- Act
accordingly
- Alert - Can you take the next road
- Direct - on the left
- Identify - just after the white parked vehicle
Correct timing to cross on coming traffic
When travelling on a main road turning left into a T junction is simpler than crossing the traffic as you do not need to cross the oncoming traffic, however you still need to work out when you are going to start the slowing down routine. The other issue you may have is a slower moving vehicle in front of you and you will need to work the timing on "have you time to overtake a slower moving vehicle (mobility scooter or bicycle)?".
Do not overtake just before you turn left and watch out for traffic coming up on your left before you make the turn, especially if driving a large vehicle. Cyclists, motorcyclists and other road users in particular may be hidden from your view.
Main road turning right
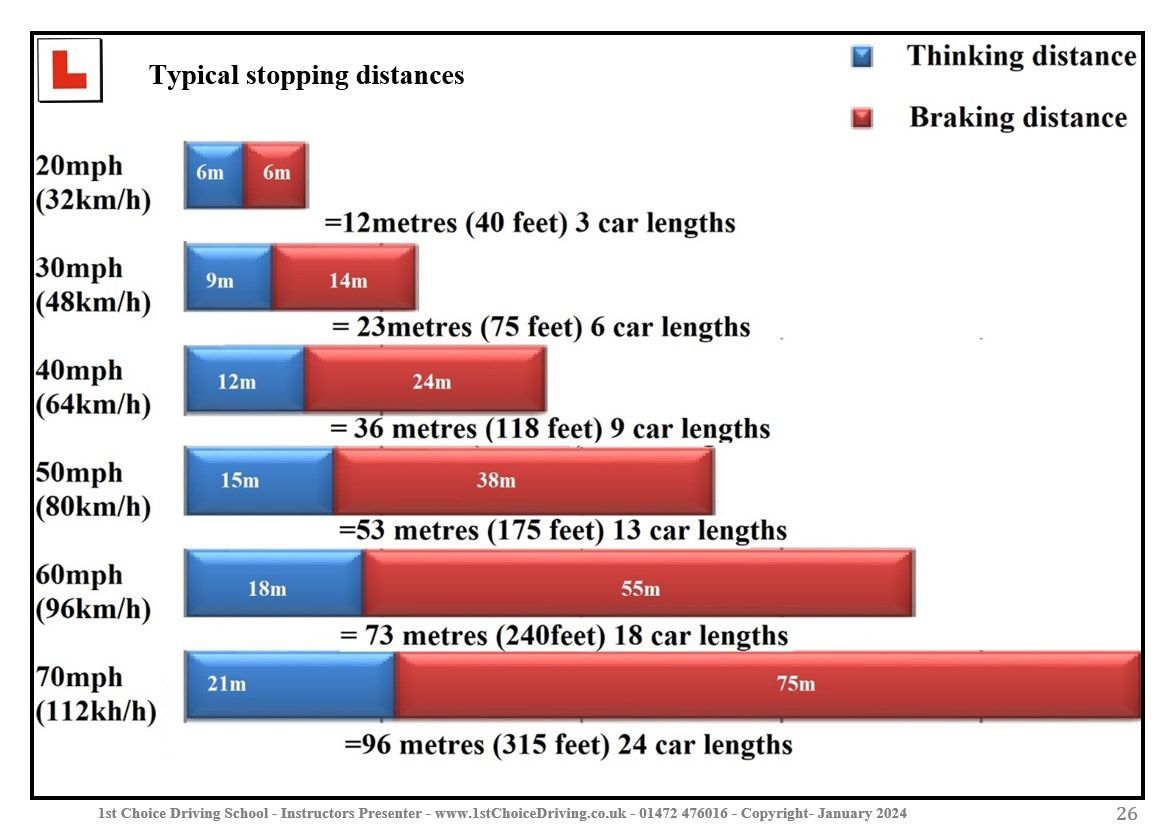
The timing you need when on a main road turning right from your point of turn is 8 to 10 car lengths (depending on your confidence), We put your walking strategy in this thought process, so if you have enough time to walk full across the road (with out a little jog at the end) you have enough time to cross the road.
The other issue you need to be looking and assessing for on the approach to turn right into a side road any pedestrian's walking across the road and any parked vehicle less than 10 meters parked in the side road. If their are parked vehicle in the new road you are planning to cross into you may need a bigger gap from ahead or you may need to stop if a vehicle was driving towards the give-way line that you in tend to entre.
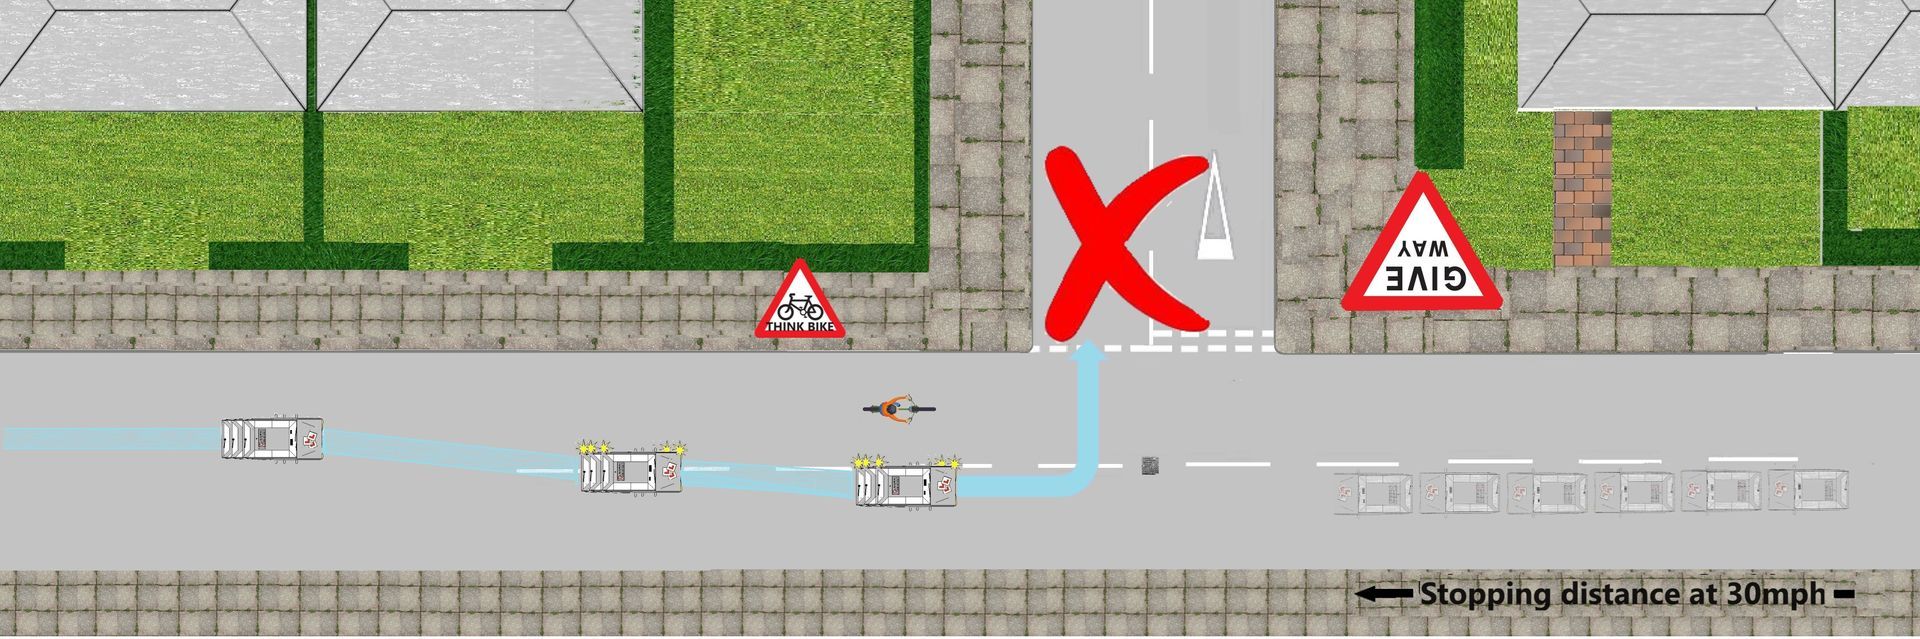
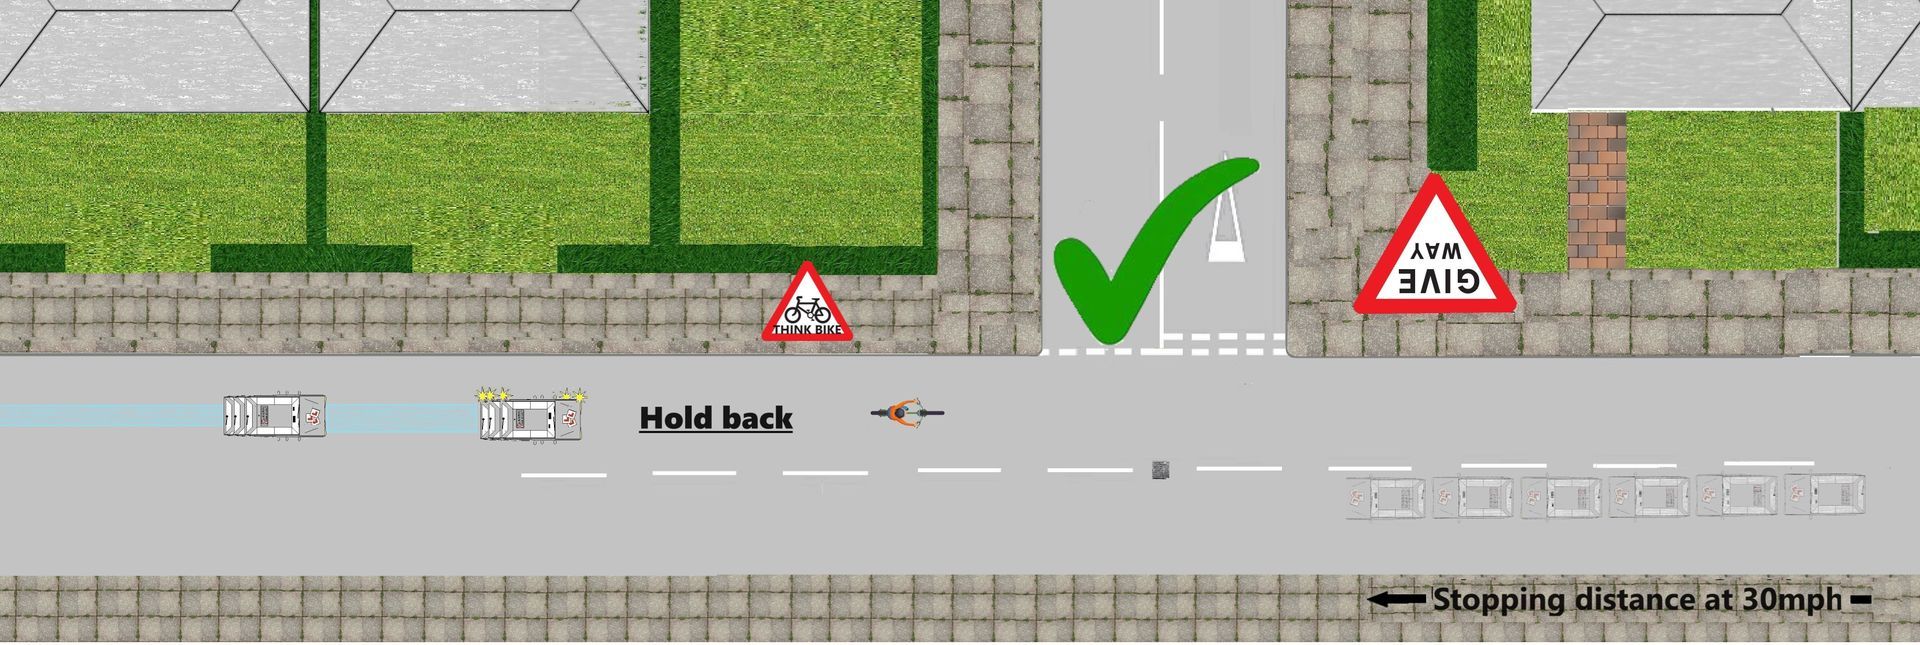
Diagram 1
In the below diagram the grey learner car intends to turn right into the side road and their a approaching red vehicle approaching. The red arrow show the red vehicles stopping distance on a 30mph road. The question is, is it going to be safe to go if you are at the point to turn into the side road?
The answer is
YES, as the red vehicle is still before the white hazard warning white lines and you are moving at 10mph and at the point of turn. If the red vehicle was closer the answer would be NO. If you have time to walk across the road you have time to turn into the side road.
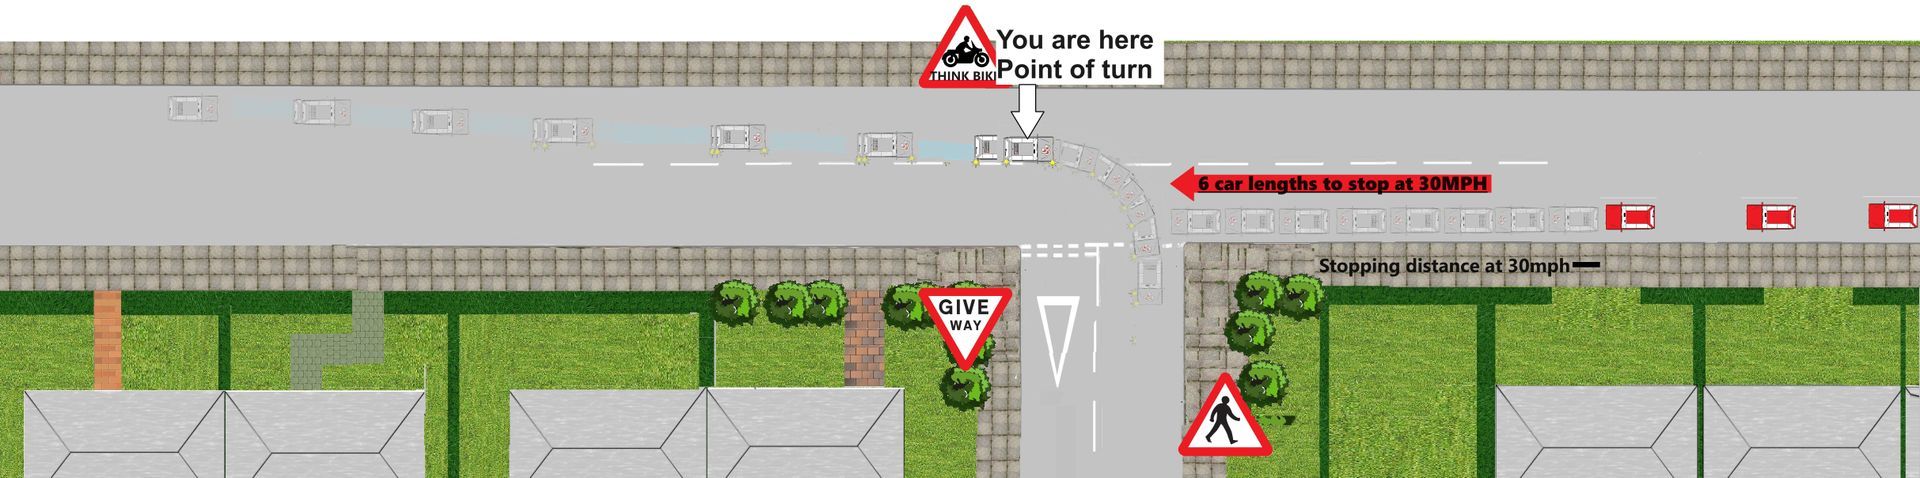
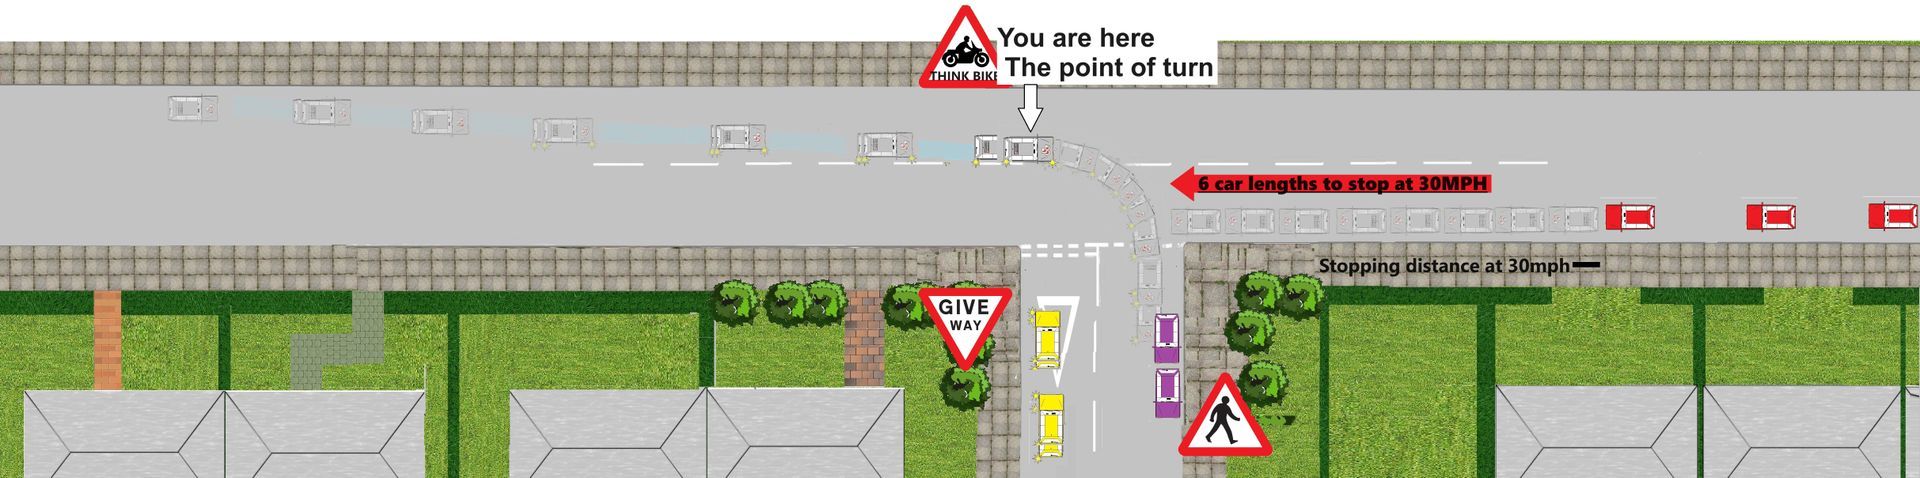
Diagram 2
As you can see we have the same T junction with the same red vehicle approaching you. However now we have TWO more complications.
- The purple parked vehicle
- The yellow vehicle approaching the give-way line
With the purple vehicle being parked you will have to turn into the side road on the wrong side of the road to safely enter the junction so the yellow car has priority over you. This will mean with the approaching red vehicle you will need to wait (at your point of turn) for the red vehicle to pass the junction then the yellow vehicle can emerge out of the junction and then it will be safe for you to entre the side road.
Planning is key to safety
- Select 1st gear and be ready to go
- If you have to wait for a while you should apply your handbrake
- Watch and wait for a gap and get ready to move, check your mirrors for any dangers and then turn if it is safe to do so
Highway code rule 151
In slow-moving traffic. You should:-
- reduce the distance between you and the vehicle ahead to maintain traffic flow
- never get so close to the vehicle in front that you cannot stop safely
- leave enough space to be able to manoeuvre if the vehicle in front breaks down or an emergency vehicle needs to get past
- not change lanes to the left to overtake
- allow access into and from side roads, as blocking these will add to congestion
- be aware of cyclists and motorcyclists who may be passing on either side.
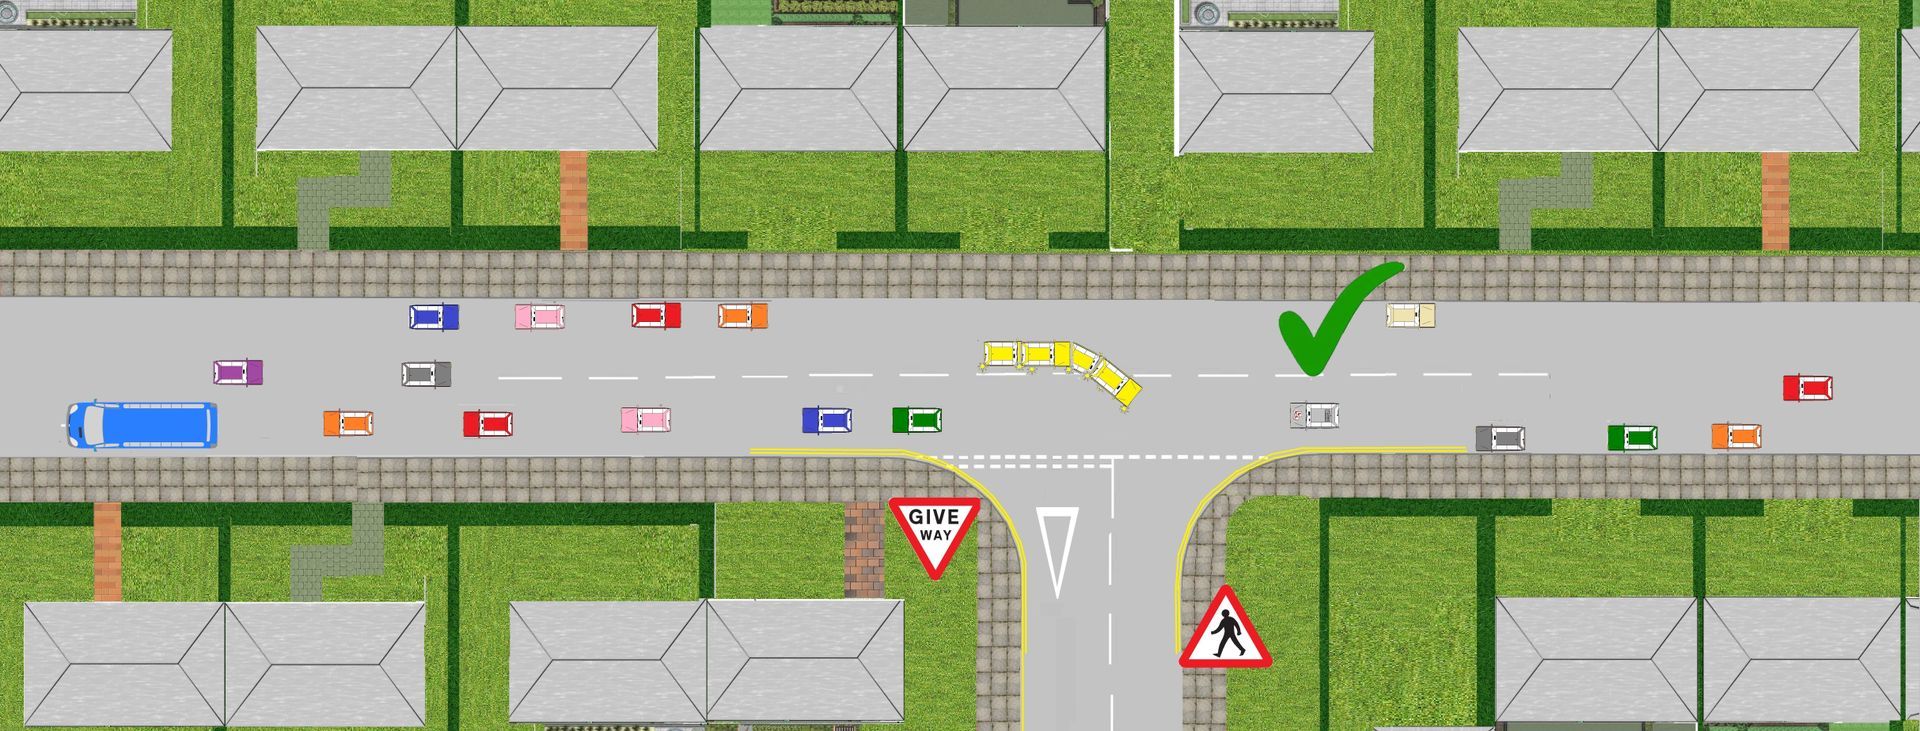
Planning with stationary vehicles
In the below diagram the bus is at a bus stop and waiting for passengers to get on and off a bus and causing temporary congestion. The vehicles can not make progress around the bus due to on coming vehicles, with the correct observations and planning the grey learner vehicle has stopped in the correct place to allow the yellow vehicle to make progress into the side road.
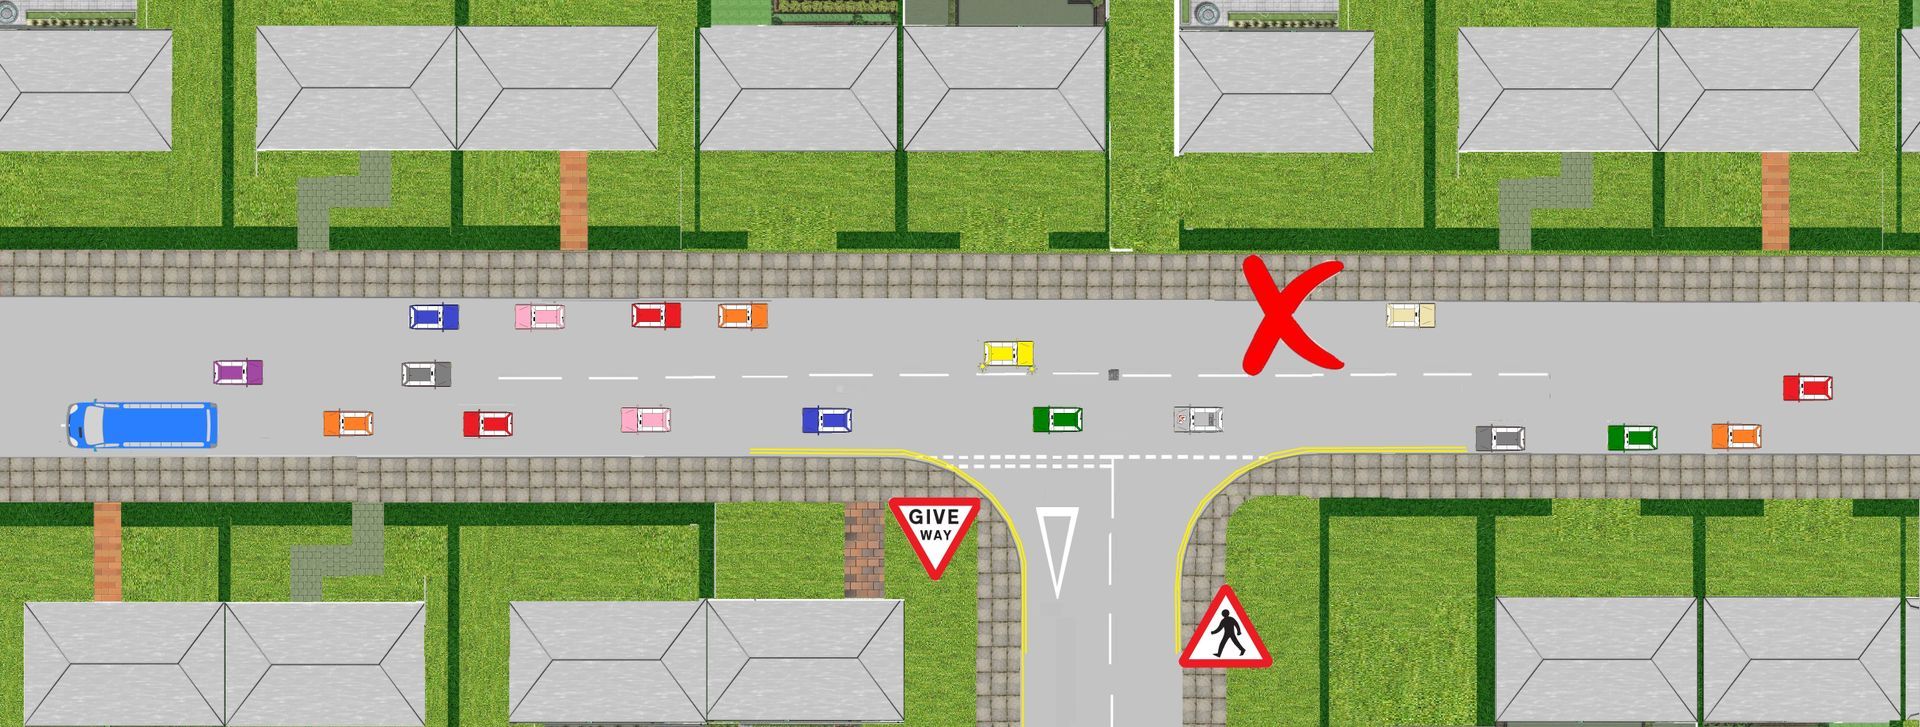
Incorrect planning with stationary vehicles
In the same diagram below with the bus at the bus stop and waiting for passengers to get on and off, with the incorrect observations and planning the grey learner vehicle has not stopped in the correct place to allow the yellow vehicle to make progress into the side road.
LOOK-ASSESS-DECIDE-ACT
- Agree learning goals and needs of todays lesson
- Agree appropriate lesson structure (full, partially or independent level of instruction)
- Practice in a suitable training area
- Agreed if needed to adapt the lesson plan to help the pupil work towards their new learning goals if any verbal or physical intervention was made by the instructor
- Directional instructions will be given in ADI format (Alert, direction and identify manor) given to the pupil clear and given in good time
- Agree if the students made a minor, serious or dangerous error on your lesson it will be broken down using F.I.S.H (fault, implications, solution & help) this method of feedback helps pupils understand what fault is being made and how to strategies on how correct the faults.
- Your driving instructor will adapt their teaching style to suite your ability and ability
- Your driving instructor will continue to encourage you on your lesson and analyse any problems made and allow you to take responsibility for your own learning goals by giving you technical information to improve your techniques. Your technical feed back from your instructor will be ether given on the move or if feel needed by pulling you up on the side of the road somewhere safe, legal and convenient.
New Paragraph

