Y junctions
- P.O.M routine (moving off)
- Improving clutch control
- M.S.M routine when stopping (including turning)
- Co-ordination of foot controls
- Steering to a safe driving position and pulling up on the left
- Turning left and right from main to side roads
- Gear changing up and down should be improving and getting more independent
- Adequate distance around stationary vehicles and slower moving vehicle (cyclists and pedestrians)
- Making progress with appropriate speed
- L.A.D.A & M.S.P.S.G (main road to side road)
- Two second gap
- Hold back position
- Meeting , overtaking, adequate clearance when overtaking stationary & slow moving vehicles
- appropriate speed limits
- Fault
- Implication
- Solution
- Help
- Full talk through
- Prompt
- Independent.

These two routines have been covered on your last couple of lesson brief but let's have a re-cap to refresh your memory.
When turning, emerging, slowing or even speeding your vehicle up you need to look in your mirror's a minimum of 3 times.
Look
- Look into your rear view mirror to ensure you know what is behind you
- Also look into the road you are entering to scan for pedestrians, parked cars or vehicles coming towards you (new rule for highway code 2022)
- Look into the new road as you have now joined the main road and give way to oncoming vehicles.
- Look ahead to see where your junction you have been asked to turn into (this will give you the information on when to start the M.S.M routine).
- Assess for any dangers you could have to slow down for.
- Decide the correct strategy.
- Act accordingly.
Emerging at Y junctions
Throughout your driving course you will use the L.A.D.A & Hazard drill's when approaching a Y and T junction, crossroad, roundabout, slip roads and so on.... On your driving (practical) test you will be assessed on the order of the hazard routine. If you reduce your speed before checking your mirrors you will probably get a minor fault. The reason is that a vehicle could be too close to the rear end of you vehicle and this could be a potential hazard.
Remember the order of your pedals should be in the order of A (accelerator), B (brake) C (clutch), so with this in mind before you press your brake pedal (slowing down) doing a simple mirror check you will know what is behind you and would know to slow down by using your brakes earlier, this would give the vehicle behind more time to react. We know it is not your fault the vehicle is too close to you but you can control the situation and keep everyone safe.

You needed to show you can use your rear view mirror and door mirrors (wing mirrors) to see what’s behind or to the side of your car. This should be done in good time, well before appropriate situations.
You needed to show you can use them at the correct time, some situations where you needed to use mirrors include:
- signalling
- changing direction or lanes
- changing speed
Your examiner will monitor this throughout your test.
Examples of faults
Some of the most common faults for this area include:
- checking mirrors after or at the same time as signalling
- changing lanes on a roundabout without checking your mirrors effectively
- trying to change lanes on a dual carriageway without checking your mirrors effectively
- pulling up at the side of the road without signalling to following traffic when appropriate
Your examiner may have explained the specific details of any faults you made.
How you can improve in this area
If you made faults in this area during your test, or if you want to improve in this area, you should:
check rule 161 of The Highway Code
read pages 76 to 86 of ‘The Official DVSA Guide to Driving: the Essential Skills’ (2022 edition)
- If you need to rebook the test, spend time practising and improving this skill with your driving instructor or supervising driver. You could work on using the mirrors - signal - manoeuvre (MSM) routine.
Where would you find a Y junction?
A Y junction can be found on most unusual places:-
- Off a side road instead of a T junction
- On a traffic light
- Just before a roundabout
- On a side road joining a 60MPh single carriageway
Lets have a look at some situations you could come across incorporating Y junction
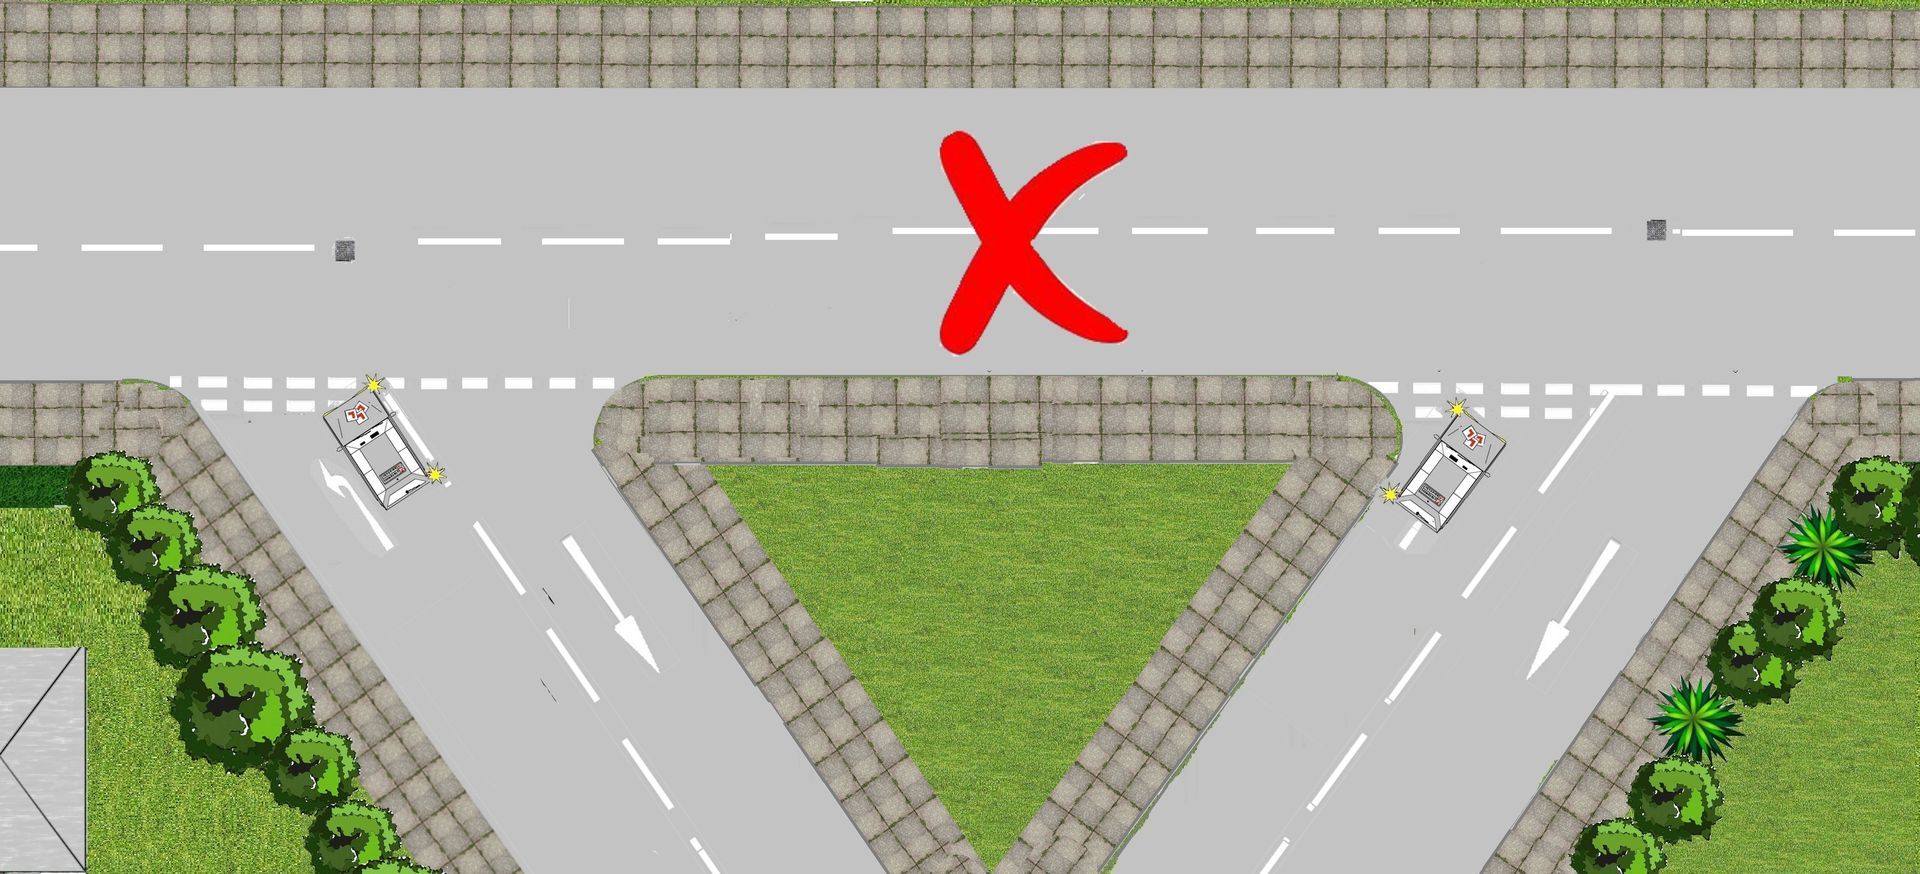
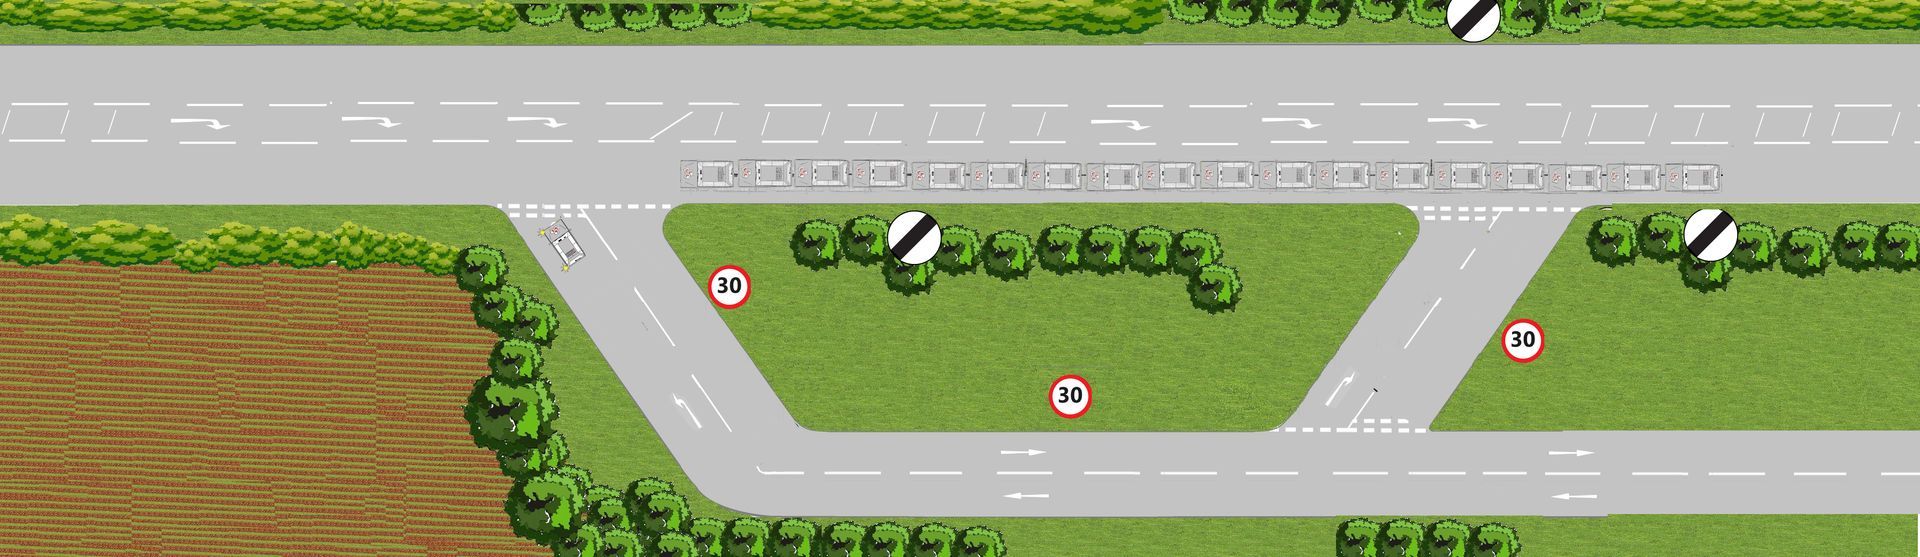
Y junction crossing traffic
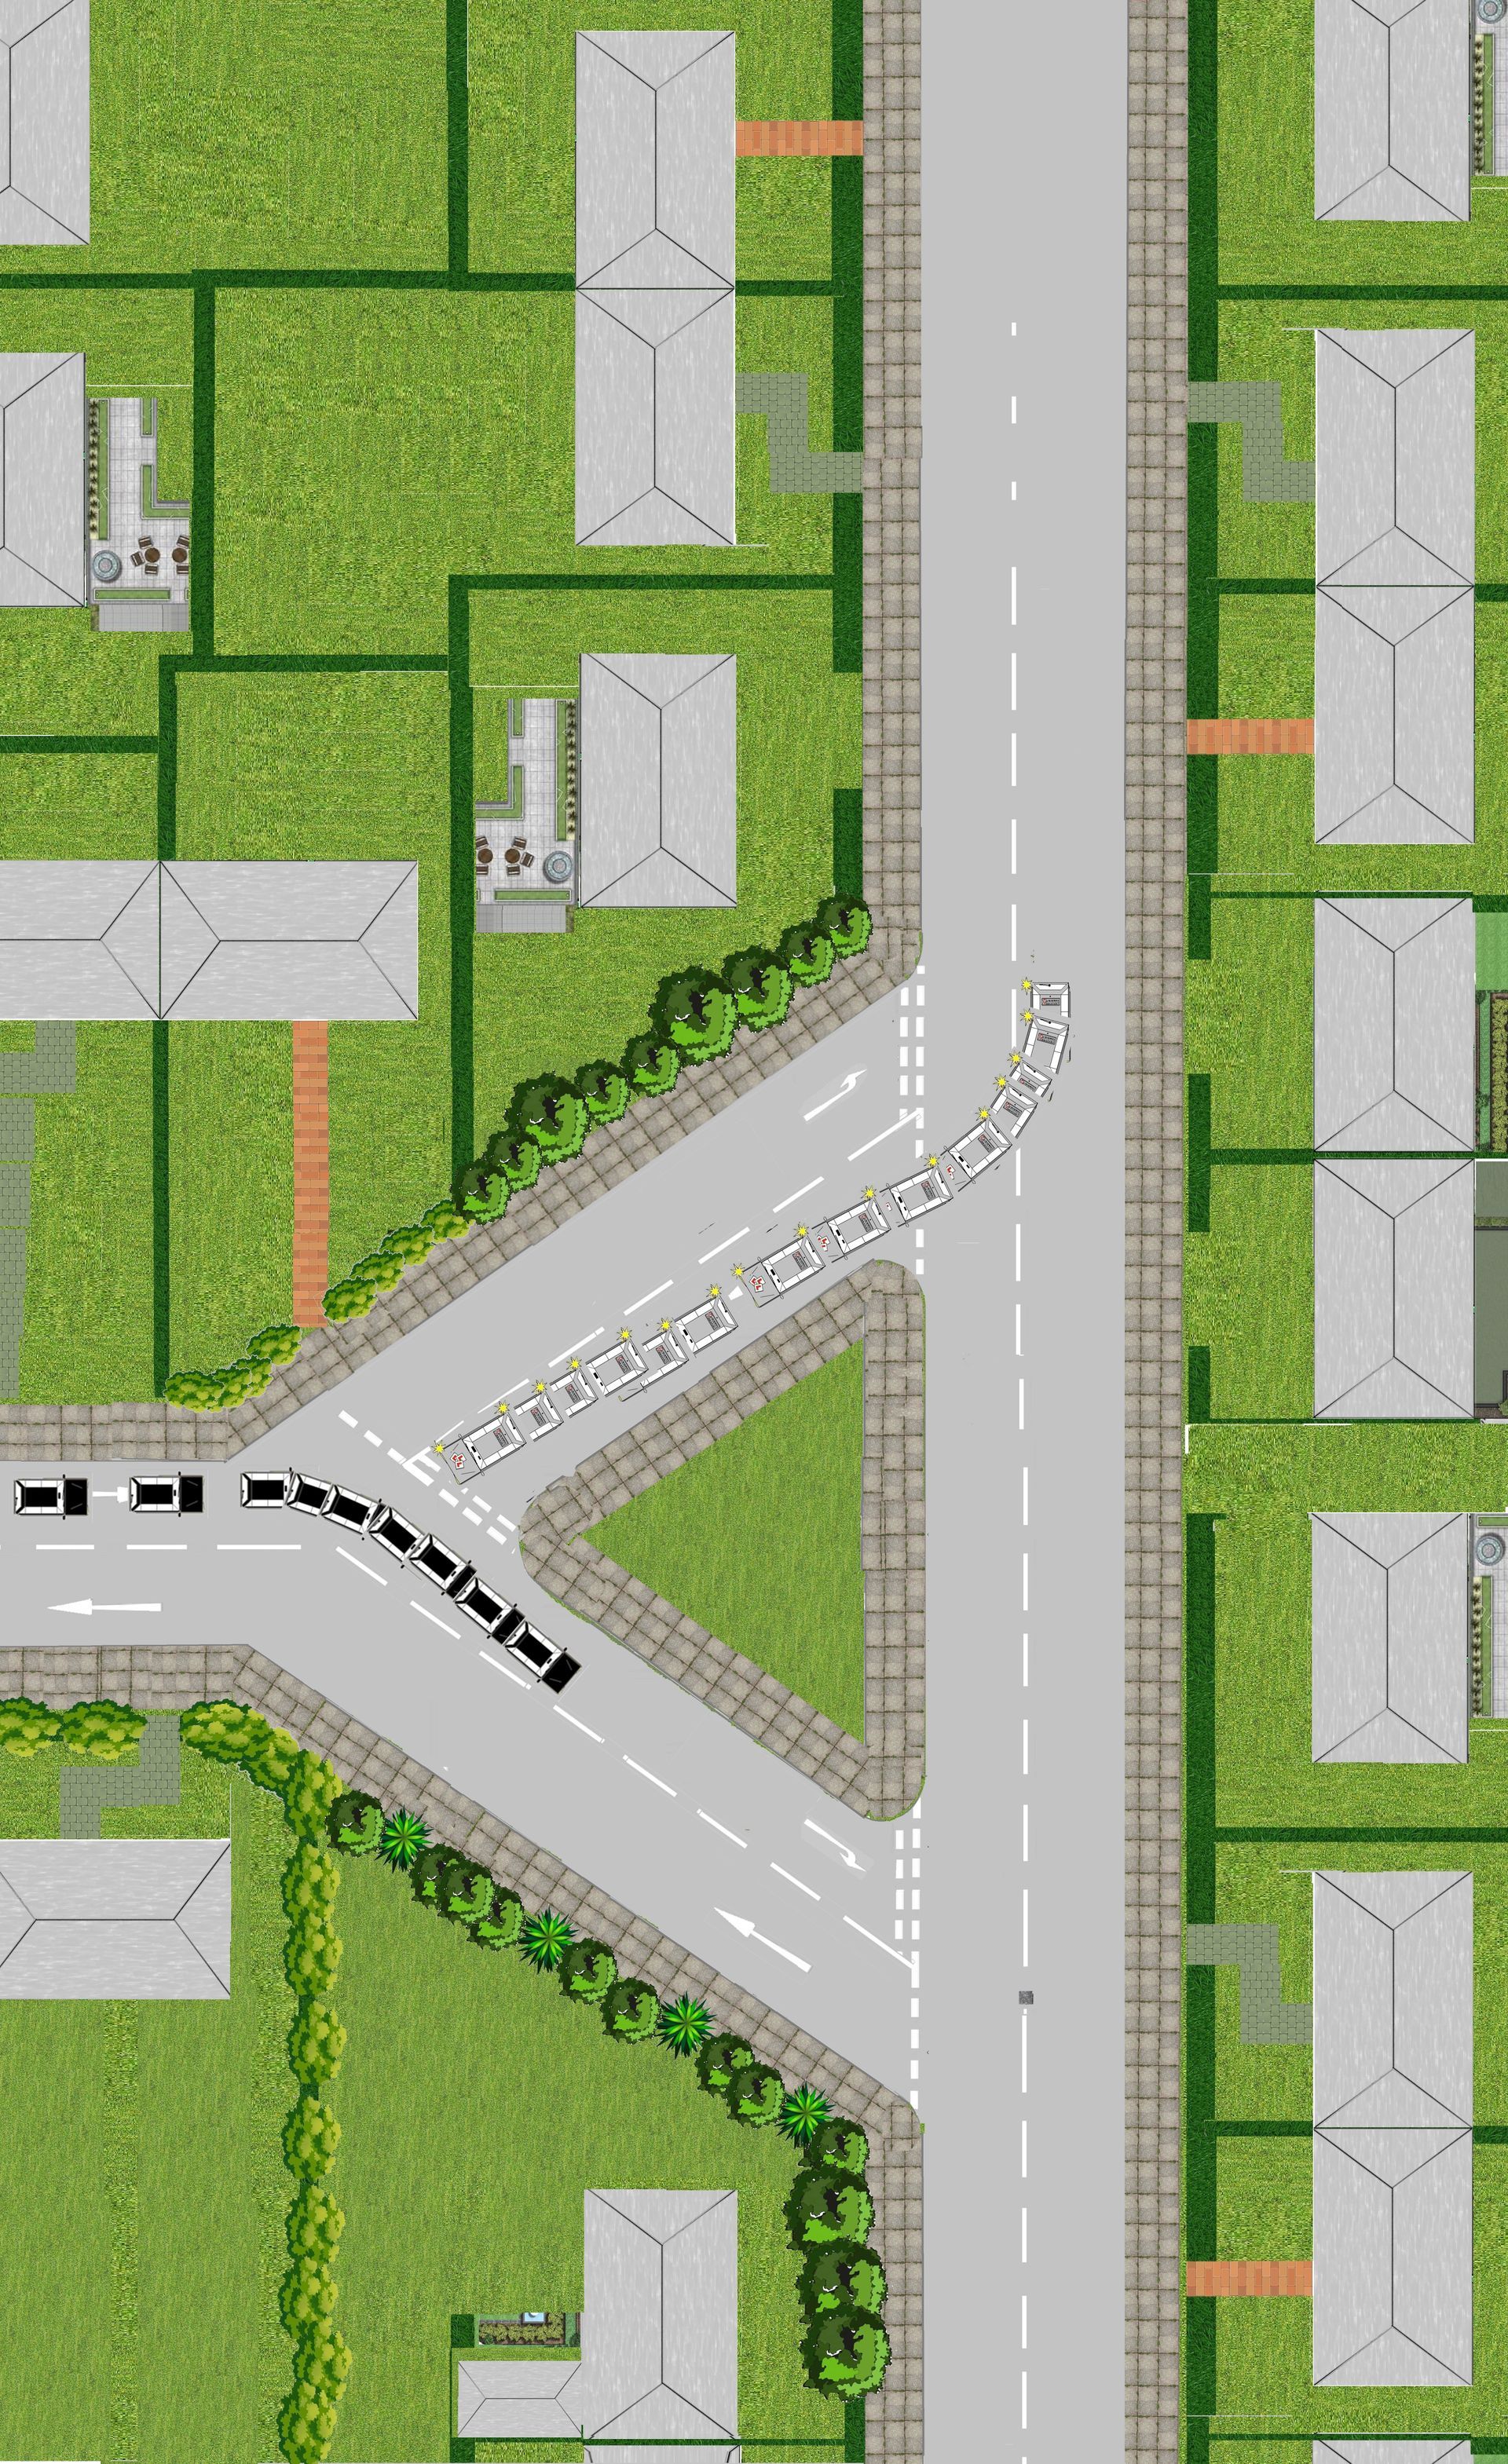
In diagram 1 you can see the side road of the main road is at a different angle to a T junction, turning into the side road you would probably need to approach slower to maintain a good positioning entering. Once your in the side road you could then be presented with another give-way line.
In diagram 2 you can see the learner vehicle has turned into the Y junction and approaching a Give-way line. This now give the black vehicle passing the learner's Y junction priority over the learner vehicle. Look, Assess, Decide, Act for road paint and road signs.
Diagram 1

Diagram 2
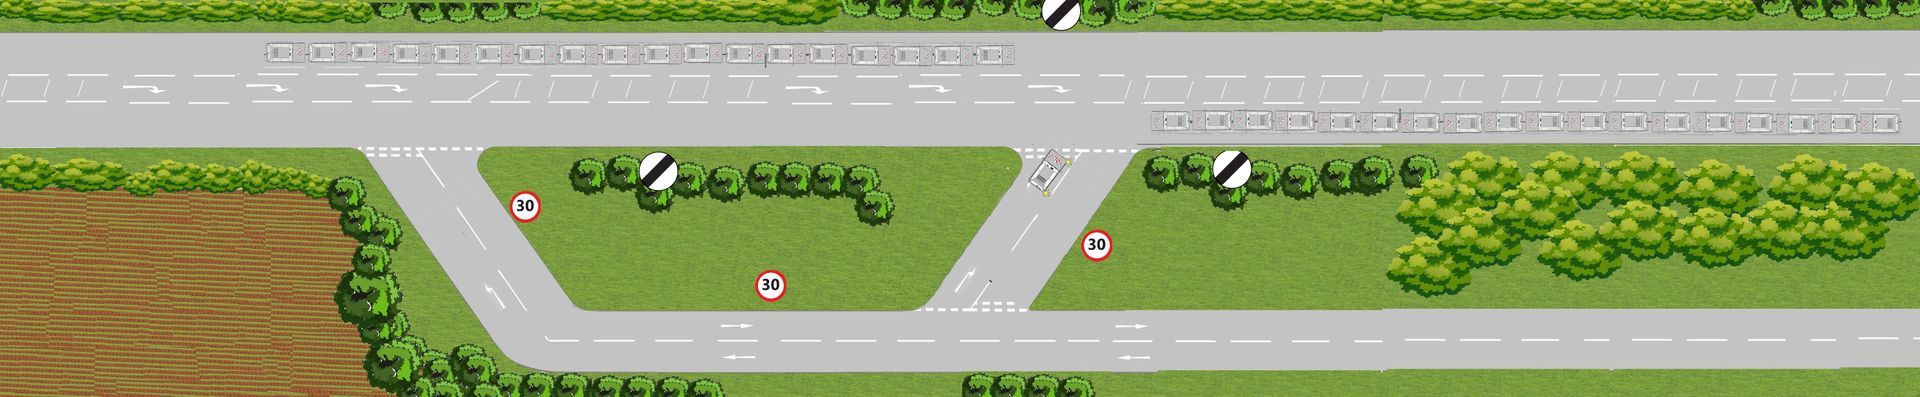
Emerging
Emerging out of a Y junction is no different than emerging out of a T junction, you check Your:-
- Mirrors
- Signal
- position
- Speed
- Gear
The issue here is the tighter angle when emerging on a narrow road you could be very close to the centre line. Look, Assess, Decide, Act to see if it is 100% safe to exit the road and emerge onto the main road.
Timing of gaps when crossing traffic (Re-cap main road to side road)
If you recall when you was briefed you on main road turning right your approaching vehicle from ahead we advised you need more 8/10 car lengths, why?
As the overall stopping distance at 30MPH is 23M, 75feet or 6 car lengths, to cross moving traffic, now think of the distance of the vehicle travelling towards you and once you are at your P.O.T is that vehicle still 8+ lines away from the junction, If you can walk across the road you have enough time to cross into the side road (8/10 car lengths is a student that is getting on to test standard).
When exiting the Y junction you can see if you get the wrong angle to turn left or right the emerge could become dangerous for you and the main road.
Diagram 1
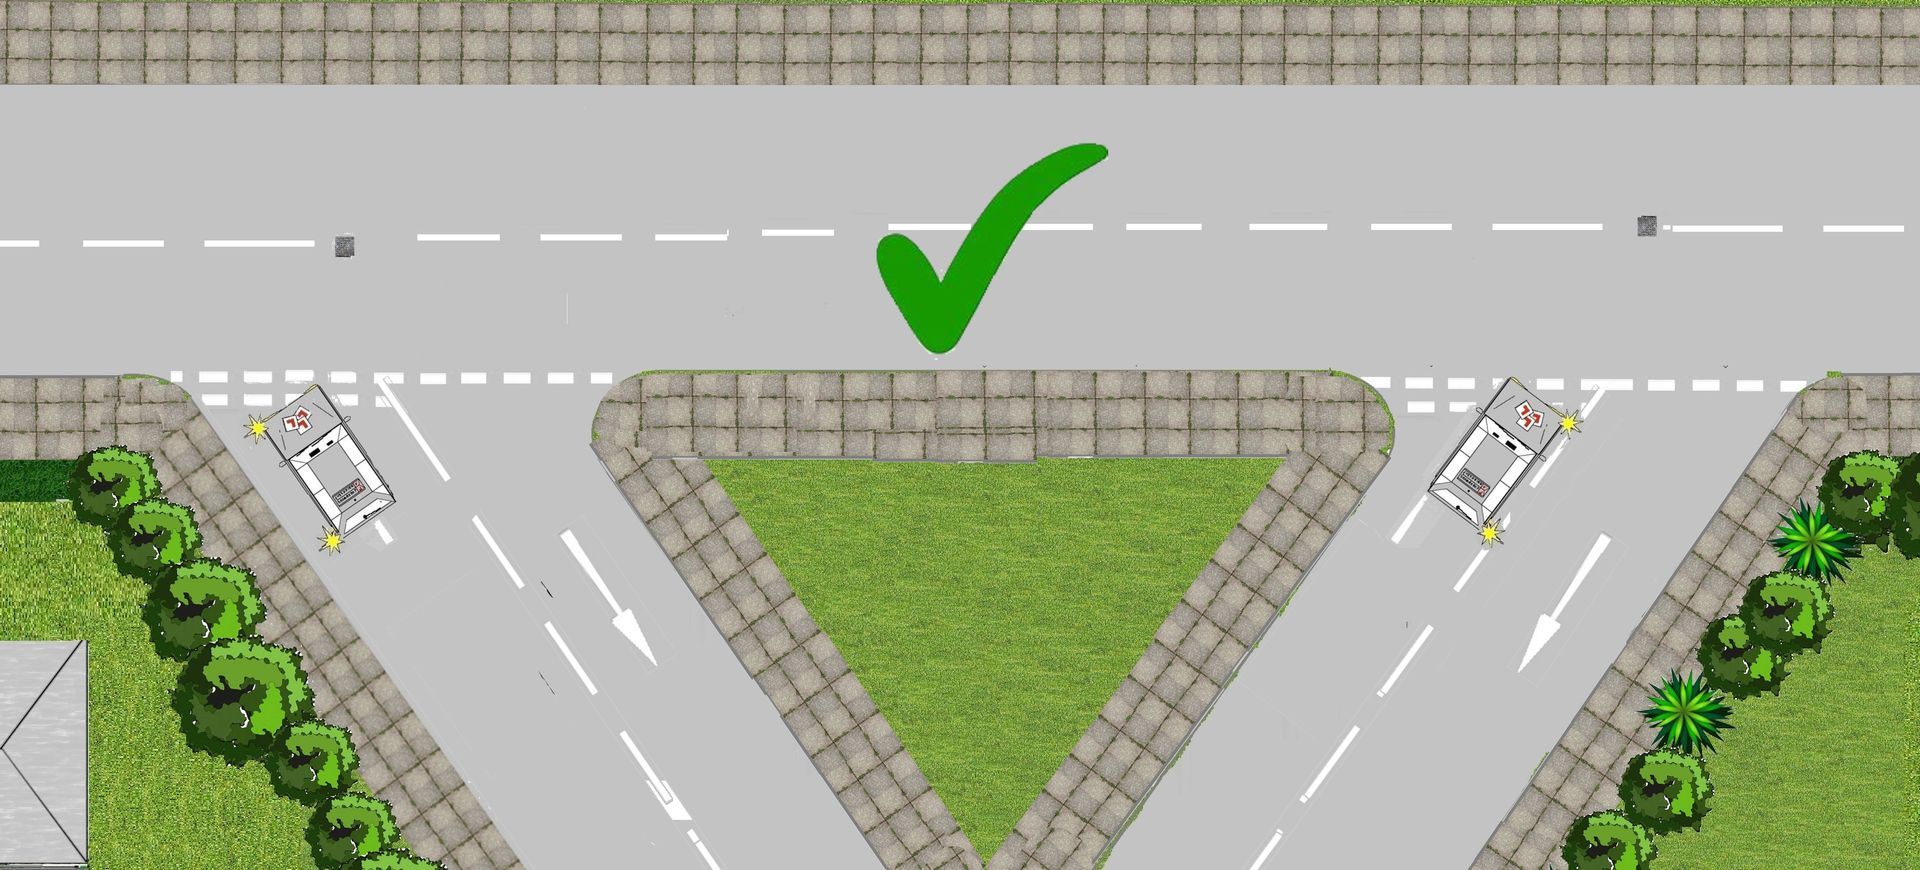
Diagram 2
Give-way and stop junctions
Stop junctions
A stop line has sold white line on the left and a single dotted on the right hand side of the road, so it separates the ins and outs on a road.
It also has an octagon sign at the mouth of the junction.
At a stop sign you have to STOP by law, if you do not stop you could get points on your licence if stopped by the police.
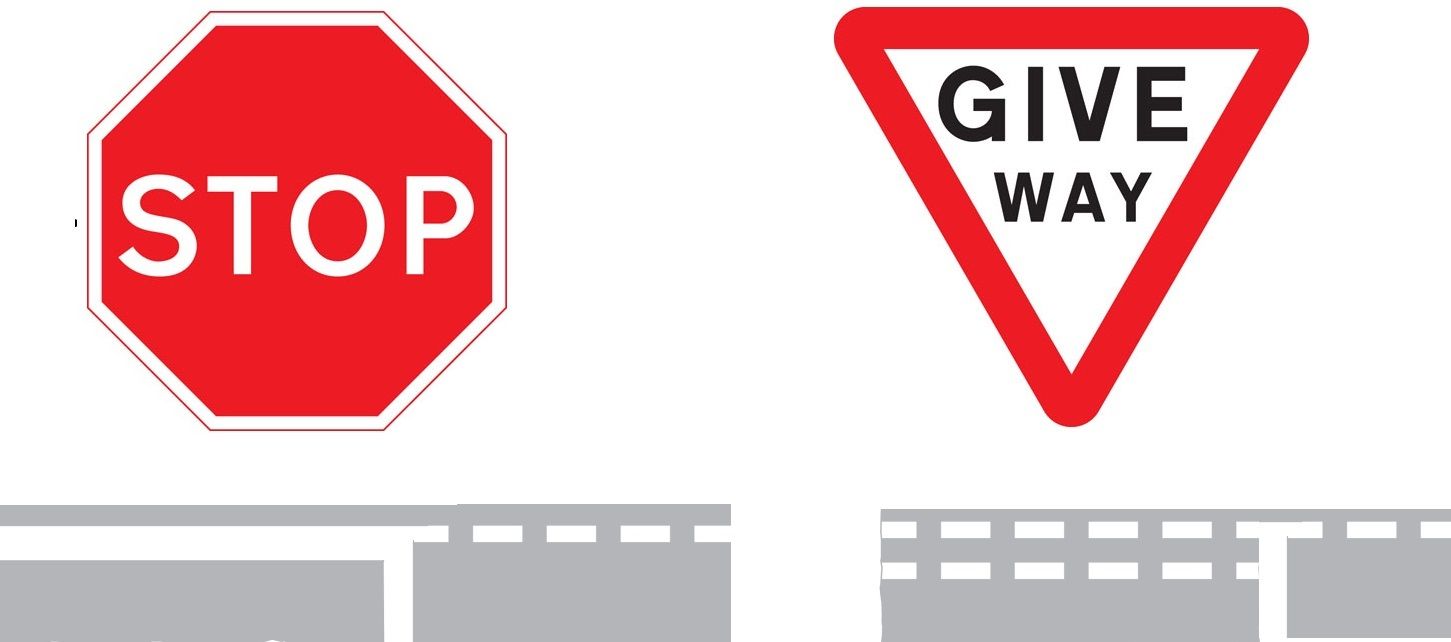
Give-way sign
A Give-way line has a double dotted lines on the left hand side and a single dotted on the right hand side of the road, so it separates the ins and outs on a road.
It also has an upside down warning triangle sign at the mouth of the junction.
Unmarked junction
No road marking show NO priority so approach with caution and give-way accordingly. Be extra careful approaching an unmarked junction as someone might no be paying attention and not even look left and right and assume priority.
Y junction on a traffic light
Y junctions can also be found at traffic lights, some instructor's also call them slip road. What you need to assess here is has the Y junction got a give-way or stop line (or maybe both discussed on traffic light brief) or is Y junction incorporated in the traffic light sequence?? Traffic lights is another brief so in this instance it will be classed as a Give-way "Y junction". When entering the Y junction and before you emerge to the left you have to give-way to your immediate right.
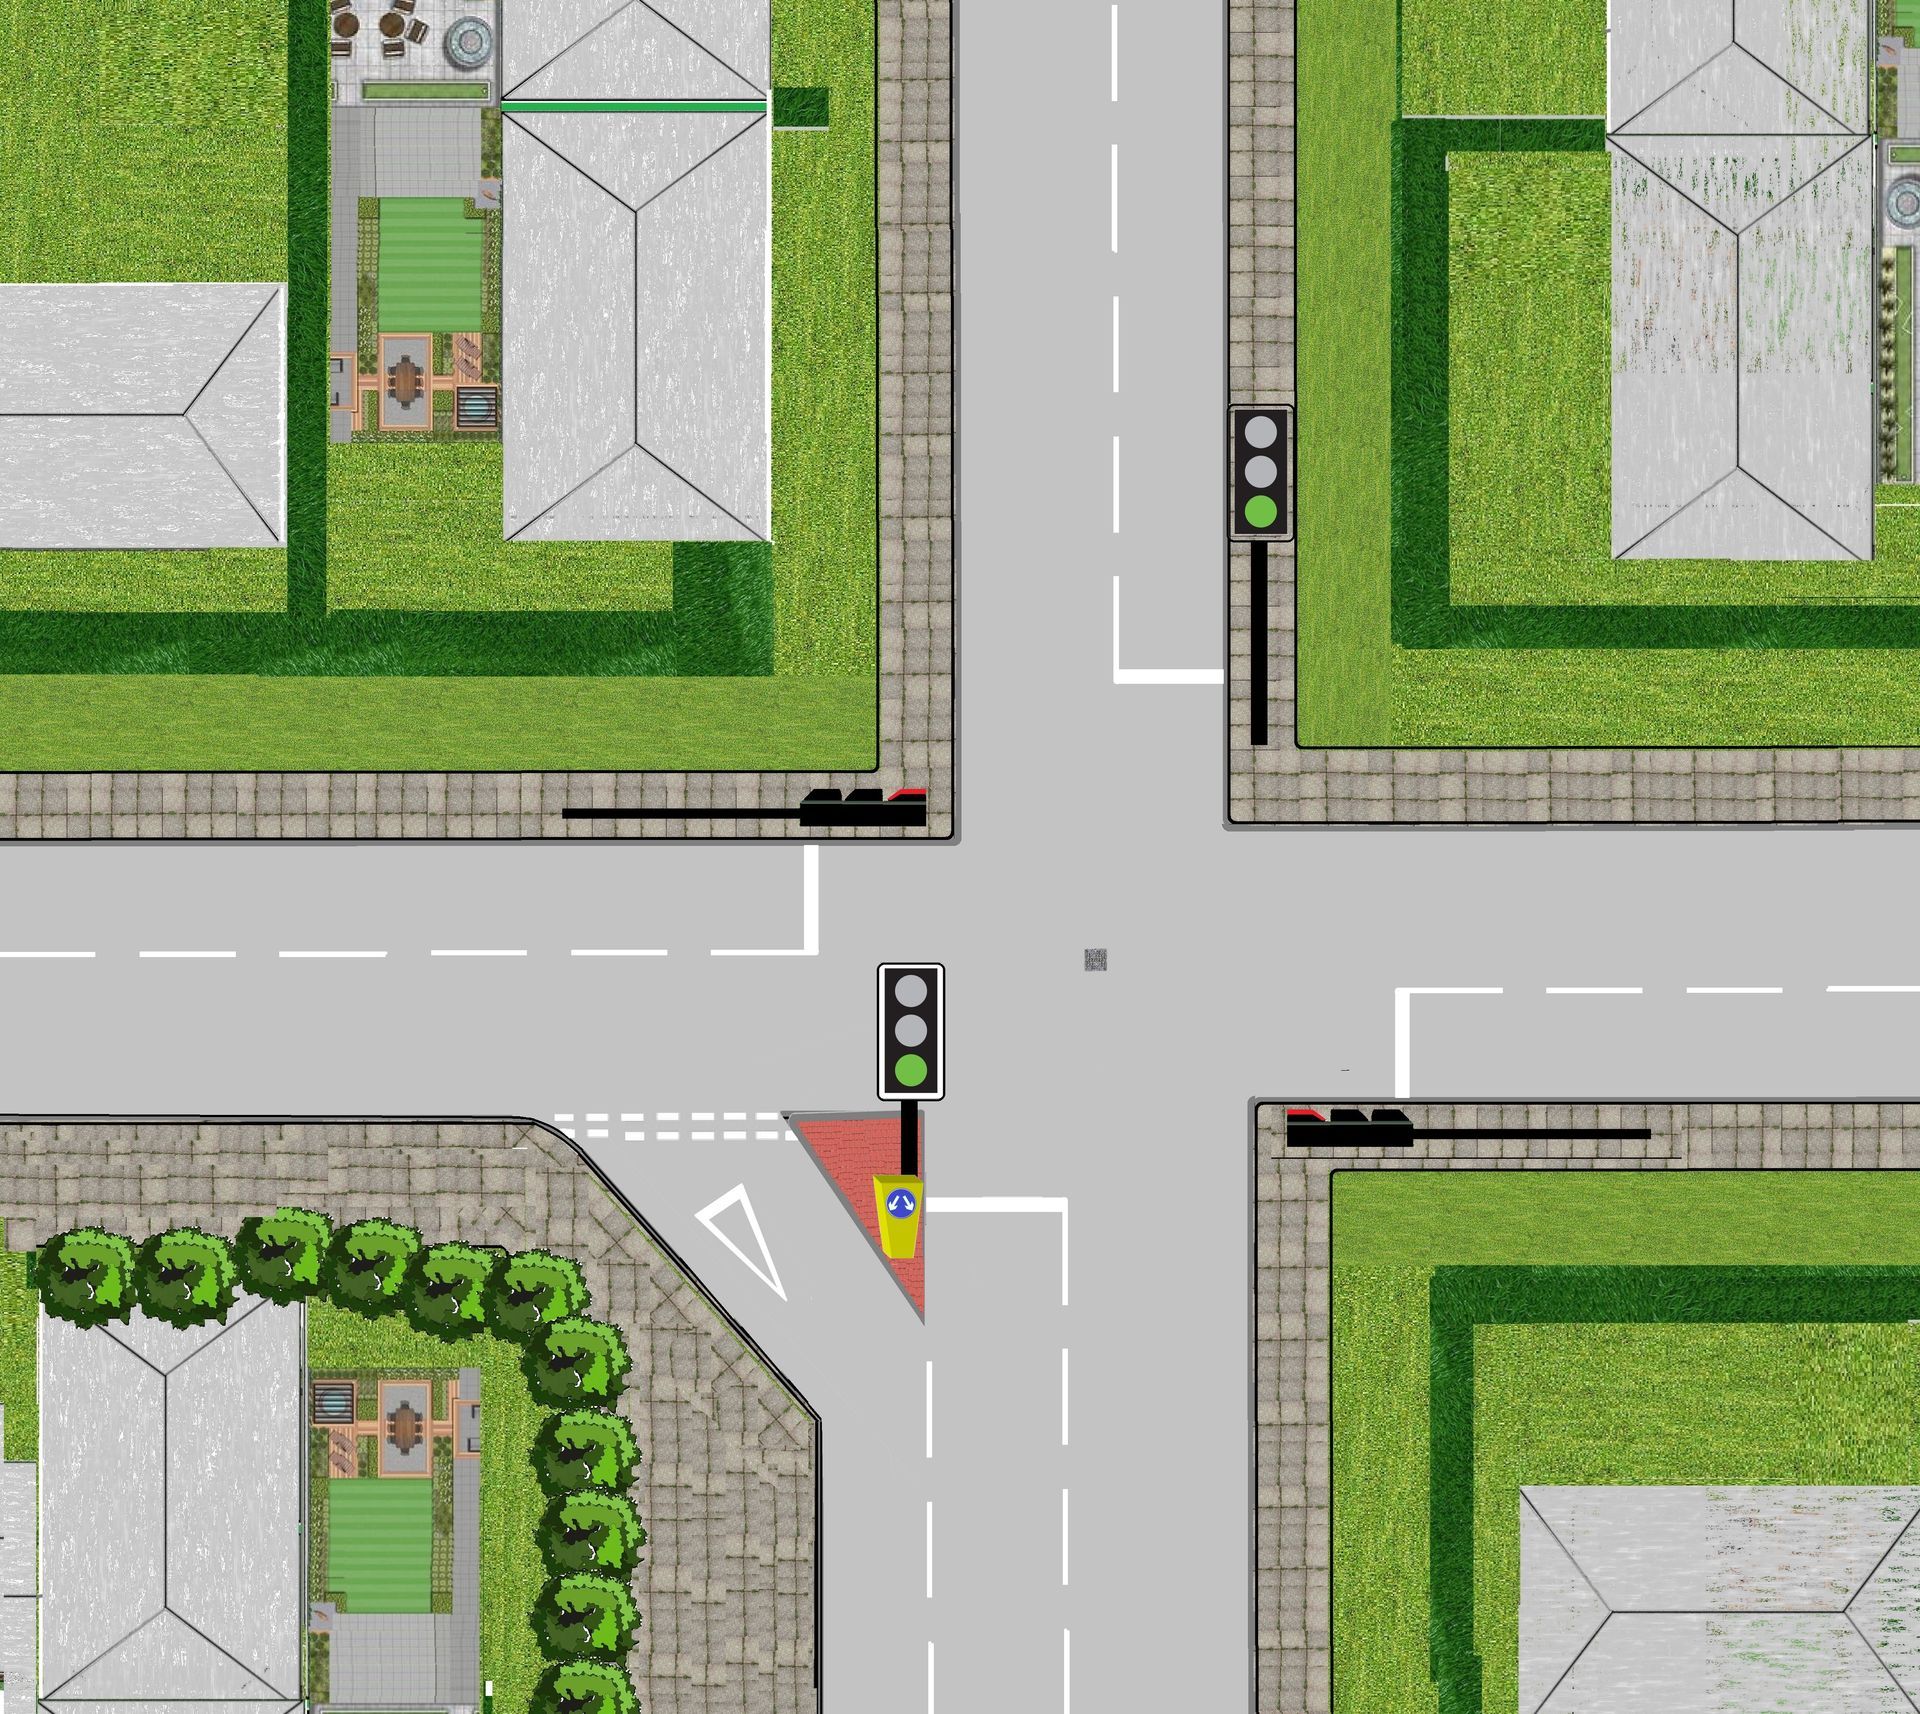
Planning
The best way to approach the Y junction is to be aware of what colour are the traffic lights, what's behind you, what's happening in front of you (L.A.D.A)
Diagram 1
In diagram 1 There is a approaching purple vehicle signalling to right the way the learner vehicle is planning to go. We have multiple vehicle's (red, pink, Gray ,salmon coloured vehicles) go straight ahead. So we have a mechanical shield or a blocker to our immediate right, plan to go with your speed and gear and slow and flow as it's safe to go.
Diagram 2
In
diagram 2
the purple vehicle now has no vehicles travelling towards them so it is safe for the purple vehicle to cross. In this situation we would have to give-way to it and continue once safe to do so.
Diagram 1
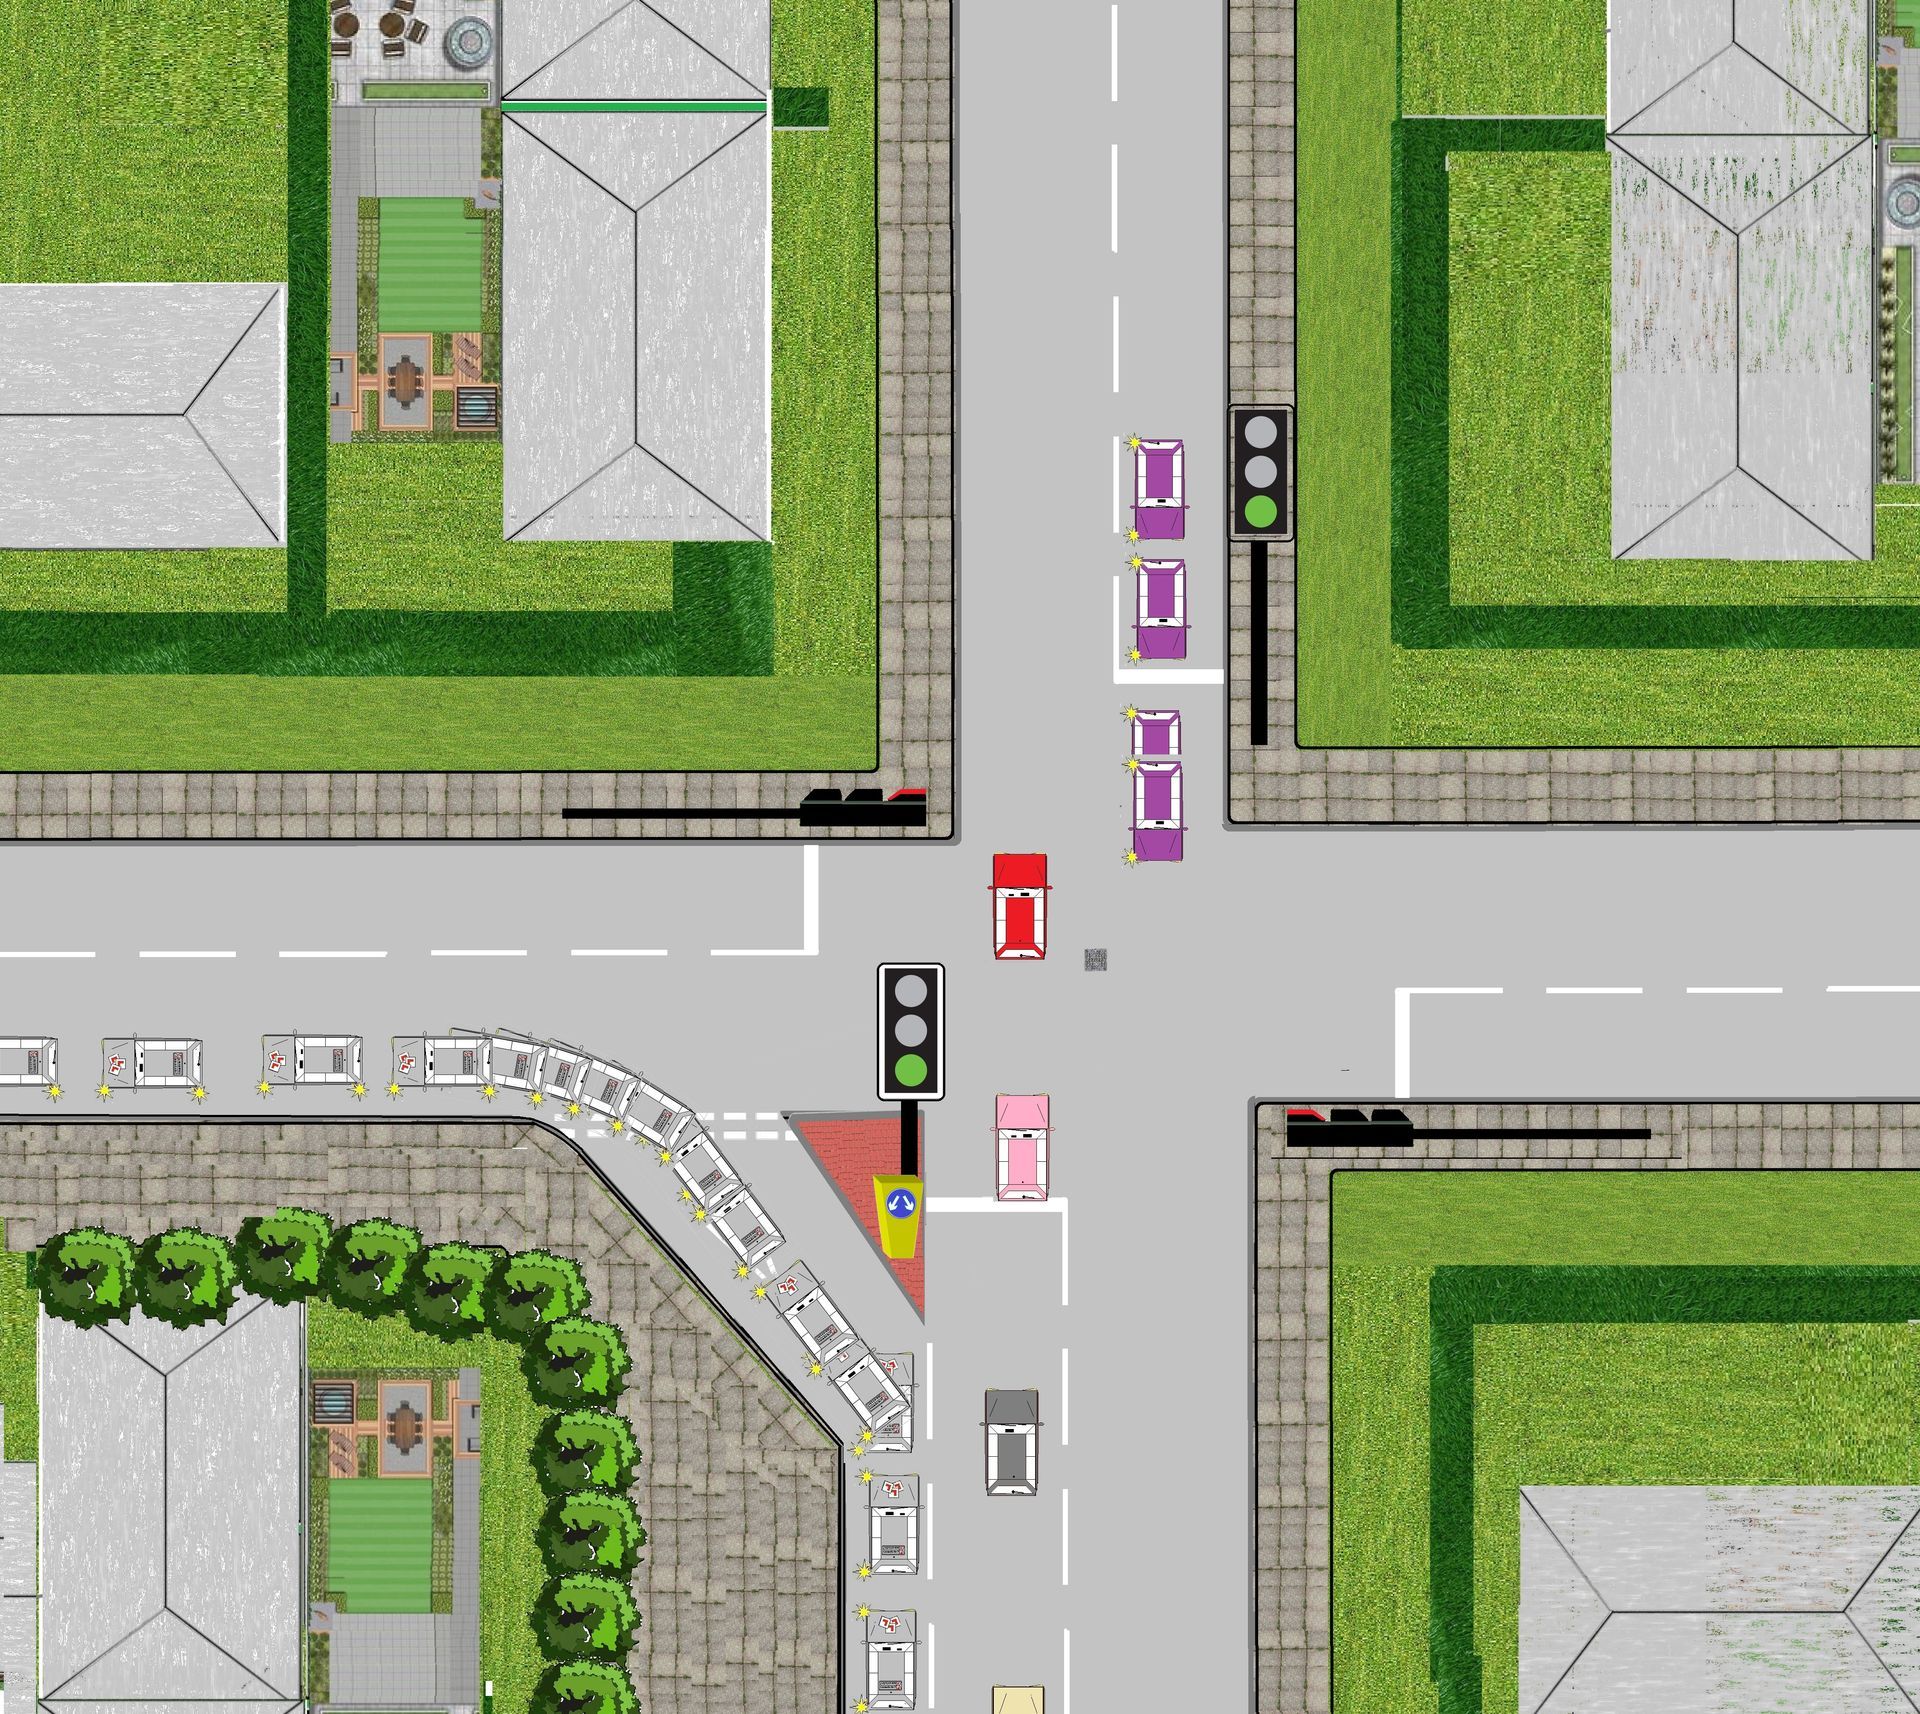
Diagram 2

Giving-way to the immediate right when you traffic light is on RED
Other issue happen when entering Y junctions, sicario (1) The driver entering the Y junction does not give-way to the main road on their immediate right (as the main road has a green traffic light), causing a potential danger.(2) Another driver error is that drivers stop at the give-way line when the traffic light on our side are on a red light. This is a planning fault, if there is no solid white line before the give-way line it is your responsibility to slow and flow when the immediate right is clear.

Complex Y junctions
Once you are confident on residential Y junctions your instructor will challenge you on more complexed Y junction on faster roads. Knowing certain road signs and road marking are key for this lesson and development
Road works quiz
- Hover on picture to pause next clip
- Hover on button to see answer

Road works quiz
- Hover on picture to pause next clip
- Hover on button to see answer
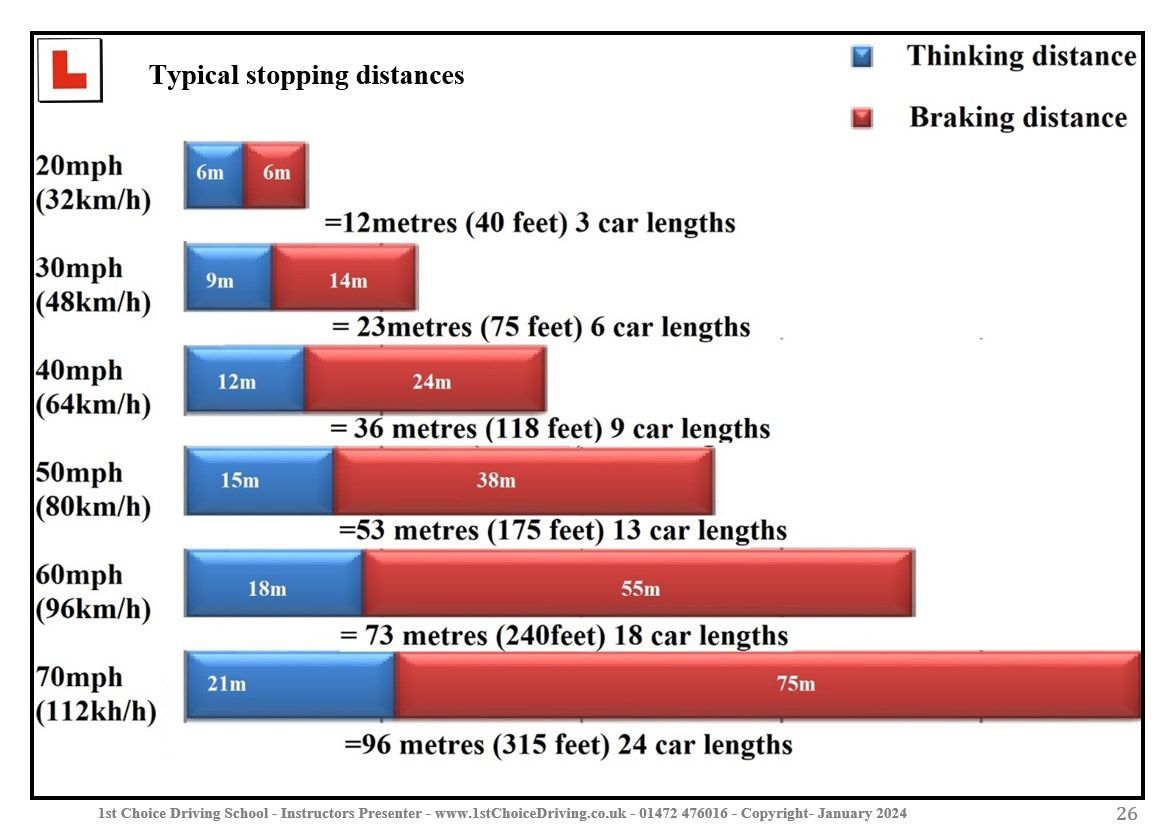
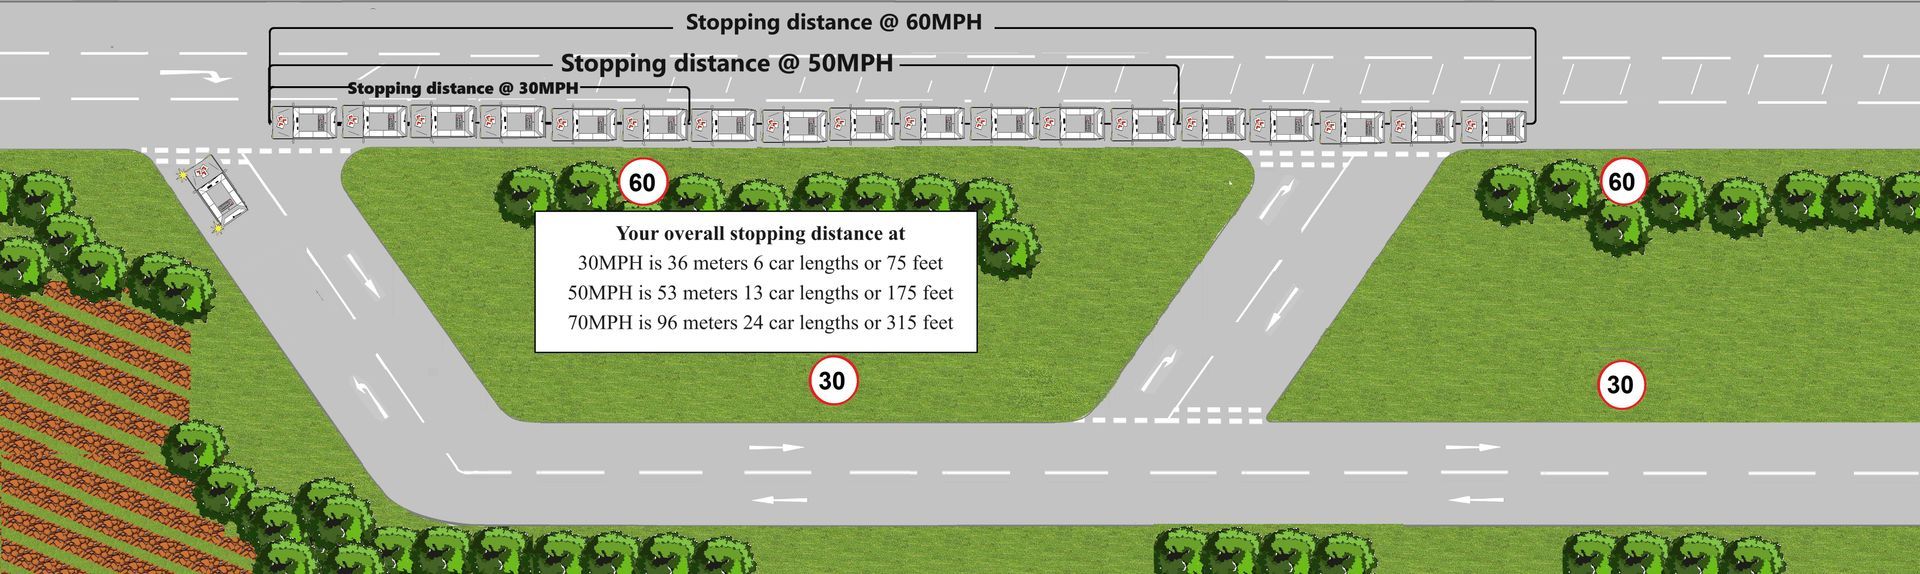
National speed stopping distance
Stopping distance at 60MPH is 73M, 240F or 18 car lengths, you will need to tripe the stopping distance to emerge safely.
Below there are three diagrams each one shows the overall stopping distance at 60MPH (national speed limit).
Crossing into the side road
The oncoming vehicles overall stopping distance on a 60MPH road is 18 car lengths. The gap will need to greater that 18 car lengths

Emerging gap turning left
The vehicles on the right is the overall stopping distance on a 60MPH road is 18 car lengths. The oncoming vehicle on your immediate right will need to be (double) triple this distance to emerge safely.
Emerging gap turning right
The vehicles on the right is the overall stopping distance on a 60MPH road is 18 car lengths. The oncoming vehicle on your immediate left will need to be (double) triple this distance to emerge safely.
The oncoming vehicle on your immediate left will need to be the vehicles stopping distance (18 car lengths).
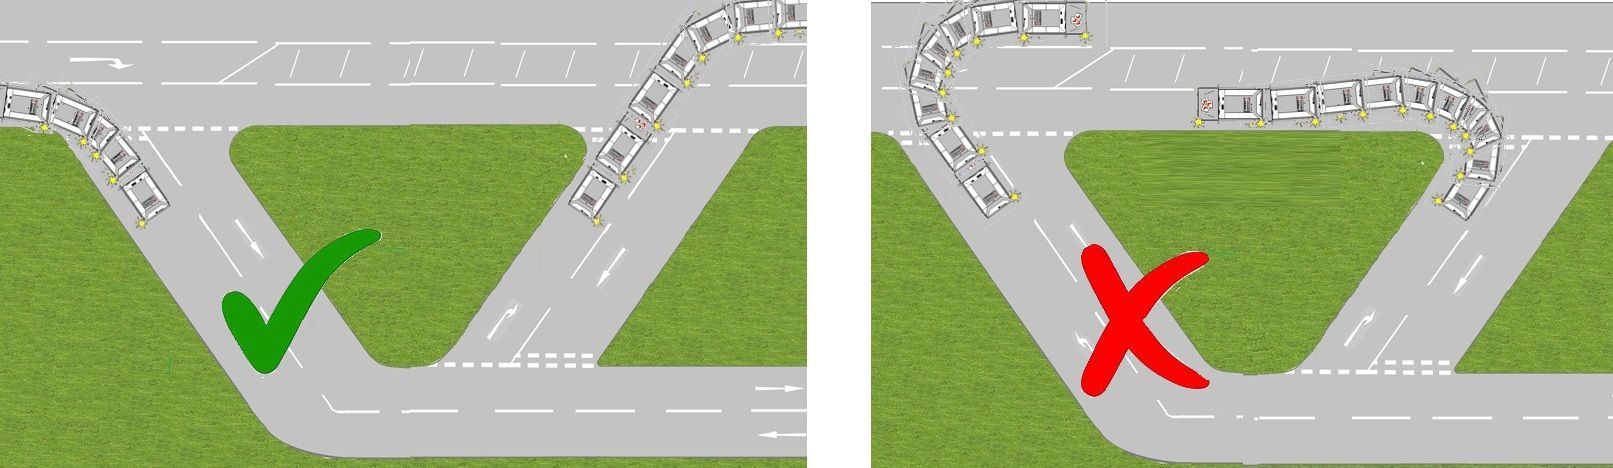
Correct road position
The correct road position is necessary due to the shape of the junction for you to emerge out safely. You can see if you emerge correctly your position as you emerge is safer and you will need your normal safety gap, however if you do attempt to emerge wrong you will need a bigger emerging gap on both sides of the road.
Technical information emerging into a safe gap
Emerging left
When your emerging left onto a main road the gap you need is roughly
- 12(+) car lengths minimum from the right at 30MPH.
- 26(+) car lengths minimum from the right at 50MPH.
- 36(+) car lengths minimum from the right at 30MPH.
Ensure you look both ways though as a pedestrians could be walking across the road you intend to emerge into or a car could be overtaking a parked or slower moving vehicle and could be over the centre hatched white line.
Emerging right
When your emerging right onto a main road the gaps you will need alters dramatically, you will need bigger gaps the faster the roads you are emerging onto, you need to work out a safe gap from both side, lets start from the right hand side of you:-
- 30MPh stopping distance is 6 car lengths, 36M or 75 feet
- 50MPG stopping distance is 13 car lengths, 53M or 175feet
- 60MPH stopping distance is 18 car lengths, 240 feet
On the left hand side you need to double the above numbers to emerge safely into a safe and timely gap
- 30MPh stopping distance is 12 car lengths, 72M or 150 feet
- 50MPG stopping distance is 26 car lengths, 106M or 350 feet
- 60MPH stopping distance is 36 car lengths, 146M or 480 feet
In the above and below pictures will hopefully give you a better picture of the types of safe gaps you will need to emerge and make safe progress.
Timing of gaps will increase depending on some students as they may not be as confident as others.

Emerging using the L.A.D.A & M.S.P.S.G routine's

- Use your interior mirror and side mirror (the direction you are turning)
- Give signals in good time, ensuring it’s necessary and correctly timed.
- A signal helps (warns) other road users/cyclists and pedestrians of your intention.
- Be careful not to give a misleading signals.
- When turning left be just over a drain width from the curb
- When turning right be close to the centre line as safe
- Determine the best position/course to negotiate stationary hazards
- Think before you change your position, be careful not to mislead others
- Adjust your speed so that you can negotiate the (open/closed) junction
- Slow down to 10/12 mph (open junction) or even slower if it’s a sharper corner or if you need to stop you will need 1st gear
- A closed junction you will need to slow down to (6/8MPH) and you will need 1st gear the same as above you may need to stop and look for a bigger gap
- If it is too Busy to carry on simply just stop until your 100% that its safe
- Select the gear to match your speed and the power you need (2nd gear/walking pace) if open (1st gear/crawling pace) closed
- Make sure that the gear is selected before the hazard is negotiated
- At the start of the routine make sure you have Looked into your rear view mirror to ensure you know what is behind you
- Look to see if you have any hazards ahead of the junction
- Look to see where the junction is
- Look to see if it is an open or closed junction
- Look into the new road and give way to oncoming vehicles
- Look into the road you are entering to scan for pedestrians, parked cars or vehicles coming towards you
- Agree learning goals and needs of todays lesson
- Agree appropriate lesson structure (full, partially or independent level of instruction)
- Practice in a suitable training area
- Directional instructions will be given in ADI format (Alert, direction and identify manor) given to the pupil clear and given in good time
- Agree if the students made a minor, serious or dangerous error on your lesson it will be broken down using F.I.S.H (fault, implications, solution & help) this method of feedback helps pupils understand what fault is being made and how to strategies on how correct the faults.