Town driving
- Full talk through
- Prompt
- Independent
- Negotiating bus and cycle lanes
- Contra flow lanes
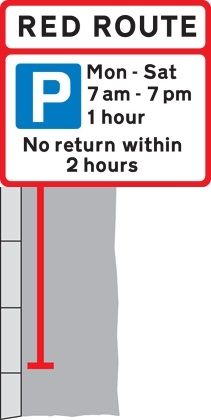
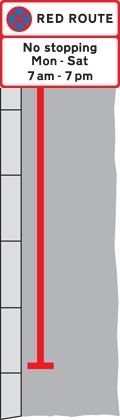
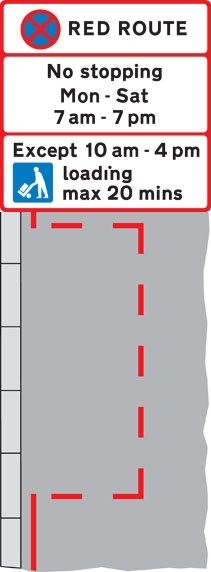
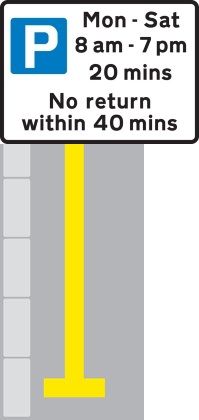
- Various parking restrictions area's
- Not blocking side roads and junctions (within 10 M to the junction)
- Meeting traffic
- Higher volume of pedestrian's
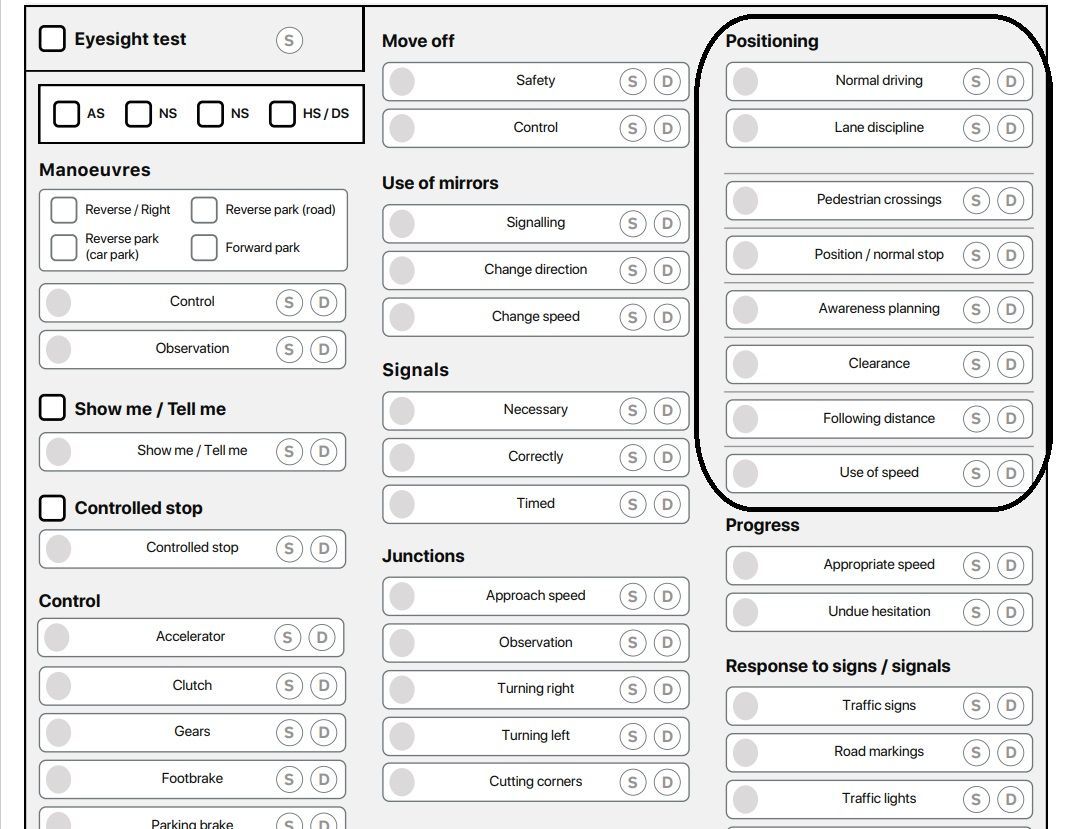
You were marked on: Positioning
- Normal driving - your position of the car when driving such as not driving too close to the pavement or lines
- Lane discipline - your ability to maintain your position within the lane
You needed to show you can keep your car correctly positioned on the road, staying within the correct lane, without driving too close to the lines.
Examples of faults
Some of the most common faults for this area include:
- Driving too close to the pavement, putting pedestrians at risk
- Driving too close to the centre of the road, putting other road users at risk
- Driving for too long in the right hand lane of a dual carriageway, for no reason
- Straddling lanes causing issues for other road users
Your examiner may have explained the specific details of any faults you made.
How you can improve in this area
If you made faults in this area during your test, or if you want to improve in this area, you should:
- Check rules 135 and 137 of the Highway Code
- Read pages 158 to 161 of ‘The Official DVSA Guide to Driving: the Essential Skills’ (2022 edition)
If you need to rebook the test, spend time practising this skill with your driving instructor or supervising driver. You could work on:
- Identifying lane markings on the road
- Changing lanes using mirrors - signal - manoeuvre (MSM)
Traffic queues and use of signals
In town and city centres you will often find traffic queuing, always try to get into your designated lane as early as possible. Queues of traffic can make it difficult to get into the correct lane so forward planning is a must.
Use of signal
There may be times when you might need to signal to change lanes and rely upon the courtesy of another driver to allow you to cross over in front of them, so in this instance the signal becomes a request to move rather than a signal that you intend to immediately change lanes. However you must continue to allow traffic to flow in your current lane so be prepared to abandon your manoeuvre if no one lets you in. Yes you are allowed to go the wrong direction on your driving test.
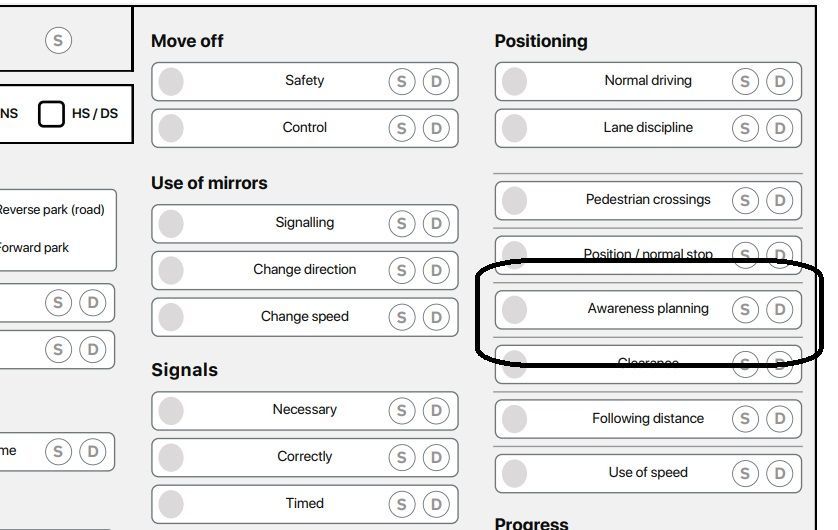
Awareness and planning
You need to anticipate and plan with a developing hazard and show your reaction to the situation rather than wait until it actually happens. As your not an experienced driver your examiner is not requiring you to do this well, however they do expect you to anticipate, plan and react hazards that occur.
The examiner checks that you
1. Take every opportunity to look, assess, decide and act with potential hazards and react in a safe manor
2. Identify vulnerable road users (mobility scooter/pedestrians and react to allow them adequate space as you pass them
3. Demonstrate good use the MSM routine on approach to any potential hazards from behind, beside and also well ahead and off you
4. Adjust your speed or position or both and react and act upon any potential hazards
5. Slow down and stop when it becomes necessary to avoid dangers
Driving faults recorded
- Not anticipating and giving way to pedestrians are about to cross the road, junctions or crossings
- Not being aware of cyclists, e scooter or even a e bike was approaching on the left/right or even about to make a change of direction
- Not reacting in time to others rod users:-
- Indicators
- Hazard warning lights
- Reversing lights.
- Brake lights on other vehicles.
- Other drivers changing speed or direction.
Observations
As you can see all round observations, awareness and planning are critical when in slow moving queues of traffic, you have to particularly watch for pedestrians walking out into the road in front of you. You will have cyclists transitioning from path to road and coming up either side of your vehicle.
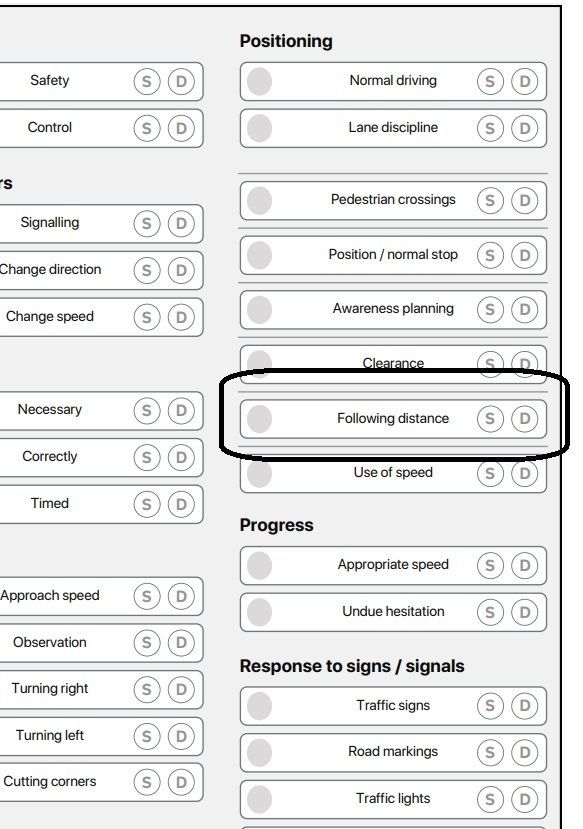
Holding back (clearance)
You have already been briefed on the hold back position from a parked vehicle, a minimum of 2 vehicles from a parked vehicle. Just incorporate that knowledge into this brief.
Two second rule
When driving always maintain a two second safety gap with the vehicle in front.


Adequate clearance
When passing stationary vehicles or other obstructions it is important that you keep a certain distance away.
What the examiner is looking for:-
The examiner is checking that you do not get too close to the vehicle in front of you. When overtaking a stationary vehicle or object as you need to give at least a metre clearance at 30MPH and less pace if your closer to the hazard.
Clearance/obstructions driving faults recorded
- Drives too close to the rear of stationary vehicles before pulling out.
- Drives too close to the side of stationary vehicles while driving past.
- Cuts back to the left too soon after passing stationary vehicles.
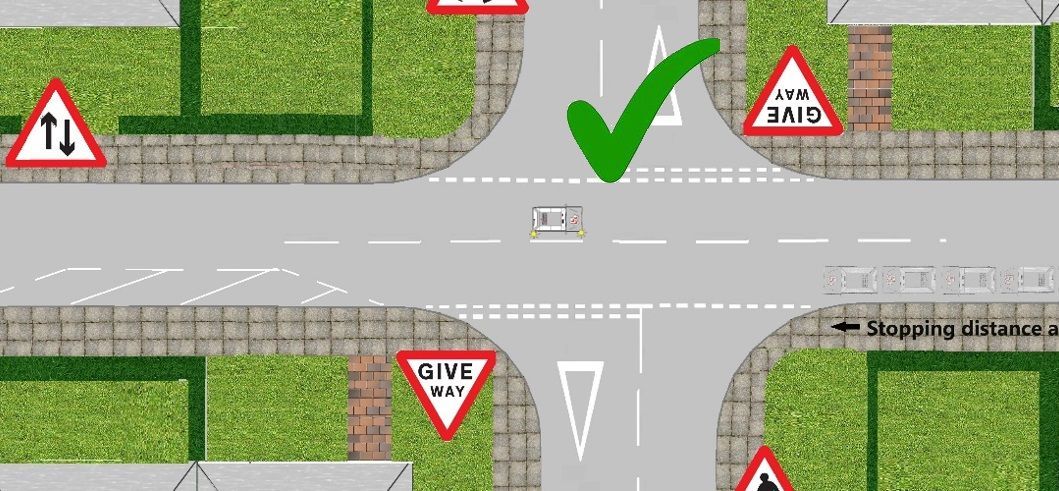
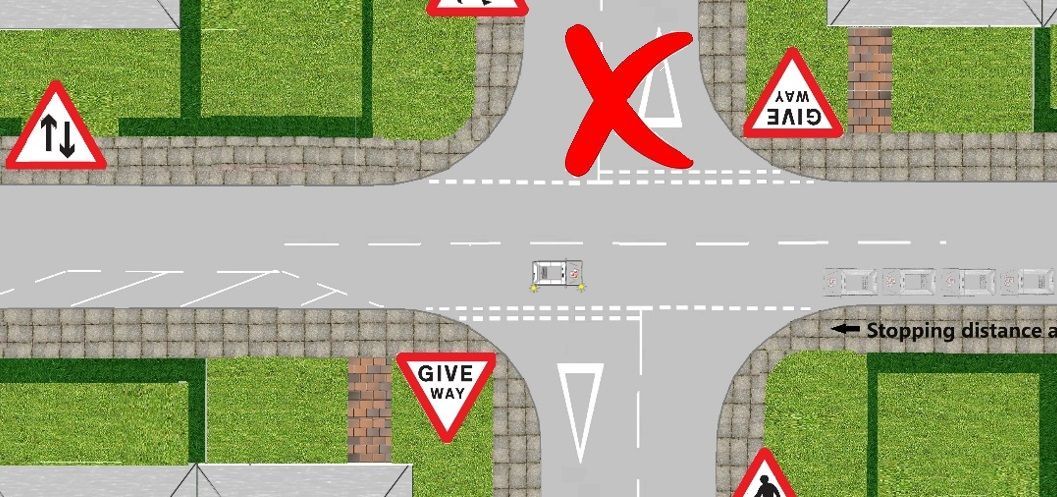
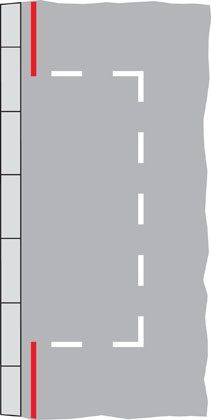
Awareness and planning - keeping junctions clear
In queues of traffic you will need to keep out of junctions to ensure you keep the exits clear for vehicle coming in and out of the side junction.
Awareness/planning/following distance
Before passing the junction when in queues of traffic wait until the vehicle in front of you is roughly 3 to 4 lines past the junction in front of you.
Keeping junctions clear
Look at the diagram below the
purple
vehicle is just at the 1st white give-way line past the junction. There is road paint saying KEEP CLEAR, your objective is not to block the T junction or cross road and allow the side roads to make progress.
Your instructor will explain always stop the opposite side of the junction in busy traffic even if their is no road paint NEVER STOP IN A JUNCTION AREA. A simple way to know you are not in the keep clear area is ensure you
stop
where you can visually see the
KEEP
writing out of your front wind screen (more of the keep clear writing you see the more your out of the junction area).
Tyres and tarmac
When in stationary traffic ensure you keep tyres and tarmac from the vehicle in front of you.
Keeping this gap is for safety and safety alone. This is risk management, work on the hypothesis..
The vehicle behind you doesn't react to the que of traffic you are in and runs into the back of you. Because you are too close to the vehicle in front of you, the vehicle collides into your vehicle and then your vehicle hits the vehicle in front off you
The consequence here is because you did not keep a safe gap with the vehicle in front this was a bad management.
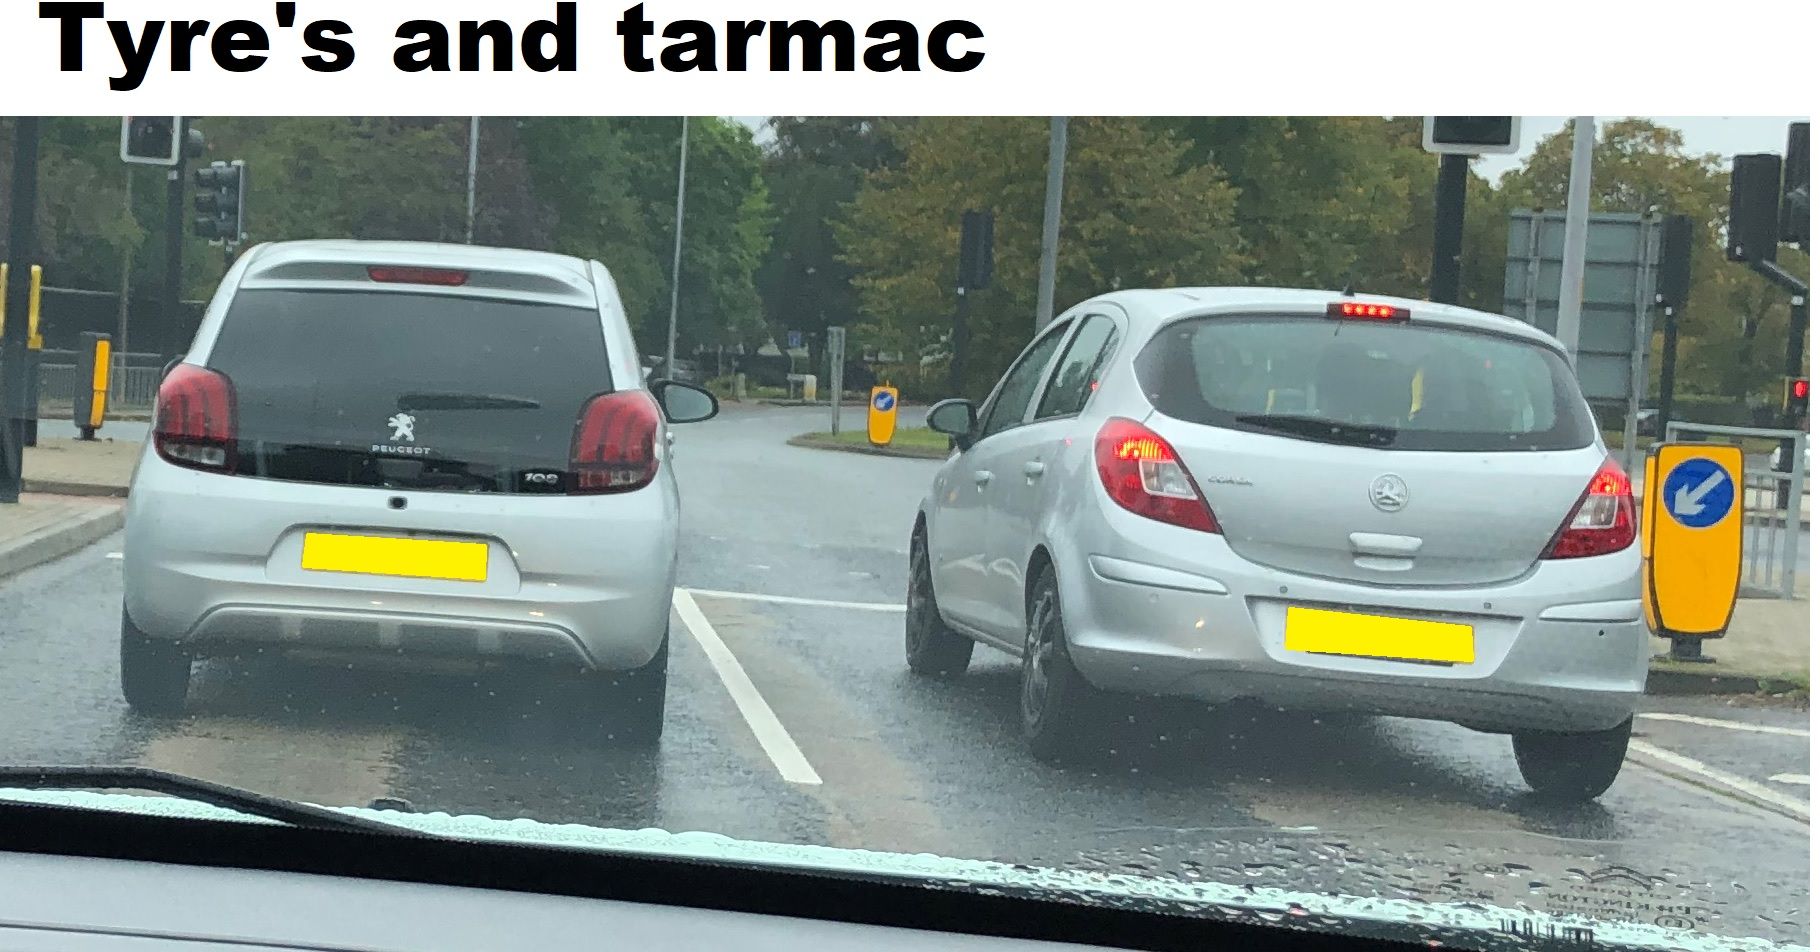
Potential safety critical of the incident
The law states if you hit the vehicle in front of you, your vehicle insurance will the have to pay for the damage.
Secondly think of the physical dangers involved in this incident, think about the risk of every situation.
Angle starts
Below the eyesight section on the DL25 their is 4 boxes saying AS/NS/NS and HS/DS.
AS = angle starts
NS = normal start
HS = hill start
DS = descending start
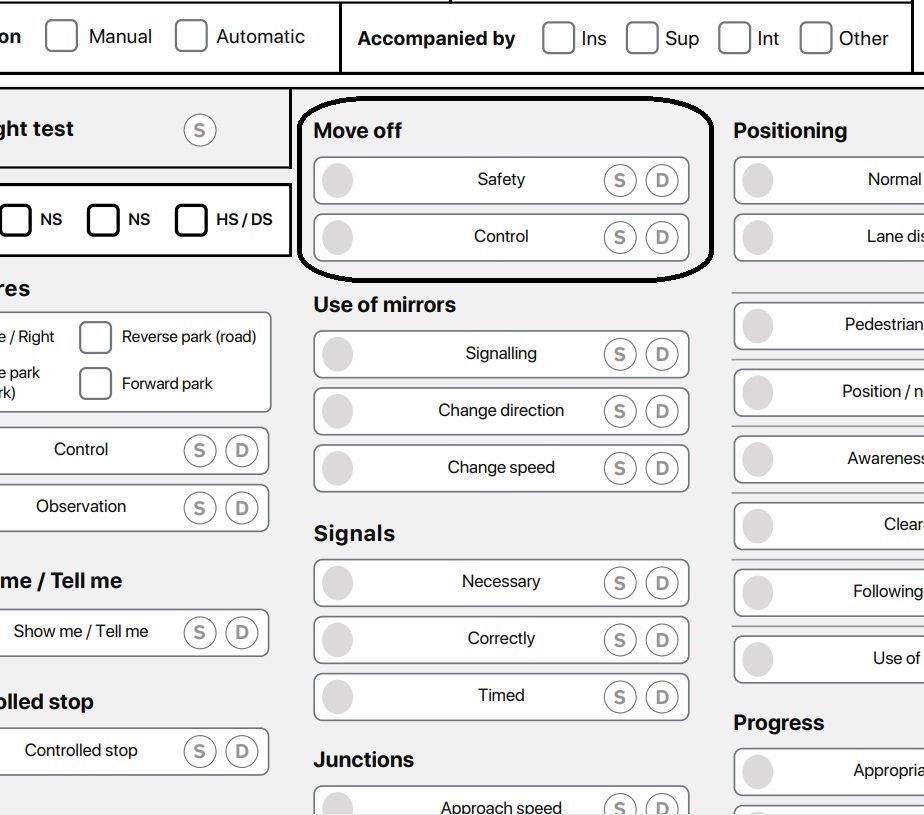
Each of these will be asses on the moving off section
- Safely
- Control

You were marked on: Moving off
- control - your ability to control the car
- safety - your ability to perform this action safely
You needed to show you could move off safely and under control throughout your test. This included:
- from the side of the road
- on a slope or hill (gradient)
- from behind a parked vehicle, so you have to move off at an angle
- at junctions
You should have used your mirrors and checked blind spots to observe your surroundings, and signalled when necessary. Your control of the car should have prevented it from rolling backwards or stalling.
Examples of faults
Some of the most common faults for this area include:
- trying to move off without appropriate control and rolling back
- not properly checking your blind spots
- moving off into the path of an oncoming vehicle
- repeatedly stalling when moving off throughout your test
Your examiner may have explained the specific details of any faults you made.
How you can improve in this area
If you made faults in this area during your test, or if you want to improve in this area, you should:
- read pages 91 to 93 of ‘The Official DVSA Guide to Driving: the Essential Skills’ (2022 edition)
If you need to rebook the test, spend time practising and improving this skill with your driving instructor or supervising driver. You could work on:
- finding the biting point when using the clutch, to prevent stalling
- using the mirrors - signal - manoeuvre (MSM) routine
Hill starts (up and down hill is on the below brief) and normal start is when you are asked to pulling up on the left (somewhere safe legal and convenient).
Angle starts
An angle start is an exercise you will get on your driving (practical) test, have you been asked to do one yet on your driving lesson?
Your driving instructor/examiner instruction will say.............. Please pull up on the left about two to three car lengths from the (blue) vehicle on the left, ensure you check your:-
● Mirrors interior and left door mirror
● Signal left
● Position towards the kerb (drain width)
● Speed (WALKING then CRAWLING PACE)
● Gear (keep in the gear you are in second or third)
- Stop a drain with from the kerb
- Apply your handbrake and gear stick into neutral

Make your vehicle safe
Once you have pulled up on the left somewhere safe, legal and convenient and roughly 2/3 vehicles from the parked (blue) vehicle and make your vehicle safe (handbrake and neutral).
Once you are asked to drive on when your ready
P.O.M
Prepare the car to move:-
- Put the clutch down and select first gear.
- Find the biting point.
Observations (Mirrors/Signal)
- The 6 point check (mirror and shoulder check).
- Always check the path side first with your observations.
- Firstly look in the interior mirror then the left (nearside) door mirror, and then look over your left shoulder.
- Next check the interior mirror again, then the right (offside) door mirror and then look over your right shoulder (your offside blind-spot).
- If it is safe to proceed (Consider your Signal to the right).

Manoeuvre (Moving away)
- When it is safe to move off release the handbrake
- Make an extra right mirror and right blind spot check as you start to move (See-saw your feet)

One way systems
One way systems in town and city centres have helped to improve the flow of traffic.
Roads that at one time may have clearly been designed to have traffic flowing in both directions may now only allow traffic to flow in one direction.
So the key is to look out for signs, road marking on the approach to the road you intend to turn into as you don't want to turn left or right into a road that is now a one way street.
When entering new roads look for new signs and mirrors.
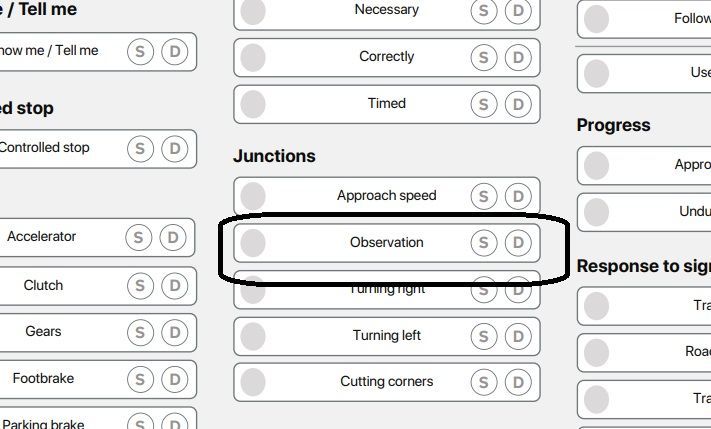
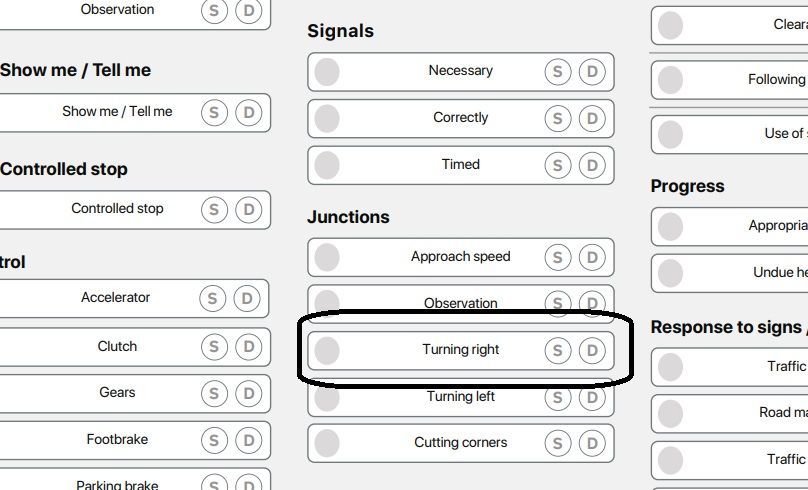
You were marked on: Positioning
- approach speed - your ability to approach junctions at an appropriate speed
- observation - your effective observation and judgement of your surroundings
- turning right - your position when turning right
- turning left - your position when turning left
- cutting corners - your ability to avoid cutting corners when turning
You needed to show you can drive through junctions safely. You should have observed your surroundings, made your intentions clear, followed road signs and signals, and properly controlled the car.
Examples of faults
Some of the most common faults for this area include:
- incorrectly judging the speed of an oncoming vehicle, forcing it to slow down when emerging from a junction
- not checking for other road users when emerging from a slip road, onto a dual carriageway
- being positioned too far to the left when turning right onto a minor road, holding up vehicles behind you
- approaching a junction too fast, making it difficult to make observations
Your examiner may have explained the specific details of any faults you made.
How you can improve in this area
If you made faults in this area during your test, or if you want to improve in this area, you should:
- check rules 170 to 190 of The Highway Code
- read section 8 of ‘The Official DVSA Guide to Driving: the Essential Skills’ (2022 edition)
If you need to rebook the test, spend time practising and improving this skill with your driving instructor or supervising driver. You could work on:
- using the mirrors - signal - manoeuvre (MSM) routine
- using the position - speed - look (PSL) routine to improve your manoeuvres
- approaching and emerging at a variety of different junctions
Correct lane
When exiting a one way street ensure you are on the correct road position for the direction you are driving. When there are two lanes on the one way street you are on ensure you have the correct position for you direction you are exiting.
- Be on the left hand side when turning left
- Be on the right hand side when turning right
One your driving test (positioning)
On your driving test and being in the wrong lane position
on a one way street would unfortunately fail your driving test as you as you are not paying attention to road markings, signs and potentially could hold traffic up.

Being in the left hand lane and turning right could be dangerous to other road users that are in the right hand lane already waiting to turn right.
You could be holding the traffic up behind you in the left hand lane wanting to turn left when you are waiting for a gap to turn right.
Using the right hand lane
The right hand lanes on a one way system are not specifically for overtaking, so you may pass on either side, also traffic can equally merge from the right as well as from the left.
Specific road markings on a one way street
When entering and exiting a one way street the road marking are slightly different giving you the information you are NOT on a two way road but on a ONE WAY road.
Entering the junction
Look for the single white dotted line all the way across the mouth of the junction, this is the observations you need to take as your entering the junction.
Exiting the junction
At the end of the road look for the double white dotted line that will be all the way across the mouth of the junction (and the directional arrows on the floor), this is the observations you need to take as you approaching the junction.

Complex one way streets
One you have completed simple one way street you will be challenged with one way streets going into a to way junction.
Correct road position
Your objective will to read the road marking signs to ensure you are safe when turning right at the crossroads.
One way street turning left and right into a cross roads
Another common fault is for drivers to turn right from a one way street in to a two wat street but adopt the wrong road positioning before turning right.
Remember when on a one way street and you are intending to turn left be on the left hand side of the road.
When turning right and intent to turn right ensure you stay on the right hand side of the road.
Wrong lane position
Not staying in the right hand position when turning right is deemed as dangerous due to moving over then centre line or to the left hand lane. Always stay to the right hand side when turning right and stay to the left hand side when turning left when on a one way street.
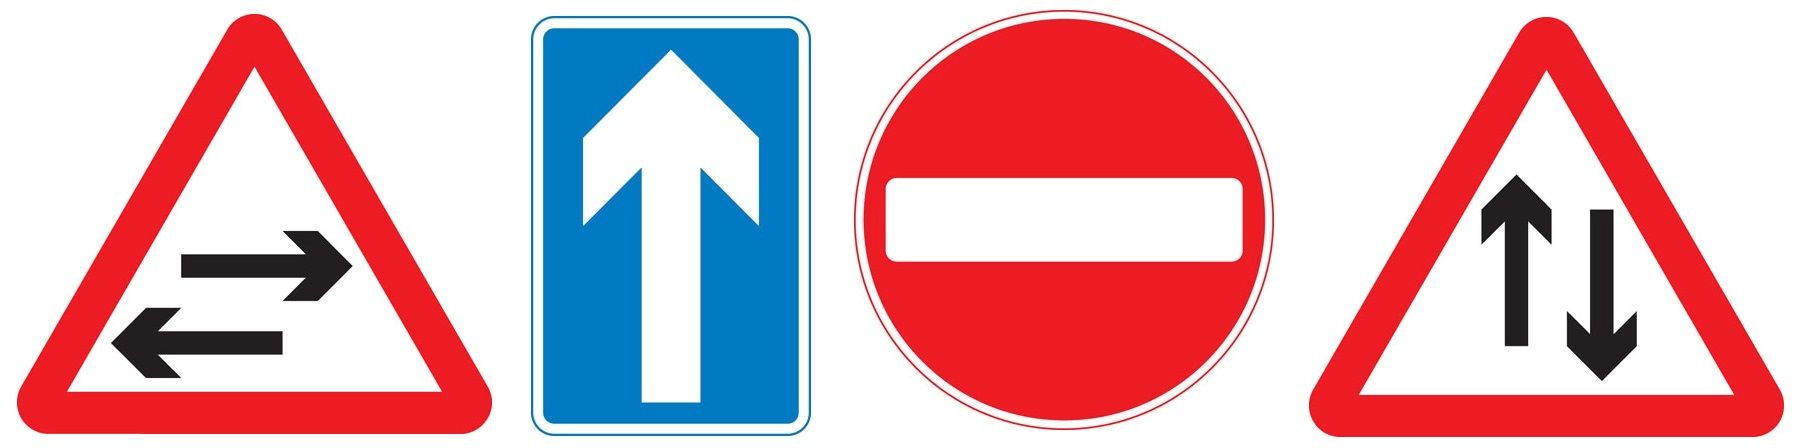
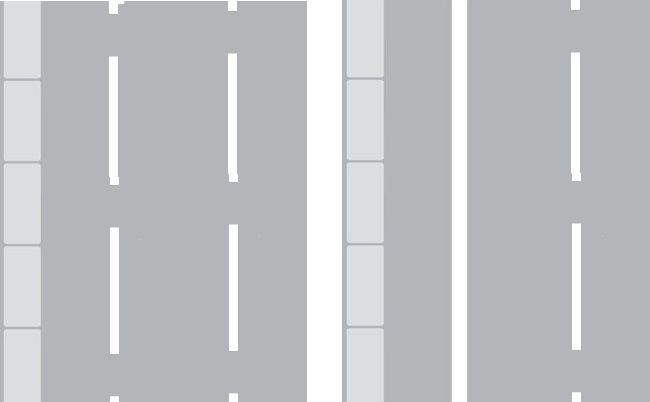
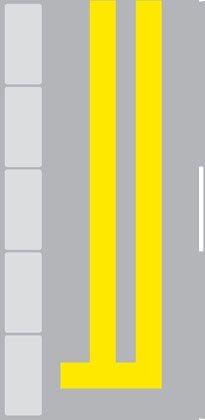
Cycle Lanes
White cycle lanes are marked by white line markings along the carriageway. You’ll find two types of cycle lanes:
- Solid White Line: You MUST NOT drive or park in a cycle lane marked by a solid white line during its times of operation.
- Broken White Line: You MUST NOT drive or park in a cycle lane marked by a broken white line unless it is unavoidable. However, you can use it for cycling.
Planning with cyclists and cycle lanes
When driving keep one eye on the cyclist that is in a cycle lane or on the pavement as the cyclist could transition from path to road in a split second.
Highway code for cyclists
The highway code tells cyclists to check behind before pulling/moving Out. If you need to pull out of a cycle lane, make sure it is safe to do so. Always signal your intention clearly to motorists and other road users.
Your job an a driver is to constantly look and assess for and potential risks and manage these risk in a safe and controlled manor.
Contraflow system
Now lets put one way streets and cycle lanes together but travelling in different directions.
A contraflow system is an arrangement where traffic flows in the opposite direction to its normal flow. While it was initially associated with temporary traffic arrangements on motorways, it has evolved to include permanent fixtures for buses and cyclists in busier areas.
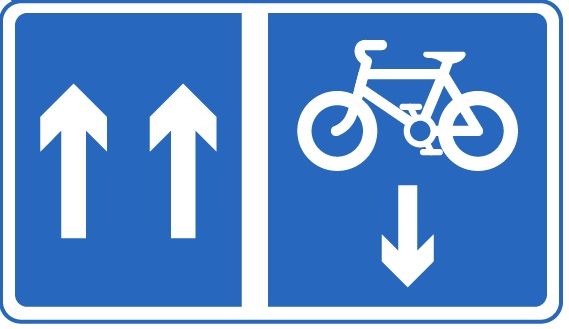
A contraflow lane allows traffic to move in the opposite direction of the surrounding lanes. These lanes are often used for bicycles or bus rapid transit on what are otherwise one-way streets.
Contraflow Cycle Lanes
- Contraflow cycle lanes are specifically designed for cyclists to ride in the opposite direction of motor vehicle traffic. They convert one way streets into two way streets, allowing bikes to travel in both directions while motor vehicles continue in one direction
- These lanes aim to increase cyclist safety by providing a separate lane for cycling, allowing riders to avoid busy roads and tricky junctions
- Cyclists can use contraflow lanes to cycle in either direction on the road
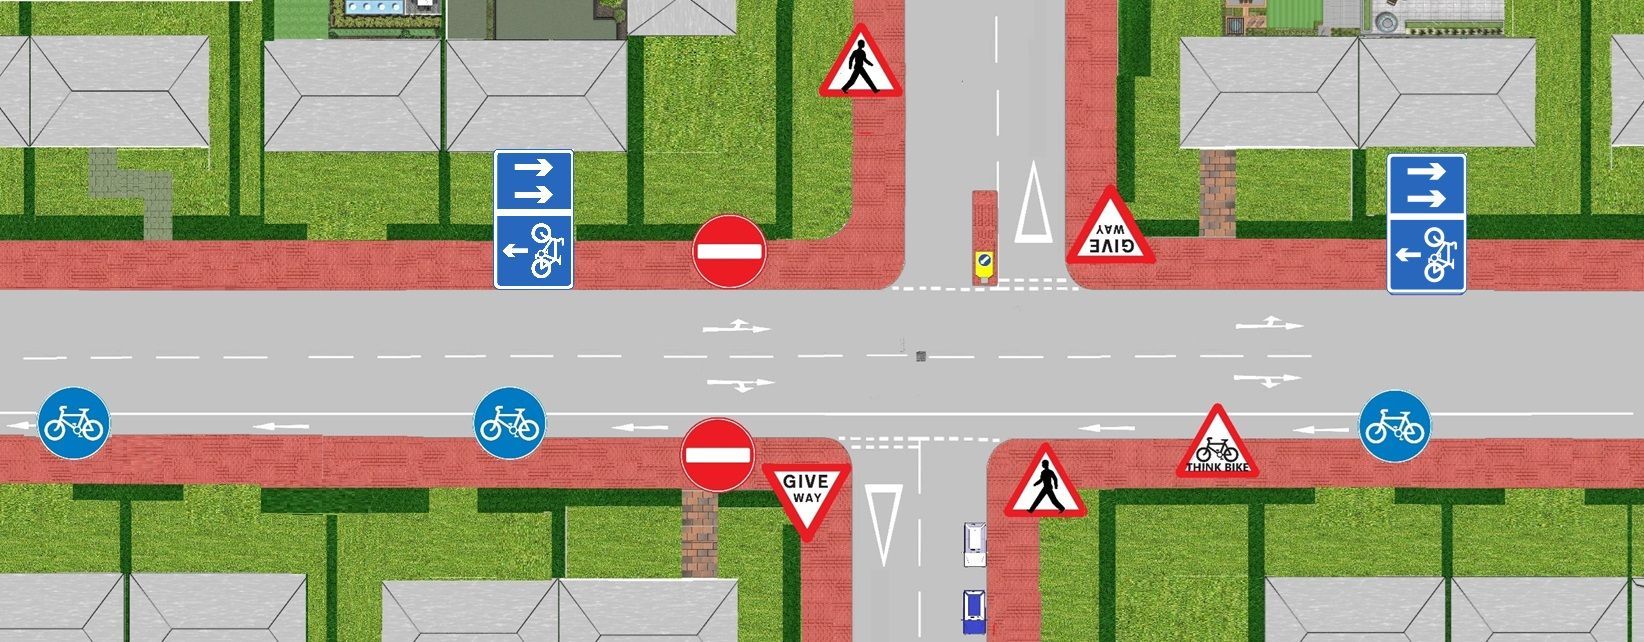
When using Contraflow Cycle Lanes
When encountering a contraflow cycle lane, cyclists should follow these guidelines:
- Utilize cycle lanes and tracks, advanced stop lines, and toucan crossings where available to make your journey safer and easier.
- Be cautious of potential hazards such as broken-down vehicles, debris, and narrower lanes.
- 20 zones: Pay attention to temporary speed limit signs and adjust your speed accordingly.
- Maintain distance: Keep a safe distance from the vehicle in front of you.
- Choose the right lane: Get into the correct lane early and stay in it throughout the contraflow.
- Hard shoulder: Be aware that the hard shoulder might be in use during a contraflow system.
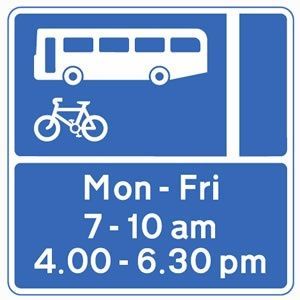
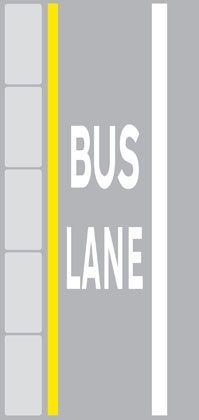
Bus/tram/cycle lanes
Bus lanes may or may not be for the exclusive use of buses (So look out for the signs when you can and cannot use them). If there are only certain times when buses have exclusive use of such lanes road signs will clearly state this.
Outside of these times normal traffic may use them.
Planning turning left over a bus/tram lane
When travelling on a main road turning left into a junction you need to work out when you are going to start the slowing down routine. As you may have a bus/tram or even a cyclist in the lane you are needing to cross over. The question is "have you time to overtake a slower moving vehicle Bus (tram or cyclist) without slowing them down.
Risk management
Think risk management here:-
Cyclist are vulnerable road users so the wrong action could be life changing for them and you. A bus/tram have all ages of pedestrian's on board, so sudden use of brakes from the Bus/tram driver could hurt passengers on board. Why? as they do not wear seatbelts.
Always strategies a safe plan if you don't know don't go. Hold back and wait for a safe negotiation.

Don't overtake just before turning left, always plan ahead check your mirrors and watch out for traffic coming up on your left before you make the turn, Plan for:-
- Cyclists
- Motorcyclists
- Buses
- Large vehicles
That may be hidden from your view.
When can and can’t you use a bus lane?
All bus lanes have blue signs signalling their times of operation, which can vary significantly from road to road. By times of operation, we mean the periods within which only buses can drive in the lanes.
The sign will usually show a time period and the days of the week when restrictions for non-buses are to be observed.
Sometimes they’ll show two sets of times (e.g. Mon-Fri 7.30 – 9.30am, 3.30 – 6.30pm).
If there are no times are shown on the sign then the lane is in operation 24 hours a day and can’t be used at any point by unauthorised vehicles.
When can you use a bus lane?
If you’re driving outside a bus lane’s operational hours, then you can use it as long as it’s safe to do so.
This will help ease traffic congestion, freeing up another lane for other vehicles.
Be aware that not using a bus lane when it’s safe to do so during your driving test could result in a marking down.
The bus lane’s blue sign will also show which other road users are permitted to use it
Who can use a bus lane?
This all depends on the lane in question. While some are reserved entirely for buses (which must have a minimum of 10 seats including the driver), individual signs will signal which other road users may drive in them.
If they display the word ‘local’ then the lane can only be used by local bus services.
The following vehicles may be allowed to use bus lanes at indicated times if they are shown on the sign:
- Licensed London Taxis (Hackney carriages)
- Motorcycles (without side cars)
- Mopeds
- Scooters
- Tricycles (non-motorised, motorised under 450kg, not with side cars)
- Bicycles
What happens if you cross in to a bus lane?
In some circumstances you may be required to cross the solid white line into the bus lane. You should only drive into the lane when you have no other choice but to move over.
These cases could include:-
- To avoid an obstruction in the road
- To move out of the path of an emergency vehicle or to avoid an accident.
If you do enter a bus lane you must make sure you leave it again as soon as is safe to do so.
You can be fined for moving out of the way of an ambulance, here’s how to avoid it
What are the penalties for using bus lanes?
Bus lanes are introduced using Traffic Regulation Orders through powers issued under the Road Traffic Regulation Act 1984 and carry penalties for misuse.
Bus lanes are increasingly monitored by CCTV cameras to record any unauthorised vehicle driving or parking within the operational area.
The recordings are also checked to determine whether the lines may have been crossed in mitigating circumstances (e.g. to make way for emergency services).
If you’re caught using a bus lane during operational hours you could be liable to pay a penalty charge notice.
A PCN will be sent to the vehicle’s registered keeper containing details of the contravention, vehicle information and photographic evidence.
The amount payable varies across the country – being much higher in the capital and its Congestion Charge zone.
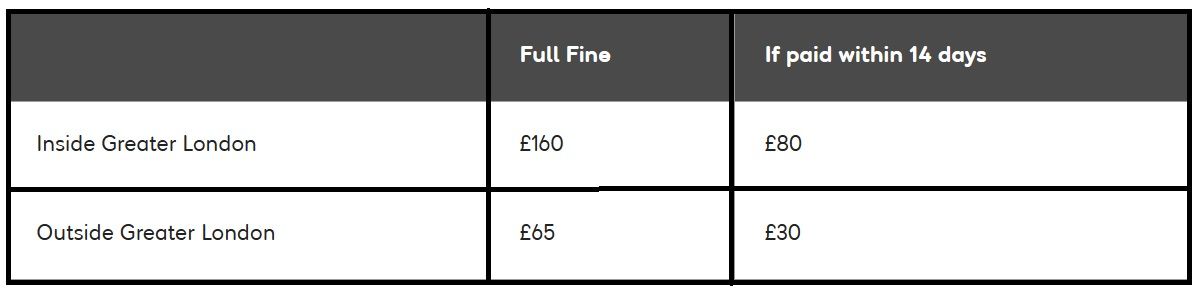
Fines for driving in bus lanes are as follows:
Client-centred-driving lesson
On your driving lessons you will be given all the relevant information on bus lane times of when you can and can not use them. By this stage of your driving lessons you should be driving independently and covering mock driving test routes. Your objective is to become as independent as soon as possible so your driving instructor will be coach you on slight errors (minor mistakes) so your driving lesson becomes a client-centred lesson and not a instructor- lead-lesson.
Read the ready to pass campaign to see what in necessary to pass your driving test.
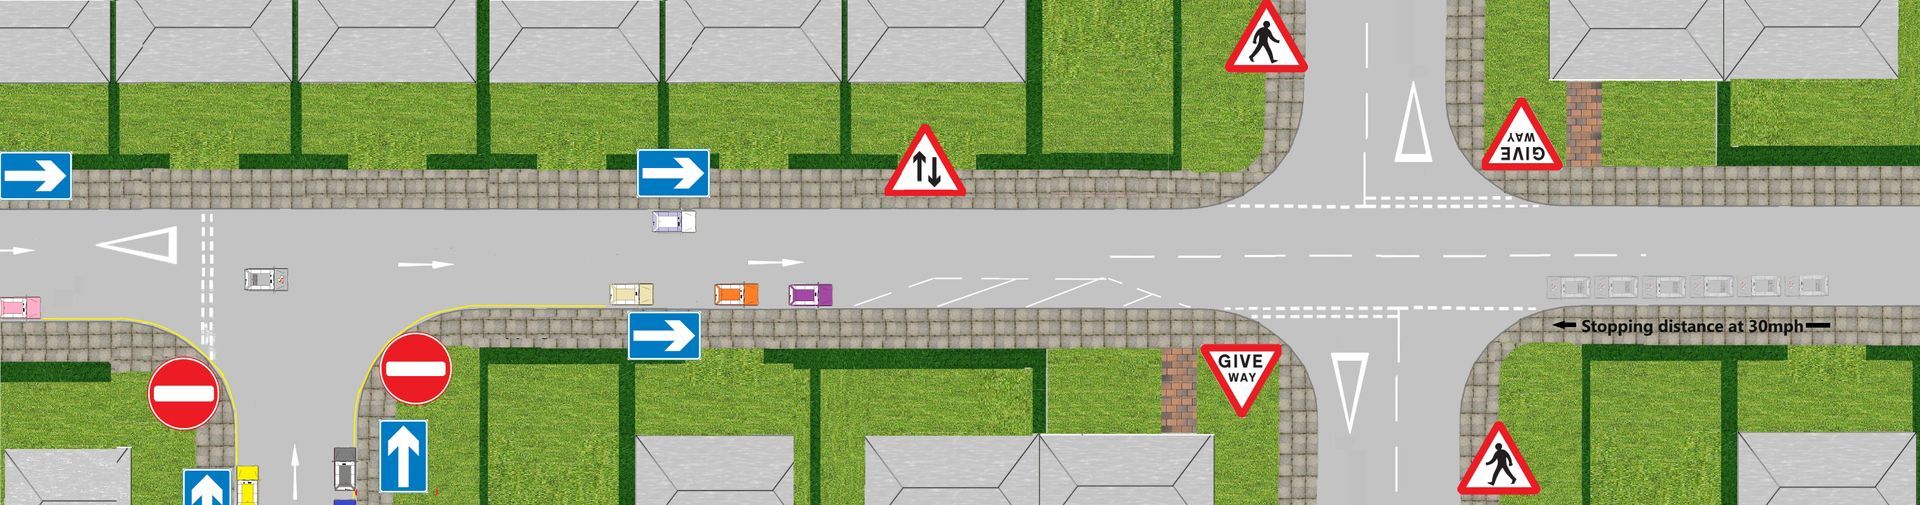
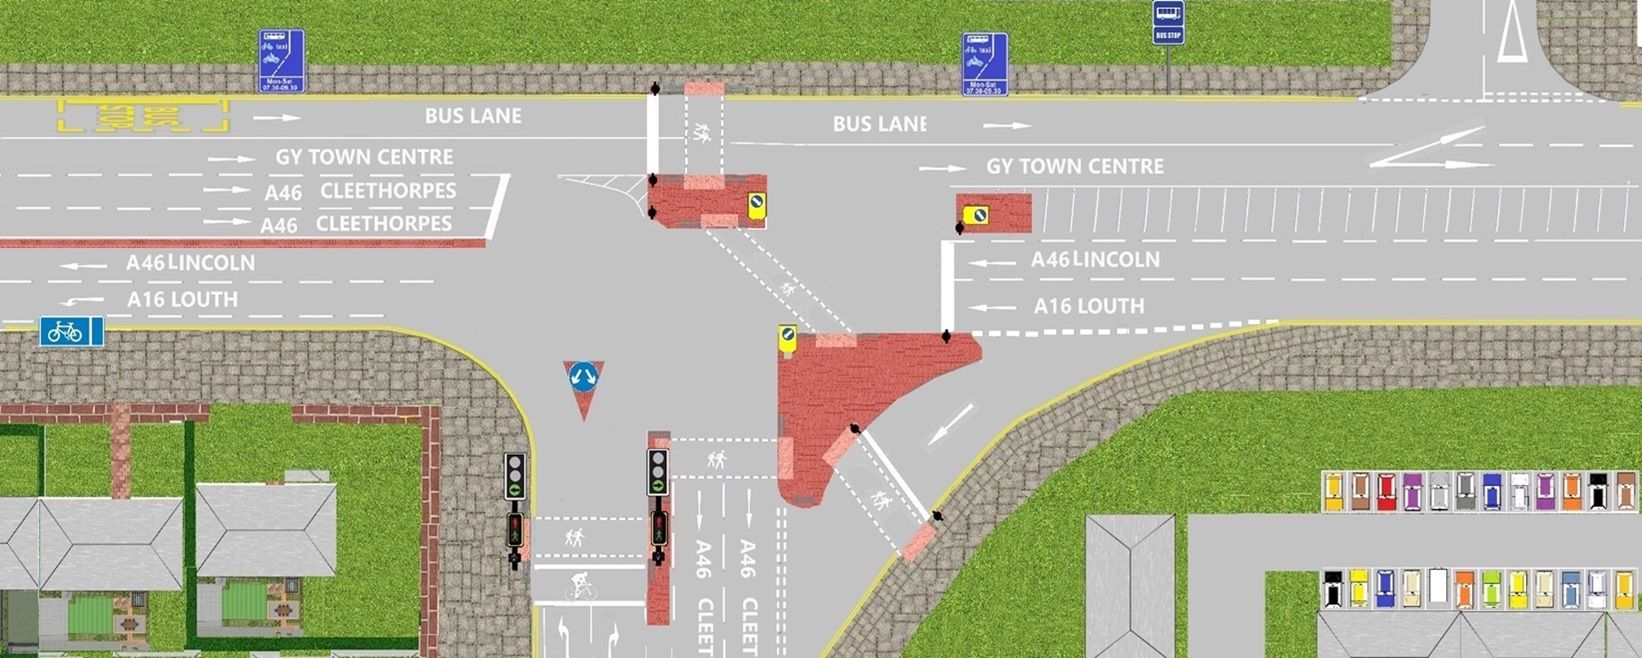
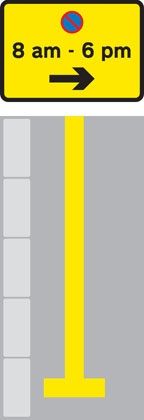
Operational times
Below is a diagram of a road with a bus lane with a operational (blue sign) time. Use this diagram to point out the bus lane area (solid white line) and when it becomes available for all other vehicles to use (not just a bus).
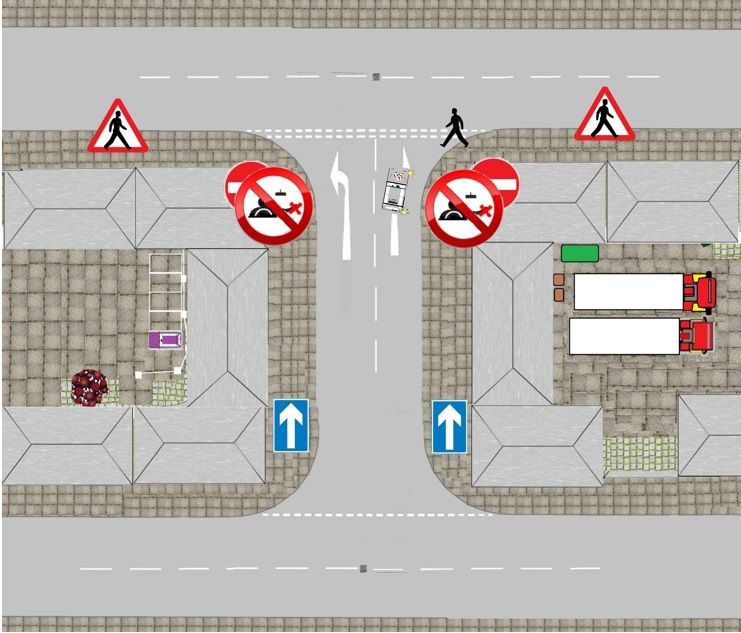
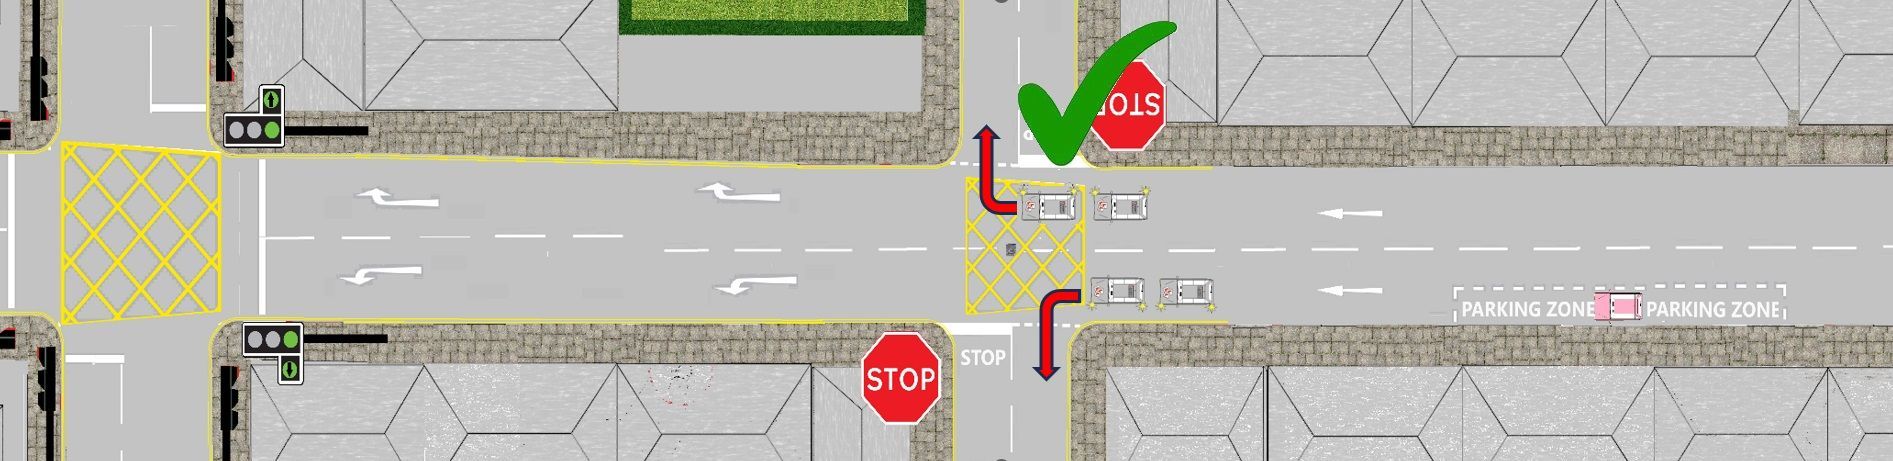
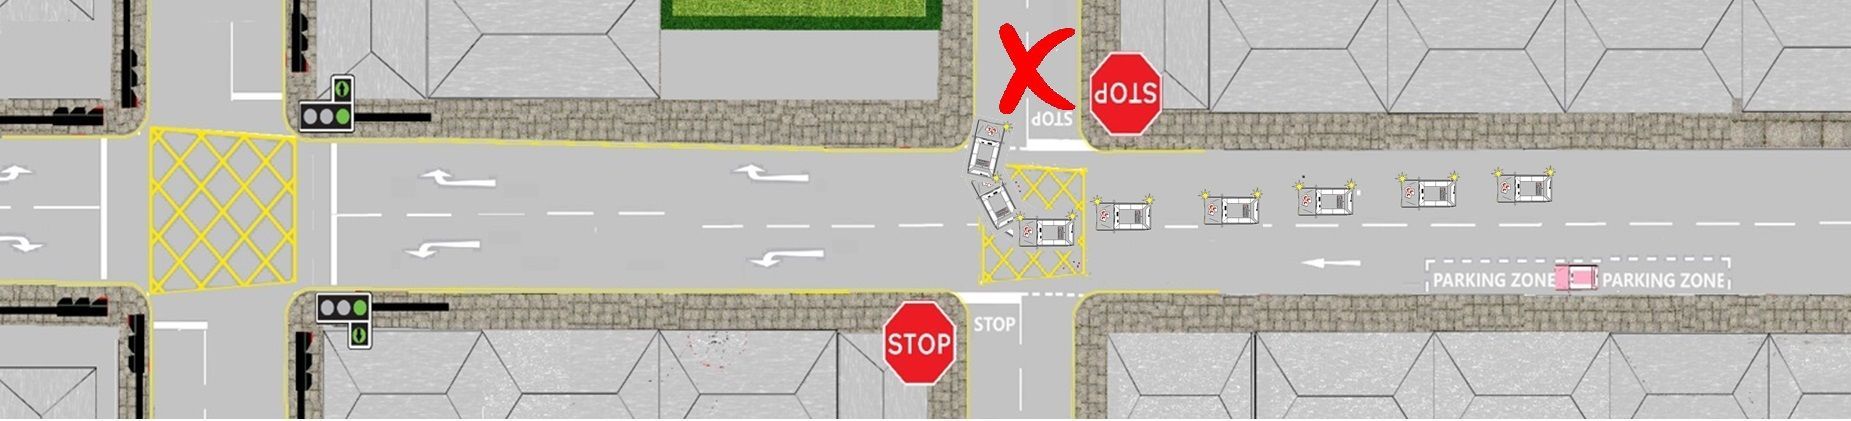
Parking up on the left somewhere safe legal and convenient
On your driving test you have to demonstrate your rules of the (highway code) road, you will be asked to pull up on the left hand side of the road a few times. This does not sound difficult but unfortunately student have failed their driving test due to where they have parked up on the left.
For example
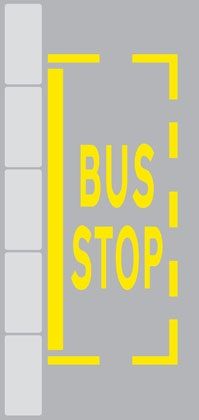
- A bus stop
- A drive way
- Yellow zig zag lines outside a school (inside operational times)
- Single yellow lines (inside operational times)
- Double yellow lines
- Near a school entrance
- Anywhere you would prevent access for Emergency Services
- At or near a bus or tram stop or taxi rank
- On the approach to a level crossing/tramway crossing
- Opposite or within 10 metres (32 feet) of a junction, except in an authorised parking space
- Near the brow of a hill or hump bridge
- Opposite a traffic island or (if this would cause an obstruction) another parked vehicle
- Where you would force other traffic to enter a tram lane
- Where the kerb has been lowered to help wheelchair users and powered mobility vehicles
- In front of an entrance to a property
- On a bend
- Where you would obstruct cyclists’ use of cycle facilities
except when forced to do so by stationary traffic
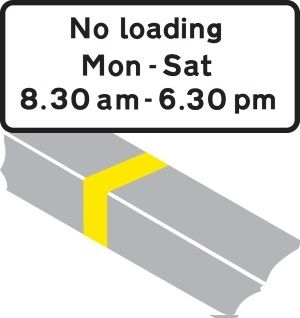
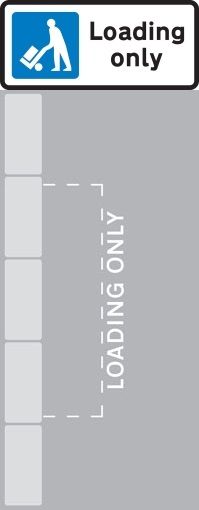
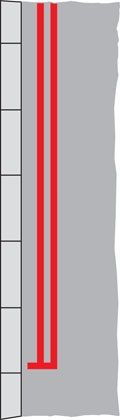
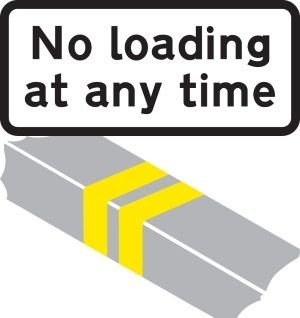
Do you know your road markings? Hover over the picture for the answer.

Teaching & Learning Strategies
Like mentioned earlier every student is induvial and each and everyone of you will progress at different rates so driving will adapt their lesson plan to help you achieve your driving goals.
- Your driving instructor will adapt their teaching style to suite your ability and ability
- Your driving instructor will continue to encourage you on your lesson and analyse any problems made and allow you to take responsibility for your own learning goals by giving you technical information to improve your techniques. Your technical feed back from your instructor will be ether given on the move or if feel needed by pulling you up on the side of the road somewhere safe, legal and convenient.
Rote learning (WikipediA)
Rote learning is a memorization technique based on repetition. The method rests on the premise that the recall of repeated material becomes faster the more one repeats it. Some of the alternatives to rote learning include meaningful learning, associative learning, spaced repetition and active learning.
At the end of your lesson
At the end of your lesson you will have a debrief with your instructor giving you the opportunity to reflect on your performance on your lesson then you can set up new goals for your next driving lesson.
This will also give you the opportunity to research any new topics that will be brought into on your next agreed lesson. So remember your instructor is there to HELP you, so on your driving lesson if you have any uncertainties or need anything rewording or recapping to make things any clearer, just ask.