Introduction
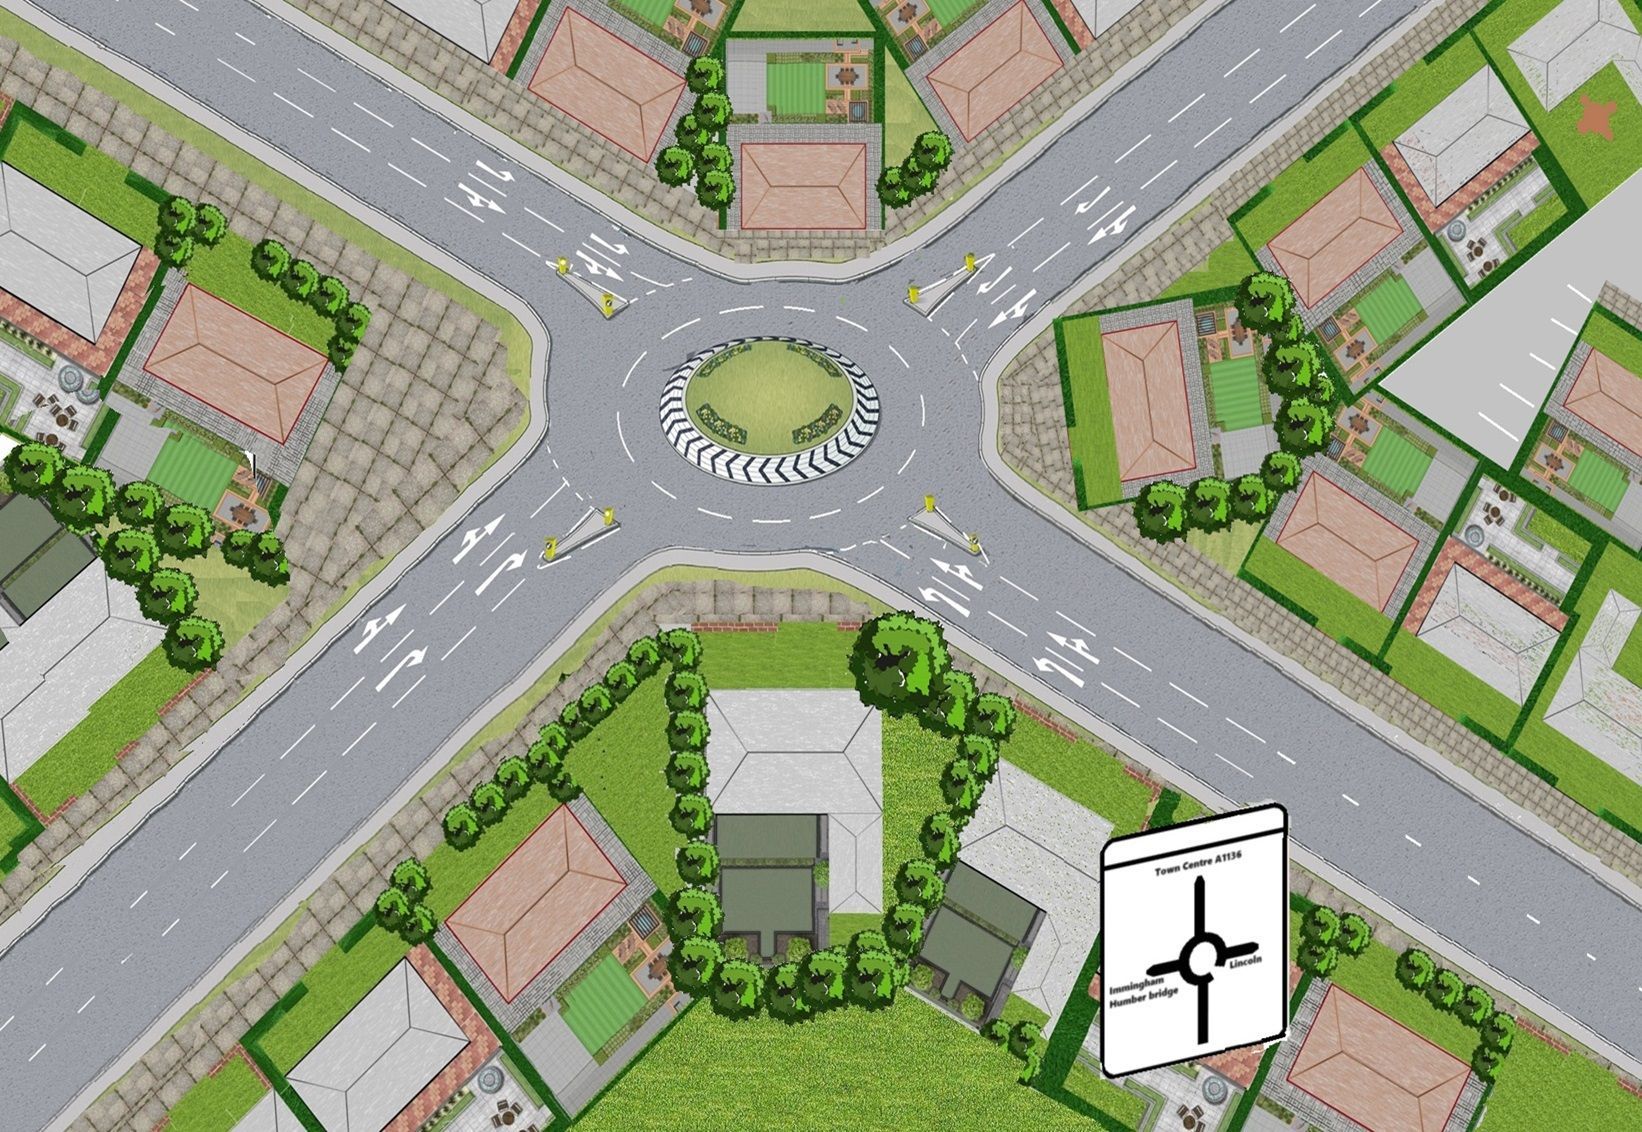
By this point of your training your (P.O.M) moving off from the side of the road and stopping on the left and right hand side of the road (smoothly), gear changes, clutch control, hill including angle starts and busier junctions should now becoming independent, this includes anticipation, awareness and planning with the road ahead, behind, including reacting to pedestrians, cyclists while driving and be improving single lane roundabouts, so it’s now time to develop your skill with multi lane roundabout and extra exits.
Agreed lesson is covering :-
On this lesson you have agreed with your instructor you will be working on multi lane roundabouts.
You will be using and incorporating the hazard and L.A.D.A routine's during this lesson, on the way to the training location you be from now assessed on your driving skills from previous briefs:-
- L.A.D.A & M.S.P.S.G routines on junctions and crossroads you approach
- Nearside to near side and offside to off side then crossing
- Two second gap. hold back position
- Meeting , overtaking, adequate clearance when overtaking stationary & slow moving vehicles
- Awareness and planning
- Traffic calming measures
- Hill/angle starts
- Busier junctions
- Approaching and negotiating single lane roundabouts
Agree level of instruction
Intervention
Agree on what part of the lesson is going to be a instructor-lead-lesson and client-centred-lesson and if it is client-lead agree if the instructor has to intervein verbally and take control of the training vehicle by ether using the dual control, verbally or take the wheel the lesson plan may need to be changed until the fault is fixed.
F.I.S.H
Fault
Implication
Solution
Help
Lesson aims and strategies
The aim of today’s lesson is for you and your instructor to disuse where the support can be reduced and which areas you have agreed to work on more independently.
Todays briefing will be using the L. A. D. A and M.S.P.S.G routine's on the approach different multi lane roundabouts and work on timing of gaps on roundabouts. These routines will be broken down to help you develop your skill to organise your lane positioning, negotiate gaps when approaching different types of single lane roundabout.
Risk responsibility objective's
You and your instructor will agree lesson plan support to ether:-
- Full talk through
- Prompt
- Independent
This is important to ensure that the instructor and student understands who has the main responsibility on the control of the training vehicle on the set lesson plan.
Your level of instruction will be given by your instructor to a level to suit you from full talk through then reducing your support to either prompt or independent.
Awareness and planning
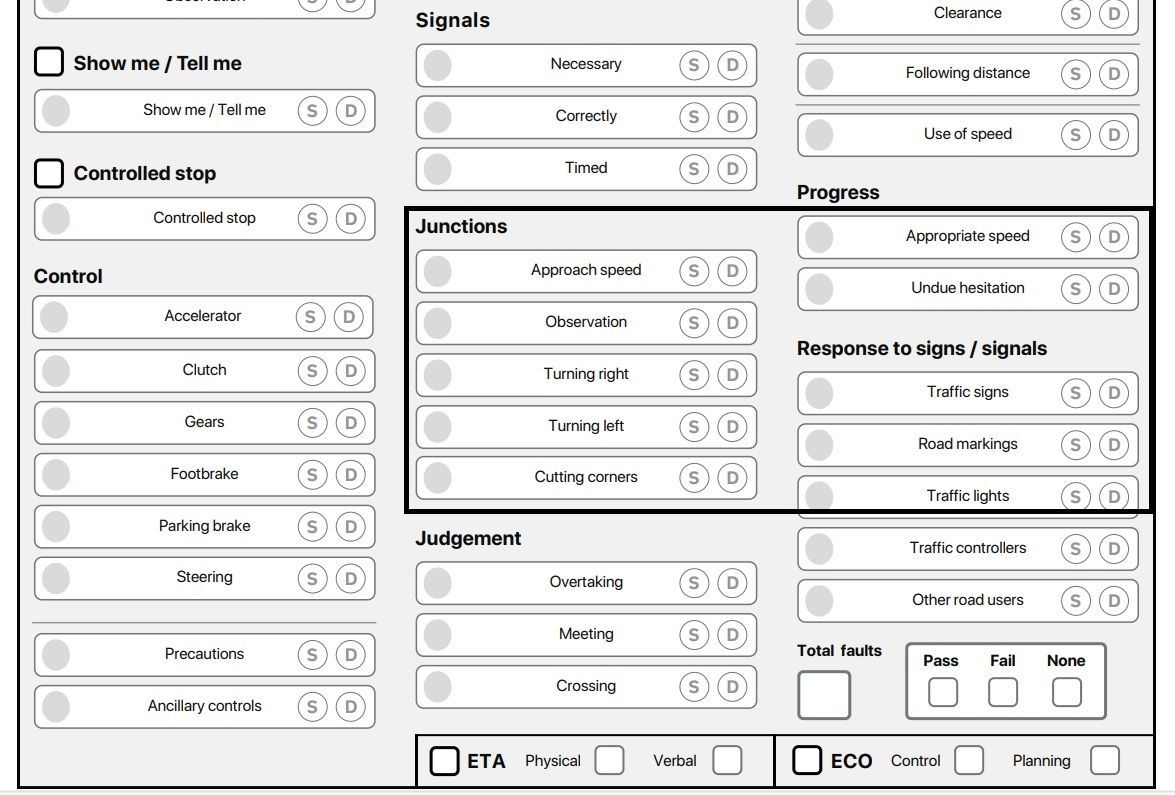
On the DL25 marking sheet there are a couple of section you need to be aware off called JUNCTIONS and PROGRESS (highlighted in the picture below). At roundabout and junction and you can be marked down with a minor, serious or dangerous fault APPROPRIATE SPEEP AND UNDUE HESITATION, hers the breakdown what the marking sheet states
Progress
You were marked on:
Appropriate speed - your ability to drive at an appropriate speed for the road and traffic conditions
Undue hesitation - your ability to maintain progress, and not hesitate and slow down when you did not need to
You should have driven at a speed appropriate for the road and traffic conditions, without holding up other road users. Your examiner will have monitored this throughout the test.
Examples of faults
Some of the most common faults for this area include:
- Not emerging from a junction when it is safe to do so
- Driving too slow unnecessarily, holding up following traffic
- Driving well below the speed limit on clear roads
- Waiting unnecessarily for another road user to pass who has clearly given way to you
Your examiner will explain the specific details of any faults you made.
How you can improve in this area
If you made faults in this area during your test, or if you want to improve in this area, you should:
- Check rule 146 of The Highway Code
- Read pages 254 to 261 of ‘The Official DVSA Guide to Driving: the Essential Skills’ (2022 edition)
If you need to rebook the test, spend time practising this skill with your driving instructor or supervising driver. You could work on:
- Keeping up with the flow of traffic and making confident decisions when emerging
- Driving in different weather conditions
- Look ahead for the correct lane you will need
- Assess the busyness of the roundabout
- Decide as early as possible which exit you need to take
- Give an appropriate signal (see Rule 184, below).
- Time your signals so not to confuse other road users
- Adjust your speed and position to fit in with traffic conditions
- Be aware of the speed and position of all the road users around you.
Who do you give-way to at a roundabout?
Single lane roundabout brief gave a lot information on priority and planning so to recap click on the link below to the lesson brief.
Early observations (L.A.D.A)
Looking and assessing ahead early will give you information on what is travelling towards you from ahead (12 o'clock) and also to assess your view on the approach to the roundabout is open or closed. If you have an open (junction) roundabout you will have the confidence to see a head and to your immediate right to keep on flowing if safe to do so.
Open and closed view
Early observations when approaching (all junctions and) roundabout will enable you to plan, slow and flow into a potential gap (walking pace 10/12MPH) and continue on your journey.
The diagrams below shows you the difference between an open and a closed roundabout with the restriction of the view on the approach to roundabouts.
Open view on the approach to a roundabout
Closed view on the approach to a roundabout
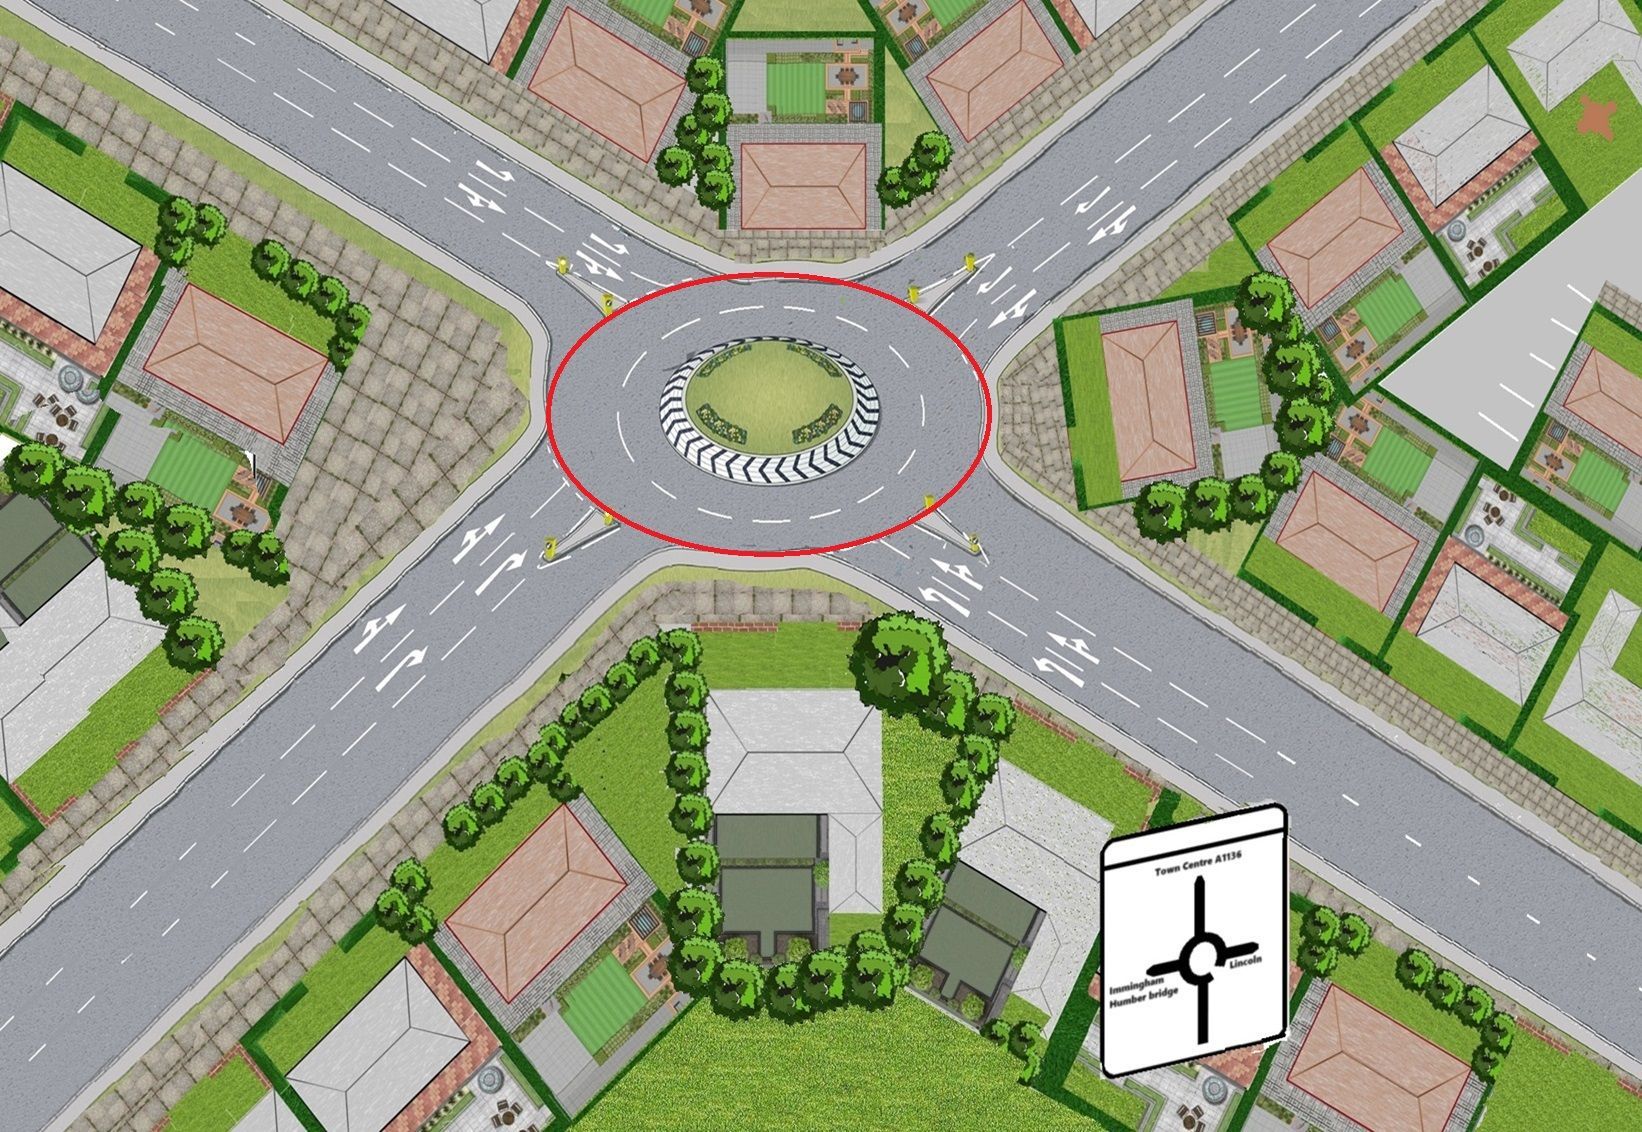
Working out a safe gaps at roundabouts
Junction/crossroads
When your negotiating gap at a junction you need 6/8 car lengths when crossing into a junction, emerging left out of a junction you need 12/16 from your immediate right and the same when your emerging right from behind.
Roundabout
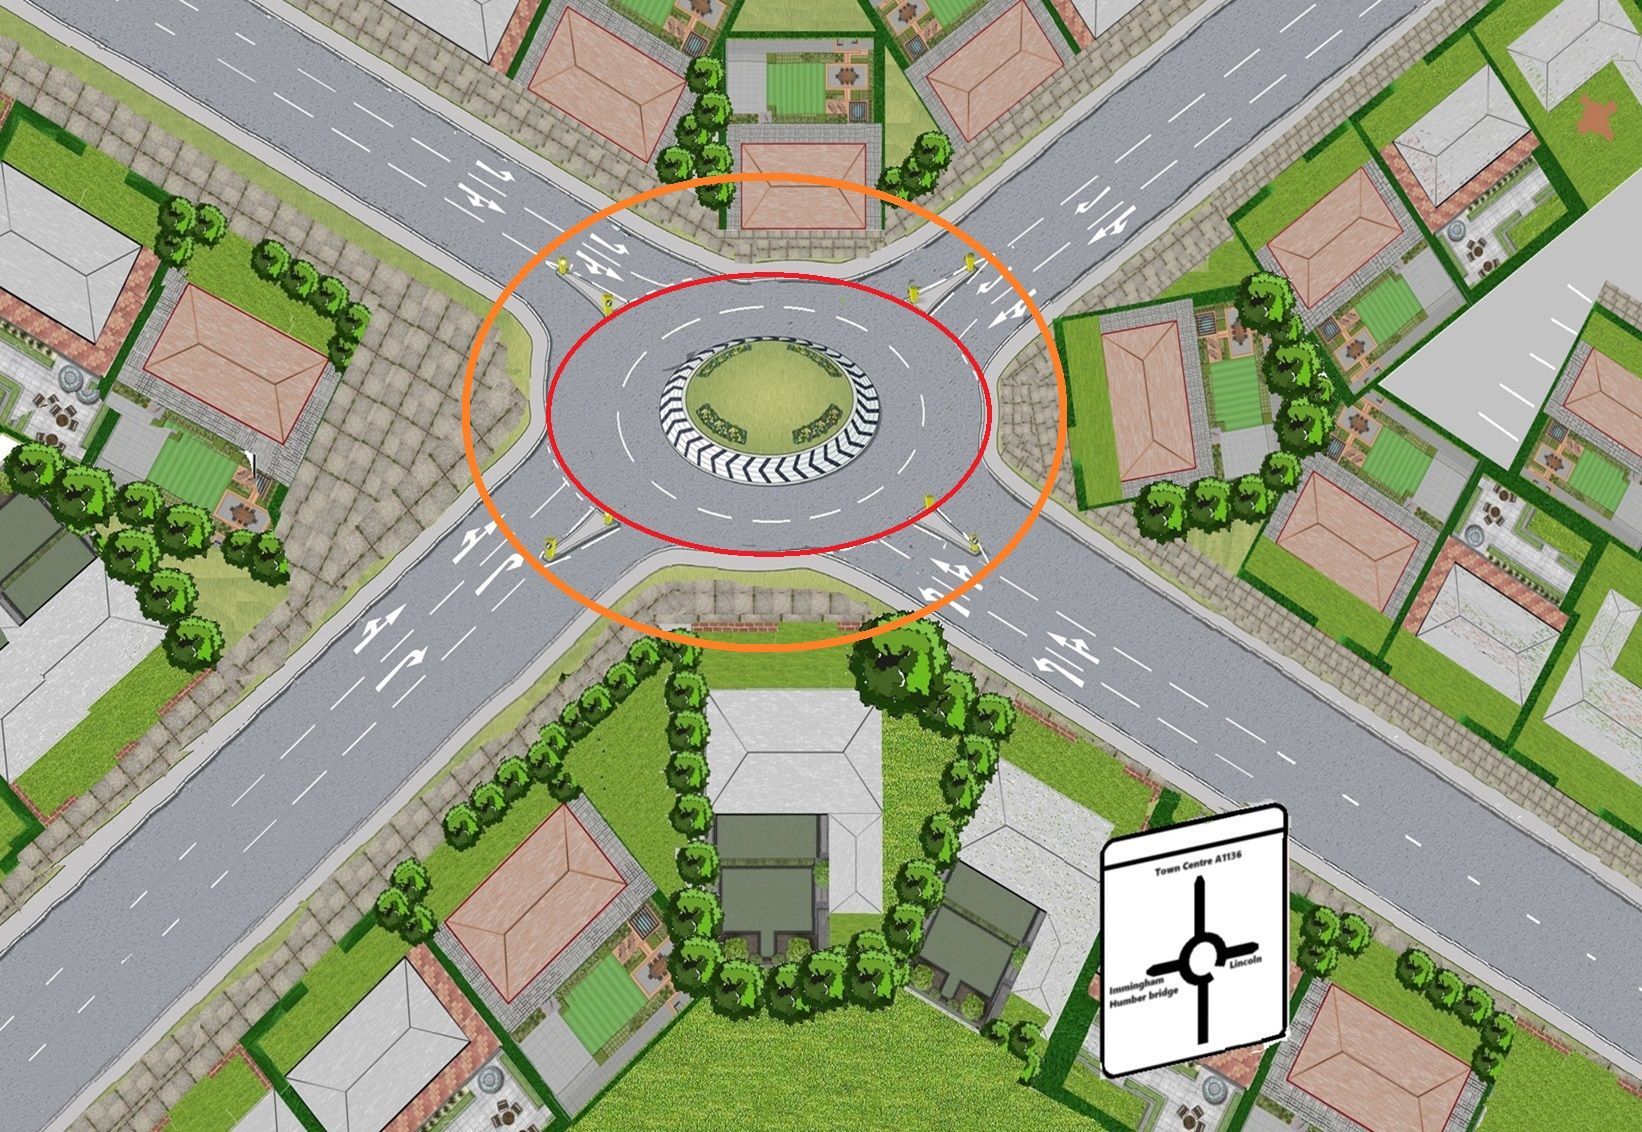
When approaching a roundabout the timings are slightly different as everyone has to give-way to their right. If you are confident it is clear and planning to go, the vehicle on your immediate right needs to be 3/4 white hazard warning lines (in zone 2 and between amber area) from the roundabouts give-way white line.
However if you have slowed down and
stopped at the white give-way line (at the mouth of the roundabout) the car on your immediate right has to be
4/5 hazard warning lines (just before the
green line or zone 3) from the roundabouts give-way line to know it is safe for you to proceed. This because you need to move the vehicle from stand still and the vehicle on your immediate right needs 3 car lengths to stop at 20MPH.
Finding a safety gap using the coloured areas
When teaching this topic it hard for student to know if they have a safe gap to proceed, they also struggle (to start with) with other vehicles lane position
Think about gaps like a ripple effect when you throw a pebble into the water. Then think of it like zones (1, 2 and 3)
All zones are 2 white hazard warning lanes apart.


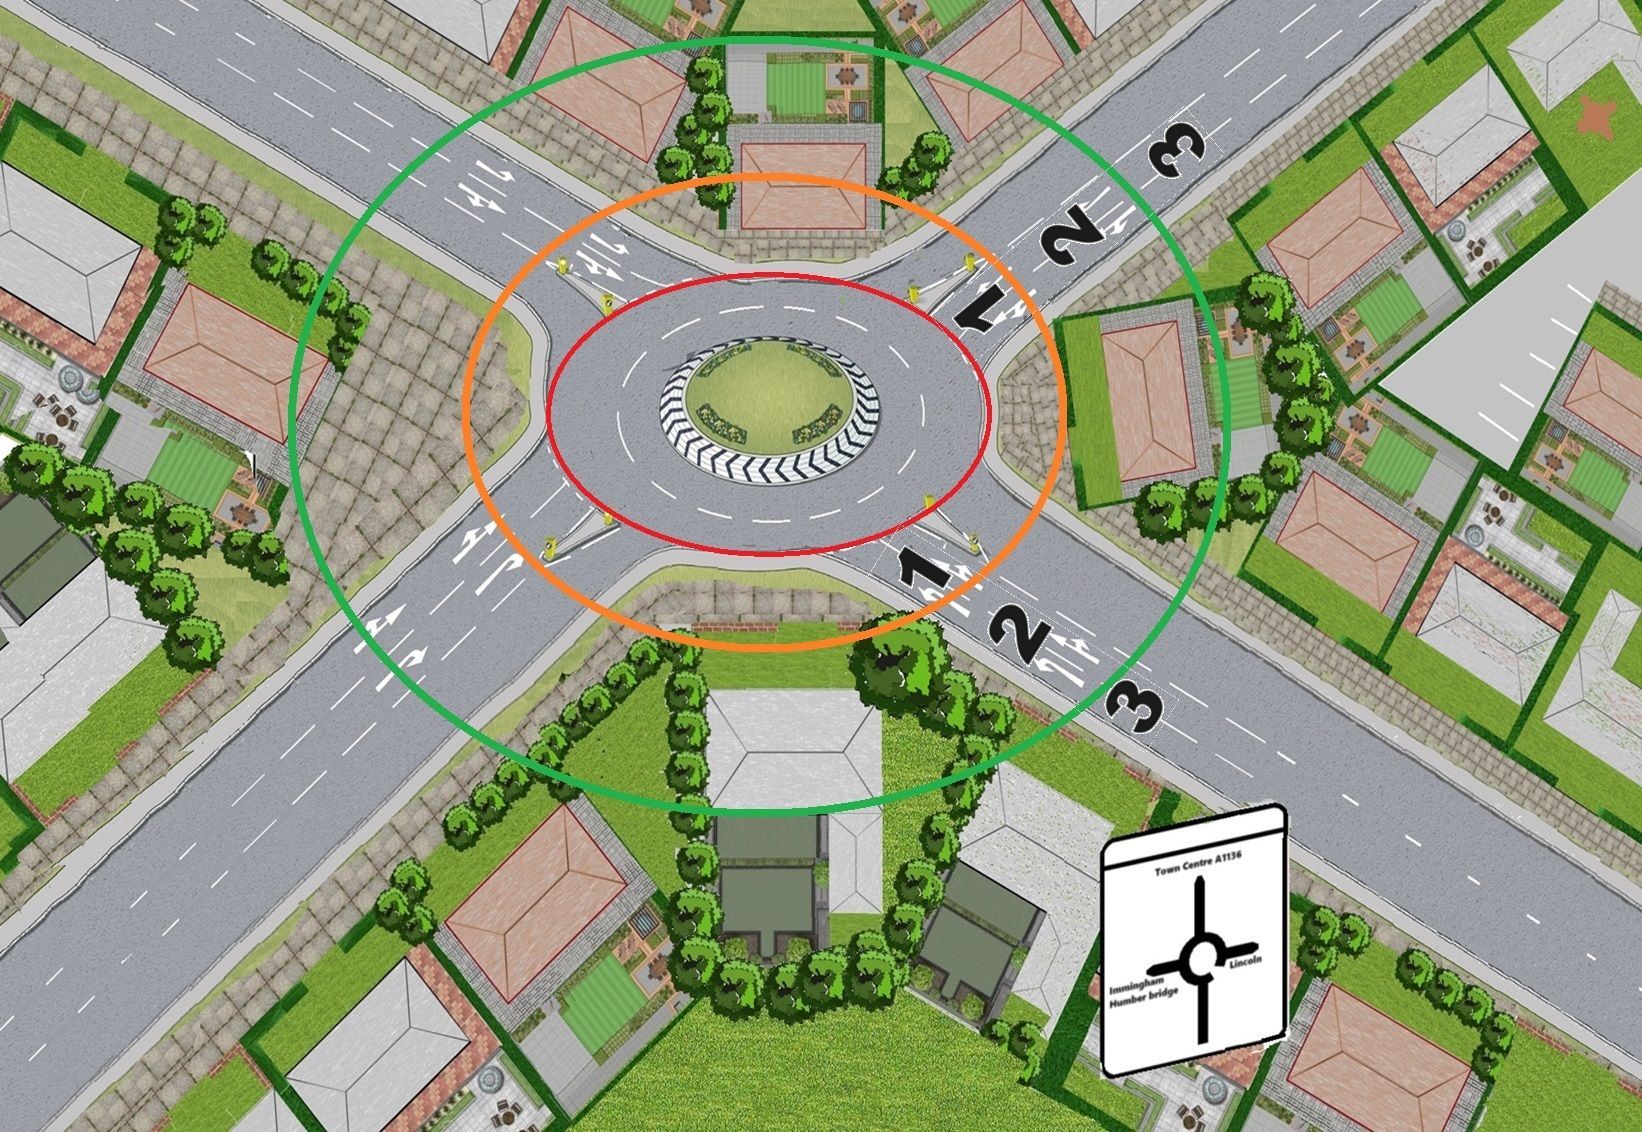

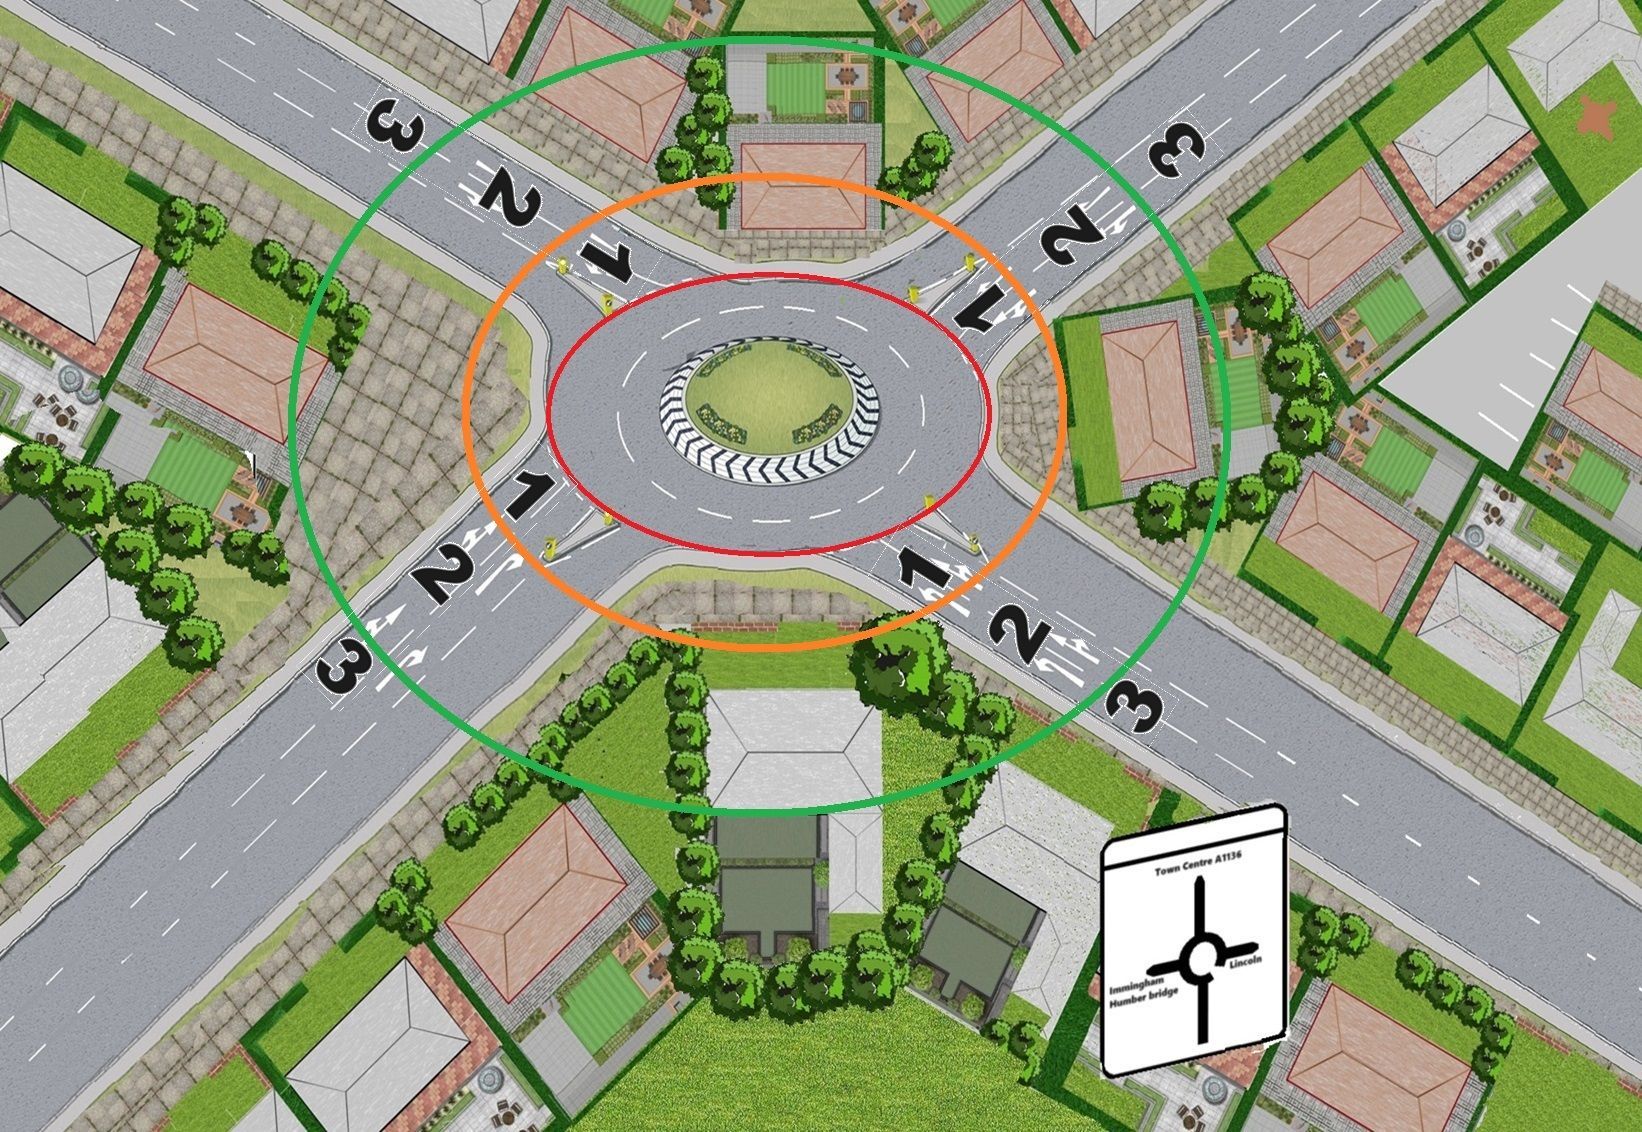
Red zone - Is at the give-way line, Amber zone - 2 white lines from the give-way line, Green zone - 4 white lines from the give-way line.
So technically, if your in zone 1 or zone 2 and the vehicle on your immediate right is in zone 3 or further back it will be safe to continue.
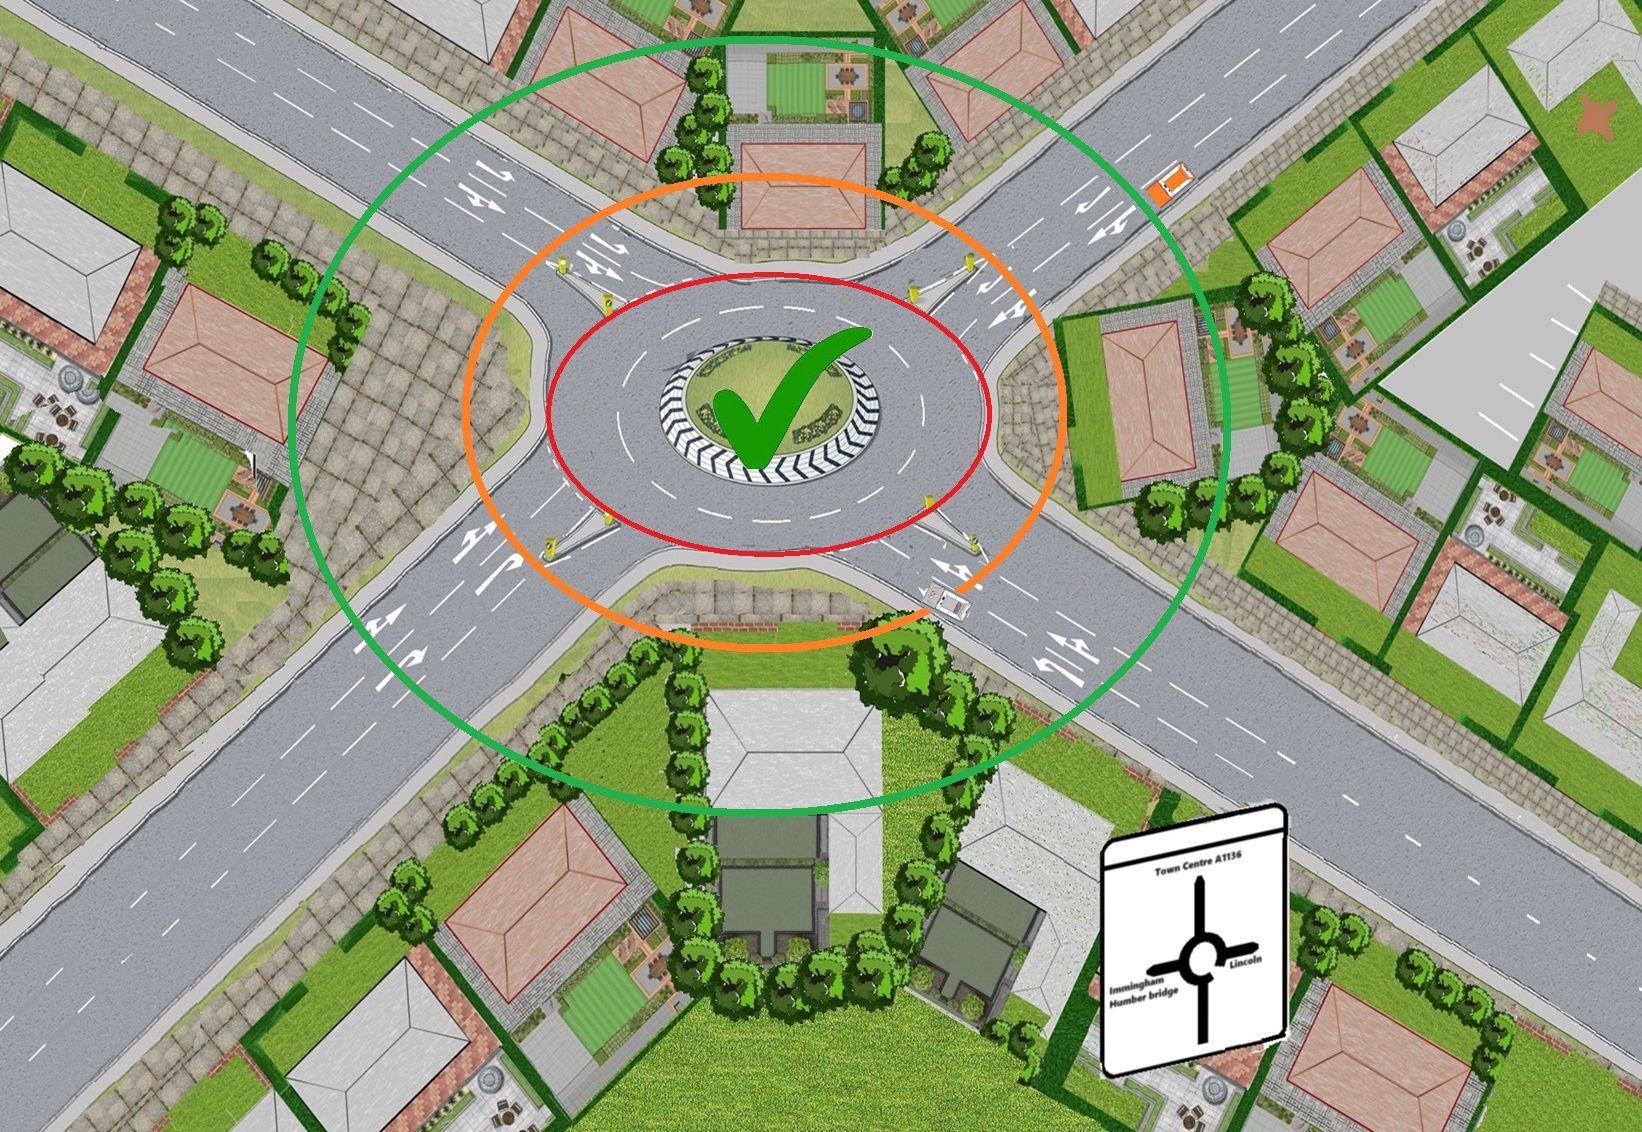
Giving way to your immediate right
Safe to proceed
In this diagram you are 2 lines (amber zone) from the give-way line of the roundabout.
The vehicle to your immediate right (amber
vehicle) is before the
green
zone, making the
amber
vehicle 5/6 white give-way lines away from you so it will be
safe to proceed
and make progress.
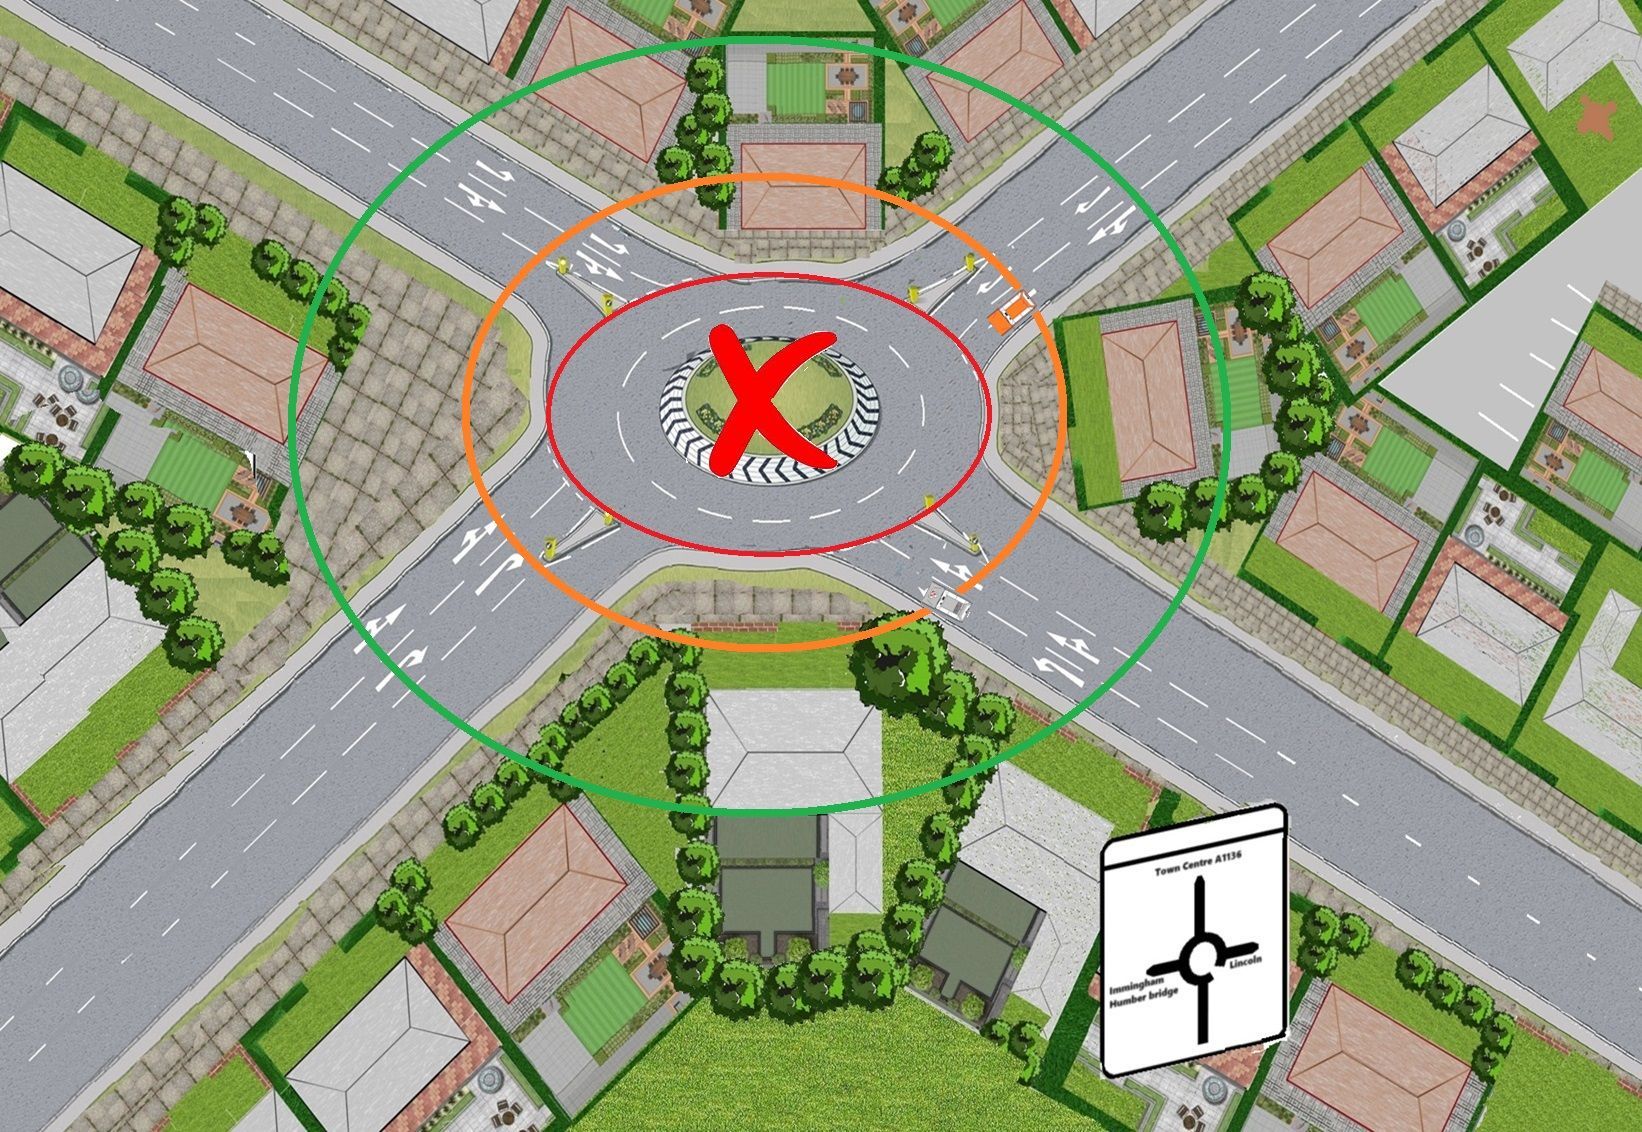
Not safe to proceed
In this diagram you are again at 2 lines (amber zone) from the give-way line of the roundabout.
The vehicle to your immediate right (amber vehicle) is coming out of the amber zone, so due to the amber vehicle is more advanced to the roundabout you will need to slow down and give-way line as it is not safe to proceed.
Slow down, give way to your immediate right and let it past (slow and flow not stop and start).
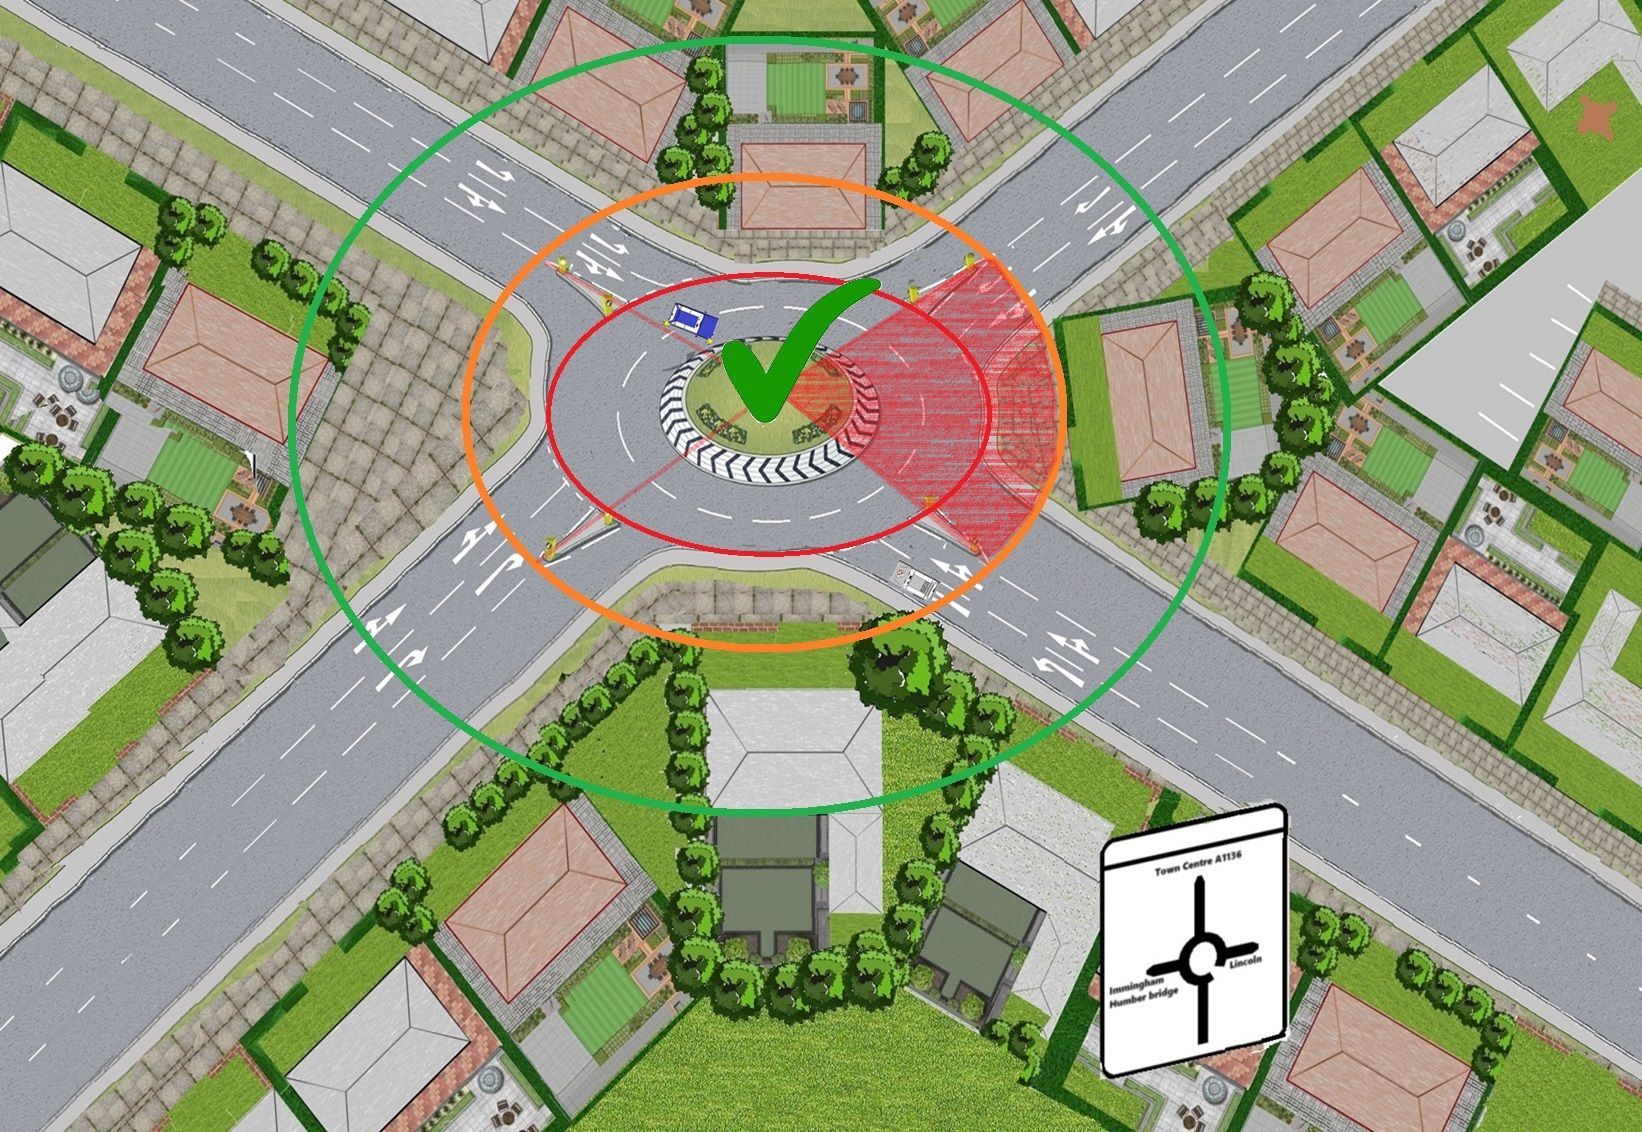
Giving way to your to ahead once your immediate right is clear
In the next two diagrams (below) you can see their is a red highlighted area from your 6 0' clock to your 3 0'clock position (immediate right) going back 2 white hazard warning lines.
We have discussed as you are just exiting the
amber area (2 white lines) and their is nothing
coming from your immediate right as you approach a roundabout it will be safe to continue.
When to give way to ahead when your immediate right is clear?
In the next two diagram's you can see the roundabout picture is now split into four sections and once you get close to the roundabout (2 lines) and their is nothing
in
your immediate quarter from the left and ahead you are safe to proceed and enter the roundabout.
Unsafe to proceed
Once you are two white hazard warning lines from the give-way lane their is now a (Blue) vehicle in your immediate quarter.
You will now need to give way to that vehicle and then once the
Blue
vehicle has passed you and safe to do so follow them and make progress.

Observation's with two or three lanes on a roundabout
It is your objective to give way, slow and flow with the appropriate lane and make progress when safe to do so. If you do not plan with the correct lane you could stop unnecessarily and hold the traffic up behind you. However if you stopped and it was safe to proceed, the implication could be the vehicle behind you has read the road perfectly well and expected you of done the same, you could have a potential rear end collision. I know its not nice thinking about, but if this ever does happen it will be up to both your insurance companies to see who was at fault. With the majority of vehicles on the road have in car camera's, insurance companies can see how the accident/incident has happened.
What to do immediately after the accident
1. Stop the car as soon as possible
- It’s against the law to drive away following an accident
- Turn off the engine
- Switch on your hazard lights
2. Check for injuries
- Check for any injuries to yourself or your passengers
- If it's a minor collision and there are no injuries, make a note of it just in case the other people later try to claim for an injury
- Due to everyone having a camera on there mobile device take photo's for evidence
- Call the police and an ambulance immediately if anyone is hurt or if the road is blocked
3. Try to remain calm
- Try to remain as calm as possible – its normal to be shaken after an accident
- Take a few deep breaths and try to take stock of the situation the best you can without losing your temper
4. Exchange details
Exchange details with anyone involved in the accident (including witnesses). Get their:
- Name
- Address
- Telephone number
- Vehicle registration number
Don't apologise or admit responsibility for the crash until you're completely aware of what happened – this can protect you from liability if it wasn't your fault.
Now that's been talked about lets continue with the brief...
Choosing the correct lane & lanes to give way too?
Road markings and signs
You will always have to pay attention to road marking (white direction arrows) and signs as roundabout lanes are marked differently. You may ask why cant all roundabout be marked up the same way?????? Simply this is done to reduce congestion on certain areas.

Immediate right
As your approaching a roundabout and assessing to see if it is safe to go, look ahead and to the immediate right and see how busy the lanes are as a rule of thumb
- Lane 1 will normally turn left and straight ahead
- Lane 2 will turn right
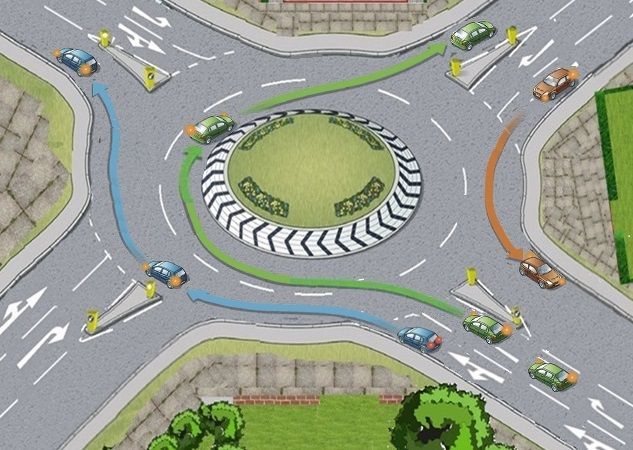
Question time
On the diagram below I've put a number representing
lane 1 and
lane 2 so by looking at the white arrows and vehicles indicators you can see who's going where. You are approaching from 6 o'clock which vehicle do you have to give way too? (answer below)
Who to give way too?
The answer is the grey vehicle as it is passing you.
However if you was going straight ahead at the roundabout you would have to give way to the grey and orange vehicle.
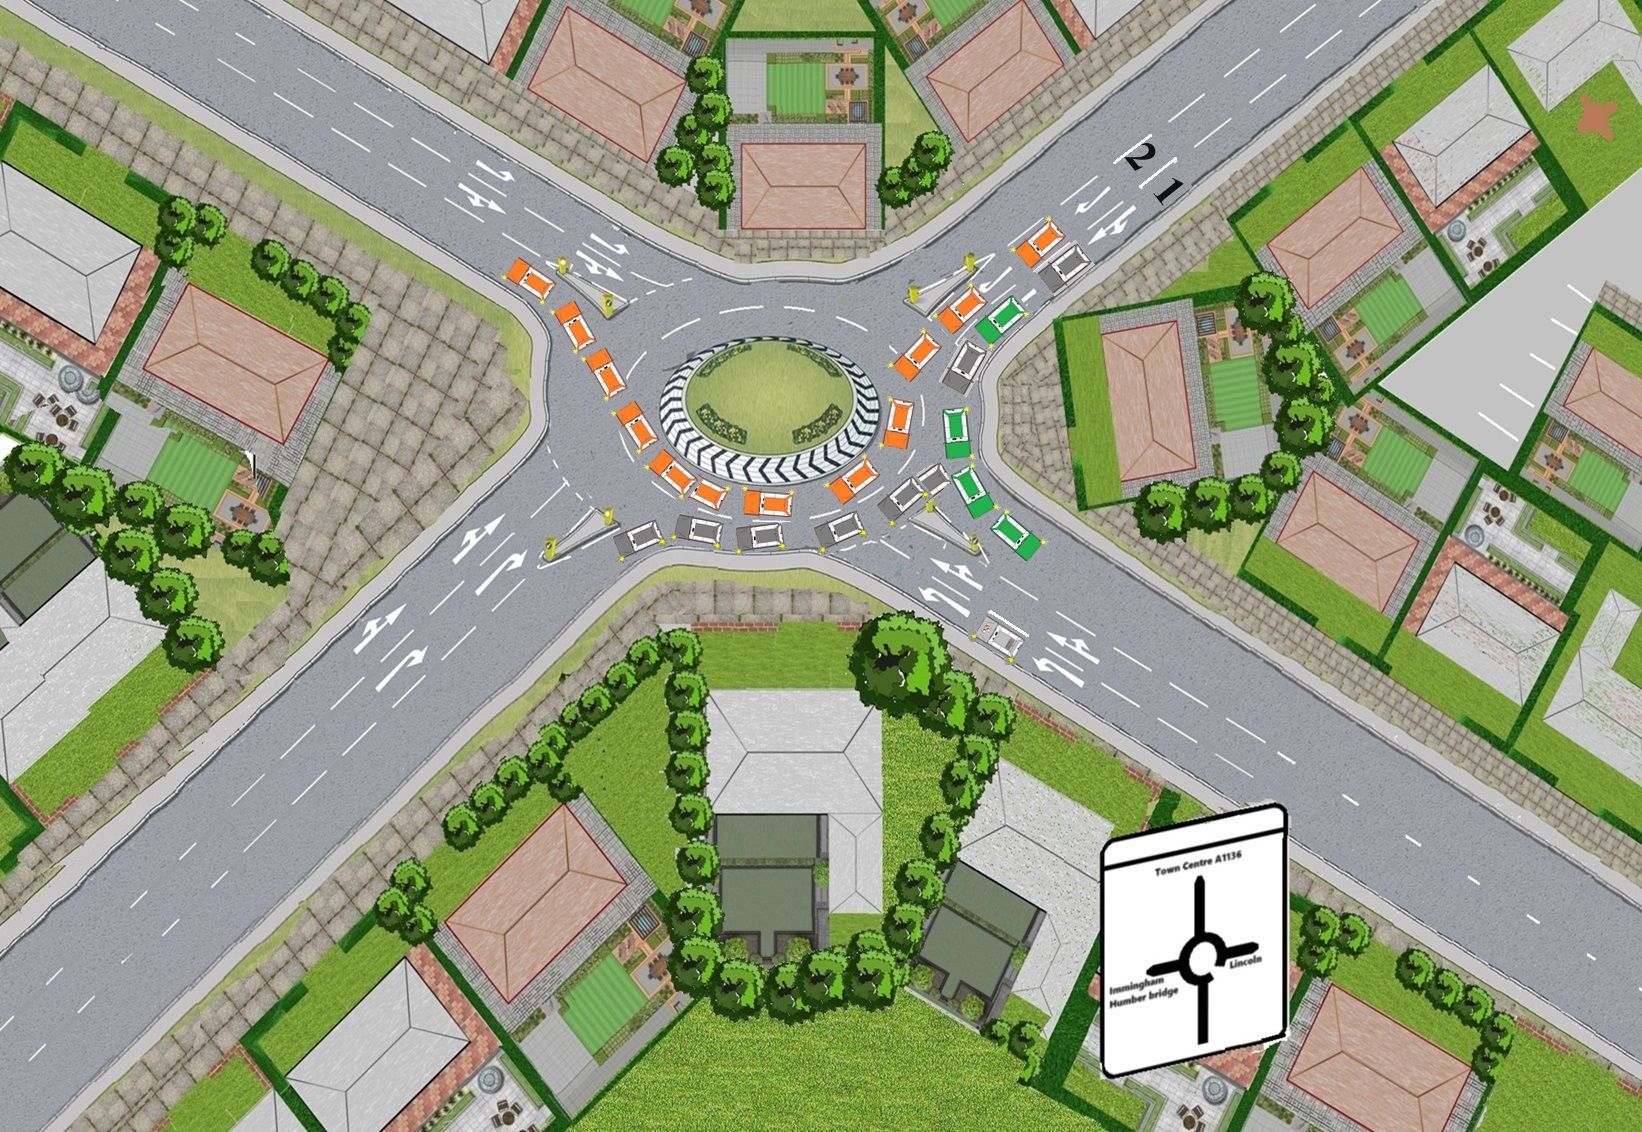
Looking at vehicles coming from ahead (12 o'clock)
As your approaching a roundabout and assessing to see if it is safe to go, look to your immediate right and ahead to see how busy the lanes are as a rule of thumb
Immediate right
- Lane 1 will normally turn left and go straight ahead (Green and grey vehicles)
- Lane 2 will turn right (orange vehicle)
Ahead (12 0'clock)
- Lane 1 turns left only
- Lane 2 dictates ahead and right
I've put at the 12 o'clock side
number 1
and
number 2 representing
lane 1 and
lane 2 so by looking at the white arrows and vehicles indicators you can see who's going where. You are again approaching from 6 o'clock, so the question is, what vehicle from ahead can allow you to keep going as you have a mechanical shield? (answer below)

The answer is the Blue vehicle as your immediate right (the green, grey and orange vehicles) has to give way to their immediate right.
However if the blue vehicle was indicating to turn right (past your exit road), you could still potentially go until the blue vehicle gets into your immediate quarter.
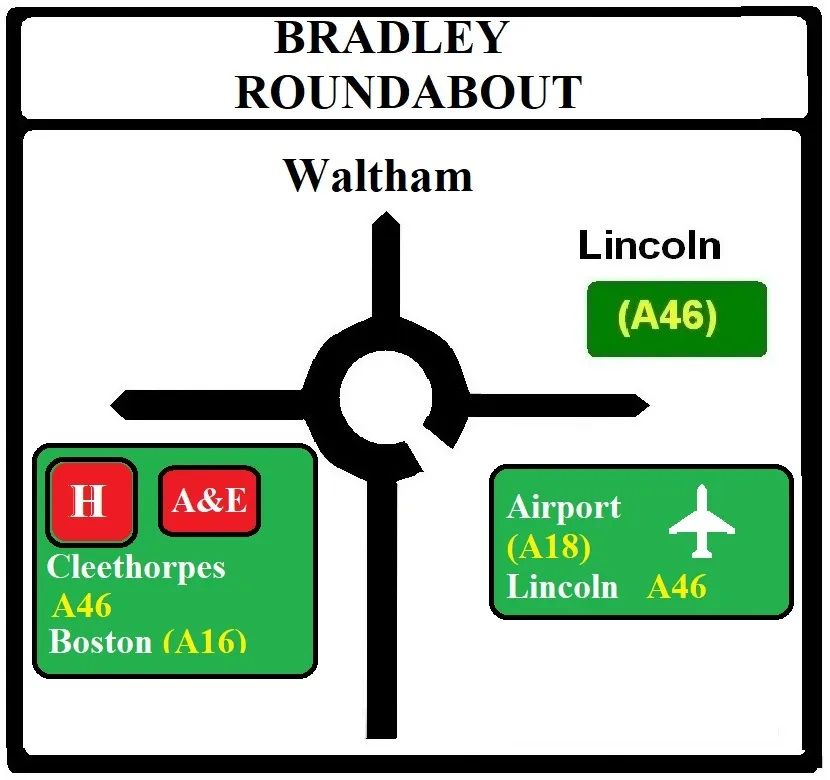
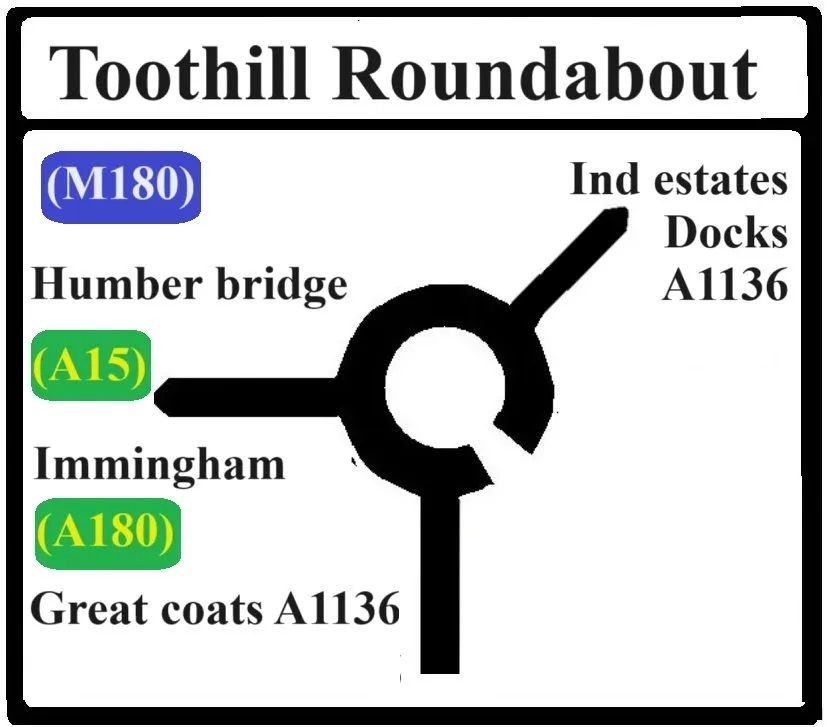
Understanding the roundabout sign
When approaching any roundabout you always approach from the bottom of the sign (6 o'clock). Lets look at the use of signals when approaching and leaving.
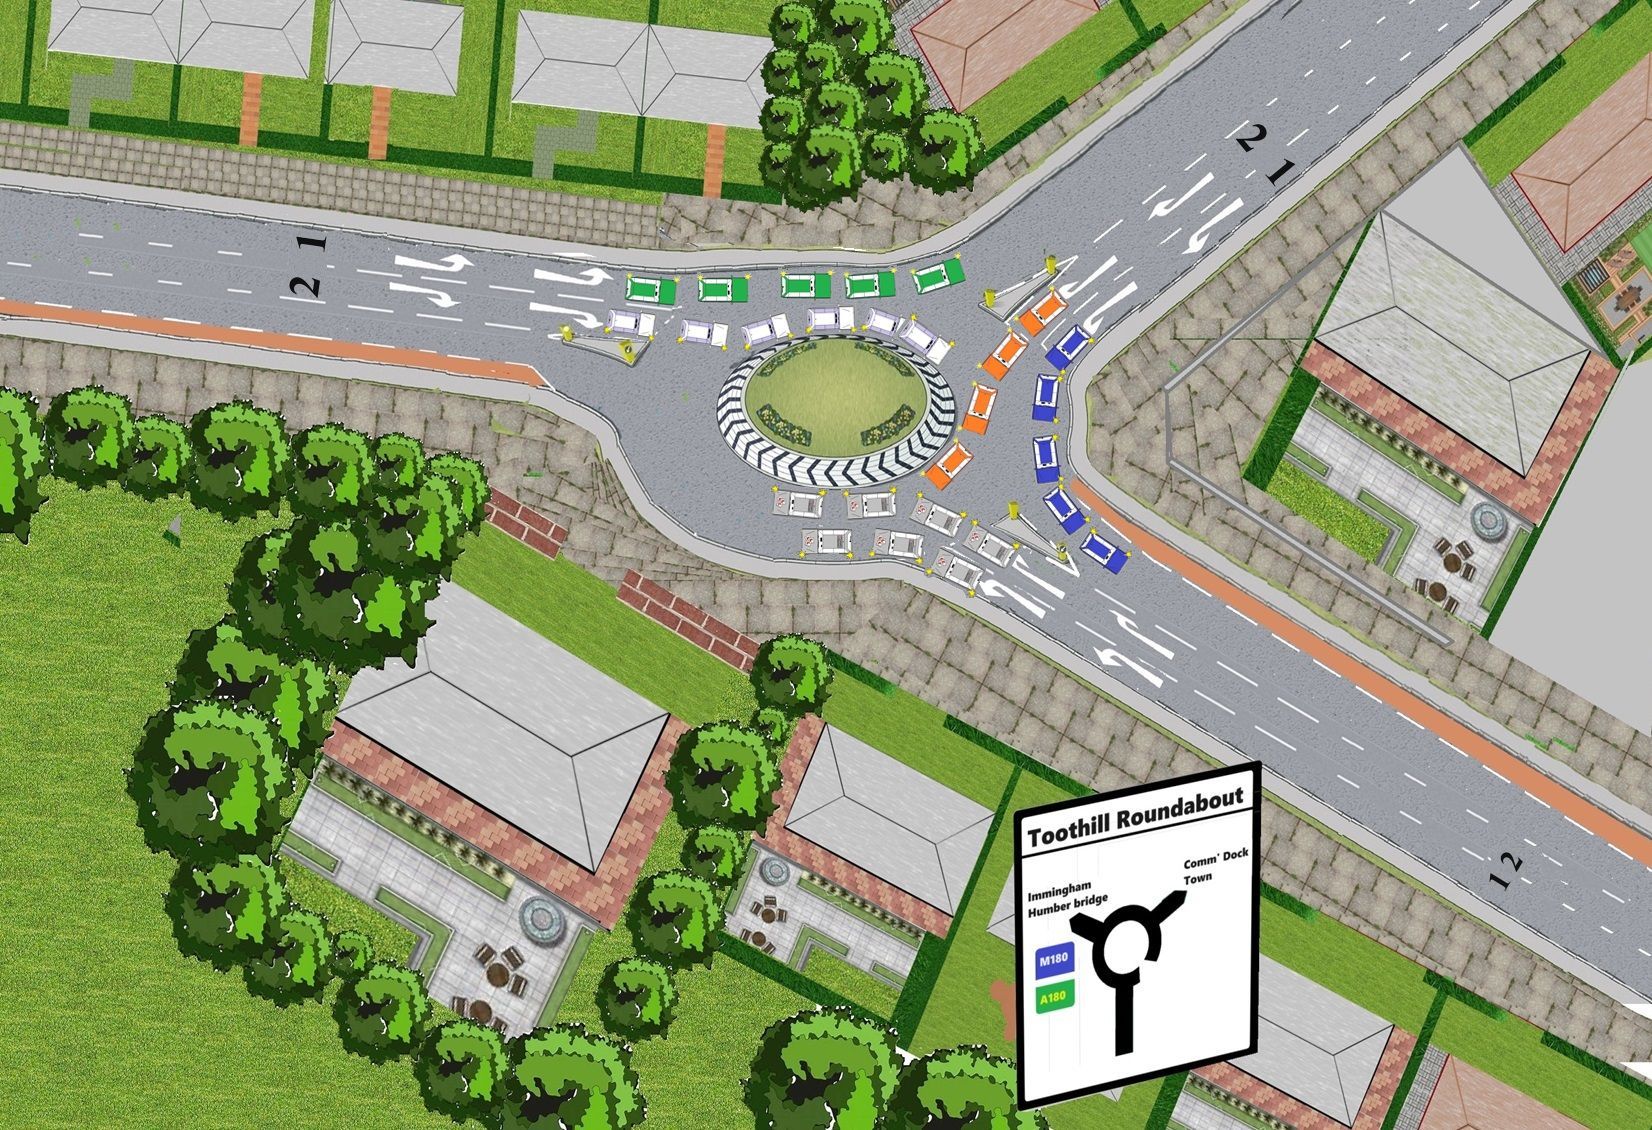
Three exit roundabout (Toothill)
On this roundabout sign there is a 9 o'clock (M180, A180, Immingham and great coats) exit and a 2 o'clock position (ind estates dock) exit.
- If you are taking the 1st exit (9 o'clock) you signal left at the roundabout sign on the approach to the roundabout.
- If you are taking the 2nd exit you signal right at the roundabout sign on the approach to the roundabout and once you get to the 9 o'clock you signal left to leave.

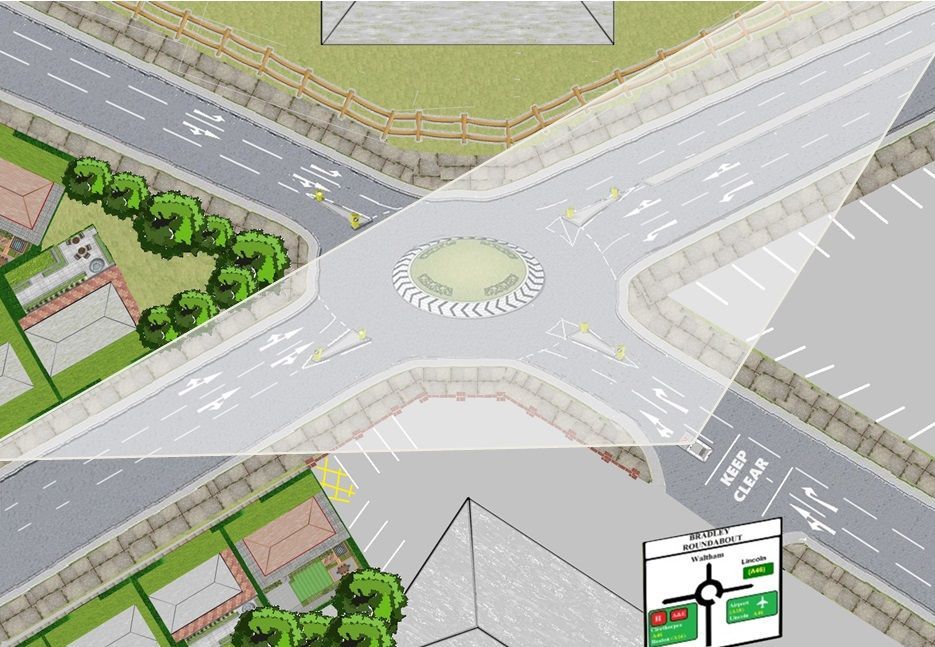
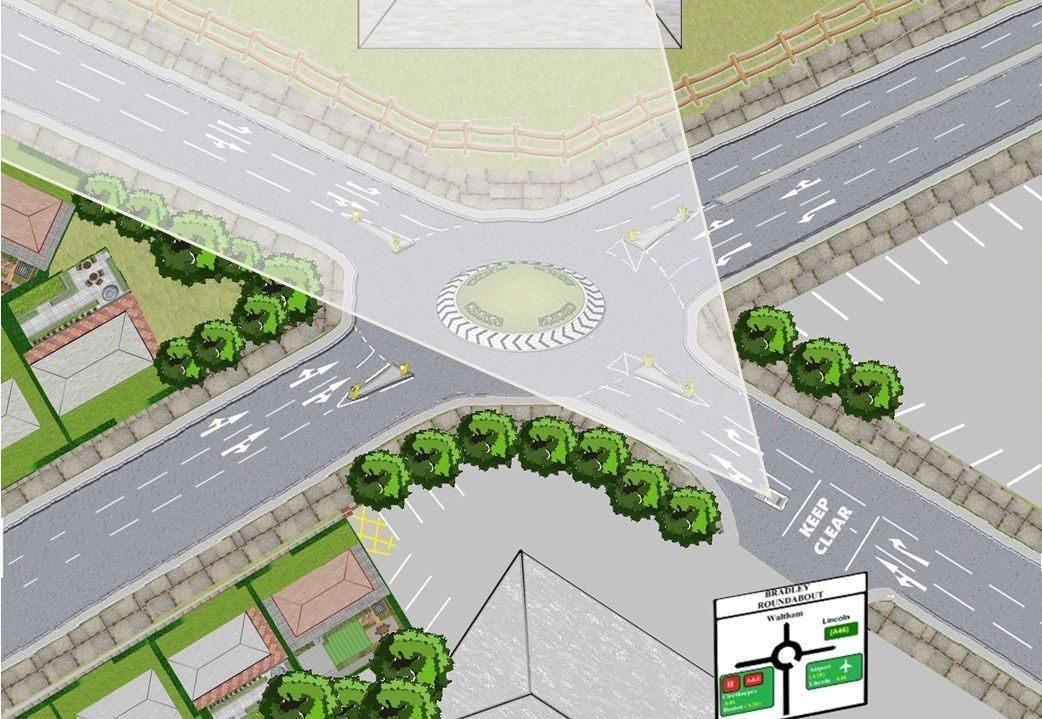
4 exit roundabout exit (Bradley)
- If you are taking the 1st exit (9 o'clock) you signal left at the roundabout sign on the approach to the roundabout.
- If you are taking your 2nd exit you do not signal on the approach to the roundabout, once you get to the 1st exit you signal left to leave.
- If you are taking the 3rd exit you
signal right at the roundabout sign on the approach to the roundabout and once you get to the 12 o'clock you
signal left to leave.
5 exit roundabout (Park Street)
(This is discussed more on the dual carriageway brief)
- If you are taking the 1st exit (7 o'clock) you signal left at the roundabout sign on the approach to the roundabout.
- If you are taking your 2nd exit (10 o'clock) you do not signal on the approach to the roundabout, once you get to the 1st exit you signal left to leave.
- If you are taking the 3rd (12 o'clock) exit you do not signal on the approach to the roundabout, once you get to the 2nd exit you signal left to leave.
- If you are taking the 4th (2 o'clock) exit you signal right at the roundabout sign on the approach to the roundabout and once you get to the 12 o'clock you signal left to leave.

Three exit round abouts
When approaching this type of roundabout and if there are two lane one each side all you need to be aware off on your immediate right
(lane 2). The only other issue that could happen is that the white vehicle could do a full circle and go back the way they came from, look for clues like the indicator staying on, the white vehicle hugs the roundabout for longer than it should will tell you its going further around.
Risk assessment
Look, assess, decide and act on the busyness and openness when approaching roundabouts, so ensure you start the slowing down routine at the correct point and ensure you have the correct speed and gear to the volume of traffic on or approaching the roundabout.
Open round about - walking pace - 2nd gear - 10/12MPH
Closed or busy roundabout - crawling pace - 1st gear -under 6/8MPH or slower to match a gap of an oncoming vehicle to follow to keep the roundabout flowing.
Observations on the approach
Unfortunately some drivers approach roundabouts as though they were approaching a give-way or stop line and only take observations at the very last minute. Consequently vehicles behind may end up running into the back of them as they wouldn’t expect them to stop if the way was clear.
Therefore don’t make this mistake and do not assume that the vehicle in front will proceed even if the way is clear.
Keep observing ahead and right (at least three times) also know how close the vehicle is behind you. Nobody knows how skilful the driver is in front of you so always maintain your 2 second safety gap.
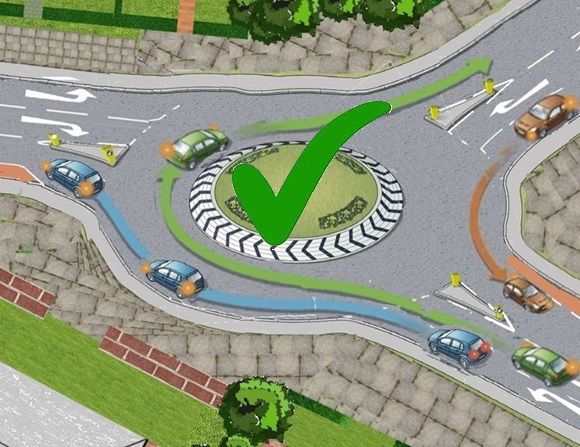
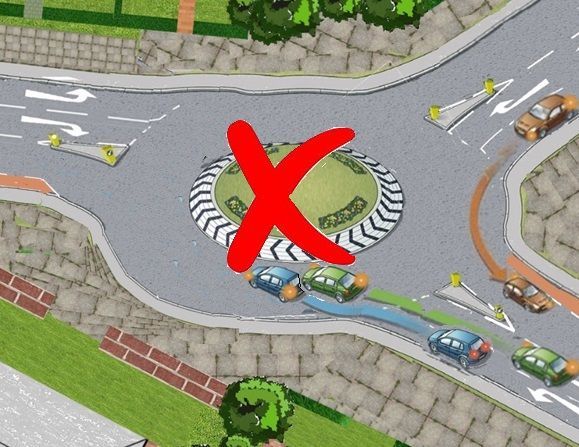
Lane positioning on a two lane roundabout
The main dangers on a roundabout is the driver error :-
- Appropriate speed
- Undue hesitation
- Not keeping correct lane discipline
Also keeping a good positioning when going ahead at the roundabout and keeping in the lane you started in.
Lane discipline remedy
Best way of keeping in the outside lane is to have a walking pace on the approach this will a good positioning and safer that you follow the curve of the Kerb on the nearside of your vehicle.
As you can clearly see in the below pictures not keeping in lanes will potentially cause a near miss or crash or even worse if it was a motor cyclist or cyclist. So always have a safe approaching speed and maintain lane discipline at all times.
Correct lane position
Incorrect position
Colour of signs
Roundabout and traffic light signs represent your location they are categorised in the highway code

Non-primary (Town roads)
Signs on non-primary and local routes - black borders
Green panels indicate that the primary route starts at the junction ahead. Route numbers on a blue background show the direction to a motorway.
Route numbers on a green background show the direction to a primary route
Primary routes
Green backgrounds
Blue panels indicate that the motorway starts at the junction ahead. Motorways shown in brackets can also be reached along the route indicated. White panels indicate local or non-primary routes leading from the junction ahead. Brown panels show the route to tourist attractions. The name of the junction may be shown at the top of the sign. The aircraft symbol indicates the route to an airport. A symbol may be included to warn of a hazard or restriction along that route.
Speed limits
Basically the white signs are in town area’s (30mph unless signs dictate otherwise), green signs will be above 30mph normally 40/70mph and blue signs are on motorway 60/70MPH. Always pay attention to your road marking and signs when you are on your driving lesson and obviously once you have passed your driving test as you are on probation for two years once you pass and will lose your full driving licence if you get 6 or more points.
Learn driver's can now drive on motorways
The rule on driving lessons changed in 2017 and now a learner driver can now have a driving lesson on a motor way with their driving instructor.
BUT please be aware you can not drive on a motorway with a family member.
Teaching & Learning Strategies
Like mentioned earlier every student is induvial and each and everyone of you will progress at different rates so driving will adapt their lesson plan to help you achieve your driving goals.
- Your driving instructor will adapt their teaching style to suite your ability and ability
- Your driving instructor will continue to encourage you on your lesson and analyse any problems made and allow you to take responsibility for your own learning goals by giving you technical information to improve your techniques. Your technical feed back from your instructor will be ether given on the move or if feel needed by pulling you up on the side of the road somewhere safe, legal and convenient.
Rote learning (WikipediA)
Rote learning is a memorization technique based on repetition. The method rests on the premise that the recall of repeated material becomes faster the more one repeats it. Some of the alternatives to rote learning include meaningful learning, associative learning, spaced repetition and active learning.
At the end of your lesson
At the end of your lesson you will have a debrief with your instructor giving you the opportunity to reflect on your performance on your lesson then you can set up new goals for your next driving lesson.
This will also give you the opportunity to research any new topics that will be brought into on your next agreed lesson. So remember your instructor is there to HELP you, so on your driving lesson if you have any uncertainties or need anything rewording or recapping to make things any clearer, just ask.